 |
|
|
|
Site Navigation
Projects & Information
»General Information»Wind turbine Projects »The F&P Smartdrive »Electronic projects »Microcontroller projects »Miscellaneous Kits & Parts
»Basicly Natural Pty Ltd»PVC & Aluminium blades »Scale model farm windmills »Price Watch Discussion Forums
Handy Links
»Wind»Solar »Electric Vehicles »Electronics »Micro Controllers »General Interrest About TheBackShed Getting Started Privacy Policy |
Home made renewable energy for the average household is on the increase, with many options available, including solar, hydro and wind turbines. However the initial cost of a "free" power supply is considerable, and it can take many years to pay for such an installation. But with a few basic tools you can build your own for a much less than the cost of a new installation.
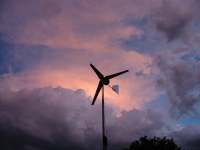
Home made wind turbines have been around for decades, with designs as varied as the people who build them. But why would you build your own windmill? Why not use solar cells, solar cells are reliable and maintenance free. The answer is simple, cost! Solar cells are expensive ( though they are getting cheaper lately ), if your handy with the tools you can build a wind turbine that will make as much power as a solar panel for much less cost. But is building a wind turbine really a option? Well, yes and no. Solar cells, while expensive at first, need virtually no maintenance for their 25 year plus life. Wind turbines need maintenance, and a fair bit of wind to make any usable power, over 15kmh is ideal, anything less and the power output is very small. Any turbine under 2 meters in diameter isn't going to make a lot of power anyway, maybe 500 watts in a strong wind, but more like 50 to 100 watts on a average day. 500 watts is barely enough to power a modern Plasma TV! You need a turbine over 3 to 4 meters in diameter to start making worth while power, and that's a big turbine for your average back yard! Anything smaller is just for fun, its not going to make a dent in your power bill I'm afraid. So if your living in the suburbs, you cant go past solar cells. They are simple, reliable and just work. But very boring to look at. Wind turbines can be fun to build, and fun to look at. If you live in the suburbs and just want to make a few clean watts with minimum fuss, then go solar, but if you have a bit of space ( or have understanding neighbours ) and are looking for a interesting hobby, go wind.
|
||||
|
The best option for the serious home power generation installation is a combination of solar and wind. There will be days of full sunshine and not a slightest hint of a breeze, or days with heavy rain clouds and strong winds. If you have the space and a location with good yearly winds, then a home made windmill could be a viable alternative to solar cells. Building your own windmill requires no special abilities or equipment, all you need are some basic handyman skills, a few tools, and the time to assemble and experiment.
Using the wind. There is a lot of energy in the wind. Power is the cube of speed, so a 40kmh wind has 8 times the power of a 20kmh wind. As an example a perfectly efficient windmill may produce 200 watts of power in a 20kmh breeze, 800 watts in a 40kmh wind, and 6400 watts in a 80kmh storm gust. But what sort of windmills are we talking about. First up a few simple rules about windmills. Windmills behave in a way very similar to your average car engine. They have a power and torque curve, with different speeds for maximum power or torque. For electrical power generation ideally you need to operate your windmill in its peak power output. 1. More blades = less speed, less power but more torque, perfect for pumping water. 2. Less blades = more speed. 3. Larger turbine diameter = less speed but more power Two other factors to consider are turbulence and wind-shadow. Turbulence can be caused by the disrupted wind from one blade to the next, or anything up-wind of the windmill and will have a big effect on efficiency. Wind shadow is the effect the windmill mast has on the propeller as each blade passes the mast. This shadow causes a sudden pressure change behind the propeller blade and results in vibration.
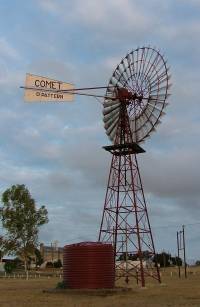
Size is important. A 2 meter turbine would struggle to make 500 watts in a gust, and will average 10 to 100 watts in most locations. A 4 to 5 meter turbine can generate power over 3000 watts (3kw) during strong winds, and more importantly, will average 100 to 800 watts in a typical location. The old farm style of windmills ( Southern Cross, Comet ) used for water pumping have lots of blades, giving them a lot of torque, however many blades means low RPM, and they are not suited to power generation. It is possible to use a gear box to speed up the output, but this creates its own problems and is best avoided. Windmill blades can be made from just about anything. Wood, steel, fiberglass, carbon fibre, etc. I've even seen a windmill using 8 wheelbarrows! Wood is the most common material for the DIY handyman, its cheap, easily formed, strong and flexible, remember trees are very good at bending in the wind without breaking
The Power Generator So what can we use for a generator/alternator on our windmill. There are several options. Most beginners to home made wind generation try to use the common vehicle alternator. While cheap, readily available and capable of producing over 600 watts, vehicle alternators need to be spun at over 2000 rpm before it will generate any useful power. A windmill large enough to drive an alternator to its full power capacity would not spin fast enough ( the larger and more powerful the windmill, the slower it will spin ), so you would need a mechanism to step up the windmill speed to over 2000 rpm. You could use a gear set, chain or belt drive, but these have disadvantages, including noise, unreliability, poor starting and reduced efficiency. There have been some vehicle alternator success stories though, using 24v alternators modified with permanent magnets, though the results are still not very good. See Matts 24v alternator conversion here. Large Permanent Magnet DC Motors are another option, but you need to find a motor that has a high running voltage. If a motor designed to run at 2000rpm at 120 volts is used on a windmill, then we could expect 12 volts output at over 200 RPM. Motors designed for 12 volts or 24 volts ( like electric scoota motors ), will only make a 4 to 6 volts when used on a windmill, too low. See my attempt here.
Don't expect too much from a treadmill motor when used on a wind turbine, 100 or so watts. However they are a cheap and easy to use, a good way to get started in wind power.
Servo motors are expensive. If you do find one for a good price, you might want to consider the fact you could sell the motor on ebay and end up with enough money to buy/build a better windmill.
Here in Australia we are fortunate that Fisher & Paykel sell a washing machine that uses a large permanent magnet stepper like motor. These motors ( referred to as a F&P Smartdrive ) are easy to come by and make excellent wind generators. You will notice most of the windmills and projects on this site revolve around the F&P. The F&P do have a problem with startup cog, but we have found a few tricks to eliminate the problem.
The Axial Flux is a well documented design, and so long as overloading is controlled and the alternator is well constructed, they can be reliable. There will be a Axial Flux project here on thebackshed.com in the next few months. Location, Location, Location. An effective windmill needs clean air, that is a breeze with no obstacles. Obstacles can include trees, buildings and even the contour of the land. As a rule, the higher the better, but be practical while a 20 meter mast would be ideal, you need to get the windmill up there, and may need to bring it down for maintenance. 5 meters above the nearest obstacle is a good start. Do not mount the windmill on the roof of your house! Windmills produce some vibration, and while this is almost inaudible, the vibration will travel down the mast and into the surrounding ground. If you were to mount it on a roof the vibration would be VERY audible.
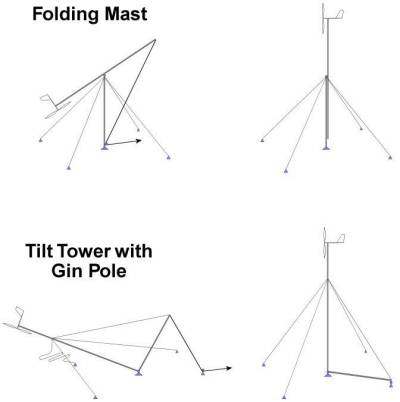
Also consider safety. Things can go wrong, blades can come off, towers can fall down. So please be locate the windmill in a people free area. My personal preference for tower design is a 7 meter tall folding tower made from 75mm od 6mm wall galvanized pipe. The tower is supported by eight 5mm stainless steel guy wires, each connected to a steel post embedded in a 700mm deep hole filled with concrete. You may need to talk to your local council before erecting a windmill tower, and they may require a structural engineers plans before proceeding. There is nothing more worrying that watching your windmill buck around in a violent storm, and nothing more rewarding than having it survive with no damage.
Regulating windmill power is a little more tricky than solar cells. Solar cells can be open circuited when the storage battery has reached full charge. This is not a good idea for windmills. Say your windmill is pumping out 20 amps into a 12 volt battery in a strong wind, and spinning at about 400 RPM. If your regulator circuit suddenly open circuits the windmill, it has no load and will speed up to, say, 600 RPM. At this high speed the windmill output voltage could reach over 50 volts unloaded. If you regulator suddenly reconnects the battery the windmill output current will be excessive and can cause damage. Remember the windmill is acting like a big flywheel and will take some time to slow down to a safe speed. Excessive speed can also increase the wear and tear on the windmill especially bearings and blade tips. So a suitable regulator will need to switch the windmill output from the battery bank to a dummy load, therefore keeping the windmill RPM down to a reasonable speed. I use 4 100 watt 12 volt spotlamps, wired in parallel, but you could use several electric heater elements. I have heard of installations where heating elements are mounted into the hot water system , so once the batteries are charged the windmill is helping to provide hot water. Building your own windmill can be a very satisfying experience, I have built several over the last few years, learning from the failures and improving with each new design. The Fisher and Paykel Smartdrive As already mentioned above, on this web site I often refer to something called a F&P. F&P, or Fisher and Paykel, is a white goods manufacturer based in New Zealand. In the 1990's F&P introduced the "Smartdrive" motor into their range of washing machines.
The Smartdrive washing machine has been a big seller for F&P in Australia and New Zealand, and it was only as matter of time before someone discovered the motors made excellent alternators. One of the pioneers in Smartdrive use as a alternator was Michael from EcoInovation in New Zealand ( www.ecoinn.co.nz ), who has used the Smartdrive in hydro and wind installations. Over the last few years there has been a growth in the use and development of the Smartdrive by windmill enthusiast's, with many of the early problems now solved ( cogging or bad startup was the biggest problem, but is now a thing of the past with decogging techniques like pole reshaping, twisting and 7 phase conversions ) So how do you get a F&P Smartdrive motor? The Smartdrives motors parts can be bought new from any F&P agent, but the parts can be expensive, up to $200 for the stator, shaft and hub, depending on how much markup the agent puts on the parts. A better option is to pick up the parts 2nd hand. I have sourced my motors from my local white goods repair center, I can usually pick up a couple of dead washing machines for a carton of beer and with any luck the motors are in good enough condition to use. I've also bought motors from ebay sellers, just search for Smartdrive or windmill and they pop up every couple of weeks or so. Another option is to post a message in the forums section of this web site and your pretty much guaranteed to get a complete motor for a good price. In New Zealand they can be sourced from www.ecoinn.co.nz, and in the USA try www.randysworkshop.com. |
|||||
 As
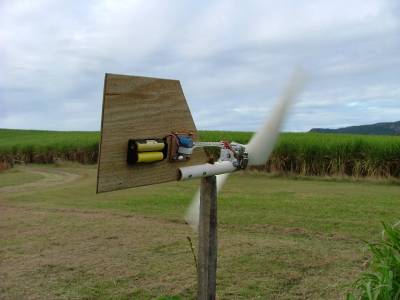
a rule 3 blades is the best compromise between power, torque and
speed. A 2 blade propeller will run faster, but there are dramatic
vibration problems with 2 blade windmills during wind direction
changes and therefore not recommended.
As
a rule 3 blades is the best compromise between power, torque and
speed. A 2 blade propeller will run faster, but there are dramatic
vibration problems with 2 blade windmills during wind direction
changes and therefore not recommended. 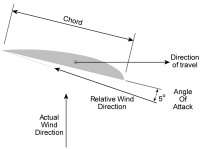 The
profile of a well designed windmill blade resembles a aircraft
wind, giving lift on the trailing edge. The blade has a angle
of attack to the wind to give its best lift, and this lift drives
the blade forward. There also needs to be a slight twist along
the length of the blade, the blade tip is traveling much faster
than the part of the blade closest to the center of the propeller,
so the blade needs to be tilted to give the same angle of attack.
The
profile of a well designed windmill blade resembles a aircraft
wind, giving lift on the trailing edge. The blade has a angle
of attack to the wind to give its best lift, and this lift drives
the blade forward. There also needs to be a slight twist along
the length of the blade, the blade tip is traveling much faster
than the part of the blade closest to the center of the propeller,
so the blade needs to be tilted to give the same angle of attack.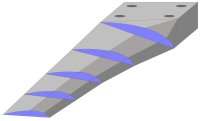 You
also need to consider tip speed, or TSR (Tip Speed Ratio). The
tips of the windmill blade travel much faster than the wind speed,
so a TSR of 7 means the tips travel at 7 times the wind speed.
A typical 2 meter diameter turbine at 500rpm could have a tip
speed of over 200kmh, and any airborne dust or unfortunate insects
will be very abrasive at this speed. For windmill blades made
from a soft material, such as timber, a layer of wear resistant
aluminium tape or fiberglass is usually applied to the leading
edge.
You
also need to consider tip speed, or TSR (Tip Speed Ratio). The
tips of the windmill blade travel much faster than the wind speed,
so a TSR of 7 means the tips travel at 7 times the wind speed.
A typical 2 meter diameter turbine at 500rpm could have a tip
speed of over 200kmh, and any airborne dust or unfortunate insects
will be very abrasive at this speed. For windmill blades made
from a soft material, such as timber, a layer of wear resistant
aluminium tape or fiberglass is usually applied to the leading
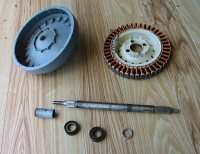
edge.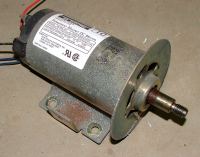 So where do you find a high voltage DC permanent magnet motor? Treadmills! Check out your local recycling center and you will usually find several electric treadmills, a treasure trove of windmill parts. Some treadmills use induction motors, so look for permanent magnet motors by reading the motor label, it will usually say something like Permanent Magenta DC Motor, 120V, 1.5HP, or something like that. The motors have a last flywheel attached, which can be used to mount the blades to. In this example the flywheel has been removed. As this is a DC motor, you will need to add a blocking diode, or the windmill will act as a fan and drain power from your battery.
 If you can find them, AC servo motors are another option for your windmill alternator. Servo motors have no cogging resistance, making then easy to start in light winds, and the output is 3 phase AC, so you will need a 3 phase bridge rectifier. Some servo motors have a electric brake built into the casing, and this needs to be removed. The brake is designed to lock the drive shaft if power is lost in an emergency.
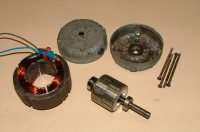 Modified
Induction Motors. Single or 3 phase induction motors can be modified
by fitting permanent magnets to the armature. This is done by
machining the armature, in a lathe, down to a size that will allow
you to glue magnets to the armature. By using strong Neo magnets,
a typical 1hp induction motor can supply over 10 amps. The available
current is limited by the gauge of the copper wire in the windings,
so some builders rewind the motor with heavier wire with good
results in excess of 30 amps. A disadvantage of modified induction
motors is the power curve, peak power will be reached at a low
rpm, any faster and the power drops off dramatically. This is
due to the high number of laminations in the stator, giving a
poor high frequency response.
Modified
Induction Motors. Single or 3 phase induction motors can be modified
by fitting permanent magnets to the armature. This is done by
machining the armature, in a lathe, down to a size that will allow
you to glue magnets to the armature. By using strong Neo magnets,
a typical 1hp induction motor can supply over 10 amps. The available
current is limited by the gauge of the copper wire in the windings,
so some builders rewind the motor with heavier wire with good
results in excess of 30 amps. A disadvantage of modified induction
motors is the power curve, peak power will be reached at a low
rpm, any faster and the power drops off dramatically. This is
due to the high number of laminations in the stator, giving a
poor high frequency response.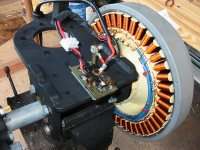 Switched
DC motors, ie Stepper Motors, such as used in most computer equipment,
make good alternators. They are readily available, rugged and cheap. Larger
motors can be sourced from industrial equipment, motion systems
and some domestic appliances, including washing machines ( more
on this later ). One disadvantage of these motors is the cogging
effect. Cogging is the vibration you can feel when you try to
rotate a stepper motor, and is caused by the interaction of the
magnets and laminations/poles. In a windmill application this
can make the windmill hard to start in light winds, as it needs
to overcome the first "cog" to get going. Once motion
has started the cogging effect has little impact on performance,
other than a slight vibration and whirring noise. Some motors
can be modified to reduce cogging, but I believe if the wind isn't
strong enough to start the windmill, then its not really windy
enough to generate any useful power anyway.
Switched
DC motors, ie Stepper Motors, such as used in most computer equipment,
make good alternators. They are readily available, rugged and cheap. Larger
motors can be sourced from industrial equipment, motion systems
and some domestic appliances, including washing machines ( more
on this later ). One disadvantage of these motors is the cogging
effect. Cogging is the vibration you can feel when you try to
rotate a stepper motor, and is caused by the interaction of the
magnets and laminations/poles. In a windmill application this
can make the windmill hard to start in light winds, as it needs
to overcome the first "cog" to get going. Once motion
has started the cogging effect has little impact on performance,
other than a slight vibration and whirring noise. Some motors
can be modified to reduce cogging, but I believe if the wind isn't
strong enough to start the windmill, then its not really windy
enough to generate any useful power anyway.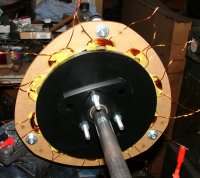 Air
Core Generators, also referred to as Axial Flux. One way to reduce the cogging effect is to remove
any magnetic material, ie laminations, from within the coils of
your generator.
One common design is to embed the coils in an epoxy disc which
is held stationary, with magnets rotating on each side of the
disc. Good results have been achieved, and the design can be easily scaled up to suit the larger turbines, but there are disadvantages.
Winding and gluing your own coils
is very time consuming. And as the coils are embedded in epoxy,
heat dissipation is poor making it very easy to cook a set of
coils if your wind turbine is not set up correctly.
Air
Core Generators, also referred to as Axial Flux. One way to reduce the cogging effect is to remove
any magnetic material, ie laminations, from within the coils of
your generator.
One common design is to embed the coils in an epoxy disc which
is held stationary, with magnets rotating on each side of the
disc. Good results have been achieved, and the design can be easily scaled up to suit the larger turbines, but there are disadvantages.
Winding and gluing your own coils
is very time consuming. And as the coils are embedded in epoxy,
heat dissipation is poor making it very easy to cook a set of
coils if your wind turbine is not set up correctly.
 The Smartdrive motor was a revolution in domestic washing machine
drives at the time and has since then been copied by other manufacturers.
The motor was designed to be efficient, easy to repair and cheap
to make. If you want to find out more about the development of
the Smartdrive, there is an interesting article worth reading
The Smartdrive motor was a revolution in domestic washing machine
drives at the time and has since then been copied by other manufacturers.
The motor was designed to be efficient, easy to repair and cheap
to make. If you want to find out more about the development of
the Smartdrive, there is an interesting article worth reading