
|
|
Forum Index : Solar : Deciding if I should build this solar heater
| Page 1 of 39 |
|||||
| Author | Message | ||||
| rogerdw Guru Joined: 22/10/2019 Location: AustraliaPosts: 792 |
I'm still working on my Warpinverter but it is going to take a little while yet. In the mean time I have been trying to work out if we can add a little extra heat to our home over winter and perhaps even burn less wood. The idea has come about due to spotting some cheap evacuated tubes for sale on FB marketplace. I bought a box of 10 initially for $20 and was offered the remaining 100+ for $100. Unfortunately the tubes come without the copper heat tubes that enable them to transfer the heat out into a manifold to heat water or air ... so it precludes using them to heat water without a lot of extra work or expense, and probably both! After playing around with the first batch, I've been impressed with the amount of heat the tubes can collect ... so I've been toying with different ideas as to how I might make a practical device out of them. One of my early experiments involved putting a plastic tube down the centre of an evacuated tube and blowing cold air down it with an air compressor. The ensuing air was far too hot to hold my hand in front of ... and despite it being late afternoon with minimal sun, it took 6 or 7 minutes before the temperature dropped to 30 degrees C. It had started at 70 degrees. On warm days I've seen temperatures as high as 200 degrees C in the tubes, though of course they are not the days we want more heat in the house. On the other hand, I have seen temperatures still at 45 degrees even at 10 o'clock at night. Again, that would drop pretty quickly if I tried to make use of it ... but any mildly sunny day during winter has to provide some warmth. Another reason for going down this track is due to my experience with winter sun here at our home over the last couple years. We have a couple massive sheds and I enclosed one end for my income producing workshop ... lining and insulating it well. I have always been amazed at how warm it is upstairs above the workshop ... to the point where I piped hot air from just under the peak, down into the workshop below. I used some thin aluminium from a roll I bought from Bunnings ... and used double sided tape to close in the front of a C-Section post that runs the full height of the shed. Then I hooked up a bilge -blower type fan out of an old microwave to aim down the post ... dropped an extension cord down the gap as well to make it easy to switch on ... and then harvest the heat from there. It is not all that fantastic on cold mornings and is not really worth having on ... but by mid morning if there is any sun, it is noticeably warmer having the fan on. The insulation is such that I often turn it off by lunch time otherwise it gets too hot ... depends on the day. I am hoping that with the efficiency of evacuated tubes, I can amplify that effect manyfold. In my next post I'll show some illustrations of an idea I've come up with and I'll be interested in some feedback. Thanks for reading. Cheers, Roger |
||||
| rogerdw Guru Joined: 22/10/2019 Location: AustraliaPosts: 792 |
Hopefully the concept will be obvious. The plan is to hang copper (or steel) tubes out of the bottom of a manifold ... into the evacuated tubes. Then, using an inline fan in the outlet to draw air from inside the house into the heater ... ... where it travels down the centre of the copper tubes and flows back up between the outside of the copper and the inner glass tube ... gaining heat all the way through ... ... and expel it back into the home via a ceiling vent. Edit: I forgot to mention that in this design I would hang them on a north facing wall and have the inlet and outlet open into the area above the eave. Could also create a version to lay on the roof, though fitting ducting through the tiles becomes a bit problematic. My first design was also to mount on the wall, but with horizontal tubes ... with the outlets designed to go through a partially open sliding window. 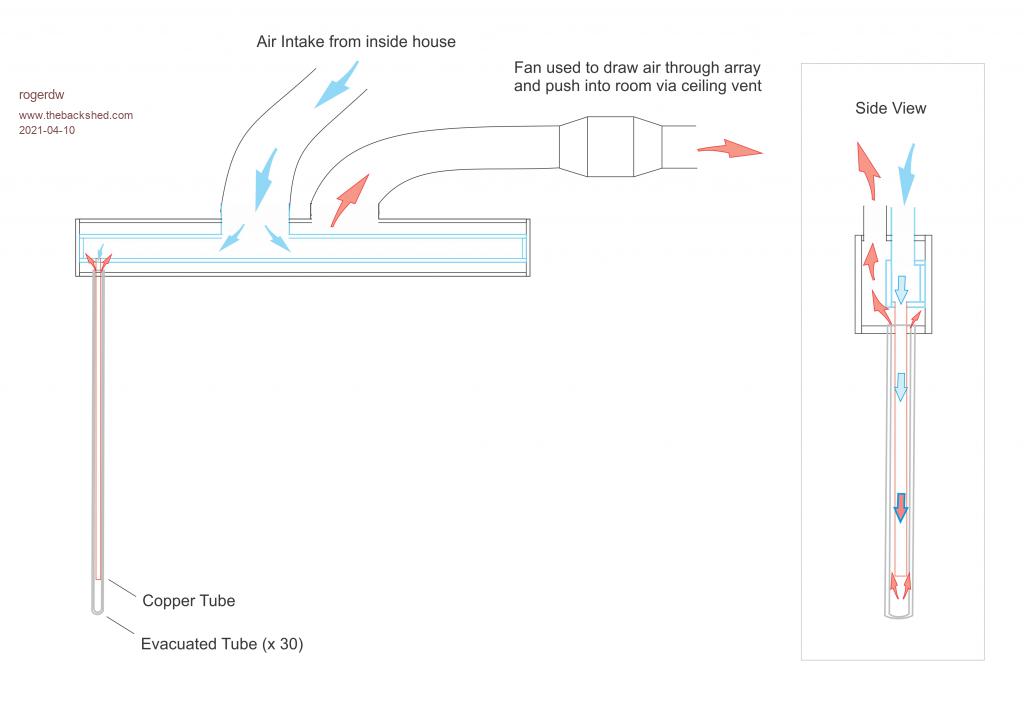 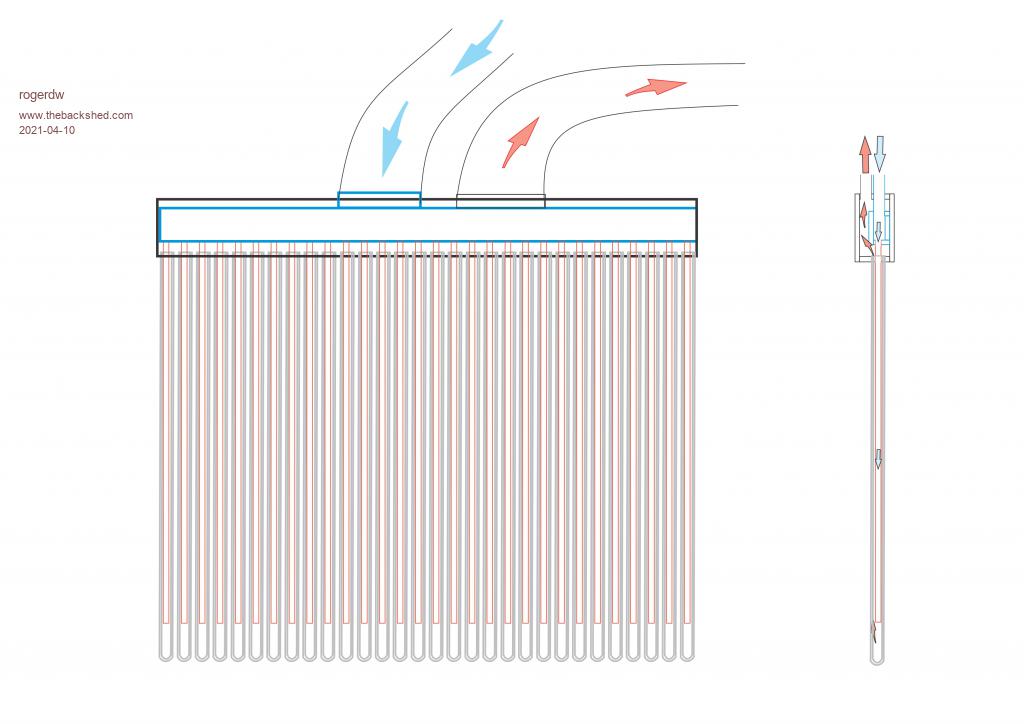 Edited 2021-04-11 00:06 by rogerdw Cheers, Roger |
||||
| Warpspeed Guru Joined: 09/08/2007 Location: AustraliaPosts: 4406 |
Fascinating Roger. My first thought is that vertical and north facing will produce little heat in the early morning when its most valuable. But you could probably overcome that with one or more fixed mirrored reflectors suitably aimed to catch the early morning sun, without losing anything during the rest of the day.  These commercial "power towers" usually actively track the sun throughout the entire day, but I see no reason why one or more fixed reflectors could not be arranged to boost output at a particular time of day. A few mirrored tiles could easily double the heat output. A large number of tiles, the heat increase could be quite dramatic. Cheers, ĀTony. |
||||
| Davo99 Guru Joined: 03/06/2019 Location: AustraliaPosts: 1577 |
I had a different Idea of how these worked from the last Discussion. I thought the end of the things got hot at a point and the heat was removed ( generally with water) from there. Didn't realise they were hollow. In my head it looks a bit tricky to get the air in and out of what I imagine is a fairly small area but if you have it figured out, that's no longer a problem. Something I can add some real world hands on experience with and have been playing with it the last few days and previously, Fans. Those Bilge fans will be absoloutley useless for this job. I think your Idea of using the C channel in the shed is bloody brilliant and I can see how one would work there, just, but these things have no pressure and there is no way they are going to force air though narrow orifices. Thats been what I have been looking at, using them to supply air for burners and even though 1.5" pipe or necked down in any way, they fail miserably. With a ducting the diameter of the outlet of the fan or larger with no restrictions, yep, no problem. Put any restriction in them and the airflow becomes non existent. The FAR better alternative I tested Just yesterday is a Cabin Blower / AC fan. The one I had is out of subaru's from about '03 to '14, they are all the same in all the models pretty much. The housing is designed by a Madman but with a bit of cutting, shaping some 90mm storm water pipe with a heat gun and some Duct tape, I got a very workable outlet. The thing supplys huge amounts of air and at good pressure too. They are a scroll type blower not an enclosed fan. I tested a Bilge blower at under 2A. The cabin Blower was 17A which gives a good relevance to their outputs. Not comparison in other words. Usually just the motors/ fans are removed as no one ever wants the housing and it is a complete pain in the arse to get out. You have to remove everything under the Dash usually and some are easier to get out than others. There are 2 Types as well, the standard brushed motors and the 3 Phase DC type. Easy to spot the difference by the plugs. If you went to a wreckers that let you pull out the housing that would probably be cheaper or you could make a housing. Pretty easy for the skilled and talented unlike me, the only thing to watch is to make a little notch where the motor mounts as they have a couple of little ports for pressurised air to go to the brushes to cool them. I can't think of any other 12V Economical fan to recommend as this has been bit of a search for a friend and I wanting a decent fan for furnaces. He got a Toyota cabin blower and said it was useless but I don't know which one he got. I would think most would have some decent output as they have to push air through a lot of bends and convoluted ducting in modern vehicles these days. I have fans on my solar inverters direct connected to some old panels and a voltage reducer. With a bit of resistance built in, you may be able to " Tune" the system to give a fairly consistent heat output. The brighter the sun the harder the fan blows and the greater the available heat. If you wanted to go to a mains powered blower, the best ones I have come across are the Jumping castle blowers. They are large diameter rotors and do great air pressure. You can turn them down with a PWM controller but be careful not to get too far down as they are a cap start motor and you don't want to be running them on the start windings. You can generally hear the switch click in and out to know where you are though. You can of course also just restrict the intake which unloads them so they use less power even at full speed. You can get these from Fleabay and Dumbtree as the castles never last as long as the blowers but they are one of these things people ask stupid money for. Don't pay more than about $20-30 for one. It's not like they are in short supply and people are fighting for the things. If you see one advertised for a couple of weeks make an offer because Odds on it will be the only one they get. This is a REALLY interesting concept and One I'll follow with great interest. If you could post some pics of the tubes particularly the ends that would be great as still not entirely sure I have them right in my head. I take it they are like a big test Tube? My only other suggestion is if you are going to use PVC pipe for the Ducting, use Pressure not DWV. That thin drainage stuff is useless crap which I personally hate with a passion. Have a job I'm about to go and do now for a repair where I touched some with a shovel in the garden and demolished it. This is going to be one of those blue word aplenty simple but incredibly annoying jobs I can just see as I took out and elbow and spilt both sides of the pipe. Might have helped if they sank it more than about 150mm down but typical of this crappy cheap built place. The previous owner whom built it was a shocking tight arse and it shows in every way. When you can't dig a hole to a decent depth..... I'm not sure DWV would stand up to much heat either. I formed it for the blower the other day with great ease with a heat gun and my bare fingers and it was like rubber and wasn't even hot. The thicker pressure stuff would be much more resilient I think or better still if you can use proper 4" ducting, go to an AC supply and get some of that. As to the setup, would seem to me as these tubes are round, with the correct spacing you should be able to get near 180o sun coverage as it moves in its arc if the array is properly aligned. Wouldn't matter too much if the sun hit them side or straight on unlike a panel as long as they were spaced so one didn't shadow the other too much. Keep us informed how you go with this.. It's a very interesting concept that's for sure! |
||||
| Warpspeed Guru Joined: 09/08/2007 Location: AustraliaPosts: 4406 |
The solution to that might be a "heat pipe" which is how I always understood these tube collectors were used. https://www.google.com/search?q=heat+pipe+evacuated+tube+solar+collector&hl=en&gl=ar&tbm=isch&source=hp&biw=1637&bih=920&ei=cHRyYInWKcmd4-EPvaC3qAU&oq=heat+pipe&gs_lcp=CgNpbWcQARgCMgIIADICCAAyAggAMgIIADICCAAyAggAMgIIADICCAAyAggAMgIIADoFCAAQsQM6CAgAELEDEIMBUNoKWM0gYItAaABwAHgAgAGGAYgB6QiSAQMwLjmYAQCgAQGqAQtnd3Mtd2l6LWltZw&sclient=img These heat pipes are amazing things for transferring heat from one place to another, fairly easy to home brew as well. https://en.wikipedia.org/wiki/Heat_pipe All you need is a copper pipe closed at both ends, with a working fluid, and all the air expelled. Water works quite well, although freezing might be a problem. Liquid propane works well too for this, and would be my choice, as its very cheap, readily available, and pretty easy to work with. Basically, you flush the copper tube out with liquid propane to displace all the air (and humidity) and allow the pipe to about half fill with liquid propane and half with gaseous propane, then quickly seal off the end by crimping. Once its firmly crimped, make the sealing a bit more permanent by silver soldering. Any heat added at the (lower) liquid end is very rapidly transferred to the (higher) vapor end with a speed and efficiency that is quite remarkable. The high end could be finned, or bolted onto a heatsink, in such a way as to transfer the heat to circulated air with a very low air pressure drop. I have never built a heat pipe myself, but a mate of mine is the Professor of a university engineering department, and he is really into this kind of thing, and he has shown me some of his experimental heat pipes. Well worth a bit of internet research. Cheers, ĀTony. |
||||
| rogerdw Guru Joined: 22/10/2019 Location: AustraliaPosts: 792 |
I think that with my observations I wasn't really expecting anything useful in the mornings, as much as it would be nice ... really only expecting heat once there's some warmth from the sun ... maybe only mid morning onwards. Dave touched on it in the other thread when he mentioned about "heat soaking" the house during the day. There's no question that our wood heater heat soaks our house because even if we do let it go out for a day or two ... it stays warm for days. If I can pipe in warm air whenever it's available, that must still help the overall temperature in the house. Would be better overnight or early morning ... but there's no sun then ... I gotta take it when I can get it.  Again I'm trying to use the thermal mass of the house to my advantage, though appreciate you work on the minimal thermal mass principle. I do agree that being vertical is not in the best interest of maximum output, but in my case where I'm trying to avoid fitting this on the roof and dealing with plumbing through tiles, it's probably my only other option. As Dave mentions, the beauty of round tubes is that (as long as they are spaced apart and not shading their partner) the sun can move up and over them and they still get the same amount of sun energy transfered. We do have a spot on the wall on the side of the house that would suit, but unfortunately it is recessed about 50cm ... which brings in some shading at top and one side. To solve that I'd like to move them right to the outer edge of the eave ... but after discussions with my wife I'm not sure she'll be happy with that ... she wants it up against the wall. Of course there's some plumbing in the way there!!! I like your idea of mirrors to increase the output, that could perhaps more than make up for the loss caused by shade. They could even be active if there is room for it without it being cleaned up by a 7 year old on his scooter! Cheers, Roger |
||||
| Murphy's friend Guru Joined: 04/10/2019 Location: AustraliaPosts: 580 |
|
||||
| InPhase Senior Member Joined: 15/12/2020 Location: United StatesPosts: 178 |
With the price of PV the way it is, I'm not sure the complexity of solar thermal is even really worth it. Of course I have no real experience, so may just be talking out of my lower digestive tract. At this point, it just seems like solar electric is so flexible and well-defined. Use PV to heat water, then use the water to heat your living space. A large insulated container full of water and rocks might make a decent heat battery. |
||||
| Murphy's friend Guru Joined: 04/10/2019 Location: AustraliaPosts: 580 |
Google found me how these heat pipes work :heat pipe Its a good read and there is a reference for the solar application discussed here about 3/4 down the detailed descriptions. Basically, using distilled water in a vertically oriented copper pipe seems to me the easiest way for home construction. No internal wick required if kept vertically, thermo- siphoning does the work then. I would fit some kind of one way valve to allow evacuation of the air, fill the pipe half full with water and soft solder a copper cap on top. It could then have the air inside evacuated via that valve. That article says water is good for temperatures between 20-150 deg C. |
||||
| rogerdw Guru Joined: 22/10/2019 Location: AustraliaPosts: 792 |
You are quite right in that they do normally harvest the heat from the tube with a "heat pipe" ... but my 'cheap' pipes don't have them fitted so my experiments revolved around just the bare tubes. The heat I was obtaining still seemed very worthwhile even without them, so I was trying to avoid the expense and complication of buying or making them. That's a good description, they do look like giant long skinny test tubes ... though they have a second tube inside the outer one ... with a vacuum inbetween ... like a good old thermos flask. The inner one has a black coating that absorbs the suns energy ... which cannot escape due to the vacuum between the tubes. The overall OD is ~60mm and ID is 44mm. 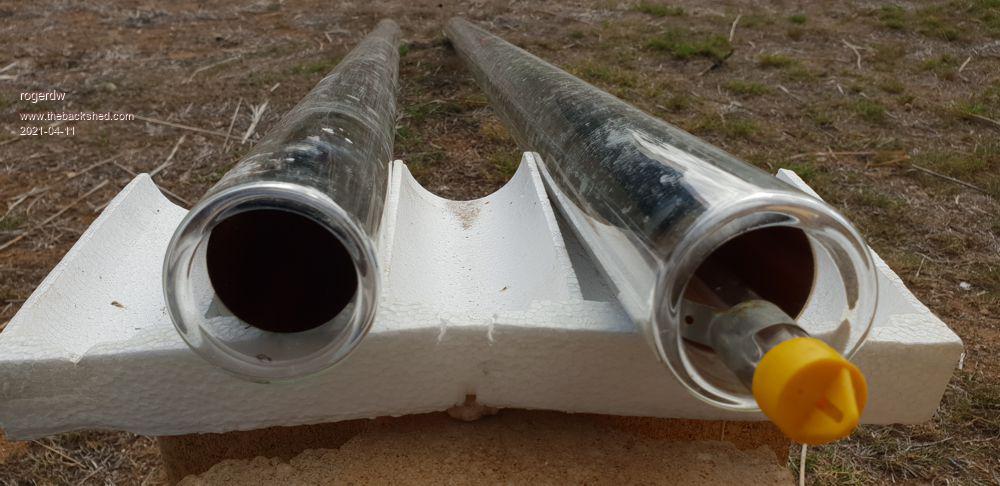 Thanks for that Dave, I can never work out the pros and cons of all the different types. The fan I used pushing air down the C-Section does the job ok though it's not super speed or volume ... just a nice continuous waft of warm air coming out from under the bench. It may have been better having a fan at the bottom pulling air down ... but I wanted the noise further away! Sounds like a good find Dave, it's obviously horses for courses ... though 17A is a bit of a jump up from 2A. Depends how often it has to run in your burner I suppose. Yes, that's a great idea if I can find a blower (or sucker) fan that will work on DC happily. Move the air easiest when the sun is strongest. I had sort of taken PVC and plastics off the list and was contemplating a timber or composite structure for the manifolds and housing. Not really sure yet but I could certainly see plastic turning into a floppy mess. Yes, that's one of the touted benefits in the sales pages for the tubes and means they are no where near as fussy as eg pv panels. I'll keep you up to date ... just gotta keep some momentum. Cheers, Roger |
||||
| rogerdw Guru Joined: 22/10/2019 Location: AustraliaPosts: 792 |
Yes, I have watched quite a few youtube videos on making your own heat tubes. I've seen them use all sorts of liquids from water to acetone etc. If it was just one or two I'd probably have a go ... but for my 30 tube array that's going to take a while. And I'd want to hope I chose the right procedure to follow. I think the heat tube is to extract the energy and be able to concentrate it into a manifold to heat water particularly. Obviously if they try and pipe water through the heated tubes and any leaks ... well goodbye tubes. Seeing I'm only dealing with air, heat tubes and a manifold are hopefully not as necessary ... maybe?? If my tubes had come with heat pipes, I'd at least be trying connecting them to large heatsinks with lots of heatsink compound and blowing air over then to extract the heat. Cheers, Roger |
||||
| Warpspeed Guru Joined: 09/08/2007 Location: AustraliaPosts: 4406 |
Its only flammable in the presence of oxygen. If its 100% propane it can never burn. All that happens will be that the pressure increases with the temperature increase, and if you solder quickly with an oxy acetylene torch, soldering takes only a few seconds right at the crimped end. Water certainly works, but you need a good vacuum pump. Depends what you have I suppose. Cheers, ĀTony. |
||||
| Davo99 Guru Joined: 03/06/2019 Location: AustraliaPosts: 1577 |
Learning so much about these things in one thread! The heat Pipes seem somewhat Mystical things. :0) From my 20 Min of research for a DIY setup, I'd try construction another way. Cap the ends of the pipe brazing them while empty. Fit a schrader Valve to the ( lower) end, Vac the Tube down then fill with LPG or whatever the working fluid. Shouldn't be hard to work out the volume of a tube and then weigh in the charge like they do in air con. Vac pumps are not that expensive on fleabay and if you know anyone in Refrigeration or AC they could suck the tubes down for you. The other way would be as I have done for AC. Put some LPG in the pipe and vent it a couple of times. Not perfect but not bad either. If the valve was fitted to the bottom , it should see the minimal heat load. I love LPG as a refrigerant. Put it in my cars AC and they never worked better. The charge is about half that of R 134 so I just put it in watching the high and low side pressures, mainly the high and that works just fine. The new Refrigerant gasses are just more Highly Refined ( supposedly ) LPG. Finer filtered and less water is the claim but never had a problem with god old BBQ gas in my cars and one has had it about 7 years now and will still Freeze your bits off. If you could get some hot air into a thermal mass, that would serve as a heat battery. I don't think that would be hard, Blow the hot air though a Drum of Big rocks, Through a car intercooler in a drum of water. Packaging and presentation is the trick here though. I was going to get a screen to put round a Drum or drape it with a table cloth and stick some pictures or a vase on the top like a round table. OK, I wasn't sure and obviously don't know much about these things so at least my impressions weren't totally incorrect. :0) I didn't realise that they were 2 part as it were. That seems much more workable than what I had in mind. Thinking the manifolding in and out does seem a bit complex though. I Imagine one would want a air feet tube going near the bottom of the pipe and exhausting back up. I'm thinking a large, 150mm pipe for the exhaust with the air feed running right though the center of that. Bit like Tube in tube HE's I used to Build for Veg oil cars. Sealing the tube to the larger duct seems like it could be a challenge. I did notice seals for these things advertised on Fleabay. If they could be obtained with an in out port, Might be just as easy to run a pipe down the center and use water as the working medium. Would be easy to use as I want to do an old electric water heater tank for storage. 400L tank will do about 27 Kwh which isn't bad. Have you any ideas on the manifolding? It seems the trick of the exercise. Yep, they will move air providing they don't have to work very hard to do it. With this and the manifolding and pushing air down say 20MM Pipes, you are definately going to need something that generates some air pressure as well as Volume. I'm wondering it instead of pushing air down the tubes, you wouldn't be better trying to suck the hot air out? That's usually how cooling fans work, Draw though but it would put importance on having air tight manifolding around the tubes. There are rubber Joiners/ Connectors used for joining pipes in boats etc. You might get one of appropriate size for the tubes. They are not that cheap especially in volume though. |
||||
| Davo99 Guru Joined: 03/06/2019 Location: AustraliaPosts: 1577 |
I think it's a 2 ( at least) edged sword. From what I understand, the Evac tubes are many times more efficient at heat capture than PV. The problem with panels as I can attest from vast experience is that their electrical generation plummets in winter. Depends on your goals wether you want to heat pretty much completely or reduce your heating costs but you need a LOT of panels in winter to make significant heating power. Im my experience I can get by happily on 20-25Kwh a day when I don't need to run the AC for heating. When I do, that's 70-80 Kwh a day.... every day over winter and we are still on the cool side. Results will of course vary wildly as will the amount of roof area people have they can put panels on in an effective direction. On the 3rd hand, panels are year round useful rather than just winter. You can use the power for cooling in summer, running the pool pump, heating domestic hot water etc. Again depends on needs and priorities. If I could dedicate an amount of roof even only for 3-4 months a year use but gave me 5 X more heating efficiency than PV in winter, I think that would be worthwhile to me. In summer PV takes care of itself with longer days, warmer weather etc. Winter for me is when I want the power most and it's least available. It is and much easier to run electric cable than Pipes and ducting etc. Also like I said it's more universally applicable. Question is how available is it when you want it? 3 Basic factors here I see... How much heat do you need to heat your home? How much roof area do you have available for solar, PV or direct? Allowing for winter Insolation, is the available area sufficient to generate the KWH of heat you need from the source you are looking at? The use of reverse cycle AC is also several times more efficient than heating water resistively. Yes, you could use the power to heat water with a heat pump but not really practical in most cases. Yes, a 200L Drum of water taken up to say 80oC ( if you can get it that high) and taken down to 20 C will store about 14KWh of thermal energy. That's not a lot for my house. Then again, might keep the chill off a room enough to make a difference and add some comfort. |
||||
| Murphy's friend Guru Joined: 04/10/2019 Location: AustraliaPosts: 580 |
That rocks in a drum as thermal mass for hot air does not work. I have seen a house here, many years ago now, where somebody built the house around a massive (2m diameter & about 8m tall) concrete column (made from culvert sections) which was filled with rocks. This required a *very* powerful fan to draw air through and the power used by the fan was way in excess of the heating power stored in the rocks. The conclusion was that using fan motivated hot air to heat a storage medium was too lossy to be worth while. Now, using water as a heat storage medium is *very* worthwhile. The university I worked for built a gigantic insulated tank that stored one million liters of water. In Summer that was chilled, using off peak power back then (I'll assume its solar power now) and this made a big saving in the campus air conditioning costs, I remember payback being somewhere around ten years. The storage was reversed to hot water in winter to be also used for air conditioning. |
||||
| Solar Mike Guru Joined: 08/02/2015 Location: New ZealandPosts: 1122 |
I have made a few DIY heat-pipes and can give you some pointers on how to do it. Method 1: using 15mm copper plumbing tubing; plug one end with a copper disk ( I used a 1cent coin) and braze together with something like silfos. Put some water in it, For a 1M tube I used about 20cc, you don't require much as its the steam that moves the heat up the tube, condensing on the cooler areas. Seal the top, drill a hole in the cap and braze in a short length of 3mm copper tubing with a schrader valve to connect to your vacuum pump. place the whole thing in a chest freezer -18c over night on a slant so the now frozen water sits on the bottom. Evacuate the tube while its still in the freezer, pinch off the copper tube and weld shut. Water in a vacuum boils at a very low temperature, take out of the freezer and let the ice melt, dunk the bottom of the pipe in a jug of boiling water, you can hear the water inside the tube boiling, near instantly the top of the pipe a meter away will be too hot to touch. Method 2: Similar process but use acetone rather than water, use approx 50cc, its not going to freeze, so warm the tube up with a gas torch until the acetone boils, that will displace all air and a very flammable gas will start hissing out your 3mm tube, quickly remove from the heat and clamp the tube shut, then braze the end closed. Test your heat-pipe same as method 1, both are similar results. This type of heat-pipe works better standing slanted upwards or vertical, the condensing liquid has to be able to run back down the pipe in order to turn back into steam, over filling the pipe, it wont work hardly at all. Method 3: using a refrigerant gas, I used LPG, and made a tiny pressure tank with a valve to fill the pipe with a precise amount after evacuation, bit tricky as you need a good quality pump and an accurate electronic pressure gauge. In the end I had about 3 cm liquid in the bottom of the pipe, putting your ear to the top and gripping the bottom, the warmth of your hand makes it boil, dunking in hot cup of tea and the heat transfer is instant. A single 15mm heat-pipe can move over a KW of heat, providing you can cool it fast enough to condense the gas. Those heat pipes used in the evac glass tubes are only 6mm thick and have water in them, they have a springy spiral of thin alloy sheet that clamps over the inner tube and press against the black coated glass to get the heat into the pipe. I believe a more simpler and cost effective method is to construct a simple timber case, glazed with clear polycarbonate with a black painted fly screen door type material inside to capture the heat warming the air in the process, its the surface area that's important, not a small volume of high temperature to warm up enough air to feel inside your house. Cheers Mike |
||||
| rogerdw Guru Joined: 22/10/2019 Location: AustraliaPosts: 792 |
Yeah, a heap of rocks heatbank was my first thoughts too ... but then it was suggested that air is a very poor conductor of heat ... so not a very efficient method. So I started thinking of heating water instead ... but the $/effort needed to buy or build heat tubes for so many evactuated tubes swung me back around to hot air. I keep saying how our wood heater warms up the tiles even 20 feet away from the fire ... and the slab underneath must surely be working its guts out trying to cool them down ... and failing ... ... so I suggested that I might lay one of those shiny foil thermal blankets on the tiles somewhere, under a floor rug ... then blow the hot air under it. That has to be more efficient than just warming up the room and accepting the little bit of energy that eventually soaks into the floor. I think you thought I was kidding. Yeah, and there's actually a third part as well that's needed. If you look at some of the images of evac tubes ... they also have a piece or two of folded or shaped copper sheet the full length of the tube ... shaped in such a way that it contacts the inner surface of the tube and transfers the heat to the heat tube. It also needs to locate the heat tube centrally or against the glass depending on which design it is. I think this part was more a stumbling block for me than the heat tubes themselves. That's pretty much what my design shows ... a 25-30mm tube right down to the bottom of the evac tube. Air is either blown in the cold air manifold and pushes to the bottom of the tube and can only escape by travelling up between the outside of said pipe and the hot centre glass tube ... taking it's heat with it ... or be sucked through by an inline fan on the hot air outlet. Nah, I'm a cheapskate ... I saw my answer on a youtube video where they were making tanks for the conventional evac tube heaters. They fitted slightly smaller temporary tube stubs into the side of the tank where the glass tubes were to fit ... then sprayed expanding foam around them. Once set, removed the stubs and a perfect seal for the evac tubes to slide into. Certainly good enough for air, maybe not water of course. Pretty much what my diagram shows ... just a wooden box inside another wooden box. Maybe I need to create a larger graphic with a bit more detail. I had a feeling I'd read that somewhere, so again that's what's in the diagram ... a fan that 'sucks' from the hot air end. Yeah, I've seen lots of options but like you say not necessarily cheap ... but I'm sure the expanded foam method could be used in a multitude of ways. Cheers, Roger |
||||
| rogerdw Guru Joined: 22/10/2019 Location: AustraliaPosts: 792 |
Very useful information to read, thanks Murph. All this info helps in building a picture of what's been tried and what might possibly be adapted to work with this project. Cheers, Roger |
||||
| rogerdw Guru Joined: 22/10/2019 Location: AustraliaPosts: 792 |
Wow, never ceases to amaze me the wealth of experience and knowledge on this forum ... thanks Mike All this discussion has me wondering whether using heat pipes are a more efficient way of harvesting the heat from the tubes ... or just a different way than blowing air through them. Certainly if the aim is to heat water ... heat pipes being inserted into a water carrying manifold sounds like the only sensible way of extracting the heat ... ... but if the aim is simply to remove the heated air ... just blowing or sucking it through should be easy enough. Of course it then depends on what is done with the hot air as to how efficient the heat collecting method would be seen. Great description ... I'm assuming the thin alloy sheets were pretty much the full length of the evac tube like the ones I have seen? As I said above, trying to replicate 30 of those struck me as being harder than trying to recreate 30 x heat tubes. Interesting you should say that Mike ... it is the exact same conclusion I had come too ... other than the fact I have access to all these tubes for $100. I suppose I will never know unless I build one of each and compare them, not that that is likely to happen ... ... though I came to this conclusion by reading all the reports of someone who did a heap of side by side comparisons and found that collectors built as you described were not only the easiest and cheapest collector to build ... but were also the most efficient. I am left wondering though ... if a clear topped collector with a couple layers of black flyscreen was so good at collecting heat (hot air) ... why aren't they also being used to heat water. There's no question that evacuated tubes can do an amazing job of heating water even in winter ... and I really can't see the flyscreen collectors being anywhere near able to compete. I'll put a couple links to examples of the flyscreen collectors. http://www.mckayphotography.com.au/photos/solar-mk3/ http://www.mckayphotography.com.au/photos/solar3/ Cheers, Roger |
||||
| Warpspeed Guru Joined: 09/08/2007 Location: AustraliaPosts: 4406 |
Wow, this thread has really got going, and I forgot to hit the subscribe button. Cheers, ĀTony. |
||||
| Page 1 of 39 |
|||||
