
|
|
Forum Index : Microcontroller and PC projects : E100: Incoming data on COM3 inverted, but outgoing not?
| Author | Message | ||||
| MustardMan Senior Member Joined: 30/08/2019 Location: AustraliaPosts: 175 |
Hi, I've been pulling my hair out all day on this one... I'm using an RS485 click board plugged into an Explore 100 as an interface to an existing system that sends & receives half-duplex data over a single RS485 twisted pair with a ground reference. EDIT: Short version... As a final sanity test I ran a loopback from the Explore 100 Tx back into the Explore 100 Rx, and the data is INPUTing back exactly the same as it is being PRINTed out. I should have done that from the very start. I been tying myself up in knots all day, getting it into my head there was a problem and then seeing it no matter where I looked. Maybe I'm getting too old for this sh!t and I should just retire and buy a beach house (or more realistically rent one).  Apologies. LONG (original version)... I am able to transmit data from the Explore 100 to the device without a problem, but when receiving data the byte is always inverted (eg: FF becomes 00, 3F becomes C0). I chased through the entire system, checking levels and verifying everything all the way from the originating UART to the receiving UART. In a last ditch attempt to figure it out I directly connected the device UART pin to the Explore 100 UART pin, and the problem remained. Sent data was fine, received data was always inverted even though the electrical signal said it shouldn't be. I am using the command OPEN "COM3: 9600" AS #3 to access the port, PRINT #3 , CHR$(&H20); to send a test byte, and a$ = INPUT(1, #3) to receive back a test byte. I am aware that COM1 can invert its' data, but I don't believe COM3 can, and even stranger is that outgoing data is 'correct' but incoming data gets inverted. To get around the immediate problem I am simply XORing the incoming byte with &HFF to invert it, but that does not explain why. Anyone have any clues? Cheers, PS: another 'strange' design decision is why both 'click' interfaces on the Explore 100 have their Tx and Rx both connected together and connected to 'COM3'. Surely it would have made more sense to connect one of them to 'COM2', which as far as I can see is only routed to the expansion connector CON8. Is there a reason? Edited 2020-09-20 21:08 by MustardMan |
||||
| Tinine Guru Joined: 30/03/2016 Location: United KingdomPosts: 1646 |
I have 3 E-100s running CNC tube benders and in fact, I'm sitting with #3 as I type this. I have COM1 running a full duplex 422/485 @115K and COM3 talking to an Android tablet @115K via Bluetooth. Never had a single glitch. Those Click boards are a nice feature and I agree that it would've been nice to have the COM ports maybe jumper assigned. The E-100 is a very nice design but I don't need video, so I run ribbon cables from the headers to Din-rail break-outs. Edited 2020-09-20 21:25 by Tinine |
||||
| Geoffg Guru Joined: 06/06/2011 Location: AustraliaPosts: 3165 |
On COM3: That is really strange and does not sound right as I would have fully tested it during development. I will be away from my workshop for a while so I cannot test it now but I think that you need to do some more thorough investigation. On click boards: The aim was to keep COM1: and COM2: free for use on the external I/O connector. Also, I did not anticipate two click boards both using serial comms. I guess that you live and learn. Geoff Geoff Graham - http://geoffg.net |
||||
TassyJim Guru Joined: 07/08/2011 Location: AustraliaPosts: 5896 |
I am a bit confused (as usual) I have an Explore64 running V5.05.02 but don't have any click boards. With a loopback on com3 RX and Tx, It works as expected. OPEN "COM3: 9600" AS #3 PRINT #3, CHR$(&H20); PAUSE 200 a$ = INPUT$(1, #3) PRINT HEX$(ASC(a$)) Result &h20 The firmware seems OK so there must be something to do with the click boards. Just reread your original post and you also confirmed that the firmware is OK Jim VK7JH MMedit MMBasic Help |
||||
Grogster Admin Group Joined: 31/12/2012 Location: New ZealandPosts: 9059 |
Please take note of the little solder-blob pads on the E100 boards to route the COM port signals: 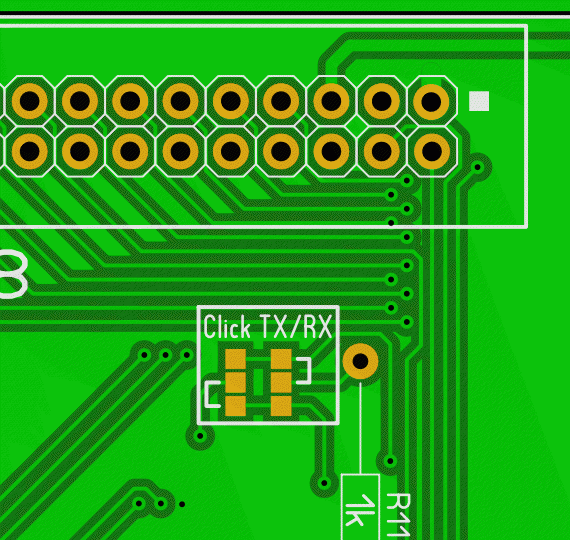 These solder-blobs MUST be in place, for COM3 to work on the CLICK sockets - MUST be. These little blobs do not affect CON8 though, and COM3 is routed there without the need to solder blob, but if you are trying to use a CLICK module.... The silkscreen shows the standard routing, but the little pads were put there, as at the time of design, neither I nor Geoff could be sure of what polarity the CLICK modules serial was. "TX" and "RX" with respect to which end? So we put those pads on the mainboard, so that if we discovered it was wrong, it was an easy fix to simply move the solder-blobs. BUT if you DON'T install them, there will be no link to COM3 on the PIC32 if you are using a CLICK module. Geoff's post explains why we did not route COM2 to the 2nd Click module. And I agree with him - hindsight is a wonderful thing. If there is ever a new version of this PCB, I will make that change. Smoke makes things work. When the smoke gets out, it stops! |
||||
| Tinine Guru Joined: 30/03/2016 Location: United KingdomPosts: 1646 |
Hey guys, @MustardMan appears to have figured that it's not the E-100, after doing a loop-back. I assume that the other device was inverting the data. |
||||
| MustardMan Senior Member Joined: 30/08/2019 Location: AustraliaPosts: 175 |
Hi Guys. Thanks for all the replies and sorry I have not updated this thread with a thank you to you all. I did manage to get my problem sorted, and it turned out to ridiculously simple. The electronics was working just fine all along and it was my stupidity that was leading me up the path. You know that little setting on the oscilloscope called 'invert'... @Grogster I admit it is somewhat unusual to have two RS232/422/485 click modules. I am using two "RS485 5V" clicks because I have two separate busses to look at. But it is and probably always will be a problem with Tx and Rx... from who's perspective are we talking? Some of the click modules are labelled confusingly too where the labels on the boards don't meet expectations. I think that little jumper field is an excellent idea, although it is a trap for young players - it certainly got me when I first got into the E100! SPI at least got the naming sorted, but its a shame they didn't spend as much effort sorting out what signal polarities should be used, so now we have 4 modes when there should have been just one! And then we have I2C, where due to licensing issues you can't even use the name without paying licensing fees, so sometimes it gets called TWI. My god! I should stop ranting: I came here to say thanks - so thanks! |
||||
| Tinine Guru Joined: 30/03/2016 Location: United KingdomPosts: 1646 |
Would never be without a scope but it's usually a last resort. Never had to use it for checking comms. I simply hook up RX & TX and be sure that parameters are compatible and that's it.  Cheers  Craig |
||||
| MustardMan Senior Member Joined: 30/08/2019 Location: AustraliaPosts: 175 |
You know what they say about garden paths! The 'sending' device is a commercial board, and the wish was to interact with it over its' RS485 channel. Because I was dealing with '485 and not just straight '232 I was not able to connect it straight to a terminal (or these days, emulator). I didn't have an RS485 to RS232 converter, but I did have an RS485 click module. RS485 is multidrop and half-duplex by design, and being the first time I'd ever played with it, I was relying on "information" garnered from the internet. First job: check there was data coming out of the commercial device. An oscilloscope verified there was a signal, and it looked close to what an RS485 signal was supposed to look like. Second job: get that data. The E100 with the '485 click was the easiest choice. I fiddled with transmitting data from the E100 with different parameters (eg: baud rate, etc) to make it look mostly the same as what I saw in step 1. Last step: Use the discovered parameters to read the actual data the commercial board was putting out. And that's when the confusion started... |
||||
| Tinine Guru Joined: 30/03/2016 Location: United KingdomPosts: 1646 |
Gotcha � I use a MAX491, dead easy. Just hook up to COM1 RX and TX. The E-100 has a 5v tolerant RX. I do full duplex and the E-100 is the master, so the TX is permanently enabled. Cheers, Craig Edited 2020-09-27 12:41 by Tinine |
||||
| Grogster Admin Group Joined: 31/12/2012 Location: New ZealandPosts: 9059 |
"TXD and RXD, with respect to......which end was it again?"  I've been playing with serial for about 20 years now, and I STILL get confused and get the TXD/RXD lines around the wrong way from time to time if I am not paying enough attention. I do like the SparkFun way of labeling: TXO and RXI kind of thing - there is no confusion with that, and it is a labeling method I have adopted myself. You can also then have RXO and TXI, and you still know what way the data is supposed to flow. The latter I have seen in quite a few RF modules. the TXD line is actually the input - the data you want to transmit, and the RXD line is the output - the data that has been received. This is not the way you would think it would be, and can cause LOTS of head-scratching! All depends on which end of the link the labels are with respect to, which is why again, I like the SparkFun method, as it is much less likely to confuse. Smoke makes things work. When the smoke gets out, it stops! |
||||
| lizby Guru Joined: 17/05/2016 Location: United StatesPosts: 3013 |
"TXD and RXD, with respect to......which end was it again?" I agree, but TxI and RxO being Transmit Input and Receive Output. I recognize the useful distinction when making connections, but I'd still be scratching my head. PicoMite, Armmite F4, SensorKits, MMBasic Hardware, Games, etc. on fruitoftheshed |
||||
| Tinine Guru Joined: 30/03/2016 Location: United KingdomPosts: 1646 |
I don't recall having a problem with regarding the TX as data-out as opposed to "connect me to the TX of the other device". Regards, Craig |
||||
| MustardMan Senior Member Joined: 30/08/2019 Location: AustraliaPosts: 175 |
I like the TxO/TxI and RxI/RxO idea. Problem with TX meaning 'data out from me' and confusing it with '[I am Rx so] connect me to the TX of the other side' is that multipage circuit diagrams will usually have 'ports' (ie: arrows, or simply 'dead-end' wires) with labels on them. To make TX and RX work you have to connect the "TX" port to the "RX" port on the other chip, and that goes against everything we've learned about how to interpret circuit diagrams! To save any confusion it is always nice to add a text label near to the 'port' saying exactly what it is. But I like verbose circuit diagrams... especially like the following...  From the arduino forum. |
||||
| lizby Guru Joined: 17/05/2016 Location: United StatesPosts: 3013 |
LOL. Might as well provide an EagleCad "Air Wire" image. PicoMite, Armmite F4, SensorKits, MMBasic Hardware, Games, etc. on fruitoftheshed |
||||
| Grogster Admin Group Joined: 31/12/2012 Location: New ZealandPosts: 9059 |
LOL from me too!  I love it! Smoke makes things work. When the smoke gets out, it stops! |
||||
