|
|
|
 |
|

|
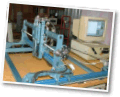
Building my CNC Router
|
Power Supply.
Stepper motors
need a good meaty power supply capable of supplying several amps.
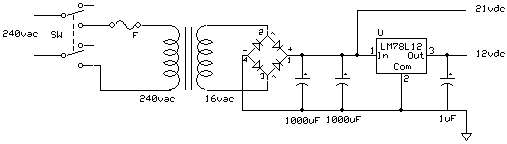
My original supply was a transformer from a discarded UPS. UPS's
are a great source of power supply electronics, they usually contain
a rugged transformer and some heavy duty power mosfets. Although
the transformers in these UPS are designed to run in step up mode
( 12 volts to 330 volts as an example ), they will run the other
way around as a step down transformer. I had a transformer from
a 24v UPS, and when I connected this back to front and fed 240VAC
into the secondary, I had 16VAC on the secondary. After connecting
a full wave rectifier and filter capacitor I ended up with about
22VDC. This power supply could supply several amps and it did work
ok considering it cost very little to make, mostly spare parts from
the jump pile. If I were to build another powersupply based around
a transformer, I would spend the money and buy a good toriod transformer,
they run cooler and are more efficient. You can pick up a new cheap battery charger for under $40, and they come with a transformer capable of up to 5 amps. For safety add a double pole single throw switch ( DPST) and fuse. The capacitors should be rated at twice the output voltage. To work out DC out from AC in, based on a full wave rectifier, you multiply the AC voltage by 1.4 to get the DC voltage, ie 16vac times 1.4 equals 22.4vdc. While my 22vdc supply worked, I knew I needed a higher voltage to get the most out of my stepper motors. The higher the voltage the better, so long as its within the capabilities of the stepper controllers. My stepper controllers had a maximum rated voltage of 24VDC, so I really needed a power supply capable of supplying close to 24VDC at several amps. Unfortunately I didn't have any power transformers in this range, so I looked at another option, PC Power Supplies ( or PS for short ).
AT Modification. Connect a 47ohm 1 watt resistor across the 5VDC output ( Red and Black Wires ). This provides a small load to the power supply to make it operate correctly.
I had a couple of the older AT type PS's, these could supply 8 amps on their 12VDC output. If I connected these two PS's in series, by connecting the yellow wire from the first PS to the black lead of the 2nd PS, I would have 24VDC at 8 amps. But before we get carried away connecing power supplies in series, we need to make one important modification.
|
||||||||||||||||||||||||||||||||||||||||||
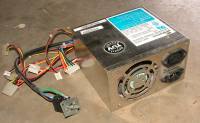 The
humble old PC PS is a great little bugger. They are tough, in that
they can supply lots of amps with short circuit protection, they
have their own cooling fan, and are dirt cheap for what they are.
There are two main types of PC power supply, the AT and ATX. The
older AT supply used a true power switch, the ATX used a power soft-start
provided by the PC's mother board and used a different motherboard
connector. You can use either type for your CNC project, but you
need to make a small modification to fool the PS's into thinking
they are powering a PC.
The
humble old PC PS is a great little bugger. They are tough, in that
they can supply lots of amps with short circuit protection, they
have their own cooling fan, and are dirt cheap for what they are.
There are two main types of PC power supply, the AT and ATX. The
older AT supply used a true power switch, the ATX used a power soft-start
provided by the PC's mother board and used a different motherboard
connector. You can use either type for your CNC project, but you
need to make a small modification to fool the PS's into thinking
they are powering a PC. 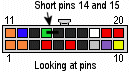 ATX
Modification. As well as the 47ohm resistor across the 5VDC output,
you need to fool the soft start function into turning on the power
supply. To do this, connect pin14 and pin15 together on the mainboard
connector.
ATX
Modification. As well as the 47ohm resistor across the 5VDC output,
you need to fool the soft start function into turning on the power
supply. To do this, connect pin14 and pin15 together on the mainboard
connector.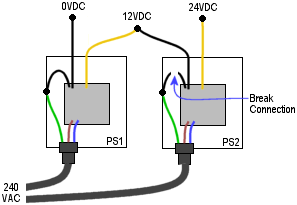 The
0 volts ( black wire ) on these PC PS's is connected the the metal
case, its earthed as it were. This is fine for a single power supply
in a PC, but if we want to connect PS's in series we need to isolate
the metal case from the 0 volt wire. If we dont, and the metal cases
touch, then we will be shorting out one powersupply and it will
shut down ( or may be damaged ). Even if we manage to keep the metal
cases isolated, the 240VAC power lead will still earth out both
cases. Now dont go disconnecting the mains lead earth pin, thats
not only illegal but dangerous. Instead we just need to isolate
the 0 volt lead in the 2nd power supply. The physical connection
is usually under one of the screw that holds the PS circuit board
in place. You could either cut the copper track leading to this
pad, to use a insulated washer under the pad and leave the screw
out. Either way, make sure you test there is no electrical connection
between the black wires and the PS's metal case with an ohm meter
The
0 volts ( black wire ) on these PC PS's is connected the the metal
case, its earthed as it were. This is fine for a single power supply
in a PC, but if we want to connect PS's in series we need to isolate
the metal case from the 0 volt wire. If we dont, and the metal cases
touch, then we will be shorting out one powersupply and it will
shut down ( or may be damaged ). Even if we manage to keep the metal
cases isolated, the 240VAC power lead will still earth out both
cases. Now dont go disconnecting the mains lead earth pin, thats
not only illegal but dangerous. Instead we just need to isolate
the 0 volt lead in the 2nd power supply. The physical connection
is usually under one of the screw that holds the PS circuit board
in place. You could either cut the copper track leading to this
pad, to use a insulated washer under the pad and leave the screw
out. Either way, make sure you test there is no electrical connection
between the black wires and the PS's metal case with an ohm meter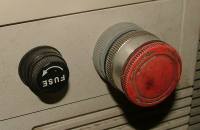 Final
note, the Kill Switch, or E-Stop. Every CNC table should have a
kill switch of some shape or size. Basically, the kill switch is
a easy to access, press to dissconnect switch that will remove all
power from the machine.
Final
note, the Kill Switch, or E-Stop. Every CNC table should have a
kill switch of some shape or size. Basically, the kill switch is
a easy to access, press to dissconnect switch that will remove all
power from the machine.|
|