
|
|
Forum Index : Solar : Off-grid RV solar installation
| Page 1 of 2 |
|||||
| Author | Message | ||||
| BenandAmber Guru Joined: 16/02/2019 Location: United StatesPosts: 961 |
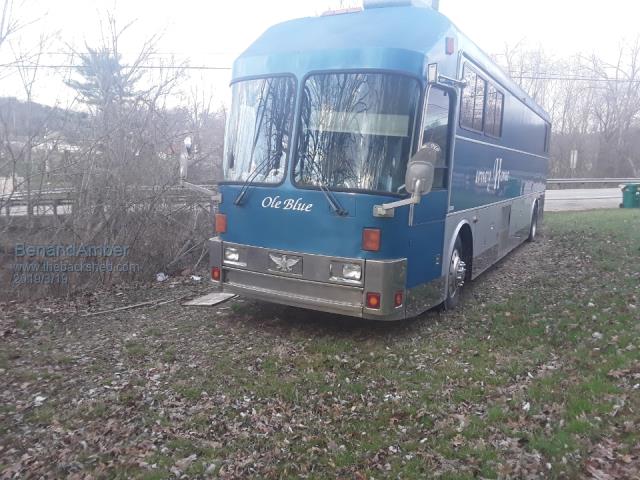 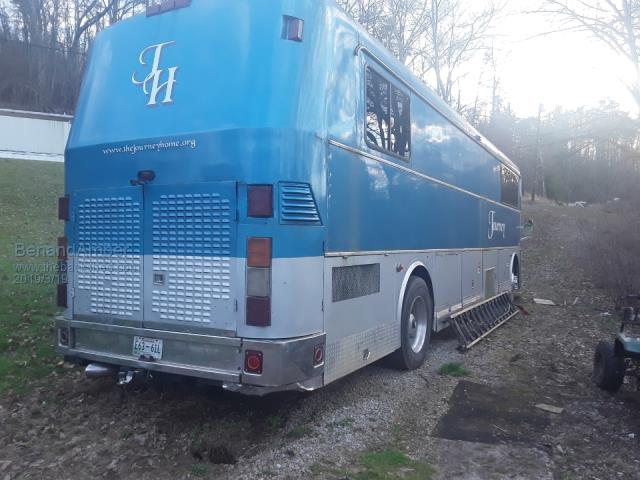 We are putting as many solar panels as we can fit on top this is the reason why we're building a inverter Neither one of us has ever installed solar panels on a bus before or anywhere else we are currently in the process of taking all four roof-top heat and air units off more room for solar the whole top of the bus will be used for solar if anyone close to my location needs them give me a p.m. have all the paperwork for them would really appreciate any advice be warned i am good parrot but Dumber than a box of rocks |
||||
LadyN Guru Joined: 26/01/2019 Location: United StatesPosts: 408 |
If the RV is not going to be driven on a highway, the panels you have should be perfect. Otherwise, you (should) have got the flexible panels (which trade off drag for PV efficiency and life). Do you have strong winds where you are? My dad refused to mount my panels on the top of my shed in the manner I wanted him to because he explained the wind forces to me. The biggest challenge I think would be to keep those heavy panels from denting the roof and the frame. Don't you think? The next challenge would be working around all the stuff on the roof, making space for the panels and making sure it continues to stay water proof You really should blog and vlog this build as a lot of people in the RV community will appreciate it! Truly inspiring work |
||||
| BenandAmber Guru Joined: 16/02/2019 Location: United StatesPosts: 961 |
LadyN these are the same panels that the good morning good morning guy on YouTube used on his school bus conversion I love watching his videos by the way that are really good people We are in the process of taking all four of the rooftop units off we will be exhausting all are exhaust fans out the side of the bus The roof of this bus is not like a regular RV this is the reason why we bought this one this RV is all heavy heavy gauge aluminum you can literally jump up and down anywhere on the roof and there will be absolutely no movement When me and Amber went looking to buy an RV we looked at RVs that were only a year too old They had already had leaks flat roofs and made out of literally toothpicks and a little thin coding of fiberglass or plastic we have children and was scared to death for children to ride in one of these type RVs even though we didn't think we could afford it we decided to get a tour bus and converted into an RV YouTube guy only use to rails 2 bolt his solar panels down and he did have a problem with one of them in the Wind but he fixed it pretty easily I plan on putting at least four rails and plan on maybe riveting all the panels together we know they would be harder to get apart I think the advantages of them all being riveted might outweigh the problems the bus is 40 foot long but the roof tilts down in the front and back that takes away about five foot of roof we are working with 35 1/2 foot long by 8foot 4 inch wide there are giant storage bays across the hole bottom of the bus with plenty of room for batteries inverter charge controller and any other things we may need we thought about taking the roof off my buddys golf cart and putting it in one of the Bays so lots of room is an understatement thanks for your input and advice we appreciate it We were hoping to get some input from everyone on here so maybe we could avoid some of the pitfalls that goes along with installing solar be warned i am good parrot but Dumber than a box of rocks |
||||
| Solar Mike Guru Joined: 08/02/2015 Location: New ZealandPosts: 1204 |
In high wind areas we use 3 rails that the panels bolt to, that's what I would use on your bus, 3 rails bolted to the roof length ways with those flexy rubber mounting blocks with a bolt out of the top. No don't rivet them together, you want to easily replace a panel if it breaks, the standard rail end and mid clamps are more than capable, you want an air gap under the panels for cooling, which you get with the rails. The rails and panels will create a rigid structure, need some flex, that's what the rubber mounts are for. I did my uncles bus a few years ago, never had any issues. Cheers Mike |
||||
| BenandAmber Guru Joined: 16/02/2019 Location: United StatesPosts: 961 |
It is awesome to hear from somebody that's already done this thanks for your advice any other thing you could think of would be great also really appreciate you be warned i am good parrot but Dumber than a box of rocks |
||||
| BenandAmber Guru Joined: 16/02/2019 Location: United StatesPosts: 961 |
My solar panels are 77 inch Long that is 6 foot 5 inches and 39 inches that is 3 ft 3 inch wide 330 Watt vmp 37.4 voc 45.8 9.33 amp maximum system voltage 1500 vdc cell technology poly-Si We were wanting more solar and thought about a awning made out of solar panels that flip down to the side of the bus went on the road if anybody has any ideas on that it would be greatly appreciated also  be warned i am good parrot but Dumber than a box of rocks |
||||
| Boppa Guru Joined: 08/11/2016 Location: AustraliaPosts: 816 |
I had panels on the old Explorer on the roofracks, and on the caravan (nearly 2.5kw total, 500 on the exploder and the rest on the van) They were mounted on ezystruts (having used it extensively in the mining game) with four rails in total down the length, and two cross struts under each set of panels lined up with the mounting holes in the panel frame, all mounted to the structural roof supports on the frame of the caravan (ezystrut is marvelous for this kind of thing- its a grownups mechano set lol, literally hundreds of brackets etc to make anything you want quickly and easily) The four long rails (actually in hindsight it was massively overengineered and I could have used two) were spaced about 4 inches above the roof of the van, this gave the added advantage of having an airspace under the panels to keep them cool, and also dropped the interior temperature in the van markedly (it was originally only so I could open the roof ventilation hatches) One thing I found with both the van and the exploders panels was to put a sloping 'wind deflector' between the panel and the roof if not mounted directly to the bodywork- unless they are flat or slightly nose down on the panels (to the direction of travel) the wind will get under them and they will try to 'take off'- acting like a planes wing, the deflector will stop this The exploder panels actually bent the edges of the panel where the 1" washers were due to this, the panels will handle the wind pressing them down onto the cross struts with no issues, but lifting up, all the force was concentrated on the factory four mounting holes and bent the frame (due to the back of the exploder sitting tail down when heavily loaded and wind blast from a semi going the other way, with both of us doing 100) ETA- you aren't the first to think of that awning idea either ;-) |
||||
| BenandAmber Guru Joined: 16/02/2019 Location: United StatesPosts: 961 |
Yes a deflector sounds great I better do that and any ideas on the awning thanks for your comments by the way be warned i am good parrot but Dumber than a box of rocks |
||||
| Boppa Guru Joined: 08/11/2016 Location: AustraliaPosts: 816 |
This was before the semi incident, afterwards it had a 45 degree checkerplate panel fitted to that front edge between the roof and the leading edge of the panel  |
||||
| Boppa Guru Joined: 08/11/2016 Location: AustraliaPosts: 816 |
I never did it myself, but I saw one that had it done up in NT They had just put a hinged frame (heay duty ball race hinges ,mounted at the top) that folded flat along the side of their caravan when traveling, from just behind the door all the way to the back of the van, stopping just above the wheel arch. Whole frame was in aluminium C channel, and the guy (grey nomad in his sixties or seventies) could still lift it (admittedly with some effort) up until it was flat(ish), two legs hinged at the outer edge (ie bottom when folded up, with the bases of the legs ending up near the roof of the van) simply dropped down as you lifted it by gravity- he had deliberately left the legs a bit 'loose' so they fell down, and if he needed a breather halfway through, it simply sat with the legs half folded and the panels at whatever they happened to be at when he stopped. When he lifted it up, he had a couple of flat plates on the inside of the frame, he would just lift one corner and tuck its leg up so it was sitting on the little plate, then do the same to the other and then lower it down until it was on the vans wall, there were 3 or 4 of those little 'fold over' latches you sometimes see on toolboxes to lock it into place (he put some circlips in for good measure- those dirt roads can shake anything loose) One thing he did do (apparently due to experience) was he had a couple of ratchet straps, which he connected from the outer edge down to the chassis of the van- apparently a willywilly near tore it off and lifted it right up one time He had 8 or so big panels on the van roof and another lot on the 'awning'- he could actually run an aircon during the day in the van- handy in the NT That was manual, for a bigger one like on a bus/rv, you could either use 'tail gate lifter' gas struts to take some of the weight, or use electric linear actuators like some vans use for their landing legs- just push a button and up it goes LOL |
||||
renewableMark Guru Joined: 09/12/2017 Location: AustraliaPosts: 1678 |
I have fitted standard roof panels to my caravan too. The bastard is finding a decent mount point for them. You cant just screw them down on the roof, it had to be mounted to the frame somewhere, and possibly that frame might need to be strengthened as it was no way in hell ever designed to have that pulling/lifting force placed on it. Read up on the standards for solar mounting in your country. Here is a bit of info for reference. here here this one is about tracking frames, but shows the devastating effects when the wind just tips the mounts past their breaking point. Cheers Caveman Mark Off grid eastern Melb |
||||
| Boppa Guru Joined: 08/11/2016 Location: AustraliaPosts: 816 |
I thought about clamps, but as I was doing a lot of dirt road hauling, and I know from experience that EVERYTHING rattles loose (I lost a spare tyre off the back one time- the bolts holding the rack were still firmly bolted to the rear step- shame the entire rear step had come loose and fallen off (complete with my number plate!) Nice guys some country cops, a copper pulled me over and asked me if I had lost something on the road from Cloncurry- looked at him with a 'huh what???' look, he walks around to the back of his 4wd and pulls out my bumperbar, and spare tyre LOL I went with angle on the ute, bolted the panels to that with 1" washers and nylocks, then bolted another bit under the roofracks so they were 'sandwiched between them Because the roofracks didnt go far enough forward and I was worried about the front lifting, the front edge of the angle was bolted to the roof with tube extensions (hey it was a 20 year old 4x4, I wasn't worried about drilling holes in it LOL)- if you look closely at the photo above you can see those mounts (literally being a piece of tube, with large washers top and bottom with rubber sandwiched between the roof and the washers) The panels had reinforced holes in them (not reinforced enough as it turns out) and I put large washers under the nylock nuts to spread the load further just in case The van I went with the ezystruts as they are mega strong, and if you need a weird bracket to make something fit- it's almost guaranteed they will have it in their range... The frame on the roof was basically made to be self supporting, and to make sure it could handle it, I ran struts down the walls outside the van and bolted the entire thing to the chassis beams, plus bolted the uprights to wall beams- probably overkill but not only the panels but the entire van survived a cyclone near Mackay that many other vans, including the one right next to mine, didn't- I suspect the framework actually helped the walls of the van stand up to it- A 1970's aluminium framed Viscount was't the strongest beast around from the factory....  That was during the rebuild, new paint, new interior, 'new' secondhand windows (I ended up painting them all black as some had white frames, some painted grey, some natural aluminum and some black- and some were literally bits of all as I mixed and matched to get functional opening windows, the exploders new bullbar (not fitted until after that first shot of the exploder) lying on the ground next to it |
||||
| BenandAmber Guru Joined: 16/02/2019 Location: United StatesPosts: 961 |
That is so cool they just don't make them like they used to even the styling of them are much better on the older ones it might be a lot of hard work to fix them back up But they are so much better than the new ones be warned i am good parrot but Dumber than a box of rocks |
||||
| Boppa Guru Joined: 08/11/2016 Location: AustraliaPosts: 816 |
Actually one thing that you should fit (I have two on the back of the van) is a reversing camera- it makes reversing much easier and safer- definitely safer!!! I fitted two because I regularly actually overtook people with the old explorer LOL, so I had one on the right top looking sideways towards the left lane (we drive on the left here, so it the states it would look to the right hand lane obviously)- this was so I could see I was actually clear of the other vehicle before pulling back in... The other one was in the center at the very top so I could see the entire width of the back of the van from the top, from corner to corner- this has a safety factor in caravan parks when reversing so that you could see no kids etc in the path, also with the length of the van, it swung the tail sideways as you turned and you don't want to clip the van or annex next to you!- you can also stop before hitting the van behind you or the power pole or tap stand On the road it was also handy if you were parallel parked as you can safely reverse back so you can park or leave without risking hitting the car behind Many reversing monitors have two video inputs, selected by pressing a button (on mine its one of four on the back unfortunately- so it now has a liquid paper line level with that button on the face of it) |
||||
| BenandAmber Guru Joined: 16/02/2019 Location: United StatesPosts: 961 |
is a really good idea I just told the wife about that and that's a must do thank you so much for the info be warned i am good parrot but Dumber than a box of rocks |
||||
| Warpspeed Guru Joined: 09/08/2007 Location: AustraliaPosts: 4406 |
I had the unfortunate experience of reversing out of a parking spot at the local supermarket. Some dumb child had propped is small bike against the rear of my car, and from the drivers seat it was not visible. No real damage, but you just cannot be too careful. Cheers, �Tony. |
||||
| Boppa Guru Joined: 08/11/2016 Location: AustraliaPosts: 816 |
One of the parks I was in had a kid run over by a caravan backing in, he was never visible from the car and knocked down, luckily with no injuries I have been a big fan of cameras for decades, I put a DSE one on my old truck after backing into a buzzbox that had decided to try and 'steal' the parking spot I was backing into (that camera system was that old it used a crt black and white about 6" monitor in the cab, although I bought it new), unfortunately I was looking in the passengers side mirror to make sure the pantech was clear of the shop awnings, and by the time I looked in the RHS mirror, she was literally out of sight behind the pantech... Checkerplate rear step meets plastic grill... guess who won??? Luckily I was right outside a 'footpath dining area' and the whole lot had seen it, so I had plenty of witnesses, she tried to sue me but lost LOL) This is similar but not the same as the 5" monitor I had to fit under the dash, no flat easily mounted lcd's back then, plus mine was black and white, and a composite monitor, not a tv as well- but same size and a very similar case  |
||||
| BenandAmber Guru Joined: 16/02/2019 Location: United StatesPosts: 961 |
Wow that's pretty cool I didn't even know they had them back then I am 100% definitely going to put several cameras all around the RV I already purchased a stereo with a 10 inch screen that has a camera input it also turns the camera on when u put it in reverse I will have to figure out how to hook several more cameras up or go with something different it also has an video out for a bigger screen if I can figure out a way to input four or six cameras split screen so I can see all the cameras at one time that would be scary kid getting ran over even though it might not have been the person's fault they would have had to live with that the rest of their life plus get sued for the rest of their life for something that wasn't their fault I will not be driving yet till the cameras are up and running and I'm going to try to get every square inch visible At my old job years ago a guy backed over a Ford F-150 and didn't even realize he had done it said he didn't even feel a bump he was driving a 797 Rock truck fully loaded with a big cat head on top of it be warned i am good parrot but Dumber than a box of rocks |
||||
| Boppa Guru Joined: 08/11/2016 Location: AustraliaPosts: 816 |
If you want to use multiple cameras split screen you need a multiplexer, or an alternative is to buy a multichannel home security video system (which has the advantage of you can use it as a security system when you are away from the RV!) Many are 12vdc powered and can be set up to display one, some or all to a video outlet, and even have motion sensing and email alerts if you have a mobile cellular dongle on board the RV Say you use one like this (this is the actual model I have in the house)  and have the reverse cameras on 1 plus 2, and 'security' cameras on 3-8 (say one on each corner looking down each side and one on the entry door to the rv). You would output the composite video out of the DVR to your stereos video in, and could easily have just one camera, two, 4 or all 8 appear on its screen and/or use a seperate monitor and use the HDMI output to it- or both at the same time... You could also hook one output to your tv in the RV and see who is knocking on the door just by using the tv remote to switch to the camera lol, I have this set up as well- as a video 'peephole' with a small reversing camera monitor, which can be viewed from the shed or the front door Leave ch1 and ch2 up on the dvr screen and whenever your stereo selects the 'reverse camera' position (usually done by a wire from the stereo to the reverse light circuit) it will bring the 1 + 2 camera view up on the stereos display Bonus, you now have all round security cameras monitoring the RV for breakins/ vandalism which on most models can be set up for selectable area motion sensing (basically you have a 'grid' on each camera view that you can select it to trigger or ignore any movement/changes in that specific part of the grid, and it doesnt have to be on the display screen to be active either) and use it to trigger an alarm siren, external lights or take a 'photo' and either store it locally on a thumb drive (helpful hint- dont leave the thumbdrive directly in the back of the DVR, put it on an extension cable and have it away from the DVR (mines in the roof LOL), that way if a crook looks for and steals the DVR to hide their identity, they will unplug all the cables and take the DVR, leaving behind the thumbdrive with their pictures on it LOL) or email it to an account every time it is triggered and you have cell phone access Rather than buying a 'house security package' I would for an RV just buy the dvr (under a hundred) and use the typical 'illuminated reverse cameras', they are much cheaper than home security cameras and do just as good a job imho (do get high res ones though, as in both home security and reverse cameras there are a range of resolutions available, and cost isn't always a guarantee of high resolution) Some more ideas to you to ponder on  |
||||
| Boppa Guru Joined: 08/11/2016 Location: AustraliaPosts: 816 |
As an example  With the camera at the 'point of the triangle and looking towards the base (this would be for an Australian RV with the entry door in blue on the left and the front up the top, reverse left to right for US) ch1 is reversing ch2 is overtaking ch3 is lane monitor farside, door monitor ch4 is lane monitor nearside ch5 is windscreen breakin/ security ch6 is security leaving two spares for extra monitoring, either more externals or internals This gives 360 degree external coverage on the RV plus a reversing camera, all selectable viewing as either one or more on the monitor(s) Actually I personally would put 7 as a mirror of 6 and 8 as a mirror of 5 Sorry about the size of the pic, turned out a little larger than I expected |
||||
| Page 1 of 2 |
|||||
| The Back Shed's forum code is written, and hosted, in Australia. | © JAQ Software 2026 |
