
|
|
Forum Index : Solar : Two stage solar heater
| Page 1 of 2 |
|||||
| Author | Message | ||||
| Murphy's friend Guru Joined: 04/10/2019 Location: AustraliaPosts: 674 |
Inspired by Rogers solar heater experiments and Davo's recovery of trapped heat behind solar panel idea I decided to combine the two. Stage one, recovering heat behind the solar panel is now finished and I started testing it, results below. Stage two, a solar hot box with black tube collectors, is still in the building phase. To get as much heat as possible from behind a 175W solar panel I made a alu foil lined Back panel that incorporated air deflectors to maximise the time the air travels from the inlet to the blower's suction side. 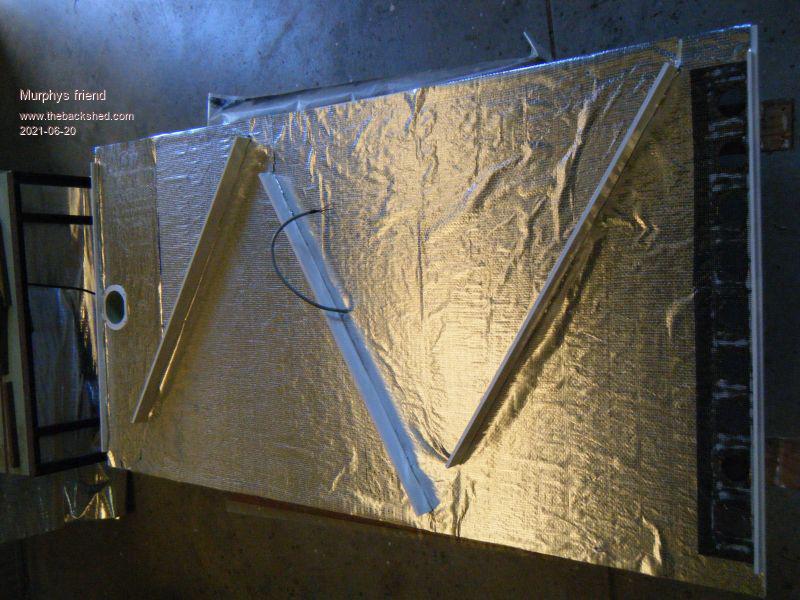 The inlet holes on the left are covered with plastic mesh to keep those pesky spiders out.. These holes are on the panel's bottom back side when installed. The blower (12V bilge blower) outlet is shown on the left side of the picture. The blower speed is solar controlled, not thermostatically. Since this contraption harvests solar heat and that heat depends on solar light the fan speed also adjusts to that light. I separated the 3 strings of the nom. 24V panel and select panel output voltages to have the fan motor running at no more than 12V at any time. The panel back wiring:  And the little relay box: 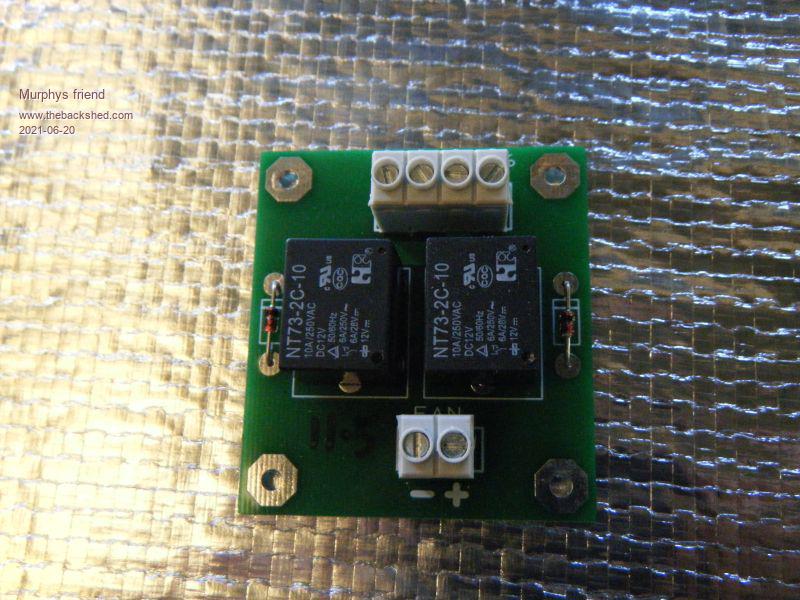 At this early stage of testing this method worked well, I just hope by the time the blower output is routed through the solar hot box this noise diminishes to a level the neighbor can hardly hear. The panel was located in a sheltered, north facing, position on this winter day in Perth, there was near no wind but high cloud came across from time to time.  After the solar panel had warmed up (experiment started at 1PM) the max outlet temperature was around 8 degrees higher than the temperature at the panels back near the inlet holes. 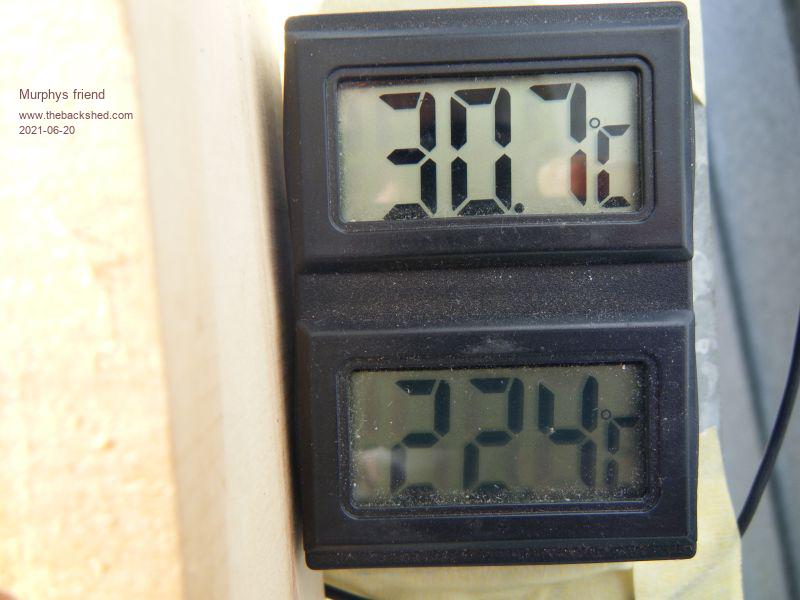 So in full sun a worthwhile heat harvest but even in light cloud cover about 5 degrees more out than flowed into the panel's intake holes. We shall see by how much that gets boosted by the hot box when its ready for testing. |
||||
| Davo99 Guru Joined: 03/06/2019 Location: AustraliaPosts: 1585 |
Very Impressive and lots of good design you have incorporated there. I'm not sure making the air travel farther is as beneficial as making it tumble and breaking up the boundary layer but I think your deflectors will do that as well. Is your stand adjustable for tilt? While Tilt angle does not seem to make a Lot of difference to electrical generation, I noticed the other day with mine it seems to make some noticeable difference to the heat of the panel. Where my heater is set up is right beside a Ground mount array. I had the heater sitting pretty straight leaning on a chair while the ground mounts are all close to 60o. A wire became disconnected on the heater panel so there was no fan and I noticed even with the backing on it, the ground mounts were still noticeably hotter to touch. I was pretty surprised by this, they are the self same panels from the same batch so no difference in them. I didn't check with a temp gun or the output air temp straight and angled but there was well and truly enough difference to notice by feel. It may be worth shooting some numbers and seeing if you see the same thing. The idea of splitting the cells in the panel is smart. I'm using a new panel I will want to put to grid tie use so haven't done that, not that it even occurred in the first place. A 175W panel from fading memory is pretty close to a meter sq so that will give a good and easy to calculate power output figure. Are you planning to use the panel power for anything bar the blower or turn it into extra heat? What sort of bilge Blower you have? I want to get a bigger one than I have but until the bearings went on it, the thing was virtually silent. Certainly nothing the neighbour would hear and it's not much more than a driveway width off the border. Will be extremely interesting to see your Comparison with the tube collector. If possible it would be great to see without the transparent cover and compare to the panel. I can well see where having a cover would make a difference to the heat output of a panel too but not really cost effective and practical for my large scale Idea. Enclosed I think they would be possibly better than a tube collector if the tubes were spaced because there would be a loss of collector area there but may be other factors in play. Look forward to seeing your ongoing developments! |
||||
| Murphy's friend Guru Joined: 04/10/2019 Location: AustraliaPosts: 674 |
Hi Davo, I don't know how to do your fancy quote question and answer posts so I just reply ordinarily  . .This panel will be mounted vertically against a north facing wall (on top of my flat roof garage that abuts the house). The blower fan is that one. I bought it many years ago to supply air to a smithy's furnace which is no longer used. The solar panel will only supply a little heat and power the fan. Its a reject from my rooftop string as it has a voltage leak to the frame at high voltage - its fine for 12V. The noise it makes is from the air rushing out, not the bearings. I can't hear it at low speed (cloudy). This solar panel bolts on the side of the 'hot box' (stage 2 of the project) which is also mounted vertically against the same wall. |
||||
| Murphy's friend Guru Joined: 04/10/2019 Location: AustraliaPosts: 674 |
Sorry, can't make that hyperlink to work. I'll try again Fan . If that does not work look in the withworths Marine e catalogue for "bilge blowers", its the inline one TMC brand, third from left I think it was. |
||||
| Davo99 Guru Joined: 03/06/2019 Location: AustraliaPosts: 1585 |
Didn't work but I made it work. :0) I was looking at this one also from Whitworths but I haven't checked out fleabay yet. Least the TMC's you have an idea they are somewhat accurate in their specs. Fleabay bay sellers will tell you something blows at 500 MPH and 1000 Cuft second and runs on 2x AA batteries for 6 Months non stop. Are you looking to push the air though much Ducting? I have found that the fan type blowers don't tend to generate much pressure. Fine for an in and out type thing but air going down a pipe ( or worse still, corrugated Ducting) tend to have resistance and Friction which kills the flow badly . In my experience, the centrifugal Blowers tend to do a Much better job of creating air pressure as well as flow. Volkswagen Kombi's had a similar style Blower which worked great but of course hard to get and stupid price when you can now. Not quite following how you are going to do the panel with the tube heater so I'll wait for the pics of that so the penny can drop. For things you want to quote, You can use the "" Button above the text box but I just hard code and put at the beginning and end respectively of what I want to refer to and then my reply after that. |
||||
| Murphy's friend Guru Joined: 04/10/2019 Location: AustraliaPosts: 674 |
For my build an inline blower is much easier to install than a centrifugal one - you will see why in a future pic of this contraption. But its not impossible to install a plan B blower like you suggest, prefer to use what I already have first. The inline blower has a 90mm drain pipe inlet and I use 80mm PVC tubing for the outlet to the hot box intake manifold. The hot box outlet is a short piece of 150mm PVC into about 3.5m of alu flex ducting so there is not much restriction for the airflow to the outlet in the ceiling. Its a straight run and just one turn down to the grille outlet. I am quite sure there will be no problem with the air being forced through 16 parallel 50mm alu tubes in the hot box. They are nothing like the super efficient but small bore evacuated glass tubes Roger uses. The lot is going to be air tight, no leaks to ruin air pressure. |
||||
| Warpspeed Guru Joined: 09/08/2007 Location: AustraliaPosts: 4406 |
Well if it works well on the shortest day of the year, it must be a pretty good thing. Cheers, ĀTony. |
||||
| Murphy's friend Guru Joined: 04/10/2019 Location: AustraliaPosts: 674 |
Thanks Tony, it worked even better today  . .A cold winter day here in Perth but full sunshine. The panel had an intake/ output air temperature difference of 12 degrees from midday to 3PM. This is possibly as good as can be got with this design, definitely worthwhile for pre heating the air for stage 2. |
||||
| Davo99 Guru Joined: 03/06/2019 Location: AustraliaPosts: 1585 |
Ahhh! Is that how you are going to set it up? Very clever! Been dull but not too cold here today and the last couple. Supposed to get some decent rain tomorrow and next week. I think I'll put in a Micro hydro Turbine instead of a solar heater. If I lived further down the road where the properties back or side onto the Creek, I definitely would have an MH setup. You wouldn't get power often but when you did you could get 50Kw without thinking about it the way that creek rages. |
||||
| Murphy's friend Guru Joined: 04/10/2019 Location: AustraliaPosts: 674 |
Well, you gave me the idea so you are the clever one Gotta need a solar panel to run the blower so why not use it to pre heat the air  |
||||
| Murphy's friend Guru Joined: 04/10/2019 Location: AustraliaPosts: 674 |
Its been a while but at last stage two of this solar heater is now finished. Actually, it was finished some time ago but I have been procrastinating about how to get this thing up on my garage roof . Today was the day for that job, see below how it was done.But first my build continues... Here is a view of the intake (on top) and output (below) manifolds. The picture was taken from the top side of the heater box. 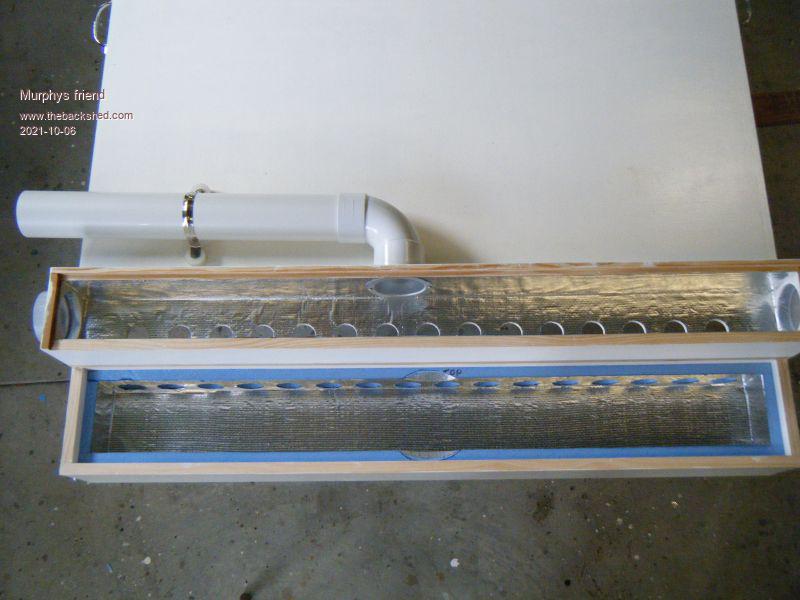 Next is the heater box lined with foam. 30mm at the back and 20 mm on the sides. 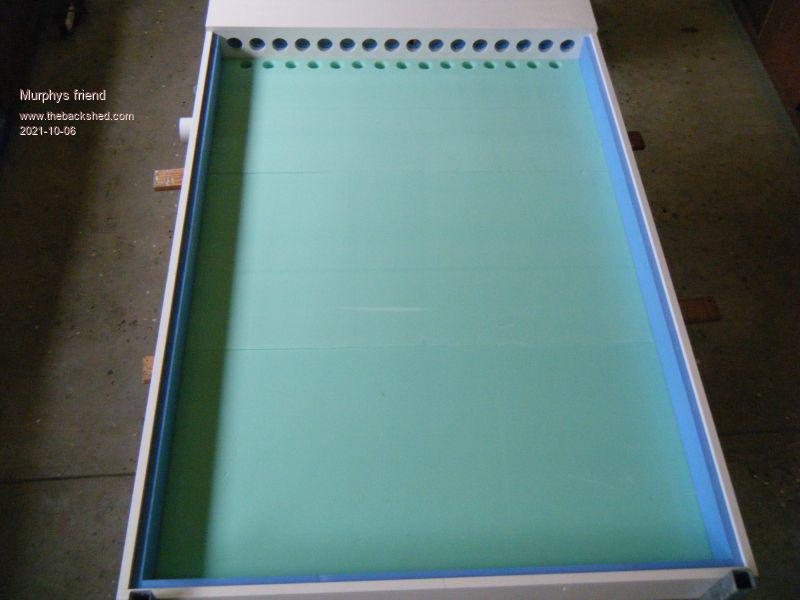 This was covered with sarking, silver side up. 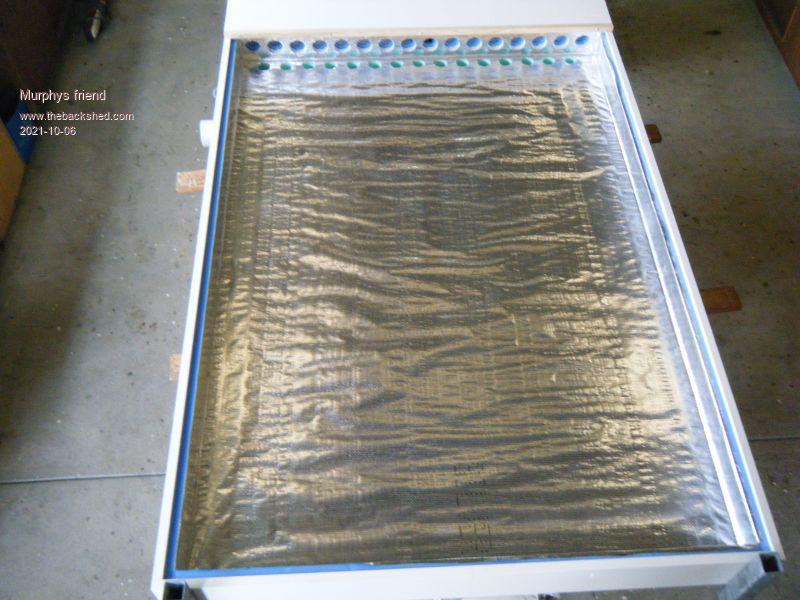 On top of that a layer of colorbond mini orb sheeting, painted black, to act as a thermal mass in the box. 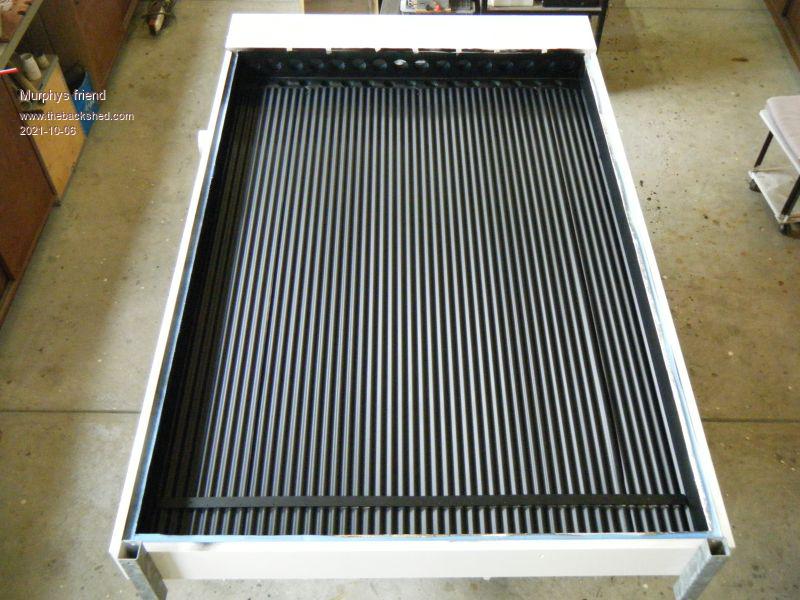 Then came the 16 anodised alu tubes (50mm dia.), these have twisted strips inserted to get some air swirling motion. 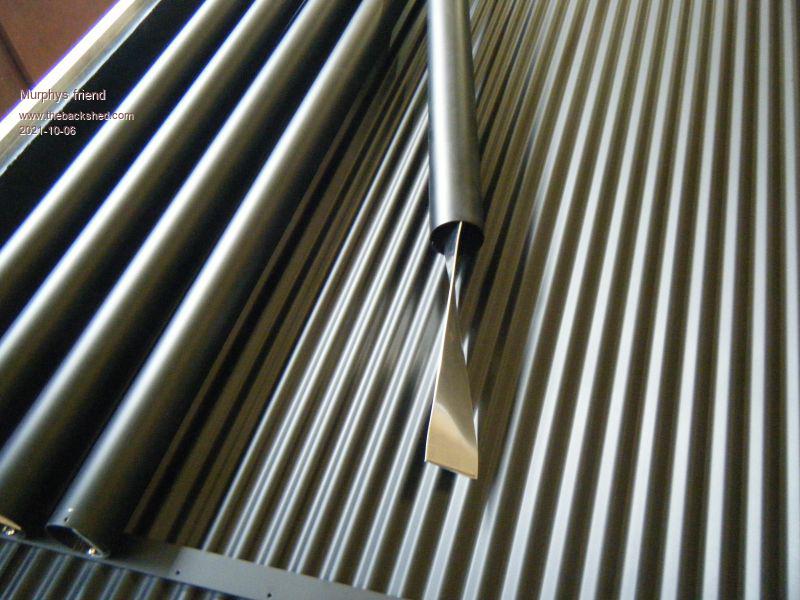 Full complement of tubes are in the box. 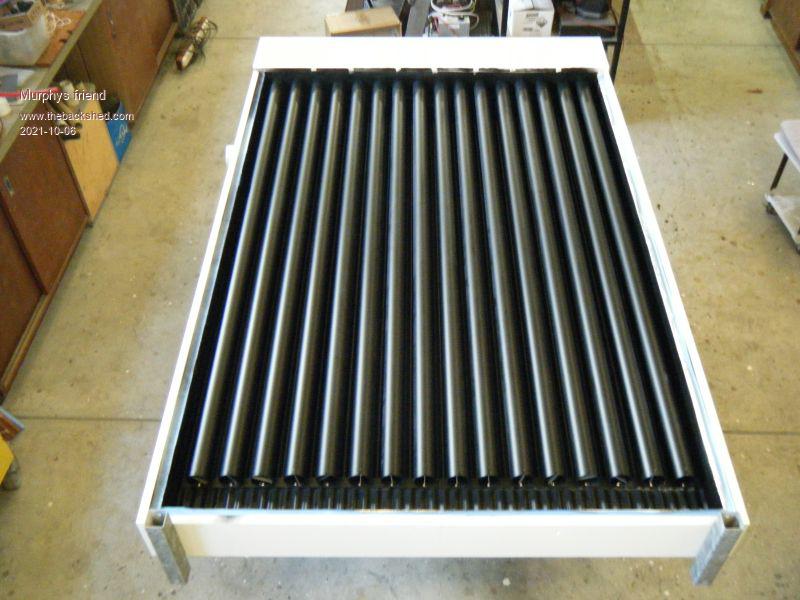 Here is how I got this onto the roof, the box stands 2m tall and weighs 60kg and is a *very* awkward shape to handle. 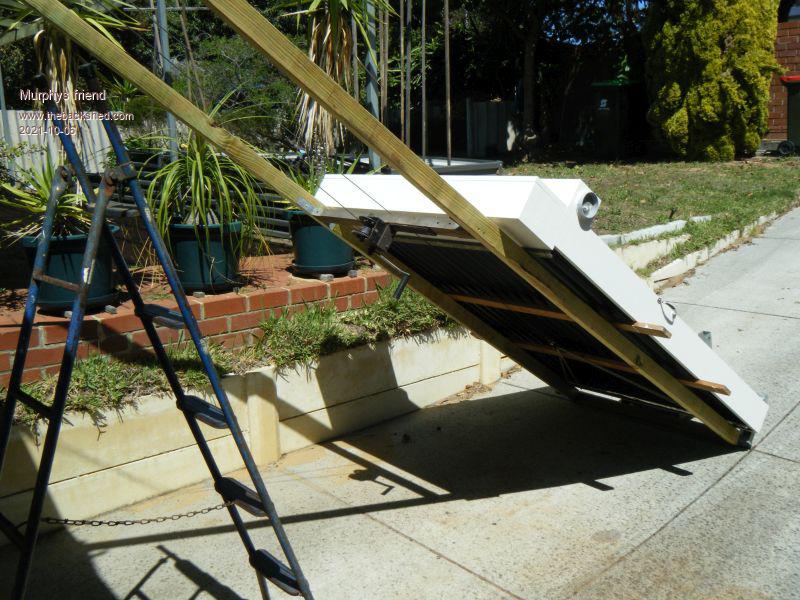 Almost up there. 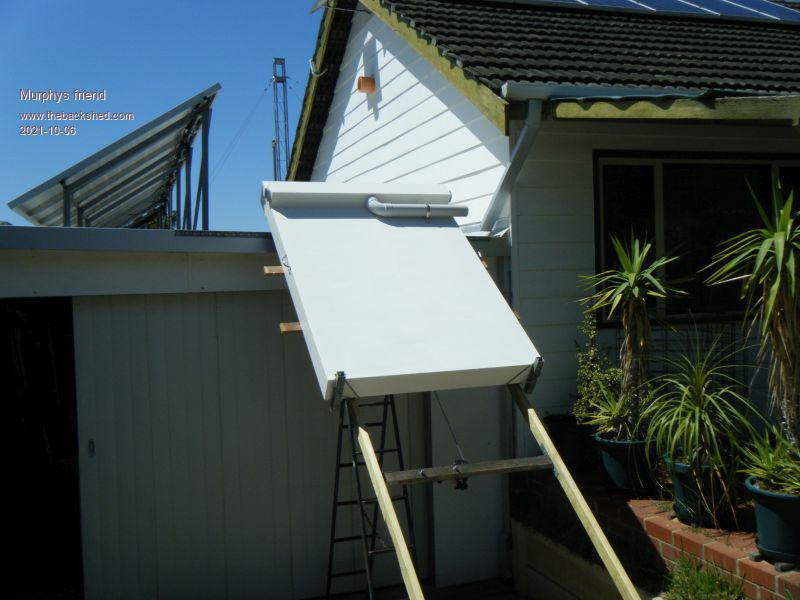 Another view of the lifting ramp. 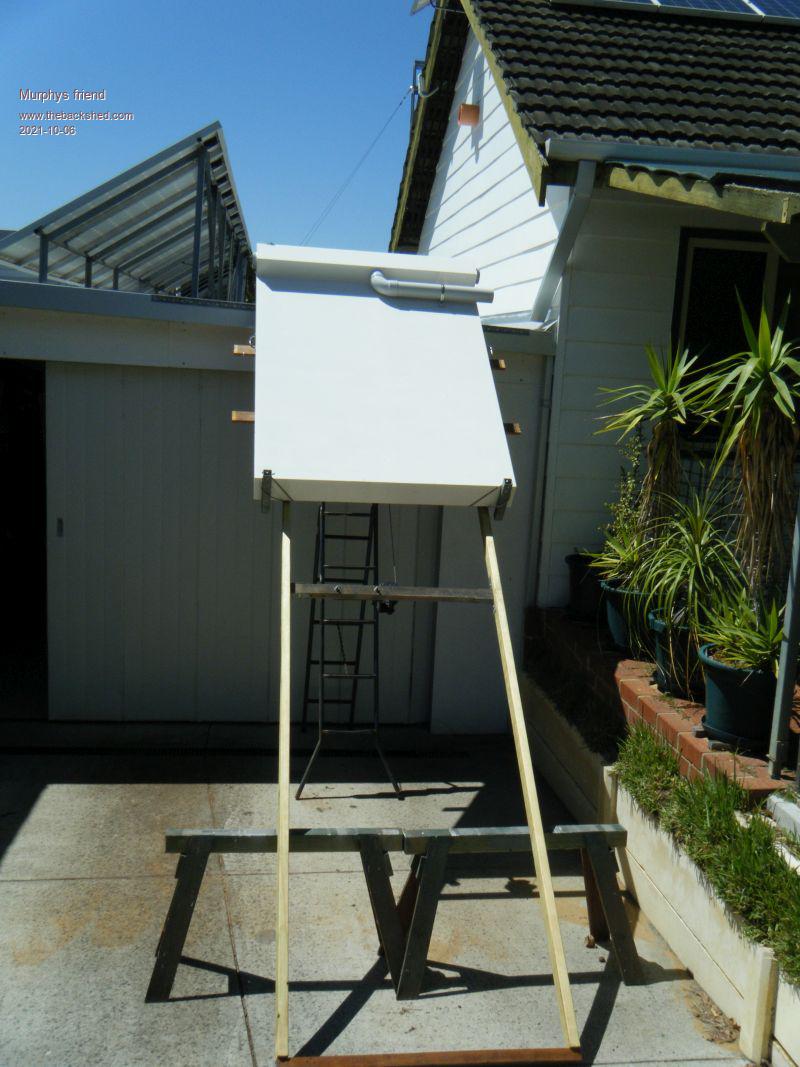 Stage 1 and 2 mounted in situ against the north facing house wall. 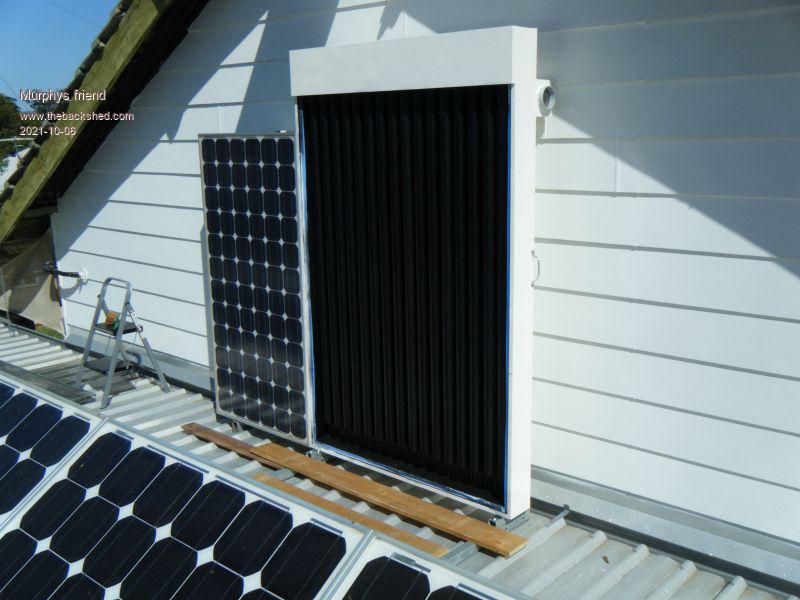 And now with the double glazed cover in position.  I used 2 x 4mm glass sheets, separated by this sealing strip. The gap is about 3mm, the edgres are sealed with gaffa tape before siliconed into the heater box. 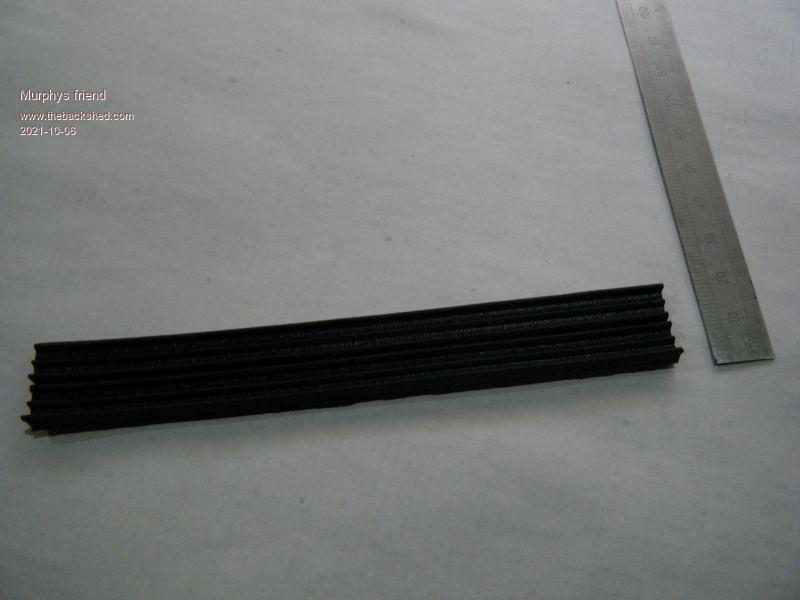 Finally, a view of the back side of the heater. 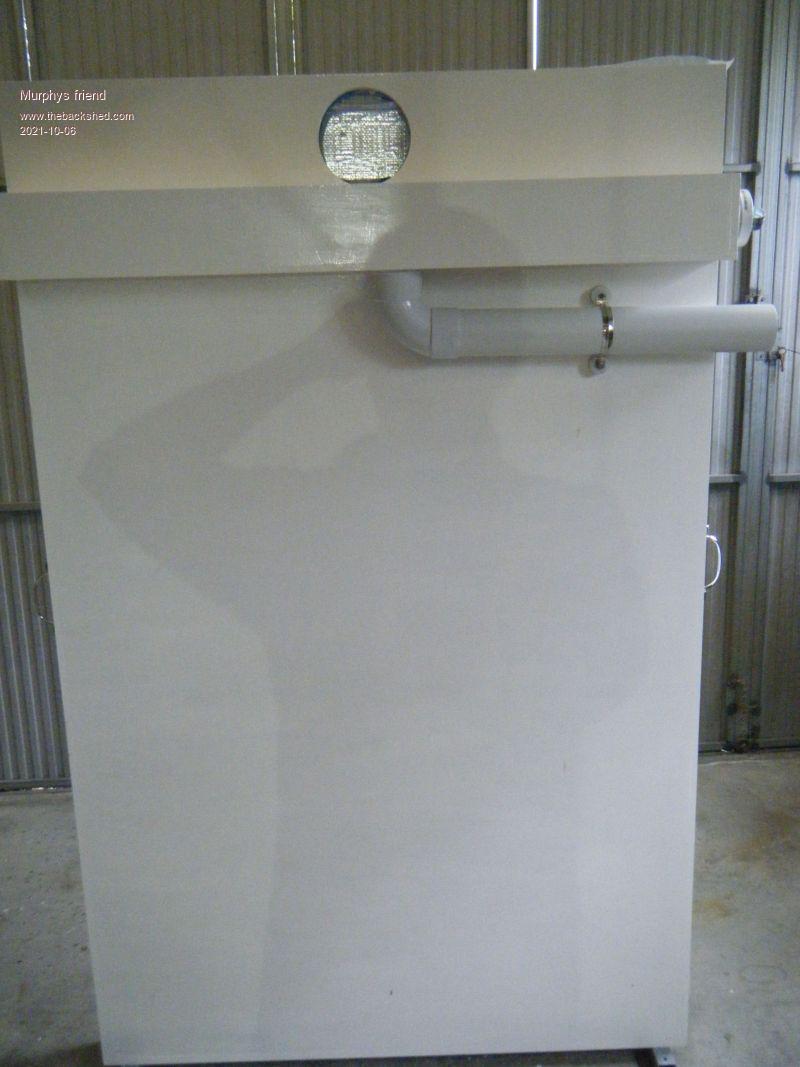 There is no ducting to any room in place as yet, plenty of time before the next Winter cold requires that . I will post some temperatures tomorrow from a sensor in the outled opening and one behind the box in the shade. It was too late for that today. |
||||
| Davo99 Guru Joined: 03/06/2019 Location: AustraliaPosts: 1585 |
Impressive. You have certainly employed every method of efficiency that's for sure. Construction looks top class and don't look like you have missed a trick with it. This thing should give very good heat output for it's area. I was wondering about tilted Vs straight up but then remembered with panels it makes about 2/10ths difference of bugger all so that's probably the more practical and more presentable way of doing it. Will look like it's just a door on that wall but I get the impression it's behind the tilt panel array so probably partially hidden from the ground anyhow. It will be very interesting to see how your and Rogers heaters perform next winter. Should put a dent in your heating Bills but most of all give a lot of satisfaction from the projects and a lot of contentment in having some self sufficiency. Will give a talking point with people and either put you in the genius or nutter category with them. I'm always the nutter.... |
||||
| Murphy's friend Guru Joined: 04/10/2019 Location: AustraliaPosts: 674 |
Thanks Davo. That box performs even better than I hoped. Today at about 8AM I heard the fan starting up as the sun had hit the solar panel by then. At 10AM I climbed up and checked the thermometers, 21 degrees air in and 43 degrees air out. The heater is located in a rather sheltered position so the intake air was around 2-3 degrees warmer than that near ground level. At noon I checked again, 23 degrees air in and 47 degrees air out. The fan running flat out all the time. That double glazing pays off, the outer glass sheet is barely warmer than ambient to the touch. Solar panel area is about 1 sq meter and the double glass surface 2 sq meter (1.96 ).Tomorrow the ducting to ceiling outlet will go in, its about 3 meters from the heater, smooth ducting and only one bend down to the outlet. |
||||
| Davo99 Guru Joined: 03/06/2019 Location: AustraliaPosts: 1585 |
Great Result! I have a builder friend coming next week to look at moving a Verandah and installing a New one. I'm going to ask him about the panel covered idea in the area we want to put a new Verandah. I can already see some issues, The roof height of the house isn't much to start with and ducting the air in under the eaves is also going to be problematic as they are neither wide nor Deep. I think the idea is creditable as you have shown but I don't think I have the right circumstance for it. None the less.... also possible on the extension verandah we want but getting the air in will still be the trick. If it don't work at least I'll have another 20 panels worth of area I can use for winter power generation. be nice to have them making heat as well but power is easier to route than Ducting. Water would be too but not in the dual purpose Idea. Quick lookup of your location ( Perth was it?) shows that you should be getting 4 Kwh a day Sq/m for a 90o north facing panel. 12Kwh day, call it maybe 10 for losses. That's pretty damn good! Certainly enough to keep a room very cosy. May not be enough to heat the place but it's 900Kwh over the winter of power you are saving in heating costs and that's significant for sure. The best heat kicks in early and as the Spring comes the heat falls off so less to worry about with the thing getting hot and pushing in any reject heat. Couple more of those and you'd be doing real well with your heating over winter. |
||||
| Warpspeed Guru Joined: 09/08/2007 Location: AustraliaPosts: 4406 |
I forgot to hit the notification button, and missed this. You have put a lot of thought into this Klaus, and that really shows. Excellent workmanship too (as usual). I will be watching this with very great interest. Cheers, ĀTony. |
||||
| Murphy's friend Guru Joined: 04/10/2019 Location: AustraliaPosts: 674 |
Thanks guys. I installed the ducting today, 2.5m of semi rigid 150mm diameter (this is supposed to pull out to 3m but I gave up trying to pull it more while standing on the rafters under my roof), then I added another 1.5m of that very flexible 150mm ducting. Only two 45 degree bends were required to the ceiling outlet. Well, this thing still amazes me, standing under the outlet (2.7m ceiling)I can feel a warm and comfortable breeze, much like that from my split A/C in the lounge room. The noise is similar, faint hum, not annoying. The bilge blower fan makes the same noise outside than the split A/C makes, I can hear it (and my neighbour ) but as it only runs while the sun shines there should be no problem.The fan starts up around 8AM and quits around 4PM with it going flat out from 9AM to 3PM. The roof space ducting does get warm, it will require insulation added before next Winter. Luckily there is only 100mm of it outside the house and I have insulated that already. The eagle eyed of you may have spotted my Summer arrangement, one does NOT want to heat a house in Summer in Perth. The intake manifold has a screened 90mm opening at each end and all I need to do is to switch off the fan and remove the caps on the openings. That opens the top of the box to the outside and all the hot air trapped behind the double glazing can escape easily through 15 x 40mm holes into the manifold and from there to the two 90mm openings. The interesting part (theory at this stage) is that the hot air exiting the box on top would suck in air through the 16 alu tubes to replace the outgoing air. Now, the alu tubes can only suck air from the ceiling grille in the house. If I'm right I would be getting rid of hot summer air at the ceiling purely by convection as the fan is off. Time will tell... I placed my Elitech temperature logger on a support that is at top door frame level and about 750 mm from the ceiling grille. I will see tomorrow evening what a full day's graph looks like. Davo, I won't be building any more of these heaters, one was fun enough to prove a point to myself. Besides, I have no room to install another and its not exactly a cheap build (the way I do things). Those heaters seen on youtube video's, using 100's of beer cans stuck end to end and all in a box covered with flimsy cling wrap is really a waste of effort IMO. |
||||
| Davo99 Guru Joined: 03/06/2019 Location: AustraliaPosts: 1585 |
I look at these things a bit, different types of heaters and cooling and even to the Amateur eye, they all have a LOT of flaws in the design. As I said, I think you covered ALL the bases with this. I see no weak points or opportunities for thermal loss. The double glazing in itself illustrates the lengths you have gone to in order to get Max efficiency. Every surface is insulated and every effort to make and keep gain has been made. I can well see why this would not be cheap or quick to build but I'm sure it's worth at least several of the beer can and other designs. The idea I had with the panels is very lossy but the heat is a secondary not primary goal to me and the position I have to place them is not optimal either so trying to make it something it will never be is pointless. If I were seeking max heat output I think your design would be well worth using as a template. Far as I can see you have thought of and addressed every angle. If there is anything you have missed I am pretty sure it would make no practical difference anyway. It's satisfying to see something like this instead of something you can look at and see gaping holes in the idea straight off. I was thinking of the summer period and was wondering if the thing could thermo Syphon and pull air out of the upper space by either venturi effect. I was trying to do the mental arithmetic but wasn't sure either way. Also wondered if it would be worth reversing the fan. That would have to be Physical however because those things are maybe 10% of their output run the opposite direction. 5th thought as usual was one would have to be careful about introducing potential hot air from outside to the lower level when attempting to get rid of it at the upper level where no one may be until well after dark anyway. You have done a great job mate no doubt and I'm sure it will prove to be quite effective. |
||||
| Murphy's friend Guru Joined: 04/10/2019 Location: AustraliaPosts: 674 |
Thanks for your thoughts and kind words Davo. I built this device to be solely solar operated with no input from myself or any thermostatic control other than opening the vents during summer and switching off the fan. So no plans to run the fan after sunshine hours. The thermo siphoning idea came to me during the build and is also a reason why the solar collector is vertical (space limits were the other reason). If it does not work no big deal, it was an interesting thought to ponder. One thing I learned about home made double glazing is, the panel ends up being *very* heavy. Mine weigh in around 50kg, its the only task I got my mate to help with when installing it on the roof - its just too fragile to accidentally drop it  . .Also, anybody trying to make something like that, do clean the inside glass surfaces before sealing them together. I assembled it at the glazier's premises on his nice big carpeted table top where it was not easy to see the dust on the glass. Carrying that lot home on a special board on my car's roof rack was fun too... |
||||
| Davo99 Guru Joined: 03/06/2019 Location: AustraliaPosts: 1585 |
I learnt that Framing Pictures. Even when the glass was wrapped fresh from the factory it always had a scum/ haze on it. If the light hit it sideways looked like there was grease proof paper under there. You would never find a commercially made unit this good. It would be unviable just on shipping weight. I was looking at a heater of this type some time back on the net designed by a university. Had an interview with a professor going on about it. Had no insulation on the back or sides and they thought that thing was wonderful. Should do " Plans" for this one and sell them on the net. Many other people are doing that for far lesser designs. Will be interesting to see what this does over winter. |
||||
| Warpspeed Guru Joined: 09/08/2007 Location: AustraliaPosts: 4406 |
Now that the days are rapidly becoming longer, and the weather warmer, manual operation with a solar powered blower is arguably quite sufficient. Its in really marginal cloudy weather you will benefit most from having some automatic "smarts" to do the on/off blower control to get the most from the system. Building your own differential temperature controller would only require two thermistors and an op amp plus a relay. Or just buy a commercial unit as Roger did. Cheers, ĀTony. |
||||
| Page 1 of 2 |
|||||
| The Back Shed's forum code is written, and hosted, in Australia. | © JAQ Software 2026 |
