
|
|
Forum Index : Other Stuff : Proof of concept, DRO, not windmill
| Author | Message | ||||
| KiwiJohn Guru Joined: 01/12/2005 Location: New ZealandPosts: 691 |
Seeing as so many BackShedders have lathes and are open to innovation. I have just tested a concept for a poor man's DRO! 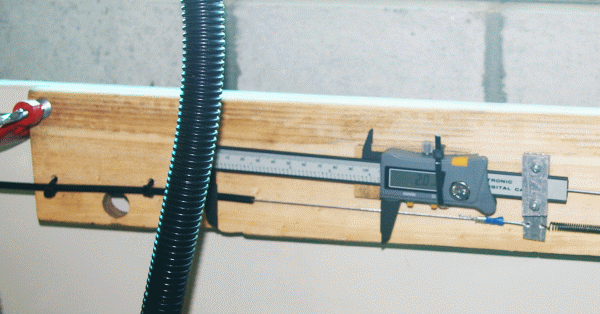
The "display" cheap plastic digital calipers from Duck Smuffs. 
The business end! Two bike cables connected to the cross slide, one cable has the outer anchored to the front of the apron and the cable loops under the lathe to come up the back and connect to one side of the calipers. The second cable has its outer anchored at the back of the saddle beside the flexible chrome coolant tube and is routed to the other side of the calipers via a fairly tightly tensionsed spring. So you can see what happens, as the cross slide moves one cable is "pulled" and the other relaxed which together move the calipers. There is no discernable backlash when the spring tension is tight but the cross slide handle has a 'nicer' feel when the tension is relaxed a little. I fully expected the flexing of the cable would cause an error, and it does, but only 0.1mm moving the carriage from one end to the other. I tested it out by measuring the diameter of the work, setting the tool in contact and setting the calipers to zero, I then reduced the diameter of the work by 2.5mm according to the calipers and sure enough measuring the new diameter of the work showed it was precisely 5mm less than at the start. The calipers of course indicate a change in radius, not diameter. Winding the cross slide back and setting the tool against part of the original diameter showed zero, bonza! OK, these are crappy calipers, but they are cheap! The cable system no doubt introduces some errors but these do not appear to be significant compared to the 0.1mm resolution of these calipers. Stopping cable flex and increasing cable tension would make it more accurate, I think. Mounting the display on the saddle and using very short cables would also improve things. [This really is proof of concept, I have some cheap DRO scales ordered and when they arrive I will probably mount them on a panel fixed to the saddle and right beside the black lighting fitting that shows in the pictures, they will be much happier there than screwed to the side of the cross slide getting swarf and coolant drips on them.] |
||||
| GWatPE Senior Member Joined: 01/09/2006 Location: AustraliaPosts: 2127 |
Hi kiwijohn, surely this thread should be in other stuff! Gordon. become more energy aware |
||||
| Jarbar Senior Member Joined: 03/02/2008 Location: AustraliaPosts: 225 |
Hello John, ����very creative and practical.I usually use dial indicators but they have limited travel but good for incremental diameters.Your system could be further refined if a quick release was attached to the caliper clamp and the cable exposed for attachment of caliper was longer.It could then be engaged at any point along the cable.Having been the former proprieter of a cycle shop,used the gear cables that were designed for the index gearing systems produced by Shimano.The inner wires (Stainless steel) were very good at not stretching and the outer cable sheath had longditudinal wires as opposed to spiral wound ( brake cable) and a teflon sleeve that gave very low friction.An adjustable ferrule was also included for reducing any slack instead of the spring.This would be the next level of even greater accuracy.Well done and another project for the list. Anthony. ��Sorry Gordon I'll try and move it. "Creativity is detirmined by the way you hold your tounge".My Father "Your generation will have to correct the problems made by mine".My Grandfather. |
||||
| Tinker Guru Joined: 07/11/2007 Location: AustraliaPosts: 1904 |
Just out of interest, what is the resolution of the dial on your cross feed handle? 
Klaus Klaus |
||||
| KiwiJohn Guru Joined: 01/12/2005 Location: New ZealandPosts: 691 |
Gordon, sorry about the wrong place, guess I only ever look in one part of this site!  If it can be moved then go for it please. If it can be moved then go for it please.
Anthony, thanks for the info on the Shimano cables, that could come in useful. When I do a permanent installation the instrument has 30cm travel so I wont need to change the cable attachment point for the cross slide but for the carriage position I am thinking of a friction attachment then if I forget to move it I wont break anything by running off the end of the scale. Klaus, the indexing on the cross feed handle is 0.04mm (diameter). |
||||
| GWatPE Senior Member Joined: 01/09/2006 Location: AustraliaPosts: 2127 |
Hi Kiwijohn, I won't be able to move the thread. This is in the realms of the administrator. I think from memory, the cross slide resolution on my lathe was 0.02mm [linear], and the resolution of the bed was 0.05mm [linear], the adjustable angle screw travel on the tool holder was 0.01mm [linear] . I never needed a digital readout in all the turning I have done on a lathe. The verniers on the screw adjusts were sufficient. I started using a lathe at around age 10. I won't go into how long ago that was. You get a feel for things after a while, and I was usually looking at the work and the turnings and not usually a dial, until the last cuts. This was usually a measure, then calculate how far to go, divide by 2 and then zero the screw vernier and cut to 0.1mm less. recheck and then make the final cuts either to a fit, or a confirmation correct measured size. If I had a position display readout now, it would be well away from the work area. Gordon. become more energy aware |
||||
| KiwiJohn Guru Joined: 01/12/2005 Location: New ZealandPosts: 691 |
Gordon, I envy your experience with the lathe! Part of my problem may be that I dont exactly understand how to use the screw adjusters, they just have graduations, no vernier scale, the clutch is very stiff and I have not yet learned to accept the backlash as a characteristic not a fault in the machine! 
For better or worse, I have ordered the El Cheapo DROs and I will be mounting them at the back of the saddle and to the right. They will be out of the way there and as they will move with the saddle the cables will be very short and I expect them to be more accurate than my concept proving with the plastic calipers. |
||||
| Tinker Guru Joined: 07/11/2007 Location: AustraliaPosts: 1904 |
101 lathe dial reading: You ONLY read the dial while turning it in the SAME direction. CW for outside turning, ACW for inside turning. This eliminates the backlash problem. BTW, if you take the cross slide off you will find the brass nut on the acme thread shaft usually has an adjustment at the end to minimize backlash. The clutch?? being stiff, its the bar (can't think of the correct name for it) at the slide dove tail that is possibly in too hard. There should be 3 little grub screws to adjust it and a fourth screw to lock the slide - check those. The 3 screws are adjusted for smooth slide travel but NO sideway play at all. Use ONLY the 4th screw to lock the slide if that is required. There is no need for vernier scales on the dials, ).02mm graduations around the circumference is as good as you can read on an ordinary hand held vernier. One complete turn is the pitch of the shaft thread, 3mm on my lathe. You would get confused with my lathe's dials as they have metric AND inch graduations - great once one gets the hang of that. Like Gordon, I never saw the need for DRO's on the short travel of lathe slides. Now, if I had a milling machine it would come in handy to have DRO's on that. Klaus |
||||
| KiwiJohn Guru Joined: 01/12/2005 Location: New ZealandPosts: 691 |
Thanks Klaus, the clutch I mentioned is the one on the scale, should you not be able to zero the scale when starting the cut so that the scale shows the increment as the tool moves? With the awkward clutch I find it difficult to get zero where I want it to be. Inches/mm, that might be good! It is 45 years since I left school and inches come naturally, 0.04mm in groups of 10 takes a bit of getting the head around.
The gibs are OK, on this lathe they are tapered and adjusted by one screw at each end, there is one more grub screw for the slide lock. Point taken re the need for DROs but you know Klaus this is a bit like fluffy dice on the new Falcon. |
||||
| Tinker Guru Joined: 07/11/2007 Location: AustraliaPosts: 1904 |
Aha, the above explains it! What you call a "clutch" is just a friction fit of the dial graduation ring on my lathe. I think there is a little steel ball in there to adjust the friction, its a while since I had it apart. What I usually do, and did this arvo, is to hold the handle firmly with one hand and zero the dial ring with the other. Its quite easy with a little practise. I am surprised that your lathe has 0.04mm graduations, they must use a rather small diameter graduation ring. On my machine the ring is about 60mm in diameter and the 0.02 mm graduations are about 1mm apart so its possible to set 0.01mm (approx) increments on the cross feed. On the compound slide the ring is smaller and 0.02mm increment is probably as good as one can repeatedly set it. How about some fluffy dice on your lathe? Might be useful to absorb stray coolant  Klaus |
||||
| Tinker Guru Joined: 07/11/2007 Location: AustraliaPosts: 1904 |
KiwiJohn, how about this for a lathe project - its about the first one I made for mine and, looking at your cross slide pic above, you could also fit a parting tool holder at its left rear end. What I did is drill and tap 2 M8 holes to take long socket head bolts. These need to be carefully placed to miss the dove tail and the spindle. A steel block (about 30 x 100 x 100mm) held the parting tool which was clamped upside down to use the normal turning direction AND to avoid being dragged into the work as a front, right way up tool can be if the cross slide is a bit loose. That project requires precision drilling, face turning and recess milling with an end mill which could keep you busy for a while and you get a very useful add on. Another project is a draw bar to hold milling bit collets in the spindle - my spindle is MT5 and I use a MT5 to MT3 adapter. Have fun  Klaus |
||||
| KiwiJohn Guru Joined: 01/12/2005 Location: New ZealandPosts: 691 |
The cross slide graduations are for diameter (I think) and are twice actual slide movement, yes the graduations are quite far apart. I guess this is just a matter of getting the knack of using it, not forgetting to take up the backlash when setting zero. So you leave the parting tool in-situ? Milling cutters and collets etc are on the long term plan, I would need to make something to hold the work first though it has been amazing what I have managed to do with just clamping small bits in the tool post and using the fly cutter I made. I have the MT5 to MT3 adapter already. The new Chinese fluffy dice are made of some synthetic material and dont absorb much. |
||||
| Gizmo Admin Group Joined: 05/06/2004 Location: AustraliaPosts: 5186 |
I moved the post to "Other Stuff". Been away for the last few days so couldnt do it earlier. Clever idea. Glenn The best time to plant a tree was twenty years ago, the second best time is right now. JAQ |
||||
| KiwiJohn Guru Joined: 01/12/2005 Location: New ZealandPosts: 691 |
Thanks Glenn, sorry about booboo. |
||||
| Tinker Guru Joined: 07/11/2007 Location: AustraliaPosts: 1904 |
That does not make sense unless your slide spindle is geared up from the handle. Perhaps you are confusing the twice bit by the reduction of *diameter* as you start cutting, the cross slide should move in or out *exactly* by the amount on the graduations. No, not always as it restricts what diameter I can turn if the part is long. I remove the compound slide for milling and use its 2 bolts plus another to an extra square nut in the slot to mount a heavy duty angle bracket or a little Z- axis slide I bought as an accessory. I also drilled and tapped 2 more mounting holes in the slide top to mount the dividing head vertically on it. These extra drilled holes have dummy socket screws in them when not in use to prevent them filling up with swarf. Klaus Klaus |
||||
| KiwiJohn Guru Joined: 01/12/2005 Location: New ZealandPosts: 691 |
Klaus, the cross slide graduation have a little symbol of a circle with a oblique stroke through it, does that not indicate 'diameter'? I guess a quick check with calipers or even a rule would sort this out!
OK, re the parting tool, I thought you had devised a cunning way of having a parting tool always mounted and I was going to ask if you had any Kiwi ancestory? 
I am on the lookout for an angle bracket as I have a couple of holding devices I could use for simple facing with the fly cutter etc. There is an XY table on my drill press, not real good quality, but it would be a simple job to mount that direct to the saddle by using the position intended for the travelling steady, that would give me XYZ for milling and not require any drilling of tapping of the cross slide etc. The only real weakness, apart from a need of a general fettling, of the XY table is that the screws are quite coarse pitch but now I have a lathe maybe I can address that! |
||||
| The Back Shed's forum code is written, and hosted, in Australia. | © JAQ Software 2026 |
