
|
|
Forum Index : Other Stuff : F&P bearing hub removal & recycling
| Author | Message | ||||
Dingdoc Regular Member Joined: 23/09/2009 Location: AustraliaPosts: 76 |
Removing F&P bearing holder The bearing holder at the bottom of the tub is well worth keeping when 'reverse engineering' an F&P washing machine for all of the good bits, but it can be awkward to get out. A method which works for me is to use a small circular saw. but this can be dangerous and awkward to use in the confines of the tub, so I have fitted it with half of an old F&P shaft which slides into the existing bearings and keeps it centred. A couple of suitable nuts lock it into a hole drilled into the plate of the saw to give the required radius cut. I kept mine fairly wide as I required a large flange to screw it to the baseboard of the handcranked generator I was building � it can be cut down further later if required. It requires a dozen or so plunge cuts from each side and then what remains of the plastic webs can easily be cut through with a hand saw or an electric sabre saw. 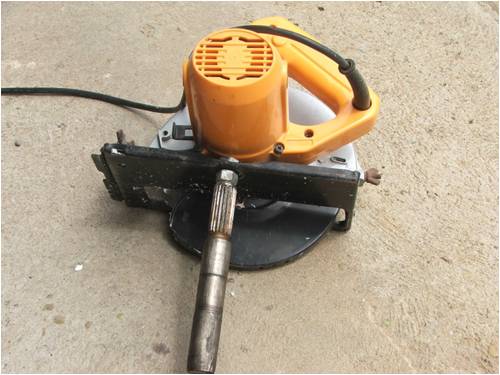
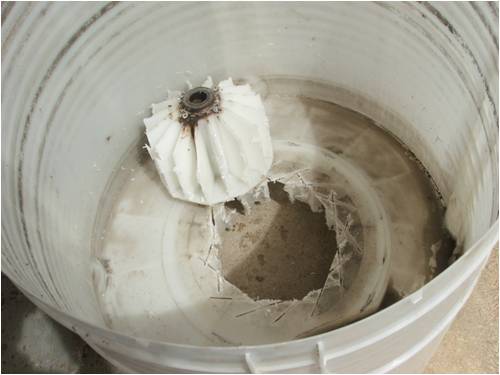
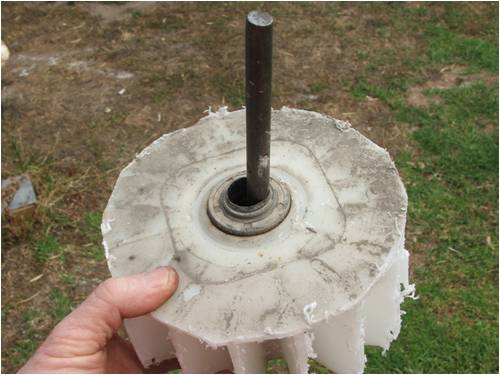
This is the tool I use to drive the bearings out of the housing. The curved end can be used to drive against the outer race of the bearings in several places without damaging them. It also works on the seal. 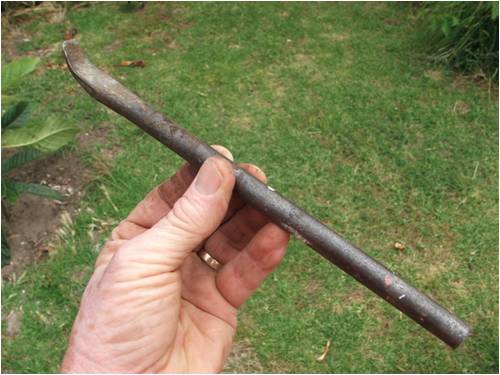
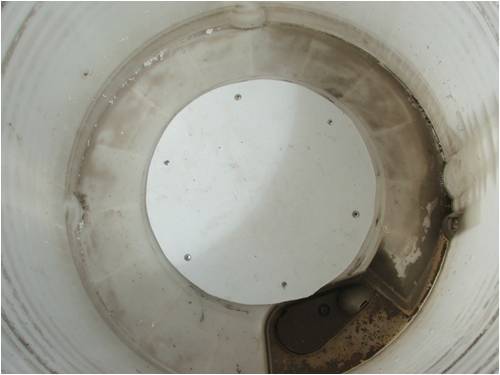
Re-cycling the leftovers The two tubs in the F&P seem to be popular as animal feed troughs but cutting the bearing holder out of the outer tends to wreck it for this purpose. This can be rectified by cutting a large circle from the plastic lid of the machine with a jigsaw and fixing it in place with the screws you kept when you dis-assembled it (You did keep all of the screws and bolts didn't you?). The lid is in two layers which can be easily pried apart. 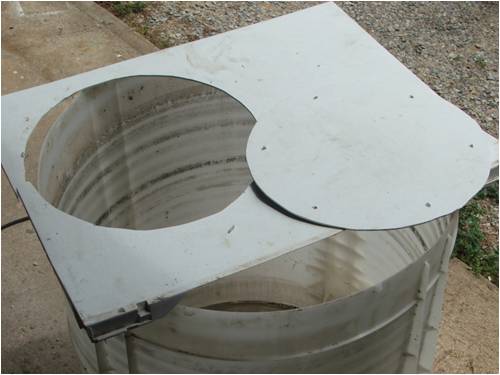
The outer tub can be fixed to the ground to prevent it being knocked over when feeding by driving steel pegs through the three lugs on the outside which were originally used to suspend it in the machine. The inner metal and plastic tub has water filled chambers top and bottom to help stabilize it when it spins � the top one can be drilled to drain it to make it lighter and less top heavy. 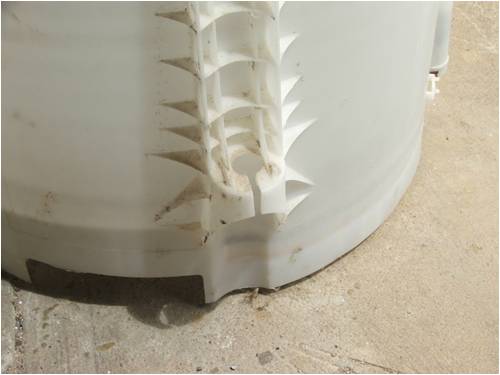
Another use for the outer tub could possibly be as a worm farm, although I haven't tried this � the bottom hole where the pump is (was!!) could serve as a drain to collect the worm juice which is a great garden fertilizer. Trev |
||||
Downwind Guru Joined: 09/09/2009 Location: AustraliaPosts: 2333 |
someone has been a busy boy! I like the safety first approach to removing the tub bearing mount. Great use of recycling to. Now you just need to find a use for a square lid with a big round hole in it. Ahrrr - Tree ring, long drop seat?? Pete Sometimes it just works |
||||
| Barry T Coles Senior Member Joined: 30/07/2009 Location: AustraliaPosts: 109 |
They are some good ideas for recycling. If you have access to a metal lathe here's another way to remove the hub. I use a 75mm hole saw, I have a length of broom handle that fits snugly into the bearings the broom handle has been put in a metal lathe & a centre hole drilled to accomodate the arbour for the hole saw. I drill from both sides of the hub & only have a small bit to cut out with a key hole saw where the hole saw isnt deep enough. Cheers Barry I need to learn from the mistakes of others. I dont have the time to make them all myself. |
||||
KarlJ Guru Joined: 19/05/2008 Location: AustraliaPosts: 1178 |
I use the outer bowl as a tree guard (perfect), which I hope will slowly degrade in the sun after the tree has gotten bigger, good for our windswept hills  . .
It occurred to me today that the inner stainless steel bowl would make an EXCELLENT compost bin, and two could be stacked if space was an issue, the holes in the side will provide for plenty of air so compost will be aerobic and thus fast and basically smell free. Karl Luck favours the well prepared |
||||
| Barry T Coles Senior Member Joined: 30/07/2009 Location: AustraliaPosts: 109 |
Dang why didnt I think of that? & I have already thrown 6 away, oh well! back to the old 44gal drum. 
Barry I need to learn from the mistakes of others. I dont have the time to make them all myself. |
||||
| Dingdoc Regular Member Joined: 23/09/2009 Location: AustraliaPosts: 76 |
The Wednesday before Christmas turned out to be a rather good day. I came in from an enjoyable late afternoon surf and my wife, who had been reading in the car, said "Did you see that washing machine on the footpath back there - is it a F&P?". As soon as I had changed I walked back to check it out and, sure enough, it was a nice little F&P 501. A quick check with the owners of the house that it was OK to take and I was off home for the trailer. It turned out that it was in quite good condition - probably could have fixed it but another washing machine wasn't really needed so I set about reverse engineering it. I must say I am always impressed by Kiwi ingenuity every time I pull one of these machines apart. After removing the motor and all of the other 'good bits' I thought "Why not make a worm farm out of the leftovers" What follows is a description of how I went about it - hopefully Gizmo does not mind the forum going off topic just a little in the interests of recycling! First I removed the pump (ingenious bayonet fixing) and its internal plates and sealed its drain hole in the tub by siliconing in a disk of plastic cut from the lid. The hole in the middle of the tub where the bearing was cut out was also sealed in a similar way. 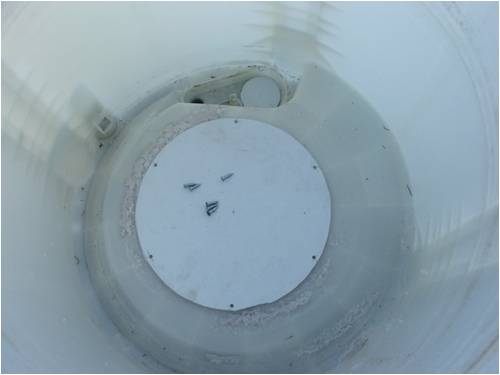
Then I made a stand from the inner perforated tub by cutting a section from its rim to clear the pump housing and to enable the drain hose to be re-fitted - I used a jig-saw for this but watch out for the water which comes out! 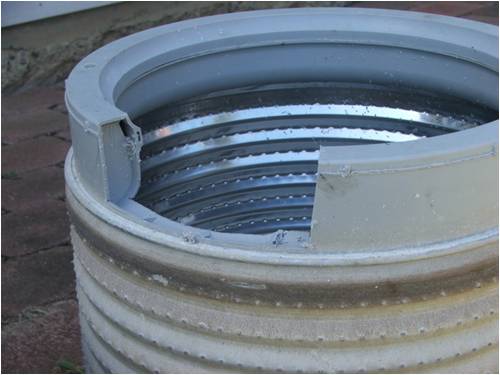
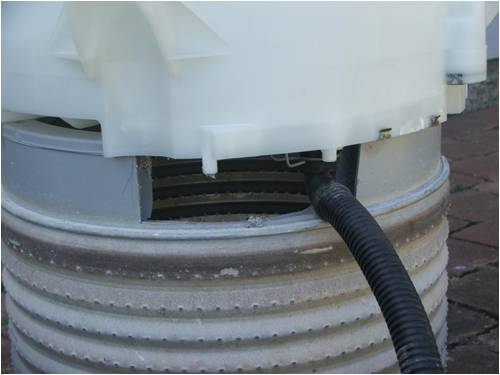
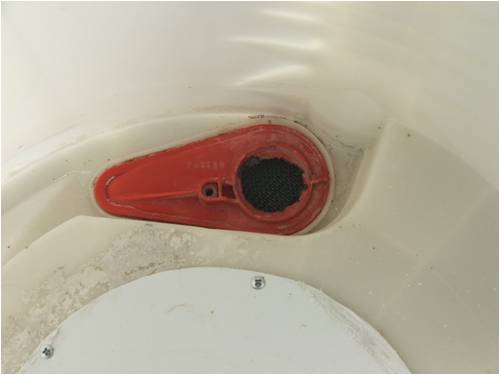
A couple of the plastic mounting spigots on the bottom of the white tub needed to be lopped off to enable it to sit neatly on its stand. The intake hole in the internal pump plate was enlarged and then a strainer of plastic shade cloth was glued into it with silicon and it was re-fitted. This was loosely covered with a plastic baffle plate also cut from the lid. 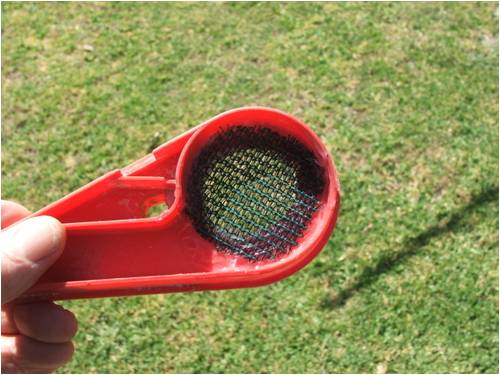
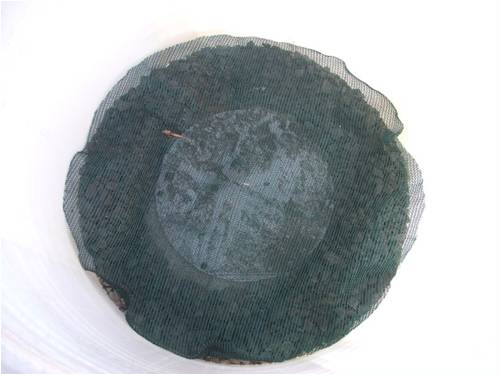
The drain channel around the circumference of the plastic tub was filled with gravel and then the whole base of the tub covered with a large circle of shadecloth to keep the wormcastings, worms and food out of the gravel and drain below. 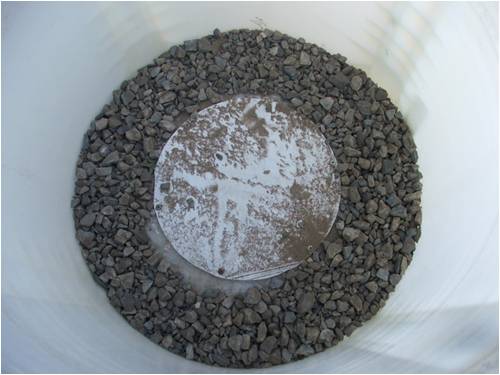
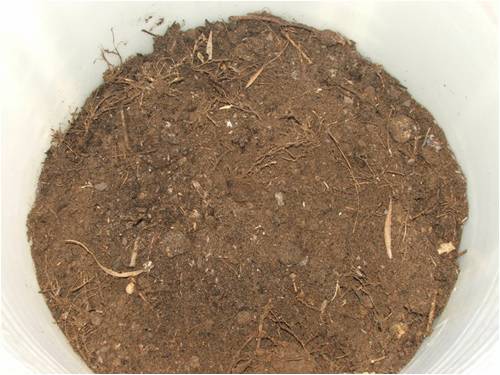
The whole contraption was then set up in a cool, shaded spot under a tree in the back yard and a large bucket full of good compost mixed with shredded paper was spread out on top of the shade cloth. The drain pipe was cut to a suitable length and put into a smaller bucket ready to catch the worm juice - now for the workers!! 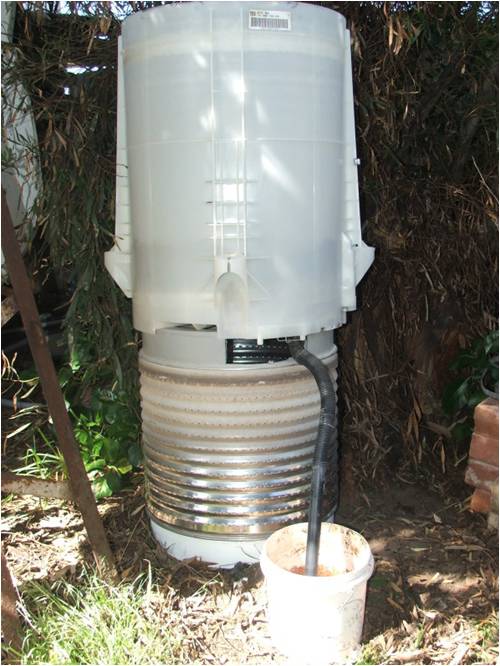
Composting worms were sourced from a local supplier but can also be obtained by mail order or from garden centres and some hardware stores. Ordinary garden worms are not really good enough - they need to be a mix of Tiger worms and Red worms which are surface feeders. Before adding them, the bedding material was watered well and allowed to drain - it needs to be moist but not soggy or the worms will drown. A well moistened square of old carpet was placed on the compost and worms to give them somewhere to hide and a lid held down with a brick on top to keep the rain out completed the job. Lots more info on farming worms can be found on the net. Trev |
||||
| KarlJ Guru Joined: 19/05/2008 Location: AustraliaPosts: 1178 |
going to get heavy isnt it? perhaps a couple of stakes through the shock absorber mounting points to help it not fall over. I like it but thinking its overkill, the stainless part alone makes a great composter Luck favours the well prepared |
||||
| Downwind Guru Joined: 09/09/2009 Location: AustraliaPosts: 2333 |
Think its more of a matter if you are using worms to compost and reap all the benefits from the goodies produced including the worm juice. This way he turns the compost into a greatly enriched organic matter, a living thing. Compared to some decomposting pile, with a much lower end product. Worms take a bit of looking after and to maintain the conditions they perform best at, also need to be considered, as Trev has. A couple of stakes either side as mentioned would make me a little less nervis as well. Good job! As for F&P design, i fully agree it is simple and engineered well. I often thought when the serviceman first encountered a pump change on a F&P he would have smiled and said " About bloody time someone got it right" The only complaint i have is they could of casted a "Cut here" line in the tub for our purpose of removing the bearing mount. I was told by a F&P serviceman that placing the washing powder down the agitator as recommended goes straight into the pump and they leak of fail early. The tip is put the powder on top of the washing. Now if you dont own a F&P than dont pass it on as a early pump fail could result in a cheap windmill. Pete. PS. Thinking about it, we all have enough pumps free that it wont matter if our own pump fails. Sometimes it just works |
||||
| Dingdoc Regular Member Joined: 23/09/2009 Location: AustraliaPosts: 76 |
In reply to Karl's comments- It looks more unstable in the photo than in reality because of the low angle it was taken at. It really sits solidly on the ground and should not become unstable even when half full. With worm farming, the idea is to regularly remove the worm castings to use as a soil conditioner/fertilizer. This is done by putting the food all to one side for a few days - the worms move across to this and the casts can be removed for use relatively worm free. I considered cutting the drum off to about 3/4 height and may do so in the future - easily done with the jig saw. As for the stainless part - I don't think it is real stainless - just plated steel and it's a bit useless for a composter because it's too small and would be awkward to turn the compost in, especially with the bulky plastic rim. My aim was to use as much of the original washer as possible with the minimum effort to build - it cost me practically nothing, compared to commercial worm farms which can be as much as A$250+ for a converted wheelie-bin type. A more elaborate stand could have been made of bricks or timber but the stainless drum made it quick and easy. It is better to raise it up so that the worm juice can be drained out easily to use as a very effective fertilizer. Worm farms have another benefit in that no methane is produced as there is when food waste is buried in landfill. Many local councils are encouraging homeowners to have their own worm farms to cut down on the amount of organic matter going in to landfill. Better get down off my soapbox now 
Trev |
||||
| Downwind Guru Joined: 09/09/2009 Location: AustraliaPosts: 2333 |
What a slippery subject, worms and soapboxes. Just a thought to worm fest 2010. Why not leave the tub in the washer as it will have a lid to keep the birds out and easy for the misses to put the scraps in. As well it will look tidy. It will give some insulation from the sun as i found 12 months with the tubs in sunlight and they fell apart. Just might need to dig a hole to put the bucket in for the juice. Happy grub farming. Pete. Sometimes it just works |
||||
| Dingdoc Regular Member Joined: 23/09/2009 Location: AustraliaPosts: 76 |
That's not a bad idea Pete. The inner spinner tub with the worms in it could possibly sit in the plastic tub too and the whole lot could remain suspended in the metal body. That would provide air and drainage. It would still possibly be high enough for the drain tube to come out the side and into a container. Unfortunately the top plastic section had with a nasty accident with an axe so it would fit in the bin - it's now a bit beyond repair!!Next one maybe - talk about variations on a theme!! Also, the metal case would probably not last too long in the salt air here and I hate painting!!! Trev |
||||
| KarlJ Guru Joined: 19/05/2008 Location: AustraliaPosts: 1178 |
amazing what we can come up with for these things, first time a saw a backyard full of them was in a pic Matt Lyon's I just laughed as thats what my backyard looks like most of the time Luck favours the well prepared |
||||
| Downwind Guru Joined: 09/09/2009 Location: AustraliaPosts: 2333 |
Trev, You are lucky you have Yf that points these gems out in others rubbish. Karl, You are lucky your Yf has'nt pointed out these old gems to be put out in the rubbish! (if you have a collection like in the pic.) As for corrosion near the sea, i thing the plastic will degrade faster in the light than the rust will eat the body away. If you want to keep the plastic a little longer then a coat of dark paint will help greatly. Then its back to the job we both love to hate "Painting" From the tubs i had in the past they are not UV stablized plastic and go brittle in 12 months and crack apart and would make a wonderful bird feeder then.(worms) Ill put my box away now. Pete. Edit- Ps- 12 months in the sun and a good thump with a block of wood and a big hammer and the hub will punch out of the tub most times. Maybe what the guy with the pics is waiting for. Sometimes it just works |
||||
