
|
|
Forum Index : Microcontroller and PC projects : Playing with the new V6.00.02b10 PIO toys
| Author | Message | ||||
| matherp Guru Joined: 11/12/2012 Location: United KingdomPosts: 11521 |
b10 includes new functionality to make PIO much easier to use. See the example program below which creates a 5Hz square wave on GP6 'this example shows how to coordinate two pio programs using the IRQ flags Option explicit Option default integer Dim p1,f1,e1,s1,p2,f2,e2,s2,o1,o2 ' set a couple of pins that will be used as outputs SetPin gp4,pio1 SetPin gp6,pio1 ' o1=Pio(next line 1) 'note the start of the first PIO instruction for program 1 - will be 0 Print "compiling first" PIO assemble 1 .program first .side set 1 .line next 'we can always use next unless we specifically want to place the code Pull block 'read in the loop counter which will define the timing of the second program .wrap target Mov x,osr side 1 [4] 'we can use osr to keep this and re-use it .label loop 'loop as specified by the counter Nop side 0 [4] Jmp x--,loop side 1 [4] IRQ 0 side 0 [4] 'set a flag for the second program .wrap .end program list ' create the setting to initialise program 1 p1=Pio(pinctrl 1,,,,gp4) f1=10000 e1=Pio(execctrl GP0,Pio(.wrap target),Pio(.wrap)) s1=Pio(shiftctrl 0,0,0,0,0,0) ' o2=Pio(next line) 'note the start of the second pio program Print "compiling second @ line: ";o2 PIO assemble 1 .program second .side set 1 .line next 'this will pick up o2 automatically .wrap target Wait 1 irq 0 side 0 'this instruction waits for irq 0 to be set and automatically clears it Wait 1 irq 0 side 1 .wrap .end program list ' create the setting to initialise program 2 p2=Pio(pinctrl 1,,,,gp6) f2=100000 e2=Pio(execctrl GP0,Pio(.wrap target),Pio(.wrap)) s2=Pio(shiftctrl 0,0,0,0,0,0) ' initialise and start program 1 but note it will block on pull block ' the call is configured to set GP4 as a side-set pin and configure it as an output PIO init machine 1,1,f1,p1,e1,s1,o1,1,0,0 PIO start 1,1 ' initialise and start program 2, it will block waiting for the irq PIO init machine 1,0,f2,p2,e2,s2,o2,1,0,0 PIO start 1,0 ' trigger the whole shebang by writing to program 1 fifo PIO write 1,1,1,100 ' loop, although the PIO will keep running anyway even if the program finishes Do Loop Edited 2025-02-10 23:51 by matherp |
||||
| Volhout Guru Joined: 05/03/2018 Location: NetherlandsPosts: 5934 |
Thanks Peter, This works very much like the counter code I used t verify. I noticed you indented the PIO code, as well as the .directives. I hope that will become automatic in MMEdit autoformat. I very much rely on autoformat.. lazy me. Jim said his website would go offline in March. That is very soon. I am not even sure if he is going to do any more updates on MMEdit. Time is ticking... Volhout Edited 2025-02-11 00:27 by Volhout PicomiteVGA PETSCII ROBOTS |
||||
| Bleep Guru Joined: 09/01/2022 Location: United KingdomPosts: 809 |
This looks great, thanks Peter, we'll be needing a separate manual just for PIO at this rate, (on top of what's already in the standard manual). :-) Regards Kevin |
||||
| Volhout Guru Joined: 05/03/2018 Location: NetherlandsPosts: 5934 |
Hi Kevin, We'll just modify the current appendix F. We'll replace the section with individual PIO ASSEMBLE lines with this new format. The appendix may even get shorter. All depends on when Peter plans to release 6.00.02. Volhout PicomiteVGA PETSCII ROBOTS |
||||
| matherp Guru Joined: 11/12/2012 Location: United KingdomPosts: 11521 |
This modified version generates a valid VGA HSYNC and VSYNC as well as a pixel clock. Run it on a VGA board but with the standard PicoMite firmware and you should see the monitor getting a perfect lock at 640x480x60Hz. The CPUSPEED must be set at 252000. I'm playing with this as a test bed for trying to drive a RGB TFT display with no controller which needs the pixel clock as well as hsync and vsync. The timings are all controlled by the input parameters to the three PIO state machines. Option explicit Option default integer Dim p1,f1,e1,s1,o1,p2,f2,e2,s2,o2,p3,f3,e3,s3,o3 ' set pins that will be used as outputs SetPin gp4,pio1 SetPin gp16,pio1 SetPin gp17,pio1 SetPin GP18,DOUT SetPin GP19,DOUT SetPin GP20,DOUT SetPin GP21,DOUT ' o1=Pio(next line 1) 'note the start of the first PIO instruction for program 1 - will be 0 Print "compiling first" PIO assemble 1 .program pclk .side set 1 .line next 'we can always use next unless we specifically want to place the code Pull block 'read in the loop counter which will define the timing of the second program .wrap target Mov x,osr side 1 [4] 'we can use osr to keep this and re-use it .label loop 'loop as specified by the counter Nop side 0 [4] Jmp x--,loop side 1 [4] IRQ 0 side 0 [3] 'set a flag for the second program IRQ 1 side 0 'set a flag for the third program .wrap .end program list ' create the setting to initialise program 1 p1=Pio(pinctrl 1,,,,gp4) f1=250000000 e1=Pio(execctrl GP0,Pio(.wrap target),Pio(.wrap)) s1=Pio(shiftctrl 0,0,0,0,0,0) ' o2=Pio(next line) 'note the start of the second pio program Print "compiling second @ line: ";o2 PIO assemble 1 .program hsync .side set 1 .line next 'this will pick up o2 automatically Pull block side 1 Mov y,osr side 1 'store the length of sync Pull block side 1 .wrap target Mov x,osr side 1 'get the length time before synch Wait 1 irq 0 side 1 'this instruction waits for irq 0 to be set and automatically clears it .label loop1 Jmp x--,loop1 side 1 Mov x,y side 0 .label loop2 Jmp x--,loop2 side 0 Nop side 1 .wrap .end program list ' create the setting to initialise program 2 p2=Pio(pinctrl 1,,,,gp16) f2=25000000 e2=Pio(execctrl GP0,Pio(.wrap target),Pio(.wrap)) s2=Pio(shiftctrl 0,0,0,0,0,0) o3=Pio(next line) 'note the start of the second pio program Print "compiling third @ line: ";o3 PIO assemble 1 .program vsync .side set 1 .line next 'this will pick up o3 automatically Pull block side 1 Mov y,osr side 1 'store the length of sync Pull block side 1 Mov isr,osr side 1 'store the length of the back porch Pull block side 1 .wrap target Mov x,osr side 1 'get the length time before synch Wait 1 irq 1 side 1 'this instruction waits for irq 0 to be set and automatically clears it .label loop3 Jmp x--,loop3 side 1 Mov x,y side 0 .label loop4 Jmp x--,loop4 side 0 Mov x,isr side 1 .label loop5 Jmp x--,loop5 side 1 .wrap .end program list ' create the setting to initialise program 3 p3=Pio(pinctrl 1,,,,gp17) f3=25000000 e3=Pio(execctrl GP0,Pio(.wrap target),Pio(.wrap)) s3=Pio(shiftctrl 0,0,0,0,0,0) ' initialise and start program 1 but note it will block on pull block PIO init machine 1,0,f1,p1,e1,s1,o1,1,0,0 PIO start 1,0 ' initialise and start program 2, it will block waiting for the irq 0 PIO init machine 1,1,f2,p2,e2,s2,o2,1,0,0 PIO start 1,1 PIO write 1,1,2,95,655 ' initialise and start program 3, it will block waiting for the irq 1 PIO init machine 1,2,f3,p3,e3,s3,o3,1,0,0 PIO start 1,2 PIO write 1,2,3,800*2-1,800*32+100,800*490-1 ' trigger the whole shebang by writing to program 1 fifo PIO write 1,0,1,800 ' loop, although the PIO will keep running anyway even if the program finishes Do Loop Edited 2025-02-11 01:19 by matherp |
||||
| Bleep Guru Joined: 09/01/2022 Location: United KingdomPosts: 809 |
So you'll be able to effectively eliminate the SPI bottleneck? Didn't know you could even get raw RGB LCD or TFT screens. Sounds very interesting. |
||||
| matherp Guru Joined: 11/12/2012 Location: United KingdomPosts: 11521 |
https://www.waveshare.com/4.3inch-capacitive-touch-lcd.htm |
||||
| bigfix Senior Member Joined: 20/02/2014 Location: AustriaPosts: 130 |
Back to the roots... 12 Years ago the german CT Magazine published a Maximite Version with a RGB LCD This was soon abandoned and no longer enhanced TFT Maximite Github TFT Maximite on Geoffs page But this made MMbasic known in Austria and Germany I build two of them, now hidden in some pile... Edited 2025-02-11 01:37 by bigfix |
||||
TassyJim Guru Joined: 07/08/2011 Location: AustraliaPosts: 6538 |
I have an alternative site ready for when my website goes off line. There will be one small update to MMEdit by then. I am not sure how long it will be before you have the PIO formatting included. Jim VK7JH MMedit |
||||
| PhenixRising Guru Joined: 07/11/2023 Location: United KingdomPosts: 1961 |
Huge fan here Jim. Please stick around  |
||||
| karlelch Guru Joined: 30/10/2014 Location: GermanyPosts: 328 |
Hi Peter Would that direct TFT control work with the Presto? If I read the specs correctly, that uses a rp2350 to drive a TFT display directly. Best Thomas |
||||
| TassyJim Guru Joined: 07/08/2011 Location: AustraliaPosts: 6538 |
A start with PIO formatting: 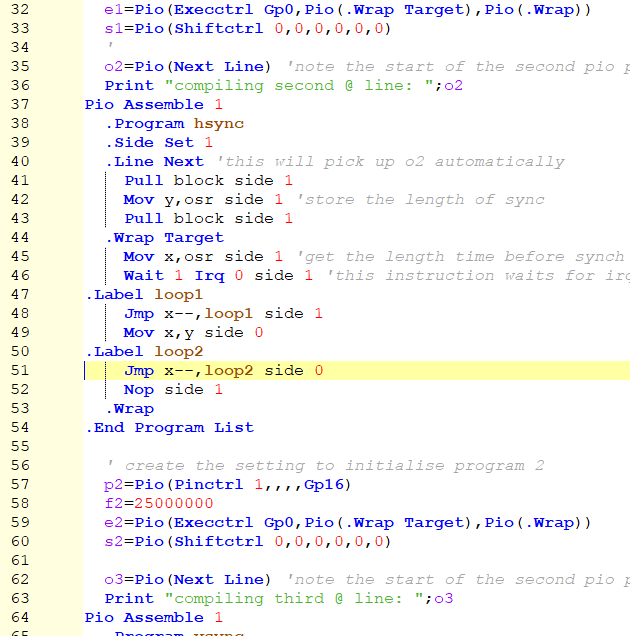 I will need to see a lot more code and the updated Appendix F, hopefully with a list of keywords. Jim VK7JH MMedit |
||||
| Volhout Guru Joined: 05/03/2018 Location: NetherlandsPosts: 5934 |
Wauw !! Jim, this is great. Keywords for the assembler are only few PIO instructions JMP, WAIT, IN, OUT, PUSH, PULL, MOV, IRQ, SET, NOP "NOP" is not a PIO instruction, but it translates to MOV y,y... it does nothing. And the directives, I guess you have seen them all. .program .line in RP2040 documentation this is called .origin .line next is in essence a .line with "next" as a special case .label .end program not listed in RP2040 documentation .end program list special case of .end program .side set in RP2040 documentation called .side_set .wrap .wrap target in RP2040 documentation called .wrap_target RP2040 documentation also supports ".word" but I have never used that. Similar .define and .lang_opt These may not be implemented in MMBasic. For RP2350 there are many more directives in the datasheet, but these have been covered already by the PIO helper functions i.e PIO(EXECCTRL n,n,n,n,). Examples are .clock_div and .fifo So I think above summarizes it well. Volhout Edited 2025-02-12 17:59 by Volhout PicomiteVGA PETSCII ROBOTS |
||||
| The Back Shed's forum code is written, and hosted, in Australia. | © JAQ Software 2026 |
