
|
|
Forum Index : Microcontroller and PC projects : Just a side project
| Author | Message | ||||
| Mixtel90 Guru Joined: 05/10/2019 Location: United KingdomPosts: 8964 |
He has my sympathy. :( The cheap Ebike batteries, especially the cheap clones from China, are usually built down to a price. Cheap cells and skimping on the protection then coupled them with chargers that have serious electrical issues. No wonder they catch fire really. This video shows how bad some of the cells are... Mick Zilog Inside! nascom.info for Nascom & Gemini Preliminary MMBasic docs & my PCB designs |
||||
Bryan1 Guru Joined: 22/02/2006 Location: AustraliaPosts: 2155 |
ok been working with Claude and got TFTP working nicely to upload to the webmite, now I have camera.bas and index.html in A: drive and doing a run I'm getting the same error. Now the CAMERA OPEN GP8, GP9, GP10, GP!!, GP14, GP0 keeps getting the wrong display type > run [28] Camera OPEN GP8, GP9, GP10, GP11, GP14, GP0 Error : Invalid display type EVERY pico version I have tried this option has said the same thing now claude has said Can CAMERA CHANGE work without an LCD configured? Is there a workaround for the "Invalid display type" error without a physical display? So the big question is the camera command only suited to a LCD which must be wired up for this to work. claude has made the camera.bas and a index.html files so just need to get over this Invalid Display type. I got everything else working but with the rain today gotta keep taking the breadboard away from the door so the wifi signal is lost. Regards Bryan |
||||
| phil99 Guru Joined: 11/02/2018 Location: AustraliaPosts: 3321 |
Have you tried the Virtual LCD Panel? Peter added it to the firmware so WebMites could process images without an attached display. |
||||
| Bryan1 Guru Joined: 22/02/2006 Location: AustraliaPosts: 2155 |
> run [28] CAMERA OPEN GP8, GP9,GP10, GP11, GP14, GP0 Error : Unknown command > option list WebMite MMBasic Version 5.08.00 OPTION CPUSPEED 252000 'KHz OPTION LCDPANEL VIRTUAL_C OPTION WIFI Home, *********, PICOE6614104032 Now for V5.8 which I'm running > run [28] CAMERA OPEN 8, 9,10, 11, 14, 0 Error : Unknown command So honestly does this confirm the webmite can't run the 0V7670 camera |
||||
| phil99 Guru Joined: 11/02/2018 Location: AustraliaPosts: 3321 |
It does look that way. Type LIST COMMANDS on the WebMite. If it isn't in that list then it probably isn't there at all. |
||||
| Bryan1 Guru Joined: 22/02/2006 Location: AustraliaPosts: 2155 |
Ok I have loaded up V6.02 and the fun continues as now MCCC is hanging and teraterm was having a hard time connecting but it did connect for this > edit PC=000026EC LR=10077821 Now this is where MCCC has fallen down > run [26] CPU 288 Error : Invalid syntax PC= 16:07:40 Port: COM14 removed Disconnected 16:07:40 Port: COM14 inserted Connected to COM14 at 115200 PICOE6614104032 connecting to WiFi... Connected 192.168.1.29 > > edit PC= Now I did do a reboot as MCCC was hanging up so much but the problem is still the same. this is with a fresh reboot of the webmite WebMite MMBasic RP2040 Edition V6.02.01 Copyright 2011-2026 Geoff Graham Copyright 2016-2026 Peter Mather PICOE6614104032 connecting to WiFi... Connected 192.168.1.29 > files A:/ <DIR> . <DIR> .. 00:00 01-01-2024 4 bootcount 00:00 01-01-2024 2651 camera.bas 00:00 01-01-2024 1186 index.html 2 directories, 3 files, 569344 bytes free > load "A:/camera.bas" > edit PC= So not only am I having fun with this but it does look I broke MCCC  with my tinkering with my tinkering |
||||
| Bryan1 Guru Joined: 22/02/2006 Location: AustraliaPosts: 2155 |
here is the list commands > list commands */ .end program .label .line .program .side set .wrap .wrap target /* ADC Arc Array Add Array Insert Array Set Array Slice Autosave Backlight Bezier Bit( Bitstream Blit Blit Memory Box Byte( Call Camera Case Case Else Cat Chain Chdir Circle Clear Close CLS Color Colour Colour Map Configure Const Continue Copy CPU CSub Data Date$ DefineFont Device Dim Do Drive Edit So the camera command IS there Now silly me forgot to load the I2C pins so did that and this is the result > option list WebMite MMBasic RP2040 Edition V6.02.01 OPTION SYSTEM I2C GP12,GP13 OPTION COLOURCODE ON OPTION CPUSPEED (KHz) 252000 OPTION LCDPANEL VIRTUAL_C OPTION WIFI Home, *********, PICOE6614104032 OPTION TELNET CONSOLE ON > load "A:/camera.bas" > edit PC= So MCCC is still hanging on that same problem Edited 2026-06-04 17:05 by Bryan1 |
||||
| Bryan1 Guru Joined: 22/02/2006 Location: AustraliaPosts: 2155 |
Well I haven't had chance to try out claudes code on the webmite today so here is what it made for me camera.zip index.zip Now looking at the index.html file it's all setup to receive the image and update every 60 seconds now my idea when we got over this step everything else could be done. Regards Bryan |
||||
| phil99 Guru Joined: 11/02/2018 Location: AustraliaPosts: 3321 |
Found the V6.02.01 manual. |
||||
| matherp Guru Joined: 11/12/2012 Location: United KingdomPosts: 11636 |
The camera command is available on the webmite. I haven't tested it recently but no reason it wouldn't work. However, it might be better to refer to the manual rather than claude. From the manual Edited 2026-06-04 17:23 by matherp |
||||
| Bryan1 Guru Joined: 22/02/2006 Location: AustraliaPosts: 2155 |
Yes all day in every version I have tried setting 280000 only to get and error saying 252000 is the max, I did try the 28000 > option cpuspeed 288000 Error : 288000 is invalid (valid is 126000 to 252000) PC= Now I'm wondering as the pullups weren't done on the I2C lines and will soon be is that the cause of my problems today. |
||||
| Volhout Guru Joined: 05/03/2018 Location: NetherlandsPosts: 5994 |
Bryan, With recent improvements in speed, I have succesfully run the camera on an RP2040 at 200MHz, and 252MHz is absolutely crisp. I did NOT test this on a Webmite (Pico W), but on a RP2040 built in a Game*Mite. Volhout PicomiteVGA PETSCII ROBOTS |
||||
| Bryan1 Guru Joined: 22/02/2006 Location: AustraliaPosts: 2155 |
Ok going off Peter's manual post it does say IT MUST be connected to a LCD, now with the option lcdpanel virtual_C command I thought it would of gotten over this but it is close to the end of the day of me trying as going WebMite MMBasic RP2040 Edition V6.02.01 Copyright 2011-2026 Geoff Graham Copyright 2016-2026 Peter Mather PICOE6614104032 connecting to WiFi... Connected 192.168.x.xx > > load "A:/camera.bas" > edit is hanging MCCC where earlier in the day it in both teraterm and MCCC opened the editor where now teraterm closes the connection after I loaded the file after typing edit. |
||||
| Bryan1 Guru Joined: 22/02/2006 Location: AustraliaPosts: 2155 |
Well as my day's work was quashed with my errors yet again where I have used claude if there is code from yesterday where the 0V7670 camera with a webmite could you guy's please share. Now as I have my daughter's boyfriend coming around to nuke my house computer as it does have that trojan on I did want to impress him with a working camera off my farm wifi using MMBasic as he does have a 3D printer to make the cases for this project. The idea for these camera's is what seeing kangaroo's and snakes after they wake up after winter and I have seen a few times brown snakes that are white after the winter sleep come out. Also it would be nice to see that huge black snake thats comes over but is never seen So most times the camera's will show the same image when a capture takes place then when the flash runs out an email is sent to so one can attend or a message on bluetooth that seemed to pass me by. Now as I have 2 off 2040W's so an order of these new webmite 2W's should be on the cards and looking on ali whats the best price of these chips as I should upgrade to the times Regards Bryan |
||||
| Bryan1 Guru Joined: 22/02/2006 Location: AustraliaPosts: 2155 |
Well today more fun and doing everything by the manual where yesterday the webmite connected easily to my wifi yet today no luck at all. So I set it up using the hotspot on my mobile which was a bad idea as trying TPFP wouldn't work and teraterm just won't connect at all. Now for the first time I found the MCCC file manager  so tried uploading doing that so tried uploading doing thatProcessing file: C:\Users\Bryan\Documents\index.html > 2 directories, 1 file, 577536 bytes free Blocks: 10 Reverting to XMODEM Responce not found at block 1 Responce not found at block 1 Responce not found at block 1 Responce not found at block 1 Responce not found at block 1 Responce not found at block 1 Responce not found at block 1 Responce not found at block 1 Responce not found at block 1 Responce not found at block 1 Transfer failed! Finished Sending 1 files Processing file: C:\Users\Bryan\Documents\camera.bas Blocks: 21 Transfer failed! Finished Now this was when the webmite was off line so hooked it back up to my mobile so the webmite was online and got the same problem with the file transfer now as I did enable the TCP server could this be the problem. Connected to COM14 at 115200 failed to connect. > option list WebMite MMBasic RP2040 Edition V6.02.01 OPTION SYSTEM I2C GP12,GP13 OPTION COLOURCODE ON OPTION CPUSPEED (KHz) 252000 OPTION LCDPANEL VIRTUAL_C OPTION WIFI Hotspot, ********, PICOE6614104032 OPTION TCP SERVER PORT 80 OPTION TELNET CONSOLE ON > web connect "Hotspot", "*******" PICOE6614104032 connecting to WiFi... failed to connect. But on the mobile it is clearly showing the pico is connected as PICOE6614104032 and 0.02mB transferred So with TFTP down, teraterm won't connect and Xmodem refuses don't know what I've done wrong but can't upload the files to the webmite Edited 2026-06-05 16:40 by Bryan1 |
||||
| Bryan1 Guru Joined: 22/02/2006 Location: AustraliaPosts: 2155 |
Maximite Control Centre Build date: 2026/01/26 Data server on port 50900 started Control server on port 50899 started started 16:02:20 Port: COM14 inserted failed! Check port then try again Connected to COM14 at 115200 failed to connect. > option list WebMite MMBasic RP2040 Edition V6.02.01 OPTION SYSTEM I2C GP12,GP13 OPTION COLOURCODE ON OPTION CPUSPEED (KHz) 252000 OPTION LCDPANEL VIRTUAL_C OPTION WIFI Hotspot, ********, PICOE6614104032 OPTION TCP SERVER PORT 80 OPTION TELNET CONSOLE ON > web connect "Hotspot", "*******" PICOE6614104032 connecting to WiFi... failed to connect. > web connect "Hotspot", "*******" PICOE6614104032 connecting to WiFi... failed to connect. > 16:11:00 Port: COM14 removed Disconnected 16:11:06 Port: COM14 inserted Connected to COM14 at 115200 WebMite MMBasic RP2040 Edition V6.02.01 Copyright 2011-2026 Geoff Graham Copyright 2016-2026 Peter Mather PICOE6614104032 connecting to WiFi... Connected 10.164.39.40 Starting TCP server at 10.164.39.40 on port 80 > 2 directories, 1 file, 577536 bytes free Sending 1 files > Processing file: C:\Users\Bryan\Documents\camera.bas > 2 directories, 1 file, 577536 bytes free Blocks: 21 Reverting to XMODEM 16:11:53 Port: COM14 removed Disconnected 16:11:53 Port: COM14 removed Disconnected 16:11:53 Port: COM14 removed 16:11:54 Port: COM14 inserted Connected to COM14 at 115200 16:11:54 Port: COM14 inserted Responce not found at block 1 Responce not found at block 1 Responce not found at block 1 Responce not found at block 1 Responce not found at block 1 Responce not found at block 1 Responce not found at block 1 Responce not found at block 1 Responce not found at block 1 Responce not found at block 1 Transfer failed! Finished 2 directories, 1 file, 577536 bytes free > This was the result trying again now as MCCC did a reboot after I started the upload the webmite was taking time to connect so if I stopped the TCP server could this be the cause of my problem Now just tried a TFTP with a fresh connection where the webmite found the wifi Connected to COM14 at 115200 Connected 10.164.39.40 Starting TCP server at 10.164.39.40 on port 80 > C:\Users\Bryan>TFTP -i 10.164.39.40 PUT C:\Users\Bryan\Documents\camera.bas camera.bas Connect request failed Yesterday when a TFTP started MCCC saw it and showed the output but today nothing comes up. Edited 2026-06-05 17:01 by Bryan1 |
||||
| ville56 Guru Joined: 08/06/2022 Location: AustriaPosts: 550 |
Bryan, if you happen to use a Fritzbox as WIFI-router you may find that connections from the WebMite to the router olny succeeds every 2nd time and this is repeatable. Dunno if other routers have the same or a similar behaviour. So simply a CPU RESTART after a failed connect solves this situation here. With the V6.03.RC7 versions Peter has introduced an additional parameter on OPTION WIFI to specifiy the country you live in. This deals with frequency restrictions in WIFI based on local regulations. This means that the Pico then will not try to talk to the router on frequencies the router is not allowed to operate on, thus preventing connect failures. This applies to all routers properly configured to your local regulations (they usually are) and not only to Fritzbox. Maybe you should give it a try. Gerald Edited 2026-06-05 17:14 by ville56 73 de OE1HGA, Gerald |
||||
| Bryan1 Guru Joined: 22/02/2006 Location: AustraliaPosts: 2155 |
Ok had a good think about this and the lack of wifi around my shed now with that Ubi router I put in back the start of '24 accepts Ethernet and just works putting the webmite beside didn't get a signal so I have raised a ticket and should get an answer in the next week. Now as I did have a spare ethernet port in the hub connected up my old shed wifi repeater that worked for years. Anyway checked on my phone for wifi and it was there Connected to COM14 at 115200 WebMite connecting to WiFi... Connected 192.168.1.29 > option list WebMite MMBasic RP2040 Edition V6.03.00RC7 OPTION SYSTEM I2C GP12,GP13 OPTION COLOURCODE ON OPTION CPUSPEED (KHz) 252000 OPTION LCDPANEL VIRTUAL_C OPTION WIFI WiFi-Repeater, *********, WebMite, AU OPTION TELNET CONSOLE ON > > TFTP request to create binary file : camera.bas TFTP transfer complete TFTP request to create binary file : index.html TFTP transfer complete > files A:/ <DIR> . <DIR> .. 00:00 01-01-2024 4 bootcount 00:02 01-01-2024 2658 camera.bas 00:03 01-01-2024 1186 index.html 2 directories, 3 files, 520192 bytes free > Now the fun can continue |
||||
| Bryan1 Guru Joined: 22/02/2006 Location: AustraliaPosts: 2155 |
Well went for a drive to Tailem Bend this morning to renew my membership with the car club and get my merc onto historic rego Well got told the vehicle MUST be registered to transfer over so put the remaining 2 months on with my mobile and joined the end of the line. So now got the papers to take to Service SA and next meeting get the logbook. Anyway on the way there got thinking why my seed trials failed and one can put that down it's just too bloody cold for them to grow. Thinking I did have some old 0.25mm ni-chrome wire when I got home untangled 2 metres and found my DMM's would just show Mega ohm readings. So the real test was just hook it up to my power supply 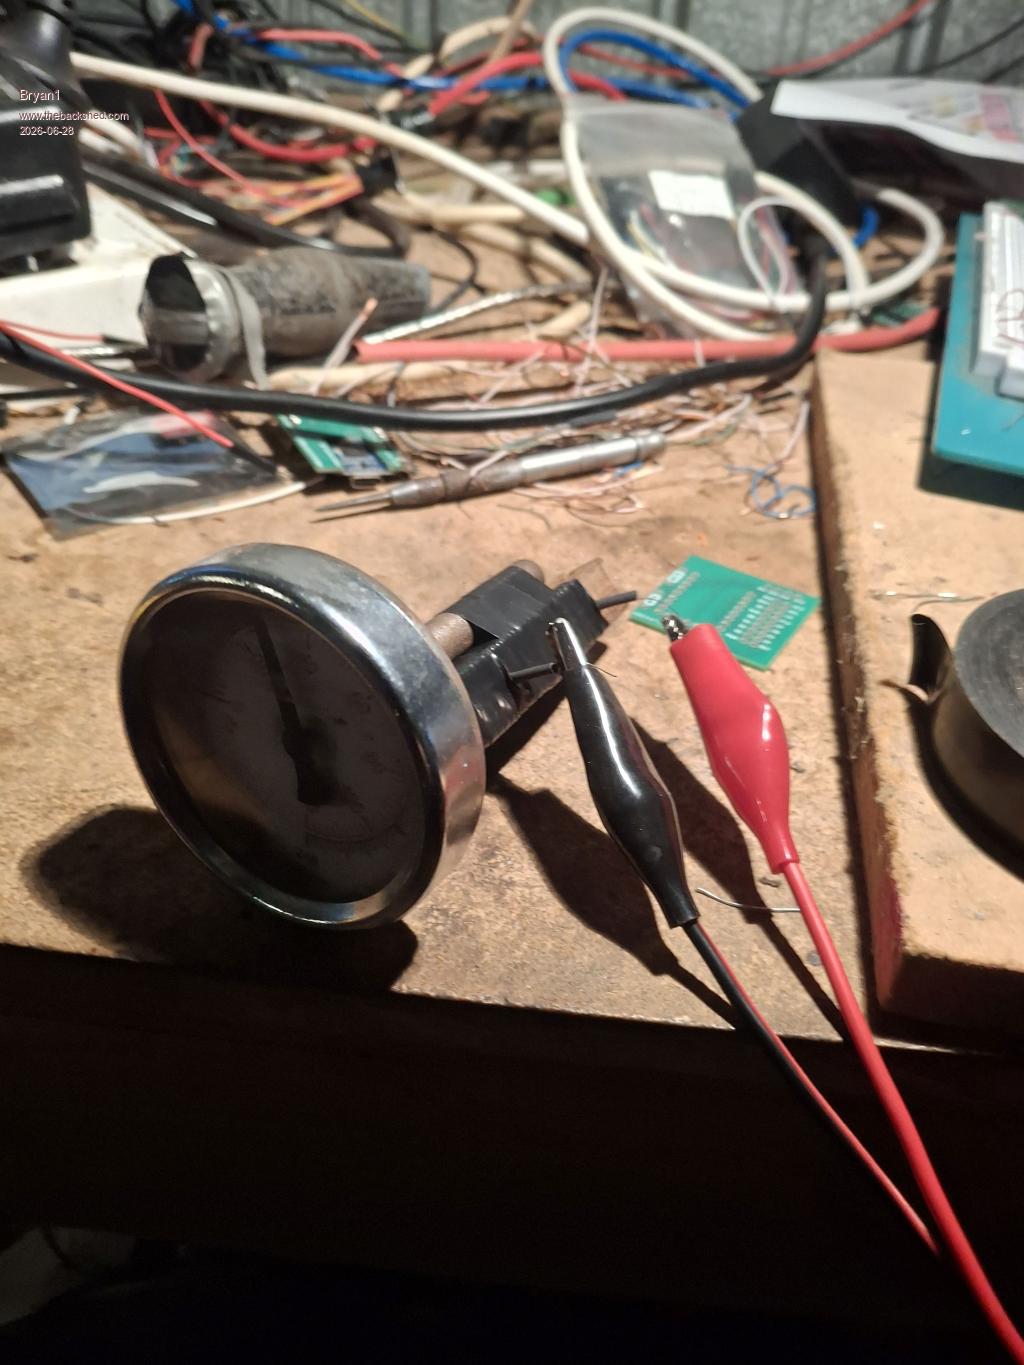 Well it looks like I made a 60 ohm resistor and with a 12 volt input 200mA current draw and by going lower voltages the relationship did correspond with 60 0hms. Now with a 200mA current draw the temp is around 34C so this will fit with one of my old N70 batteries for another conversion. Just drain the fluid of the battery use some baking soda to neutralize then put a pool chemical in from the big green shed. Then leave it on my 5 watt array of panels so charge and within a week the battery will hold enough charge for a 200mA draw. Regards Bryan |
||||
| The Back Shed's forum code is written, and hosted, in Australia. | © JAQ Software 2026 |
