| Author |
Message |
damos
Regular Member

Joined: 15/04/2016
Location: AustraliaPosts: 81 |
| Posted: 02:26pm 23 Jun 2016 |
 Copy link to clipboard Copy link to clipboard |
 Print this post |
|
Some helpful ideas for mounting touchscreen displays.
After years of working in the scale industry and seeing a lot of equipment using evolving touchscreen technology over the years, I have spent a bit of time with the Micromite backpack to find a good mounting solution. To me the following points are really important:
- completely flat front panel surface. In the food industry this is really important for cleaning - you need to be able to do a single wipe to clean it
- sealed to prevent ingress of liquids
- provide protection for the touchscreen. Plastic is cheap to replace.
- no visible screws or ugly cut-outs - I see the as the goal for all enclosures
I experimented with a few options, initially cutting a rectangle the size of the touchscreen and then bevelling it at 45 degrees. It looks very good, but it is not as nice as a flat mounting.
Another problem is that the large cut-out weakens the panel so it needs re-enforcement.
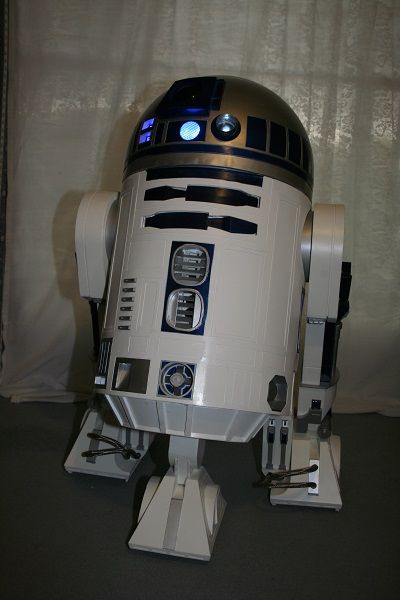
I have a lot of experience using styrene, which is basically the same as ABS. I built an entire full size R2-D2 model using it, and it is really light, strong and easy to work with. I found it glues to the normal ABS enclosures really well, meaning that you can have a cut-out that goes within millimeters of the edge of the panel, then substantially re-enforce it behind the panel to recover the strength and stiffness. I also expect it will glue to ABS output from 3-D printers.
I buy my styrene from Plastix:
http://www.plastix.com.au/
They sell it in white and black in 0.5mm, 1mm, 2mm and 3mm thicknesses if sheets of about 700mm x 1500mm (at a guess). The price is approximately $10 for a sheet of 1mm, and that scales with the thickness, so 3mm is around $30-40 for a sheet. They also sell a glue called "Weld-On" which is a solvent based blue and is runny like water. You put it in a bottle (which they sell) that has a very fine needle nozzle. You just wet the surface that you want to glue and then stick it to the to piece you want to glue it to. Hold it for a few seconds and it sticks. If you want to put any load on it, give it 30 minutes or so to really become solid. Clamps and weights are useful for holding large pieces in place while curing. If it really needs to be strong, I often construct bracing pieces or use multiple pieces laminated together - R2-D2 uses 7 pieces of 3mm laminated for its centre foot. Plastix also sells a lot of other plastics including clear plastics and acrylics.
I really does not machine well (eg with a router) as it melts, but it is really good with a file and sandpaper, in which case joins can be made almost visually perfect. You cut it with a sharp hobby knife. For thin pieces you just score and snap, For 3mm pieces you can score up to 10 times then snap. For areas like the touch panel hole, I often just keep scoring until I am all the way through, or I get sick of it and drill an bunch of holes and hack into it with side cutters. A pair of pliers is really handy for snapping off small pieces. You can do complex bends by laminating thinner pieces and re-enforcing from behind. It really is a perfect modelling material.
For front panels I usually discard the front panel that comes with the case and start with a fresh piece of styrene with matching thickness (This also allows the enclosure to be reused for something else in the future). Then cut a hole large enough that the touch panel can sit perfectly flush with the front panel. Then add some packing behind the hole so it sits perfectly flush. For 2.8" displays I found this to be about 1.5mm when using 2mm thick panels. You can then mount the display through the front using countersunk bolts or from the back using self tappers. For the 2.8" displays I usually build a re-enforcement box around the panel and then secure the panel using a couple of strips of styrene behind the panel that are screwed into the re-enforcement box. Drill any other holes that may be required for pots, switches and sockets and add braces to the panel between them (if required) for additional strength. For HI-FI enclosures where you want zero screws, I have found the best way is to build flaps or a box around the panel that go back 20-30mm. This allows the panel to be secured to the enclosure at the sides, top and bottom with no visible screws on the front. You can finish the panels will plastic paint (see below) and I have found that light sanding can produce a nice brushed effect.
Now to hide the ugly gaps (if required). The hole you want for the LCD display is actually smaller than the panel cut-out, as there will be a gap around it, and as not all of the LCD panel is active, so it looks better if the inactive parts are also covered. I bought a thin piece of clear plastic (like the stuff in soft drink bottles) from Plastix, and I found the resistive touch panels work perfectly behind the plastic. Lay the clear plastic on top of your enclosure and drill any holes that are required for mounting or controls, then trim the plastic to the correct size. For a jiffy box I tend to use the 4 screw holes. I suggest you secure the plastic in a least one place with a screw, control or clamp, so it does not move for the next step.
Get a sticker larger than the active portion of the LCD display and cut it to the exact size of the active portion. Lift the clear plastic away from the display (assuming it is being pinned in at least on place by a screw, control or clamp), and place the sticker on the display with the sticky side up. Move it until it exactly covers the active portion of the LCD display, then carefully lower the clear plastic so the sticker attaches to it in the perfect location for this display. Remove the plastic and make sure the sticker is sitting perfectly.
Get a can of plastic spray paint. I use Plasticote which is available from Masters in a range of colours, including some nice metallic finishes (around $16). There is also a Plasticote primer that allows other paint to stick to plastics. Spray the sticker side of the plastic and let it dry (Plasticote is fast drying). Cut lightly around the sticker with a very sharp knife to make sure the paint won't peel when you remove the sticker. Remove the sticker and you till have the a perfect clear section where the LCD panel shines through.
I am also going to look at photographic lettering on the underside of the plastic before do the painting step above using this approach:
https://www.youtube.com/watch?v=Vj_cdBZO1Tk
The UV paint seems to stick the clear plastic really well, as I found when I tried to copy this video. It is very cheap on eBay and comes in a range of colours.
|
| |
palcal

Guru

Joined: 12/10/2011
Location: AustraliaPosts: 2039 |
| Posted: 03:05pm 23 Jun 2016 |
Copy link to clipboard |
Print this post |
|
Can you upload some pictures.
Paul.
"It is better to be ignorant and ask a stupid question than to be plain Stupid and not ask at all" |
| |
Grogster

Admin Group

Joined: 31/12/2012
Location: New ZealandPosts: 9985 |
| Posted: 04:06pm 23 Jun 2016 |
Copy link to clipboard |
Print this post |
|
Yes, interesting, photos request from me too please. 
Smoke makes things work. When the smoke gets out, it stops! |
| |
MicroBlocks

Guru
Joined: 12/05/2012
Location: ThailandPosts: 2209 |
| Posted: 08:05pm 23 Jun 2016 |
Copy link to clipboard |
Print this post |
|
One good cover that can extend beyond the screen itself is an iPad screen protector.
You just cut it to size.
When you mount the LCD flush then you can stick this over the rest of the panel to make it dust proof and easy to clean.
Microblocks. Build with logic. |
| |
damos
Regular Member
Joined: 15/04/2016
Location: AustraliaPosts: 81 |
| Posted: 08:31pm 23 Jun 2016 |
Copy link to clipboard |
Print this post |
|
Good idea. I am looking for good alternatives to the clear plastic, as it can be scratched. For test gear this is not a problem, but for consumer gear with heavy use it could be. I will take some photos this weekend, and maybe we can roll everything up into a good article like the PCB one, including any other good ideas that arise. |
| |
damos
Regular Member
Joined: 15/04/2016
Location: AustraliaPosts: 81 |
| Posted: 12:55pm 24 Jun 2016 |
Copy link to clipboard |
Print this post |
|
Ok, here are some photos:
This is the R2-D2 I made, just to show you what is possible:
This the finished product:
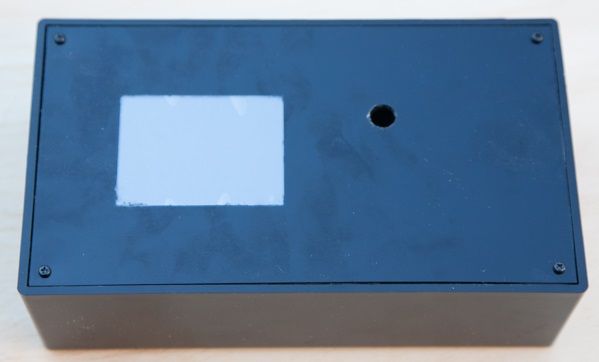
Note: the clear plastic is a first attempt and I mucked up the paint job, get a bit under the sticker. I am getting better at that. I also left the protective film on the LCD panel, as I am still working on this project.
When you remove the panel and clear panel, it looks like this:
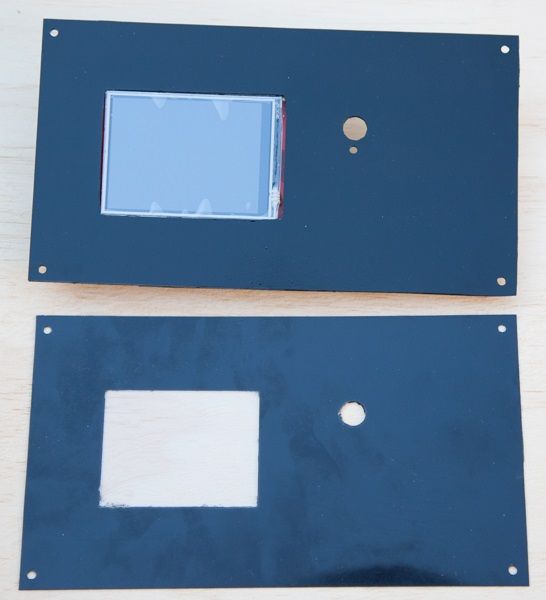
Behind the front panel looks like this:
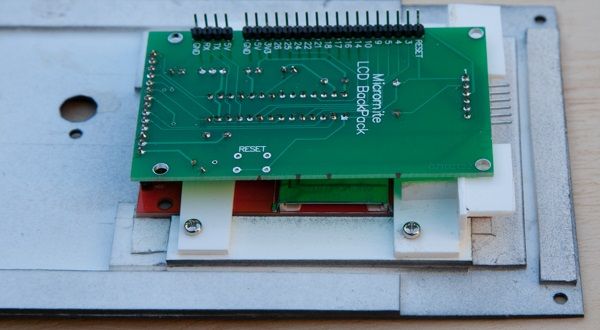
On this panel I have just added padding under the board to get the front flush. I have then added some pieces on either side of the panel, then secured the panel in place with strips behind it and self tappers. On of the strips I have turned into a bracket with holes that I can bolt through the backpack holes. I plan to attach my circuit board to the backpack using spacers.
Here are some styrene offcuts:
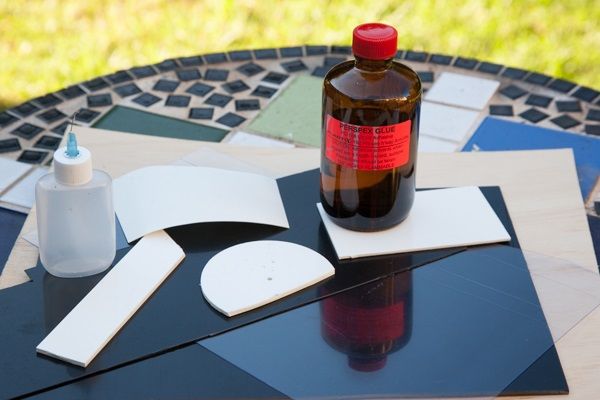
I have black and white styrene and clear plastic as well as a well used applicator bottle and the solvent glue. This is not the weld-on glue that I normally use, but it was all they had last time I was there, and it works just as well. You can see a range of thicknesses.
Here is the paint I have been using:
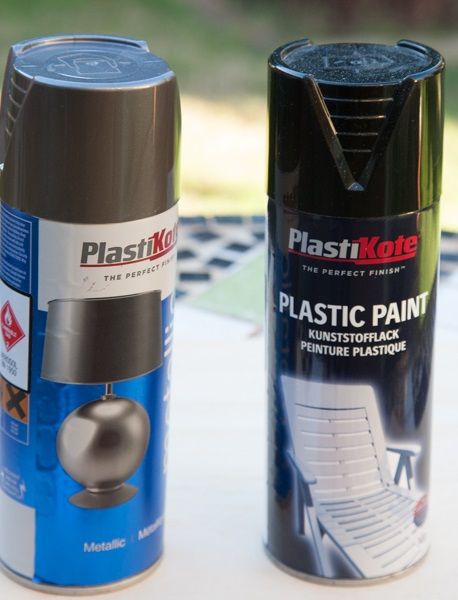
It sticks to plastic really well with no preparation, dries in minutes. The black is very suitable for jiffy boxes, and the metallic looks really good.
|
| |
mikeb

Senior Member

Joined: 10/04/2016
Location: AustraliaPosts: 180 |
| Posted: 02:27pm 24 Jun 2016 |
Copy link to clipboard |
Print this post |
|
Mate. That R2-D2 is fantastic. Well done. 
Does it project a hologram ? 
There are 10 kinds of people in the world.
Those that understand binary and those that don't. |
| |
