
|
|
Forum Index : Microcontroller and PC projects : ARMmite F4 line command - thickness problem
| Author | Message | ||||
| vegipete Guru Joined: 29/01/2013 Location: CanadaPosts: 1127 |
I was playing with what I think is the latest ARMmite version > ? mm.ver and I see what seems like odd line thickness behaviour. Assuming the command is just like the 'BOX' command, and omitting the fill colour,5.0508 > ? mm.device$ ARMmite F407 Line MM.HRes/2, MM.VRes/2,XE,YE,thick,RGB(WHITE) should draw a line from the center of the screen to coordinates XE,YE. (BTW, I can't find the 'LINE' command in the manuals - might be just me.) However, the thickness parameter only seems to apply to vertical or horizontal lines. Diagonal lines seem to always have a thickness of 1.Also, the thick line, when drawn, is not centered on the line between the end points. Instead, the line specified by the end points represents one _edge_ of a box that is 'width' thick. Hopefully that is not as intended. Visit Vegipete's *Mite Library for cool programs. |
||||
| matherp Guru Joined: 11/12/2012 Location: United KingdomPosts: 10180 |
"However, the thickness parameter only seems to apply to vertical or horizontal lines. Diagonal lines seem to always have a thickness of 1." See the Micromite manual in the drawing commands section "Also, the thick line, when drawn, is not centered on the line between the end points. Instead, the line specified by the end points represents one _edge_ of a box that is 'width' thick. Hopefully that is not as intended." As with all drawing commands the coordinates represent top left. Same for all MM Edited 2019-10-13 17:19 by matherp |
||||
goc30 Guru Joined: 12/04/2017 Location: FrancePosts: 435 |
Hi vegipete you can use my program who use all standards graphics functions as exemple test_graf.zip |
||||
| vegipete Guru Joined: 29/01/2013 Location: CanadaPosts: 1127 |
Well, that's a disappointing answer. ;-) I eventually found the 'line' command in the micromite manual. (It's in the section "Using an LCD Panel:Drawing Commands" but NOT in the alphabetical list of commands. Hint Hint) And sure enough, it says right there that the line width defaults to 1 for diagonal lines. That sort of defeats the purpose of having a line width if it only works for special cases that could be done instead with the 'box' command. Anyways, I'll not gripe and whinge about it. I know that thick lines are not trivial. Instead, I offer the following code. Some googling found this thick line drawing site which evaluates and explores work by Alan Murphy Thick Line Algorithm. I went through the presented code and rewrote it in MMBasic. Ideally this could be rewritten back into C and made part of MMBasic. The idea uses Bresenham's Line drawing algorithm to draw a line from start to end. Then, for each pixel (more or less) along said line, perpendicular Bresenham lines are drawn to each side to generate the desired thickness. (The code on the first link actually allows the width to be a function of distance along the line, so neat patterns are possible but I just went with simple.) All variables are integers, and there is only a single 'Sqr(dx*dx+dy*dy)' per thick line so calculations are simple. MMBasic kinda bogs down with this but does draw nice fat lines. Ends are flat and nicely aligned. I haven't tested extensively to see if the resulting widths are exactly as expected. Widths are calculated in lines 107 and 200 but I'm not convinced they are 100% correct. Also, I think the algorithm could be improved slightly for constant thickness lines. The short perpendicular lines are mirror symmetric so it ought to be possible to only calculate them for one side and plot the other side with sign-swapped relative coordinates. 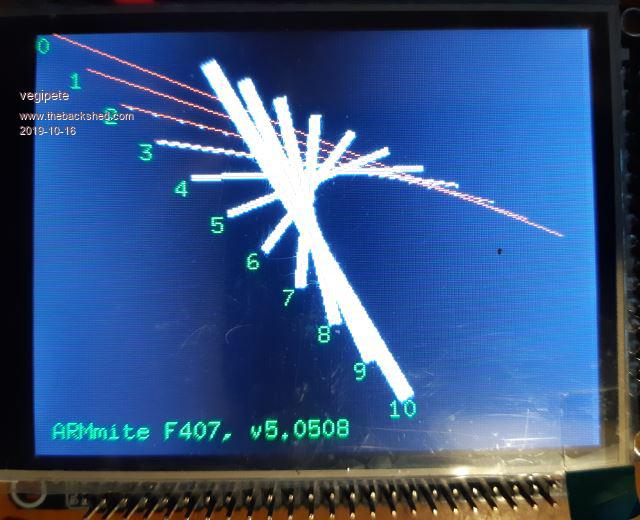 Note there is at least one long line in the following code that may cause MMBasic to barf because it gets split onto the following line. Option DEFAULT INTEGER Dim INTEGER i CLS Font 1,1 Text 10,220,"ARMmite F407, v5.0508",,,1,RGB(GREEN) For i = 0 To 10 Colour RGB(GREEN) Text 20*i,21*i,Str$(i) 'Show line thickness at start of line DrawThickLine 10+20*i,21*i,300-20*i,120-10*i,i,RGB(WHITE) Line 10+20*i,21*i,300-20*i,120-10*i,1,RGB(RED) ' red line down the middle Next i End '*********************************************************************** '* ENTRY * '*********************************************************************** Sub DrawThickLine(x0%, y0%, x1%, y1%, thick%, colour%) Local integer dx, dy Local integer xstep, ystep Local integer pxstep, pystep If thick% < 2 Then Line x0, y0, x1, y1, 1, colour Else dx = x1-x0 dy = y1-y0 xstep = 1 ystep = 1 If dx < 0 Then dx = -dx : xstep = -1 If dy < 0 Then dy = -dy : ystep = -1 If dx = 0 Then xstep = 0 If dy = 0 Then ystep = 0 ' 9 possible states to consider ' xstep can be -1,0,1 and ystep can be -1,0,1 If xstep = -1 Then If ystep = -1 Then pystep = -1 pxstep = 1 ElseIf ystep = 0 Then pystep = -1 pxstep = 0 Else 'ystep = 1 pystep = 1 pxstep = 1 EndIf ElseIf xstep = 0 Then If ystep = -1 Then pystep = 0 pxstep = -1 ElseIf ystep = 0 Then pystep = 0 pxstep = 0 Else 'ystep = 1 pystep = 0 pxstep = 1 EndIf Else 'xstep = 1 If ystep = -1 Then pystep = -1 pxstep = -1 ElseIf ystep = 0 Then pystep = -1 pxstep = 0 Else 'ystep = 1 pystep = 1 pxstep = -1 EndIf EndIf If dx > dy Then ' closer to horizontal so iterate over x ThickLineX(x0,y0,dx,dy,xstep,ystep,pxstep,pystep,thick,colour) Else ' closer to vertical so iterate over y ThickLineY(x0,y0,dx,dy,xstep,ystep,pxstep,pystep,thick,colour) EndIf EndIf End Sub '*********************************************************************** '* X BASED LINES * '*********************************************************************** Sub ThickLineX(x0%,y0%,dx%,dy%,xstep%,ystep%,pxstep%,pystep%,width%,colour%) Local integer x, y, D Local integer p_err, e_err Local integer E_diag, E_square Local integer length, p Local integer threshold Local integer w_len p_err = 0 e_err = 0 y = y0 x = x0 E_diag = -2*dx E_square = 2*dy threshold = dx - E_square length = dx+1 D = Sqr(dx*dx+dy*dy) For p = 0 To length 'move along all the pixels in the X direction w_len = width * D '* 2 'calculate half width XPerpendicular(x,y,dx,dy,pxstep,pystep,p_err,e_err,w_len,colour) If (e_err >= threshold) Then y= y + ystep e_err = e_err + E_diag If (p_err >= threshold) Then p_err= p_err + E_diag XPerpendicular(x,y,dx,dy,pxstep,pystep,p_err+E_square,e_err,w_len,colour%) EndIf p_err= p_err + E_square EndIf e_err = e_err + E_square x = x + xstep Next p End Sub Sub XPerpendicular(x0%,y0%,dx%,dy%,xstep%,ystep%,einit%,winit%,width%,colour%) Local integer x, y Local integer threshold, E_diag, E_square, e_err Local integer tk Local integer p, q threshold = dx - 2*dy E_diag = -2*dx E_square = 2*dy p = 0 q = 0 y = y0 x = x0 e_err = einit tk = dx + dy - winit Do While(tk <= width) Pixel x,y, colour If (e_err >= threshold) Then x = x + xstep e_err = e_err + E_diag tk = tk + 2*dy EndIf e_err = e_err + E_square y = y + ystep tk = tk + 2*dx q = q + 1 Loop y = y0 x = x0 e_err = -einit tk = dx + dy + winit Do While(tk <= width) If p <> 0 Then Pixel x,y, colour If (e_err > threshold) Then x = x - xstep e_err = e_err + E_diag tk = tk + 2*dy EndIf e_err = e_err + E_square y = y - ystep tk = tk + 2*dx p = p + 1 Loop If q = 0 And p < 2 Then Pixel x0,y0,colour ' for very thin lines End Sub '*********************************************************************** '* Y BASED LINES * '*********************************************************************** Sub ThickLineY(x0%,y0%,dx%,dy%,xstep%,ystep%,pxstep%,pystep%,width%,colour%) Local integer x, y, D Local integer p_err, e_err Local integer E_diag, E_square Local integer length, p Local integer threshold Local integer w_len p_err = 0 e_err = 0 y = y0 x = x0 E_diag = -2*dy E_square = 2*dx threshold = dy - E_square length = dy+1 D = Sqr(dx*dx+dy*dy) For p = 0 To length 'move along all the pixels in the Y direction w_len = width * D '* 2 'calculate half width YPerpendicular(x,y, dx, dy, pxstep, pystep, p_err, e_err, w_len,colour) If (e_err >= threshold) Then x = x + xstep e_err = e_err + E_diag If (p_err >= threshold) Then p_err= p_err + E_diag YPerpendicular(x,y,dx,dy,pxstep,pystep,p_err+E_square,e_err,w_len,colour ) EndIf p_err= p_err + E_square EndIf e_err = e_err + E_square y = y + ystep Next p End Sub Sub YPerpendicular(x0%,y0%,dx%,dy%,xstep%,ystep%,einit%,winit%,width%,colour) Local integer x, y Local integer threshold, E_diag, E_square, e_err Local integer tk Local integer p, q E_diag = -2*dy E_square = 2*dx threshold = dy - E_square p = 0 q = 0 y = y0 x = x0 e_err = -einit tk = dx + dy + winit Do While(tk <= width) Pixel x,y, colour If (e_err > threshold) Then y = y + ystep e_err = e_err + E_diag tk = tk + 2*dx EndIf e_err = e_err + E_square x = x + xstep tk = tk + 2*dy q = q + 1 Loop y = y0 x = x0 e_err = einit tk = dx + dy - winit Do While(tk <= width) If p <> 0 Then Pixel x,y, colour If (e_err >= threshold) Then y = y - ystep e_err = e_err + E_diag tk = tk + 2*dx EndIf e_err = e_err + E_square x = x - xstep tk = tk + 2*dy p = p + 1 Loop If q = 0 And p < 2 Then Pixel x0,y0,colour ' for very thin lines End Sub Visit Vegipete's *Mite Library for cool programs. |
||||
TassyJim Guru Joined: 07/08/2011 Location: AustraliaPosts: 6264 |
Interesting algorithm. If you aren't interested in varying the width along the line, you should be able to draw 2 or more lines parallel. This should reduce the calculations somewhat. Re the manual. My Micromite V5.05 manual has, in the command list:  Jim VK7JH MMedit |
||||
| vegipete Guru Joined: 29/01/2013 Location: CanadaPosts: 1127 |
The trick is to make sure you hit each pixel once, and ideally only once. But I am pondering just that, using the perpendicular line at the starting point to generate the relative start and end coordinates. You are quite right. I had version 5.1 open... Maybe the version number could appear on the bottom corner of each page? Visit Vegipete's *Mite Library for cool programs. |
||||
| ceptimus Senior Member Joined: 05/07/2019 Location: United KingdomPosts: 130 |
Don't the Armmites all have a triangle command? ĀCompute the coordinates of the four corners of the thick diagonal line and then fill it by drawing two filled triangles - that might be faster than drawing lots of parallel short lines. ĀIt would be a lot less code anyway. If you don't have a triangle command available, then lots of straight lines is probably the best way to go. list commands on my Armmite also shows a Polygon command is available. That should be even faster!  POLYGON xarray%(), yarray%() [, bordercolour] [, fillcolour] you have to make sure the first and last elements of the arrays are the same so that the polygon is closed. . Edited 2019-10-17 02:57 by ceptimus |
||||
| The Back Shed's forum code is written, and hosted, in Australia. | © JAQ Software 2025 |
