
|
|
Forum Index : Microcontroller and PC projects : Not MM related but..
| Author | Message | ||||
lew247 Guru Joined: 23/12/2015 Location: United KingdomPosts: 1709 |
I know almost everyone here is smarter than me I have a picture I have made in Photoshop but I need to add holes for screws in specific places Would anyone be able to do this if I sent them the picture? I need 2 holes in 4 locations in the picture 8 holes altogether The holes need to be spaced as in this Or alternatively can anyone tell me how to place these holes in the exact position I need? 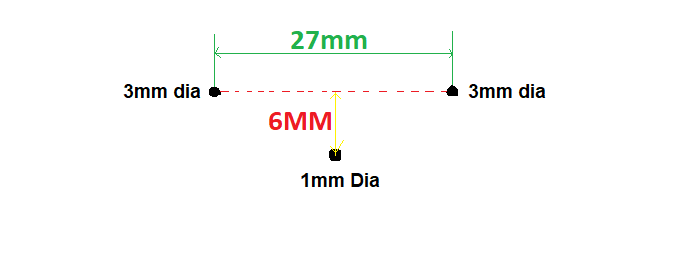 Edited 2021-01-03 22:29 by lew247 |
||||
| Plasmamac Guru Joined: 31/01/2019 Location: GermanyPosts: 620 |
Is there a Ruler in the Picture to get the right Dimensions ? Will you print the picture and used it as a Form? Plasma |
||||
| circuit Guru Joined: 10/01/2016 Location: United KingdomPosts: 307 |
On my system I would simply drop the photo into CorelDraw, size the photo as needed, lock the scales to the bottom left of the photo and then draw on the holes as needed. If the holes needed to be really neat then I would pop the print (with registration marks) through my Silhouette Cameo cutter. If you do not have CorelDraw, then the free vector editing program LibreOffice Draw will do the same. Quite simply though, why not just mark up the back of the photo with a ruler and then pop the holes through? If you need the holes to be really neat then use a hollow punch of the appropriate size - easily available on Amazon. |
||||
| lew247 Guru Joined: 23/12/2015 Location: United KingdomPosts: 1709 |
When I'm happy with it, it's going to a printers to be printed onto laminate sheet so it isn't an option to print it and mark the holes on the back The holes will be drilled by the printers when the print it btw has anyone else had an issue with the forum? it's saying this when I go to edit posts even though there are no emojis 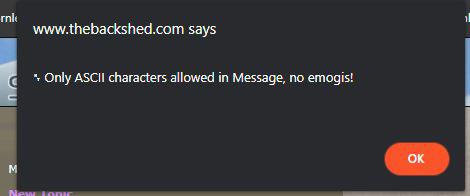 |
||||
| Tinine Guru Joined: 30/03/2016 Location: United KingdomPosts: 1646 |
Inkscape is great for that kind of stuff and very easy to use. I had an application where I needed to create an overlay for 7 pushbuttons where the steel panel had already been punched for the 7 holes of 22.5mm diameter. The scaling was perfect and because I didn't want to fight with self-adhesive paper, I printed on magnetic sheet. I printed on my ink jet printer, punched the holes out and applied the overlay to the steel panel. The magnetic sheet was easy to align and then I sprayed with photo lacquer to fix it permanently. This solution has survived for several years of operator-gloves abuse. |
||||
TassyJim Guru Joined: 07/08/2011 Location: AustraliaPosts: 6546 |
You are probably doing a copy and paste from Word documents etc that use "smart quotes". These "smart quotes" use a character code above 127 and are now getting blocked. The nasty people out there are making life difficult for the rest of us. Jim VK7JH MMedit |
||||
| lew247 Guru Joined: 23/12/2015 Location: United KingdomPosts: 1709 |
Nope just trying to edit a post to remove some bits |
||||
| lew247 Guru Joined: 23/12/2015 Location: United KingdomPosts: 1709 |
and it let me that time again lol |
||||
| Holger Newbie Joined: 04/11/2020 Location: GermanyPosts: 11 |
If indeed no characters above 127 are allowed, it might be one of those accents that are not used very often by "seven-bit-ASCII-enthusiasts". like 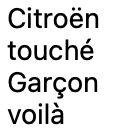 |
||||
| Holger Newbie Joined: 04/11/2020 Location: GermanyPosts: 11 |
... and I love the fact that all those characters are called Emogi by the forum software (very similar to emoji) I also got the emogi error, when I tried to edit my post with the attached picture above Edited 2021-01-04 07:21 by Holger |
||||
| TassyJim Guru Joined: 07/08/2011 Location: AustraliaPosts: 6546 |
You are right, every time I think I have the reason why there are problems posting, I find out that it is something else. Jim VK7JH MMedit |
||||
| Mixtel90 Guru Joined: 05/10/2019 Location: United KingdomPosts: 8964 |
Lew: I don't know what file format your photo is in, but I could load a raster file (tif, jpg, jpeg, bmp, png or pcx) as a background into the free version of nanoCAD then mark the holes. Would the finished file be ok as a dwg file suitable for loading into AutoCAD or similar or does it have to be a Photoshop raster-type file? It'll depend on your printer, what conversions can be done and the final accuracy required. Mick Zilog Inside! nascom.info for Nascom & Gemini Preliminary MMBasic docs & my PCB designs |
||||
bigmik Guru Joined: 20/06/2011 Location: AustraliaPosts: 2981 |
Lew, What format do you want it in? Is the lower 1mm dia hole exactly in the middle of the other 2 ? Ie 13.5mm from the left hole? What resolution do you want/need? Regards, MICK Mick's uMite Stuff can be found >>> HERE (Kindly hosted by Dontronics) <<< |
||||
| panky Guru Joined: 02/10/2012 Location: AustraliaPosts: 1132 |
Lew, As Photoshop is essentially a raster editing type program, there is no easy way to position a circle with a precise size at a precise place. You can place circles (elipse tool, filled or unfilled) but I know of no simple way of doing it precisely in Photoshop. I would import the raster graphic into Adobe Illustrator (a vector manipulation program) then create the holes of the required size and place them accordingly. The complete image (pic plus holes) could then be saved/exported to whatever format your printer requires. I would be happy to do that for you if you send me the Photoshop image file. I would need 3 things: 1. The absolute dimensions of the picture file ( x by y in mm), 2. The size of the holes and their relative positions with reference to the lower left corner of the Photoshop image, and 3. The format and resolution your printer requires. Doug. Edited 2021-01-04 22:35 by panky ... almost all of the Maximites, the MicromMites, the MM Extremes, the ArmMites, the PicoMite and loving it! |
||||
| The Back Shed's forum code is written, and hosted, in Australia. | © JAQ Software 2026 |
