
|
|
Forum Index : Microcontroller and PC projects : LCD + Pico combo
| Author | Message | ||||
| lizby Guru Joined: 17/05/2016 Location: United StatesPosts: 3367 |
I don't recall that a 3.5 inch 480x320 ILI9488 LCD has been recorded as working with this PCB. Here it is with the guidemo program modified to fit the pixels: 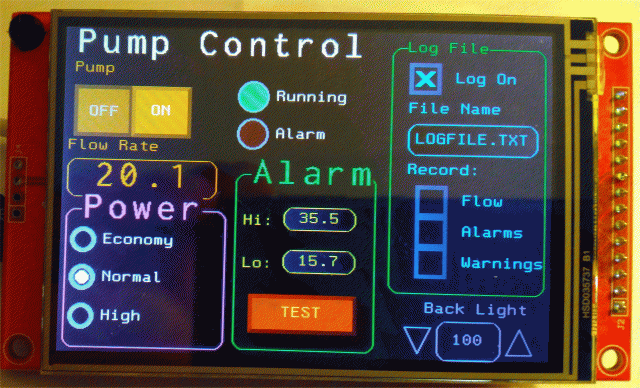 To fix the ILI9488's MISO problem, I cut the very short trace between the LCD MISO pin on the PCB and the adjacent via. I didn't have a 68R as recommended, so put two 33Rs in series bridging the cut trace (easy to do with one leg of one resister through the via and the other soldered to the pad for the MISO pin on the PCB). Here's guidemo480.bas: ' guidemo480 ' Demonstration program for the Micromite+ ' It does not do anything useful except demo the various controls ' Geoff Graham, October 2015 ' Mod to 480x320 by Lance Benson (lizby) April 2021, June 2021 ' LB PCB: OPTION SYSTEM SPI 4,5,6 ' option lcdpanel ILI9488,L,26,25,24 & option touch 29,27 ' Mixtel PCB: OPTION SYSTEM SPI GP18, GP19, GP16 OPTION LCDPANEL ILI9488, L, GP20, GP21, GP17 ' OPTION TOUCH GP14, GP15 OPTION SDCARD GP22 ''''''''''''''''''''''''''''''''''''''''''''''''''''''''''''''''' 'Option Autorun On Option Explicit ' gui calibrate 'backlight 50 ' not available on pico Dim ledsY Colour RGB(white), RGB(black) ' reference numbers for the controls are defined as constants Const c_head = 1, c_pmp = 2, sw_pmp = 3, c_flow = 4, tb_flow = 5 Const led_run = 6, led_alarm = 7 Const frm_alarm = 20, nbr_hi = 21, nbr_lo = 22, pb_test =23 Const c_hi = 24, c_lo = 25 Const frm_pump = 30, r_econ = 31, r_norm = 32, r_hi = 33 Const frm_log = 40, cb_enabled = 41, c_fname = 42, tb_fname = 43 Const c_log = 44, cb_flow = 45, cb_pwr = 46, cb_warn = 47 Const cb_alarm = 48, c_bright = 49, sb_bright = 50 ' now draw the "Pump Control" display CLS dim integer f1=4,f2=5 if mm.device$="RP2040 PicoMite" then f1=1:f2=2 GUI Interrupt TouchDown, TouchUp ' display the heading Font f2 : GUI Caption c_head, "Pump Control", 10, 0 Font f1 : GUI Caption c_pmp, "Pump", 10, 32, , RGB(brown) ' now, define and display the controls ' first display the switch Font f1 GUI Switch sw_pmp, "OFF|ON", 10, 57, 115, 50, RGB(white),RGB(brown) CtrlVal(sw_pmp) = 1 ' the flow rate display box Font f1 : GUI Caption c_flow, "Flow Rate", 5, 109,, RGB(brown),0 Font f2 : GUI Displaybox tb_flow, 5, 130, 147, 37 CtrlVal(tb_flow) = "20.1" ' the radio buttons and their frame Font f2 : GUI Frame frm_pump, "Power", 5, 180, 157, 135,RGB(200,20,255) Font f1 GUI Radio r_econ, "Economy", 22, 210, 12, RGB(230, 230, 255) GUI Radio r_norm, "Normal", 22, 247 GUI Radio r_hi, "High", 22, 285 CtrlVal(r_norm) = 1 ' start with the "normal" button selected ' the alarm frame with two number boxes and a push button switch Font f2 : GUI Frame frm_alarm, "Alarm", 172, 142, 137, 172,RGB(green) Font f1 GUI Caption c_hi, "Hi:", 180, 180, LT, RGB(yellow) GUI Numberbox nbr_hi, 220,MM.VPos-6,70,MM.FontHeight+6,RGB(yellow),RGB(64,64,64) GUI Caption c_lo, "Lo:", 180, 222, LT, RGB(yellow),0 GUI Numberbox nbr_lo, 220,MM.VPos-6,70,MM.FontHeight+6,RGB(yellow),RGB(64,64,64) GUI Button pb_test, "TEST", 187, 260, 105, 37,RGB(yellow), RGB(red) CtrlVal(nbr_lo) = 15.7 : CtrlVal(nbr_hi) = 35.5 ' draw the two LEDs Const ledsX = 187, coff = 75 ' define their position ledsY = 65 : GUI LED led_run, "Running", ledsX, ledsY, 15, RGB(green) ledsY = ledsY+37 : GUI LED led_alarm, "Alarm", ledsX, ledsY, 15, RGB(red) CtrlVal(led_run) = 1 ' the switch defaults to on so set the LED on ' the logging frame with check boxes and a text box Colour RGB(cyan), 0 Font f1 'GUI Frame frm_log, "Log File", 210, 10, 110, 158, RGB(green),0 GUI Frame frm_log, "Log File", 323, 15, 150, 240, RGB(green) Font f1 GUI Checkbox cb_enabled, "Log On", 340, 30, 30, RGB(cyan) GUI Caption c_fname, "File Name", 340, 67 GUI Textbox tb_fname, 340, 90, 125, 30, RGB(cyan), RGB(64,64,64) GUI Caption c_log, "Record:", 340, 127, , RGB(cyan), 0 GUI Checkbox cb_flow, "Flow", 348, 150, 30 GUI Checkbox cb_alarm, "Alarms", 348, 180, 30 GUI Checkbox cb_warn, "Warnings", 348, 210, 30 CtrlVal(cb_enabled) = 1 CtrlVal(tb_fname) = "LOGFILE.TXT" ' define and display the spinbox for controlling the backlight GUI Caption c_bright, "Back Light", 358, 262,,RGB(200,200,255),0 ' GUI Spinbox sb_bright, 210, 210, 110, 25,,,10, 10, 100 GUI Spinbox sb_bright, 333, 282, 135, 37,,,10, 10, 100 CtrlVal(sb_bright) = 100 ' All the controls have been defined and displayed. At this point ' the program could do some real work but because this is just a ' demo there is nothing to do. So it just sits in a loop. Do : Loop ' the interrupt routine for touch down ' using a select case command it has a different process for each ' control Sub TouchDown Select Case Touch(REF) ' find out the control touched Case cb_enabled ' the enable check box If CtrlVal(cb_enabled) Then GUI Restore c_fname, tb_fname, c_log, cb_flow, cb_alarm, cb_warn Else GUI Disable c_fname, tb_fname, c_log, cb_flow, cb_alarm, cb_warn EndIf Case sb_bright ' the brightness spin box ' BackLight CtrlVal(sb_bright) ' not available on pico Case sw_pmp ' the pump on/off switch Print CtrlVal(sw_pmp) CtrlVal(led_run) = CtrlVal(sw_pmp) CtrlVal(tb_flow) = Str$(CtrlVal(sw_pmp) * 20.1) CtrlVal(r_norm) = 1 Case pb_test ' the alarm test button Open "Test.txt" For Append As #1 Print "File Opened" Print #1, "Hello World", Time$ Print "Hello World", Time$ Close #1 Print "File Closed" CtrlVal(led_alarm) = 1 ' GUI beep 250 ' on picomite, "Error: CLick option not set Case r_econ ' the economy radio button CtrlVal(tb_flow) = Str$(CtrlVal(sw_pmp) * 18.3) Case r_norm ' the normal radio button CtrlVal(tb_flow) = Str$(CtrlVal(sw_pmp) * 20.1) Case r_hi ' the high radio button CtrlVal(tb_flow) = Str$(CtrlVal(sw_pmp) * 23.7) End Select End Sub ' interrupt routine when the touch is removed Sub TouchUp Select Case Touch(LASTREF) ' use the last reference Case pb_test ' was it the test button CtrlVal(led_alarm) = 0 ' turn off the LED End Select End Sub PicoMite, Armmite F4, SensorKits, MMBasic Hardware, Games, etc. on fruitoftheshed |
||||
| robert.rozee Guru Joined: 31/12/2012 Location: New ZealandPosts: 2440 |
68 ohm seemed a little low, so i looked back through the records. earliest reference seems to be peter's post here, where he recommends 680 ohm: https://www.thebackshed.com/forum/ViewTopic.php?TID=11419&PID=135581 3.3/680 = 5mA, which is more-or-less within the drive capability of most logic outputs. you could go for an even higher resistor value (2k2), but since 680 ohms work there is little point in doing so. has anyone looked at the ILI9488's MISO output with a scope to see what is present on the pin when the device is deselected? is it permanently high/low, or does it have a changing signal on it? cheers, rob :-) |
||||
| KD5ZXG Regular Member Joined: 21/01/2022 Location: United StatesPosts: 53 |
Lets not forget the MISO problem wasn't about all ILI9488, or even about a resistor, but one unfortunate diode that didn't belong on one now obsolete board that prevented that display from releasing MISO to tri-state. https://github.com/Bodmer/TFT_eSPI/discussions/898 Waveshare's 3.5 doesn't have a diode preventing deselect and tri-state. MISO is connected without resistor to both display and touch and both work. But the last I tested (I haven't checked updates of the last few weeks) MMBASIC console and commands leaning on BLIT were still not permitted to try. Ended up getting some 7" parallel displays instead. SPI console is no longer an issue I'm losing sleep over. Edited 2022-03-26 16:34 by KD5ZXG |
||||
| phil99 Guru Joined: 11/02/2018 Location: AustraliaPosts: 2626 |
Reading the above link, it seems the diode problem applies only to some boards with the ST7796. As I understand it the ILI9488 problem is in the chip, requiring the resistor to allow other devices to use MISO. As noted by robert.rozee 68 ohms would seem low enough to seriously tax the output of the touch controller. |
||||
| KD5ZXG Regular Member Joined: 21/01/2022 Location: United StatesPosts: 53 |
My Waveshare 3.5 has ILI9488 and no resistor. Touch over shared MISO works perfectly. I have traced MISO to the ILI9488. It is connected. If some bizarre earlier version won't release MISO, a series mosfet channel might work to restore shared function better than a resistor. Pull up the gate to enable, pull down to tri-state. Whatever part one might have around for logic level translation... Edited 2022-03-26 17:04 by KD5ZXG |
||||
| phil99 Guru Joined: 11/02/2018 Location: AustraliaPosts: 2626 |
Just tested my ILI9488 and it's SDO (MISO) is held low with an impedance of about 40 ohms when idle. Edit From memory (may not be reliable) others have said the SDO pin on the Waveshare displays is not connected to the chip. Edit 2 Further testing. The maximum resistor value for reliable BLIT and SAVE IMAGE is about 820 ohms, any higher results in many pixel errors. At 390 ohms touch still worked. Wasn't game to go any lower. Edited 2022-03-26 17:42 by phil99 |
||||
| The Back Shed's forum code is written, and hosted, in Australia. | © JAQ Software 2025 |
