
|
|
Forum Index : Microcontroller and PC projects : new vga moan
| Author | Message | ||||
| phil99 Guru Joined: 11/02/2018 Location: AustraliaPosts: 2619 |
As Peter said use SPRTIE SHOW not SPRITE WRITE and erasing the old position and restoring the background all gets done for you. From my previous post try this:- Mode 1 cls : circle 250,50,15,0,1,1,1 : sprite read 2,235,35,32,32 cls 1:for y=1 to 460 step 17:for x=1 to 610 step 17:BOX x,y,16,16,,0,0:next:next for y=1 to 450 step 30:for x=1 to 620 step 17:sprite show 2,x,y,0:pause 99:next:next You don't need to run it as a program, just copy & paste each line to the PicoVGA command prompt. Edited 2023-02-06 09:48 by phil99 |
||||
| Martin H. Guru Joined: 04/06/2022 Location: GermanyPosts: 1221 |
Hi Stan, here you have something to play with  MODE 2:FRAMEBUFFER create:FRAMEBUFFER Layer create Dim col%(15) Restore colors:For f%=1 To 15:Read Col%(f%):Next f% FRAMEBUFFER write f:CLS Box 0,0,16,16,,RGB(255,0,0),RGB(255,64,0) Box -1,2,16,15,,RGB(255,128,0),RGB(255,64,0) Sprite read #1 ,0,0,16,16 For p%=1 To 20 Read Byt$ For n%=1 To Len(Byt$) Pixel n%-1,p%+119,COL%(Val("&H"+Mid$(Byt$,n%,1))) Next n% Next p% Sprite read #2,0,120,20,20 For p%=0 To 16 Step 8 For x%=0 To 24 Step 8 Box x%,p%,6,2,,col%(14),col%(14) Box x%-4,p%+4,6,2,,col%(14),col%(14) Box x%+1,p%+1,6,2,,col%(12),col%(12) Box x%-3,p%+5,6,2,,col%(12),col%(12) Next x% Next p% Sprite read #3 ,0,0,16,16 '----------------- ' CLS RGB(0,128,255) Print @(0,120) For x%=0 To 304 Step 16 Sprite write #1,x%,224:Sprite write #1,x%,208 Next cnt%=0 FRAMEBUFFER write L Box 256,0,64,240,,RGB(BLUE),RGB(White) Font 7:Text 120,110,"Demo" Sprite write #2,118,188 FRAMEBUFFER write f Do Sprite scroll -1,0 FRAMEBUFFER copy f,n,b Inc cnt%:If cnt%=16 Then ty=Int(Rnd*13)*16 Box 304,0,32,208,,RGB(0,128,255),RGB(0,128,255) Sprite write #3,304,ty cnt%=0 EndIf Loop ' colors: '--Colorscheme accordung to matherp Data RGB(BLUE),RGB(GREEN),RGB(CYAN),RGB(RED) Data RGB(MAGENTA),RGB(YELLOW),RGB(WHITE),RGB(MYRTLE) Data RGB(COBALT) ,RGB(MIDGREEN),RGB(CERULEAN),RGB(RUST) Data RGB(FUCHSIA),RGB(BROWN),RGB(LILAC) ' Data "000000E0060060000000","000D0DD606666E0D0000","0000D0DDE060E55D0D00" Data "005DD555566EDDD66006","00366DD5DD65EEE36060","0036066D6566DFF006E0" Data "000606F6F56DDFF00606","0060FF56C66FF8870060","006955C6CFFFFCCF0060" Data "006555C6FFCC8CF50000","060151FFFFCC8C100000","0005F44CCCCC441F0000" Data "000FDF4444444CF10000","000FFBB44444B9FF0000","00091B4444444B800000" Data "00000F11111111F00000","00000011111111000000","00000011100111000000" Data "00000077700777000000","00007777700777770000" have fun cheers Mart!n 'no comment |
||||
| stanleyella Guru Joined: 25/06/2022 Location: United KingdomPosts: 2547 |
Nice scrolling demo Martin.Thanks, stan. |
||||
| stanleyella Guru Joined: 25/06/2022 Location: United KingdomPosts: 2547 |
@phil99. Hi, if I want 16 sprites the same then if I use sprite hide 1 then instead of each sprite being erased, moved and redrawn, it erases all the sprites and is a mess. I would need 16 sprites even if the same ie sprite read 1,2,3.....16. |
||||
| stanleyella Guru Joined: 25/06/2022 Location: United KingdomPosts: 2547 |
vga mini ps2 plug keyboard. The manual shows front view but I cut the lead and buzzed the connections and it's green....O || O yellow..O O..red white.....O O so it's the ps2 mini socket front view,not the keyboard plug? Don't open the keyboard to see the wiring, it'll never work again,they are so cheaply made. |
||||
| Mixtel90 Guru Joined: 05/10/2019 Location: United KingdomPosts: 7877 |
It's no good going off the colours. They aren't guaranteed to be the same for all manufacturers (or for all keyboards of the same model from the same manufacturere for that matter!). It's pin numbers that are important. https://en.wikipedia.org/wiki/PS/2_port Mick Zilog Inside! nascom.info for Nascom & Gemini Preliminary MMBasic docs & my PCB designs |
||||
| stanleyella Guru Joined: 25/06/2022 Location: United KingdomPosts: 2547 |
True Mick and I am colour blind but red/green so coloured wires not a large area to see. I got an inverter circuit set up but kb wires? 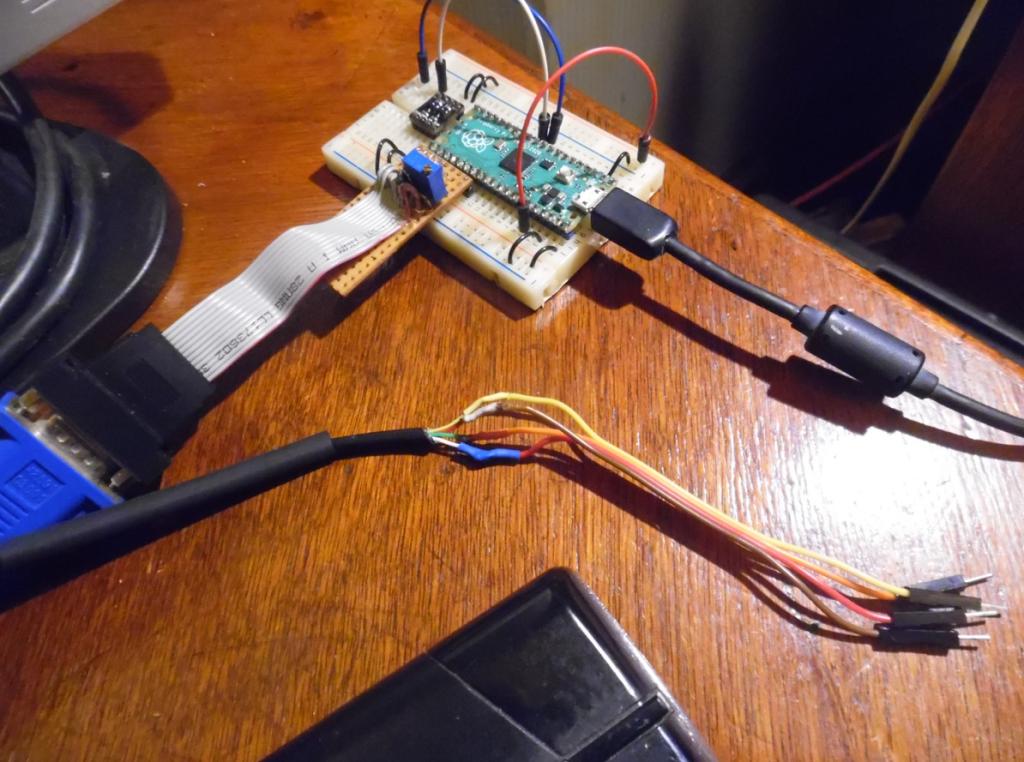 |
||||
| Mixtel90 Guru Joined: 05/10/2019 Location: United KingdomPosts: 7877 |
My dad was red/green colour blind. That's how I got into electronics - reading resistor values for him when he was building short-wave radios in his shed. :) Both clock and data from the keyboard go into the 5V side of the level shifter (which will also ned a 5V supply, as well as the keyboard). The 3V3 side of the level shifter will need a 3V3 supply and the clock / data signals on that go to the Pico. As for telling which of the coloured wires from the keyboard goes, compare the pin positions in the link that I posted. You can figure out the colours from that. Mick Zilog Inside! nascom.info for Nascom & Gemini Preliminary MMBasic docs & my PCB designs |
||||
| stanleyella Guru Joined: 25/06/2022 Location: United KingdomPosts: 2547 |
Cheers sir,being colour blind don't mean I see as a dog and dogs are not logical anyway and can't taste anything but I luv dogs,had rambo 14 years. cats,I had loads but it was a wife thing. I have to read resistors with a meter, I should get another hobby :) eyes that see helps. the kb is only 4 wires, I am an eegit |
||||
| phil99 Guru Joined: 11/02/2018 Location: AustraliaPosts: 2619 |
Latest PicoVGA manual page 6 bottom. Clock...green....O || O Gnd.....yellow..O O..red...5V Data....white.....O O |
||||
| stanleyella Guru Joined: 25/06/2022 Location: United KingdomPosts: 2547 |
Hi Phil, my keyboard is now working, UK keys. I'm very happy, vga and keyboard. Many thing to explore. page 6 in my manual shows reverse view from kb plug. It does say keyboard front view but it's not. 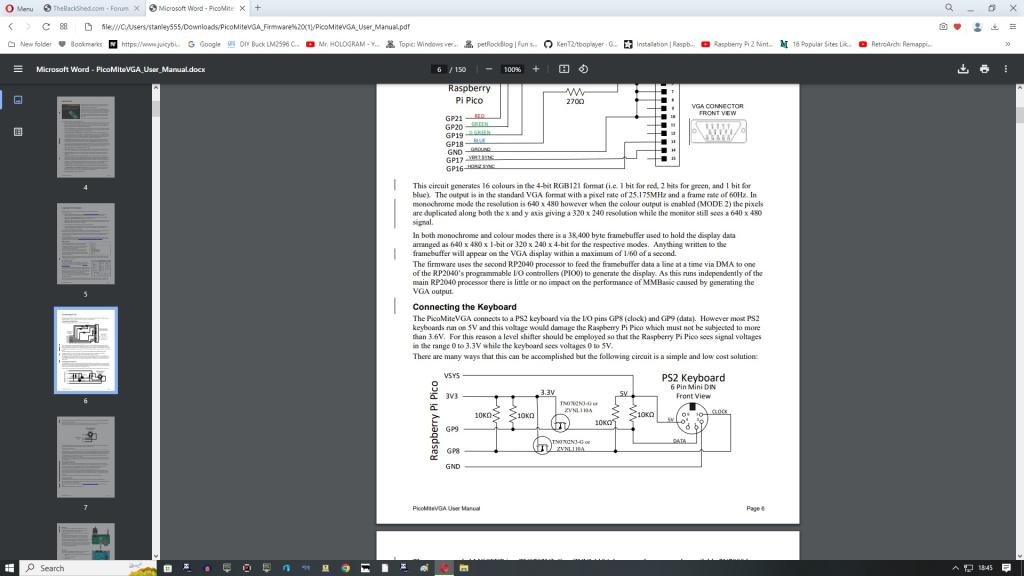 Edited 2023-02-10 04:51 by stanleyella |
||||
| stanleyella Guru Joined: 25/06/2022 Location: United KingdomPosts: 2547 |
I was impressed when the keyboard worked.The £1 level converter worked fine, lot less bother than the converter in the manual. I found the vga keyboard shows the inbuilt editor better than it shows using teraterm. It is full screen but only mode 1. I should try it but used to mmedit. lots to try I ran the keyboard from 3.3V and no logic level converter and it works! even tidier and cheaper. Brill! Edited 2023-02-10 07:28 by stanleyella |
||||
| phil99 Guru Joined: 11/02/2018 Location: AustraliaPosts: 2619 |
The circuit shown is wiring up a socket, viewed from the front of the socket and is correct. The view from the front of a plug is the mirror image. You are not the first to be caught by this. A very expensive instance was when a 3 phase generator was being wired in to the local fire station. The electrician wired the inlet socket the same as an outlet socket. All the roller doors turned backwards and were severely damaged. |
||||
| Mixtel90 Guru Joined: 05/10/2019 Location: United KingdomPosts: 7877 |
On most of the plugs and sockets the pins are numbered somewhere, although you may need some sort of magnification. It's easy then. :) Mick Zilog Inside! nascom.info for Nascom & Gemini Preliminary MMBasic docs & my PCB designs |
||||
| stanleyella Guru Joined: 25/06/2022 Location: United KingdomPosts: 2547 |
Will I not be popular for sharing my enthusiasm? https://www.youtube.com/watch?v=O1DawsYK4TU |
||||
| stanleyella Guru Joined: 25/06/2022 Location: United KingdomPosts: 2547 |
The ps2 keyboard I use is Dell and it's the same colour wires. 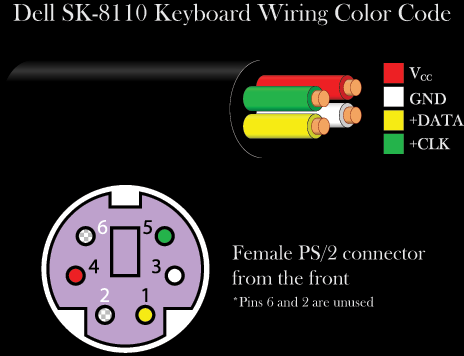 |
||||
| The Back Shed's forum code is written, and hosted, in Australia. | © JAQ Software 2025 |
