
|
|
Forum Index : Microcontroller and PC projects : PicoMite: Big Wheel Balancing Robot
| Page 1 of 2 |
|||||
| Author | Message | ||||
DrifterNL Regular Member Joined: 27/09/2018 Location: NetherlandsPosts: 58 |
A long time ago (early 2000) while working on one of my robot projects I came across this website -> Robot Page One of Mr Anderson's robots had me mesmerized , the nBot -> nBot page Fast-forward to a few months ago and a while searching Amazon I came across a set of R/C monster truck wheels which got me thinking again about building my own 2-wheeled balancing robot. A rummage thru my parts bin, a couple of trips to the local hardware store and few orders later, and I had the parts to try building one myself. Floating Point Keeps Sinking Me! Back To Integer So I Don't Get Injured. |
||||
| DrifterNL Regular Member Joined: 27/09/2018 Location: NetherlandsPosts: 58 |
Big Wheel Balancer V1: I decided to use 100mm x 100mm x 2mm aluminum sheets as the base to mount motors, electronics etcetera and 4mm threaded rod to build up the frame. The motors I wanted to use were constant turn r/c servos with pololu wheels. After a few tests I realized that this setup wasn't going to work. The servos took too long to rev up and didn't have enough speed. Sorry, no pictures. Floating Point Keeps Sinking Me! Back To Integer So I Don't Get Injured. |
||||
| DrifterNL Regular Member Joined: 27/09/2018 Location: NetherlandsPosts: 58 |
Big Wheel Balancer V2: Controller: Pi Pico with MMBasic Sensor CMPS12 (later changed to CMPS14) from Devantech (robot-electronics) Motor Driver: Cytron MDD3A Motors: Pololu #1445 (later changed to #4752) Power: 2 (later 3) Soshine 3000 mAh Li-ion cells in series. Monster Wheels from Amazon with 12mm hex to 6mm shaft adaptors.  Floating Point Keeps Sinking Me! Back To Integer So I Don't Get Injured. |
||||
| DrifterNL Regular Member Joined: 27/09/2018 Location: NetherlandsPosts: 58 |
Big Wheel Balancer V3: Controller: Pi Pico with MMBasic Sensor: CMPS14 from Devantech (robot-electronics) Motor Driver: Cytron MDD3A Motors: Pololu #4752 Power: 3 Soshine 3000mAh Li-ion cells in series. Monster Wheels from Amazon with 12mm hex to 6mm shaft adaptors. Changes: Created a new power and controller section and cleaned up a lot of the wiring. Also added 3 potentiometers to easily-er adjust the PID control. 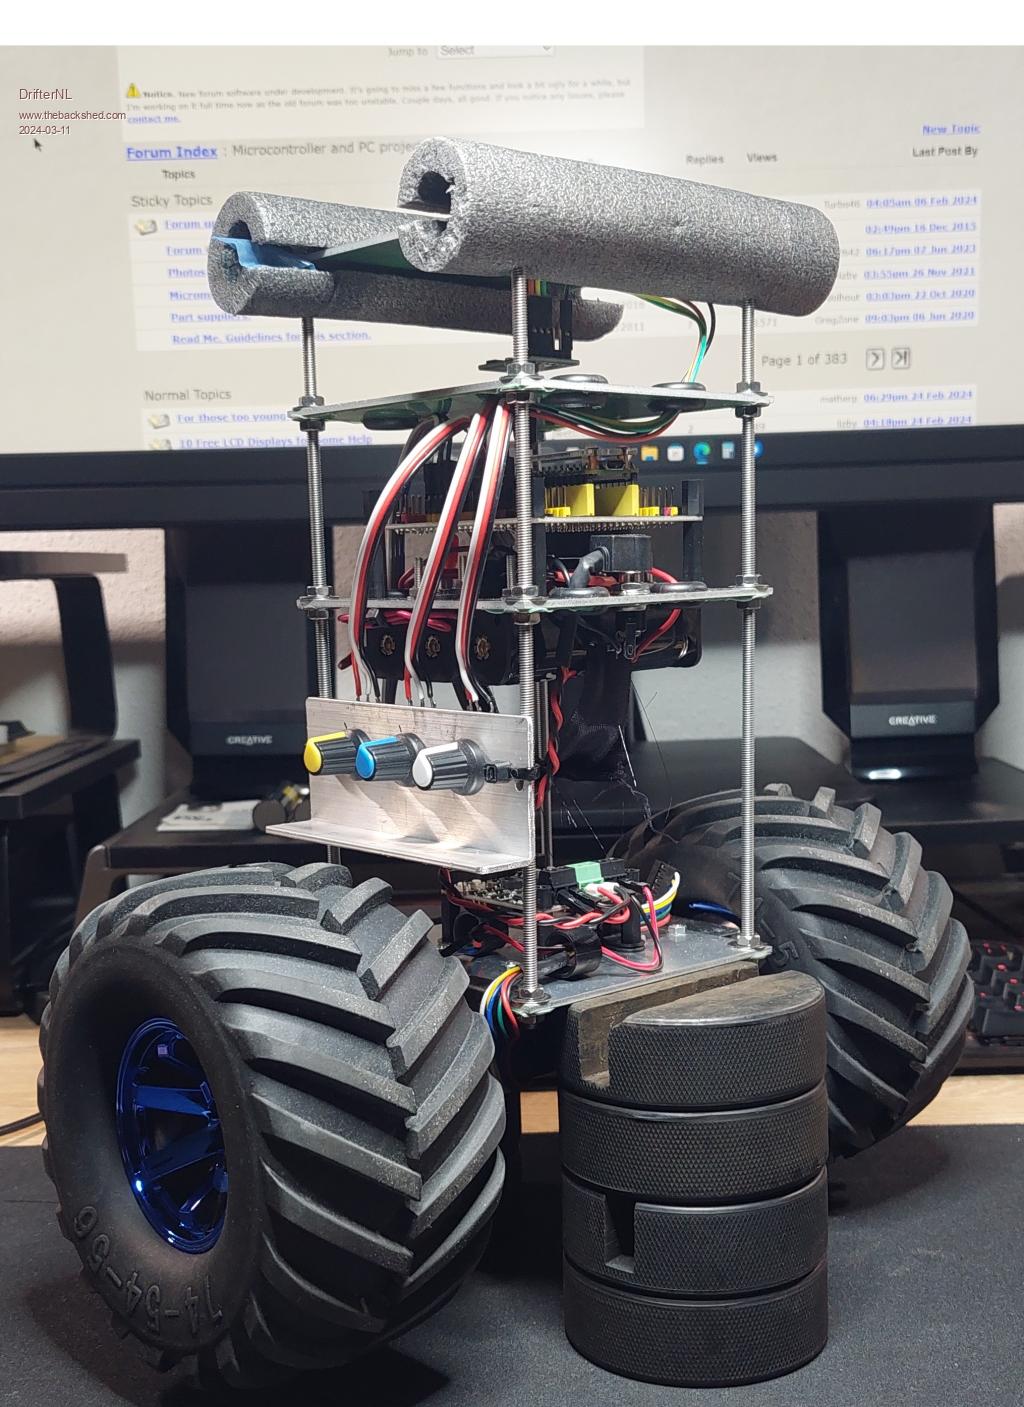 Floating Point Keeps Sinking Me! Back To Integer So I Don't Get Injured. |
||||
| DrifterNL Regular Member Joined: 27/09/2018 Location: NetherlandsPosts: 58 |
Big Wheel Balancer V4: I'm working on a few upgrades and will post pictures soon. This is an ongoing project and I have a few things I want to try / add in the future. I'll talk about the software challenge and what I learned in another post as well. Floating Point Keeps Sinking Me! Back To Integer So I Don't Get Injured. |
||||
| EDNEDN Senior Member Joined: 18/02/2023 Location: United StatesPosts: 295 |
"Also added 3 potentiometers to easily-er adjust the PID control." Wouldn't it make sense to add a little bit of code to Auto Tune the PID values? You can't do a classic Auto Tune because any extended overshoot of the value will cause it to tip over. But you could lean it against a wall and have it auto tune by knowing it can quickly move the wheels away from the wall to get its balance back. |
||||
| PhenixRising Guru Joined: 07/11/2023 Location: United KingdomPosts: 1962 |
Is there a "classic Auto Tune"? To paraphrase pretty much every paper I've ever read re: Auto Tune: "At the end of the day, the preferred method is manual tuning" I agree with the extended overshoot issue because it requires an analysis of a step-response which often means that the motor needs to be decoupled from the load which renders the entire procedure useless (memories of machinery doing the fandango across the shop-floor  ). ). |
||||
| Plasmamac Guru Joined: 31/01/2019 Location: GermanyPosts: 620 |
I failed hard to create a robot like this in 2002 🤪 Plasma |
||||
| Volhout Guru Joined: 05/03/2018 Location: NetherlandsPosts: 5942 |
Hi PhenixRising, DrifterNL I see your batteries (mass) are located at the ceiling of the ground level. Is there any benefit in rasing them up a few floors ? or will the inertia just create a slower moving robot ? In the link you provided, his version 4 has batteries on top floor, and acceleration sensors on bottom floor. Just curious Volhout Edited 2024-03-11 18:16 by Volhout PicomiteVGA PETSCII ROBOTS |
||||
| PhenixRising Guru Joined: 07/11/2023 Location: United KingdomPosts: 1962 |
That would create more of a pendulum than it already is; if anything, would be better to lower as much mass as possible. I once had an idea for these as table-servers but the payload would be the problem. Ideally, this requires cascaded PIDs and some fuzzy logic - to be adaptive. |
||||
| EDNEDN Senior Member Joined: 18/02/2023 Location: United StatesPosts: 295 |
Yes. There is a 'classic' approach to tuning PID loops. Please check out: https://www.controleng.com/articles/auto-tuning-control-using-ziegler-nichols/ |
||||
| Volhout Guru Joined: 05/03/2018 Location: NetherlandsPosts: 5942 |
I guess you could mount the serving tray on top of the robot on a scale. When you know the weight, you can adapt the PID accordingly, since you can estimate the centre of gravity of this weight quit accurately. The smaller the tray, the better. Would be a nice project.... Volhout P.S. don't use the very tall wine glasses. COG may be off quite a lot, and they may fall over if the robot corrections are too fast... PicomiteVGA PETSCII ROBOTS |
||||
| Volhout Guru Joined: 05/03/2018 Location: NetherlandsPosts: 5942 |
Just screwing together some Aliexpress components may not give you a working solution. It is easy to fail. The essence here (appart from stabilizing the loop) is to provide sufficient power to do it. The smaller the robot, the faster you must react. But fast reaction also requires high peak powers. The link in this thread shows the sucessfull robot version 4 with 24V batteries for the motors (18xAA NICD) and sturdy motors. And the weight in top of the robot, so you have more time to react. Running this on a 2 toy motors and 3.7V lipo may not be easy... Try balancing a broomstick on your hand. It is easier with the broom on the stick, than without the broom. Volhout Edited 2024-03-12 00:13 by Volhout PicomiteVGA PETSCII ROBOTS |
||||
| PhenixRising Guru Joined: 07/11/2023 Location: United KingdomPosts: 1962 |
It was the mid-90s when I tried the ZN system without success so I thought I'd check-out YouTube for a live demo. Haven't found one. Lots of vids about the ZN theory and lots of vids showing PID tuning of actual motors but I haven't found a single example showing an actual motor auto-tuned.  |
||||
| DrifterNL Regular Member Joined: 27/09/2018 Location: NetherlandsPosts: 58 |
Hi all. PID controllers is a new learning subject for me. When BWB V2 was put together I was just able to get it balancing with the code I wrote. I had heard about PID but had never really looked into it. Searching the web I came across a Wikipedia article that had my head spinning lol -> WIKI PID After a further search I came across an article from PARALLAX which simplified how PID works and made it very understandable -> Parallax PID The Parallax article breaks everything down and helped me a lot to write my own code. It took me about an hour of trying values to tune the PID, plug the usb cable in, change the values, unplug the cable, run the robot on the floor, rinse and repeat. And yes, it tipped over many times! Eventually I got it to a point that I could even hit / tap the robot (not too hard) and it would recover. It was interesting watching PID do its work and how the characteristics would change even with the slightest adjustment. The pots were eventually added so I could adjust the main values (which I got through trial and error) in small steps and not have to constantly plug in to the USB. How high to put the weight was also a bit of trial, error and luck. I read a few on-line posts about how high to put the weight and if I understood it correctly the higher the weight is placed the easier it is to balance but the more susceptible it is to sudden changes in direction (harder to recover), the lower the weight is placed the harder it is to balance but is less susceptible to sudden changes in direction (easier to recover). I think I found the sweet spot for the robot. Auto tuning PID, if even possible for my bot, is way above my pay grade.  Floating Point Keeps Sinking Me! Back To Integer So I Don't Get Injured. |
||||
| PhenixRising Guru Joined: 07/11/2023 Location: United KingdomPosts: 1962 |
I'm just delighted to see another shedder doing this type of thing. Your balancing bot should be in every high-school...What a great learning tool  Suggestion: The bare-bones PID can only respond to position error. There are limits to how far one can go with gain scheduling or we'll have instability. A common solution to improve response is a predictive offset correction. These have fancy terms like AFF (acceleration feed forward), AFB (acceleration feed backward) and simply OFF (offset). They can all occupy the same VAR but have the value change whenever it needs to. OFF: The axis might have an external disturbance such as gravity which manifests as a position error. The integral term, in theory, should eliminate this but this is not always the best solution. Adding an offset to the sum of PID is effectively a counterbalance. AFF: During the acceleration phase, the OFF changes to whatever reduces the lag. This can be a fixed value or proportional to the sum of the PID. Again, it's tacked-on to the summed PID and therefore doesn't affect the loop gain. AFB: Same as AFF but for the deceleration phase (personally never had a need for this). I suspect that all you have is the PID and no velocity profile generator (accel-slew-decel) so you would probably want to add an offset as soon as you detect a tilt. I use similar analogies to Volhout ( ) so this would be like pedaling a bike uphill and a motorcyclist pulls up alongside, places his hand on your back and provides some push assist. The amount of push-assist offset could be determined through experiment, as part of calibration. |
||||
| DrifterNL Regular Member Joined: 27/09/2018 Location: NetherlandsPosts: 58 |
Thank you  In the PID I did add a limit to the integral to prevent values getting to high (running away), this comes in handy when handeling the bot while the software is running. Outside of the PID I also added PWM starting values for the motors due to slight differences in the motors (forward and reverse) and maybe in the components of the MDD3A motor controller. Also the bot can turn to face a course heading by slightly adjusting its PWM values being sent to the MDD3A by using the yaw which is calculated in an CMPS14 I2C subroutine. I also added a pitch correction value because the center point of gravity was ever so slightly off (about 1°), before this the bot tended to drive off slowly in one direction while balancing. Floating Point Keeps Sinking Me! Back To Integer So I Don't Get Injured. |
||||
| DrifterNL Regular Member Joined: 27/09/2018 Location: NetherlandsPosts: 58 |
Big Wheel Balancer V4: Controller: Pi Pico with MMBasic Sensor: CMPS14 from Devantech (robot-electronics) Motor Driver: Cytron MDD3A Motors: Pololu #4752 Power: 3 Soshine 3000mAh Li-ion cells in series. Monster Wheels from Amazon with 12mm hex to 6mm shaft adaptors. Changes: Added suspension to the bot. The suspension is made from 2 door hinges with the pins replaced with brass tube to take out a lot of the slop, metal pcb standoffs and springs that are normally used in garden tools. 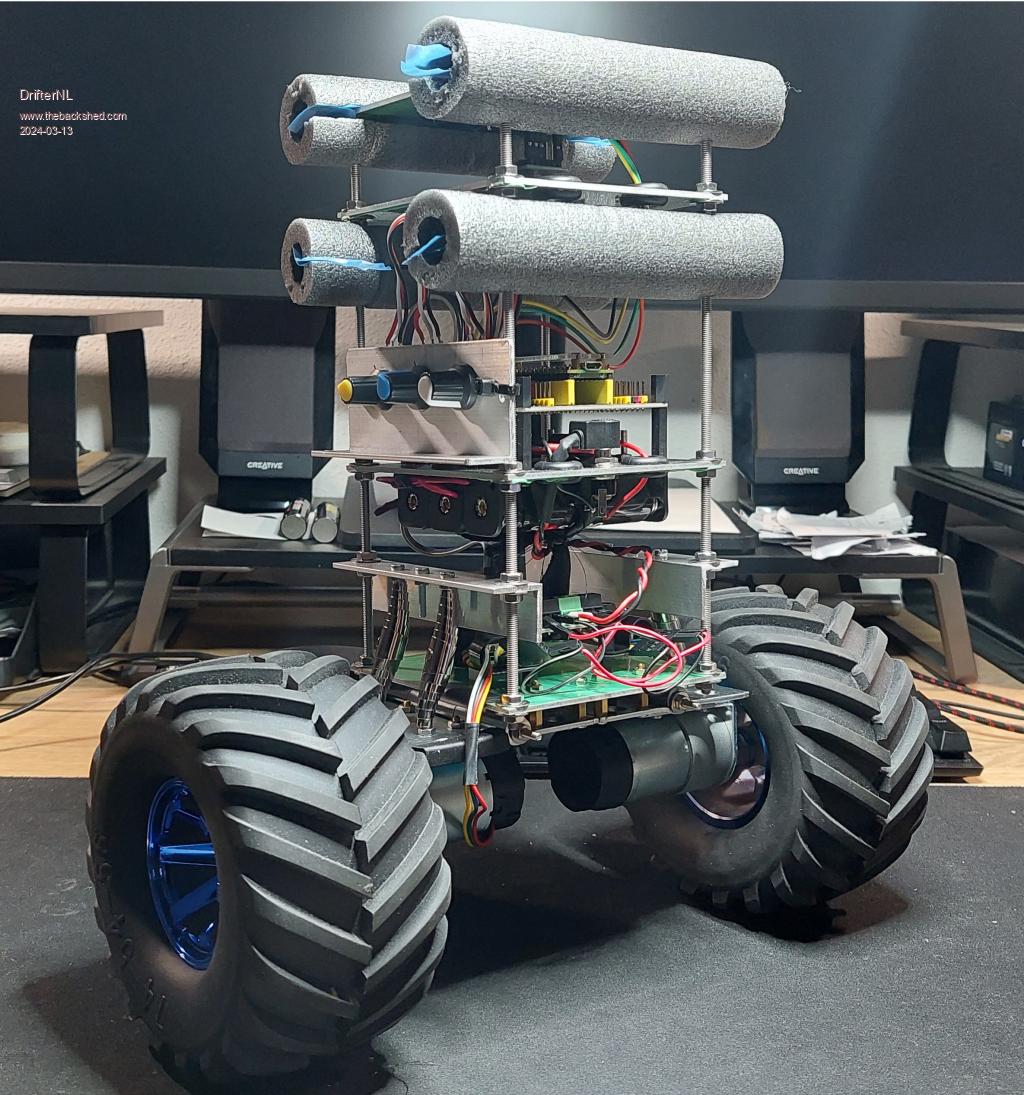 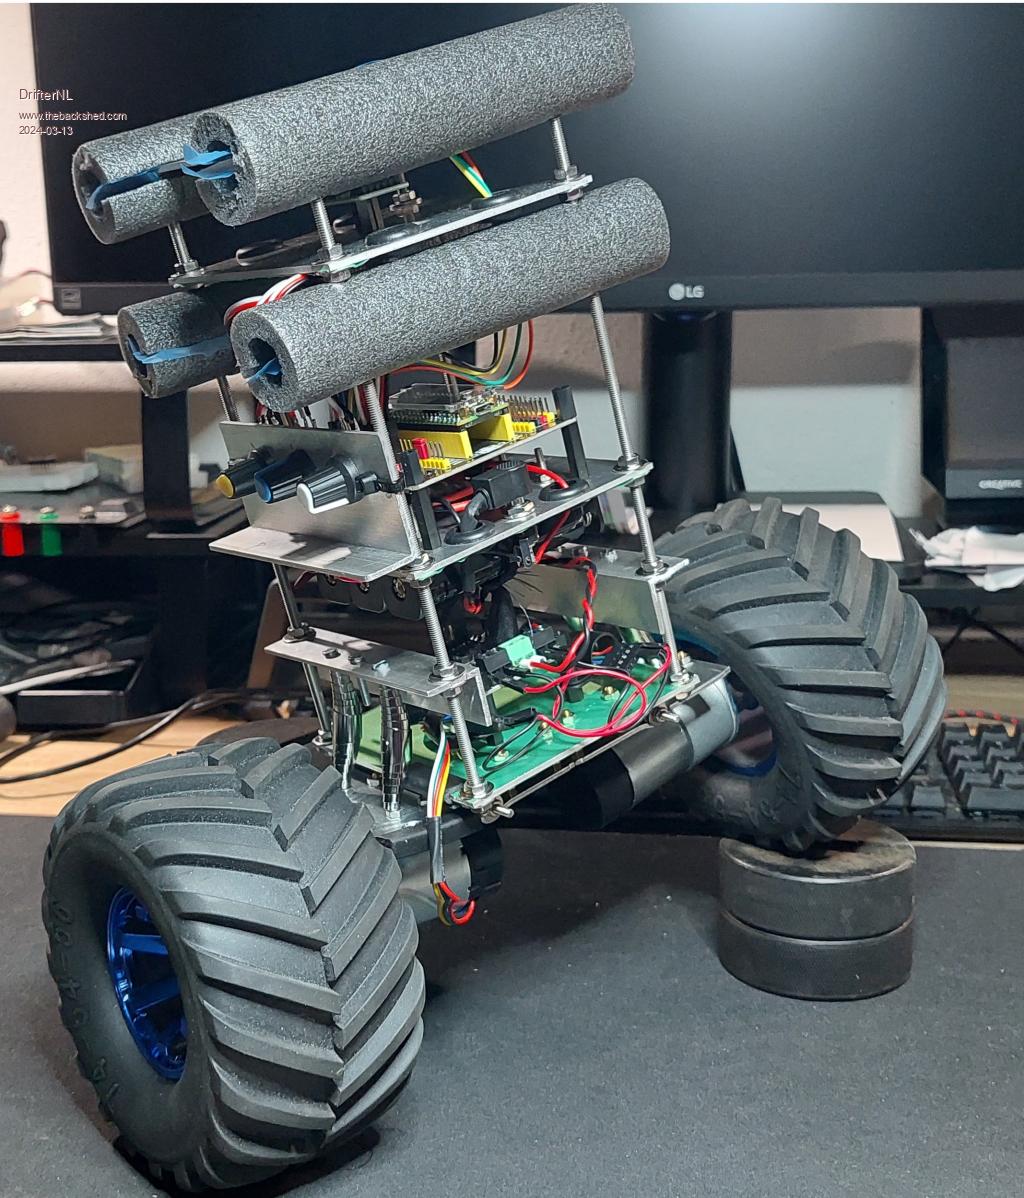 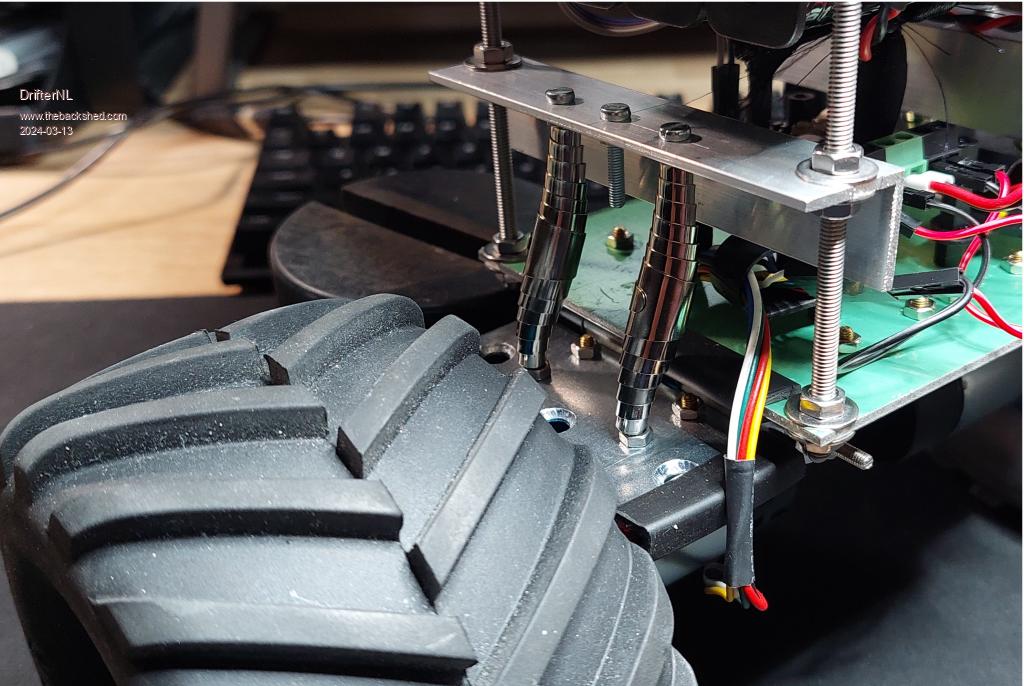 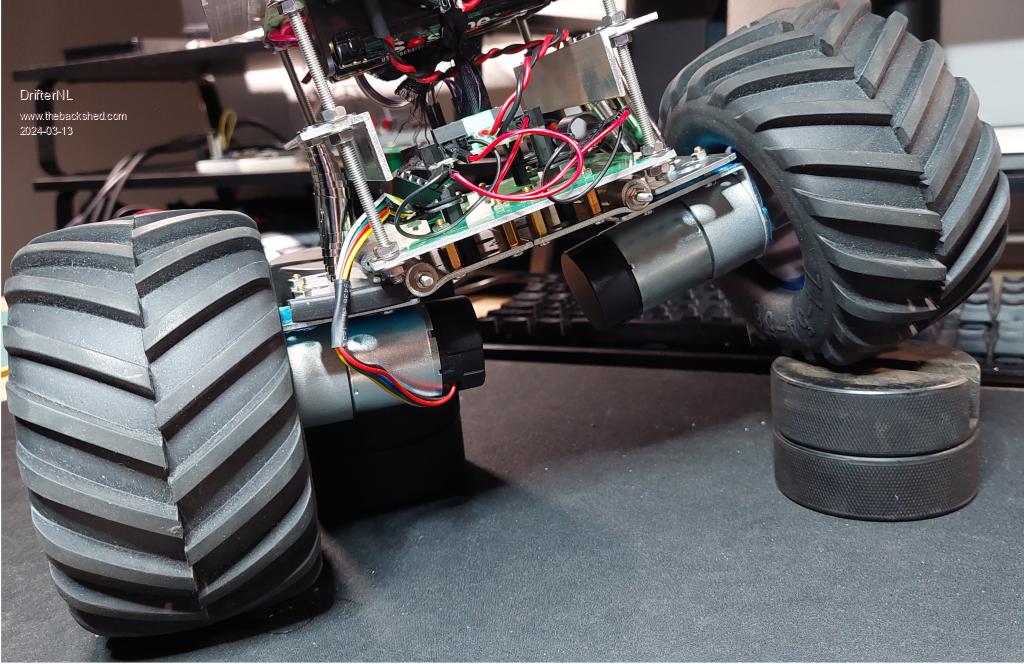 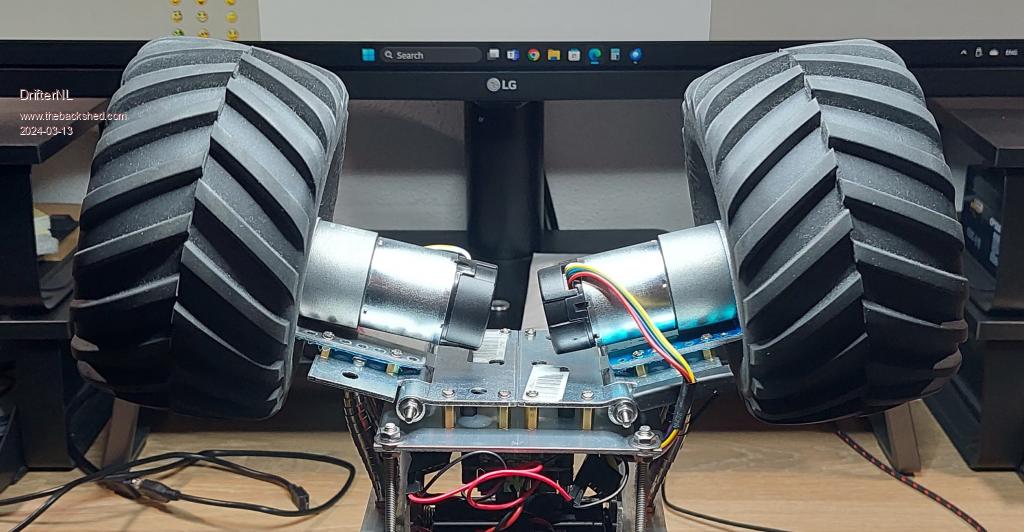 Floating Point Keeps Sinking Me! Back To Integer So I Don't Get Injured. |
||||
| PhenixRising Guru Joined: 07/11/2023 Location: United KingdomPosts: 1962 |
Hinges...Brilliant |
||||
| DrifterNL Regular Member Joined: 27/09/2018 Location: NetherlandsPosts: 58 |
Hi all, Just a quick video of BWB V4 doing it's thing. BWB V4 Video Floating Point Keeps Sinking Me! Back To Integer So I Don't Get Injured. |
||||
| Page 1 of 2 |
|||||
| The Back Shed's forum code is written, and hosted, in Australia. | © JAQ Software 2026 |
