
|
|
Forum Index : Microcontroller and PC projects : Maximite with TOUCHSCREEN working
| Author | Message | ||||
bovist Newbie Joined: 21/06/2013 Location: GermanyPosts: 11 |
Hi folks, after I got a cheapo 4.3" TFT working perfectly on my DIY Color Maximite (see my other post), I wondered if MMBASIC could also handle a touchscreen. Well, it does -- just needs some additions in MM_Custom.c sources: YouTube Video Button and screen handling is completely done by my MMBASIC extension, written in PIC32 ANSI-C. My MMBASIC has commands like TouchButtonCreate(x,y),index,caption$,color etc. 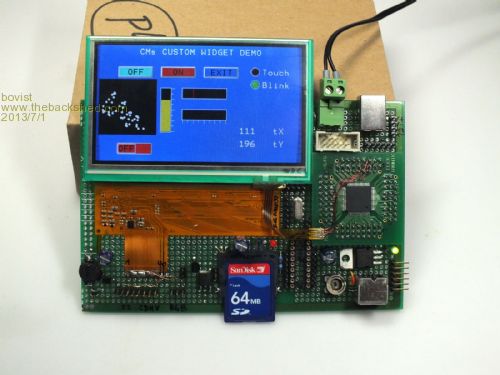
For this demo, I needed only 40 lines of BASIC code. HEX file coming soon! Preliminary schematics can be found on my github repository. --------------- Greetings, Carsten Meyer www.keyboardpartner.de |
||||
| MicroBlocks Guru Joined: 12/05/2012 Location: ThailandPosts: 2209 |
I love it! You make great progress. Microblocks. Build with logic. |
||||
| plasma Guru Joined: 08/04/2012 Location: GermanyPosts: 437 |
wow it looks really cool! macht schon spass der kleine oder  |
||||
| Zonker Guru Joined: 18/08/2012 Location: United StatesPosts: 772 |
This is awesome..!! I have been using the 4.3" LCD displays from 4-D systems to get a touch LCD UI going, but using method, I can do mostly the same thing for less than half the cost..!! I see from the Git-hub info that you have a board already worked up. Nice.! I would be very interested in getting a unit or two up and running to play with over here. What LCD Display are you using that has the touch panel on top. I ordered the Sharp display you had mentioned earlier but it doesn't have the touch overlay installed. Excellent work Carsten..!!  |
||||
| bovist Newbie Joined: 21/06/2013 Location: GermanyPosts: 11 |
Hi all, 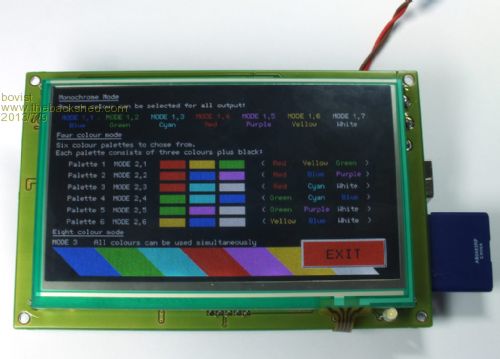
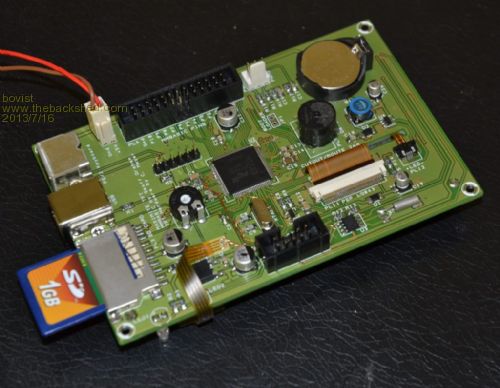
Just got the prototype PCBs for the TFT Maximite last friday and made it work. This is a 2-layer PCB. Shortly beeing proud of the instantly working prototype, but damn, I forgot the resistive touchscreen connector and had to wire it manually. And the touchscreen would need a buzzer for a touch feedback to the user. OK, next try... Here is a better video of my new TFT Maximite prototype. 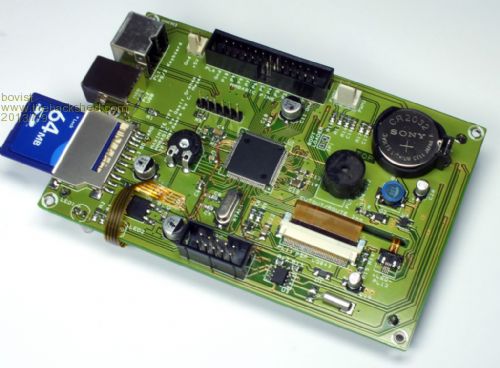
Anyway, the touchscreen is a totally new experience to MMBASIC use. You won't need a keyboard or separate buttons anymore. Rework of MMBASIC programs for touch use is pretty easy. On start of your program, you define the active touch items, for example: ...
TouchItemSize 120,40 'set new bigger button size for all subsequent items TouchItemCreate(350,220),"EXIT",0,red,B 'create and draw button ... creates and draws a Button (type=B) on XY coordinates 350,220, labels it "EXIT", assigns Refnum 0 for first item and colours it red. The line TouchItemCreate(250,40),"dummy",3,purple,S
would have created and draw a purple ON/OFF switch (type=S) with RefNum 3, caption is ignored on slider switches. TouchItem(3) = 1
will set switch 3 state manually to "on" (or whatever you like, but all "digital" controls accept only 0 or a non-zero value). In your programm loop, insert the line TouchCheck
which handles all touch events, makes buttons look "pressed" or toggles switches, checkboxes and radio buttons. To query a touch item, use TouchItem(<RefNum>) as a function: if TouchItem(0) then 'automatically resets button state
DrawLED(352,50),0,red endif For buttons, they are automatically "released" if you query them. There might be up to 32 touch items in total which should be sufficient. If you don't need a particular touch item further, it may be removed by TouchItemRemove(<RefNum>) or count up <RefNum> in a loop to remove all (even non-exiting ones, the data structure is pretty fool-proof. Here's the BASIC code for the blue BTNDEMO you see in the video: cls 1 : font #2 : color white,blue
option usb off print @(100,6) "CMs CUSTOM WIDGET DEMO" print @(387,52) "MyLED" print @(387,82) "Blink" DrawLED(352,50),0,red 'draw a small LED DrawLED(352,80),0,green settick 500, ledblink TouchItemSize 80,25 'set default button size (power on) ' TouchItemCreate(x,y), "Caption", <refrum>, <colour>, <type> (B)utton or (S)witch or (R)adio TouchItemCreate(50,40),"OFF",0,yellow,B 'create and draw some buttons TouchItemCreate(150,40),"MyLED",1,red,B TouchItemCreate(250,40),"ignore",3,purple,S 'create and draw a ON/OFF switch, caption ignored TouchItem(3) = 1 ' set switch state manually to "on" by RefNum (3) TouchItemSize 120,40 'set new bigger button size TouchItemCreate(350,220),"EXIT",2,green,B 'create some radio buttons TouchItemSize 80,25 'set default button size (power on) TouchItemCreate(350,120),"TEST",4,green,R 'create and draw some radio buttons TouchItemCreate(350,150),"Opt 2",5,white,R TouchItemCreate(350,180),"Opt 3",6,white,R TouchItem(4) = 1 TouchItemSize 80,20 TouchItemCreate(50,230),"CheckMe",7,cyan,C 'create and draw a checkbox TouchItemCreate(200,230),"or me",8,white,C 'create and draw a checkbox toggle_onoff = 0 Line(5,80)-(140,210), black, BF do x = TouchX ' needed for sketch drawing only if x >= 5 and x < 140 then y = TouchY if y >= 80 and y < 210 then Circle ( x, y ) ,2, white, F font #2 print @(200,90) x " " @(250,90)" tX" print @(200,120) y " " @(250,120)" tY" TouchRelease ' wait for finger releasing touch screen ' DrawHBar(x,y), val, colour, [BFS], val ranges from 0 to 100 DrawVBar(160,90),y/2.7,yellow,BFS DrawHBar(210,160),x/4.8,green,BFS ' bargraph with box, fill, scale endif endif TouchCheck ' handle all buttons/switch events if TouchItem(0) then 'automatically resets button state DrawLED(352,50),0,red endif if TouchItem(1) then DrawLED(352,50),1,red endif if TouchItem(2) then 'exit button for i= 0 to 31 TouchItemRemove(i) next i cls black font #2 colour yellow, black print: print "Good Bye" pause 500 run "AUTORUN.BAS" end endif loop ledblink: if TouchItem(3) then blink_on = not blink_on DrawLED(352,80),blink_on,green endif ireturn --------------- Greetings, Carsten Meyer www.keyboardpartner.de |
||||
| Zonker Guru Joined: 18/08/2012 Location: United StatesPosts: 772 |
Carsten..!! Absolutely astounding piece of kit..!! This is a complete game-changer of a project.!! This is exactly what I needed to create for the EIS project I'm working on. This idea of yours sets a new price point for the whole subsystem that will probably be less than half of what I was spending to get the same thing going... OMG..!! 
Let me know if you need any hardware beta testing help..!! Would LOVE to get one to play with... Money is not a problem... Wow..!! You even have some active objects created... (nice meter) Tip of the hat to ya fine Sir..!! Awesome..!! |
||||
| TinkersALot Regular Member Joined: 20/11/2012 Location: United StatesPosts: 72 |
very nice! very nice indeed. |
||||
| TinkersALot Regular Member Joined: 20/11/2012 Location: United StatesPosts: 72 |
what tools do you use to layout your board? |
||||
| cwilt Senior Member Joined: 20/03/2012 Location: United StatesPosts: 147 |
How much memory is free with your code modifications? |
||||
VK6MRG Guru Joined: 08/06/2011 Location: AustraliaPosts: 347 |
Awesome work! Just a quick question about your prototype. You have the Arduino Connector missing from the schematic but the pins from the PIC32 are assigned. Also the PCB, you have some pins roughted for the Arduino Connector and others not, as well as no Arduino Connector. Is this on purpose? Just wondering as it would be good to also have the Arduino Connector option to play with. Its easier to ask forgiveness than to seek permission! ............VK6MRG.............VK3MGR............ |
||||
| bovist Newbie Joined: 21/06/2013 Location: GermanyPosts: 11 |
Hi, I ommitted the Arduino connector since 4 analog inputs plus one digital output are to be used for the touchscreen interface and the buzzer. Also, my new small PCB (only slightly larger than the display itself) simply has no space left... 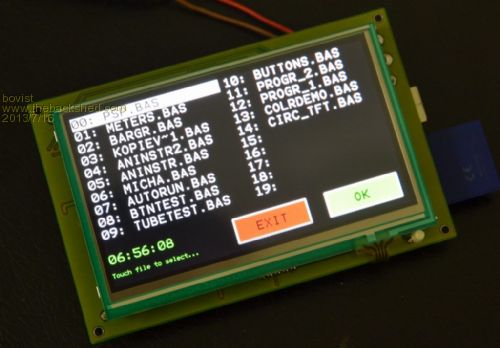
--------------- Greetings, Carsten Meyer www.keyboardpartner.de |
||||
| bovist Newbie Joined: 21/06/2013 Location: GermanyPosts: 11 |
Somewhat more RAM as with the normal VGA colour mode, as the TFT only uses 480 x 272 pixels. Drive A: becomes one third smaller due to touch and GUI routines. --------------- Greetings, Carsten Meyer www.keyboardpartner.de |
||||
| bovist Newbie Joined: 21/06/2013 Location: GermanyPosts: 11 |
I used Easy-PC from Number One Systems which I found very convenient and straightforward to use and reasonably priced. There is a similar free software named DesignSpark promoted by RS Components which is a descendant of Easy-PC (but unfortunately not compatible with Easy-PC files). --------------- Greetings, Carsten Meyer www.keyboardpartner.de |
||||
| Greg Fordyce Senior Member Joined: 16/09/2011 Location: United KingdomPosts: 153 |
Great work Bovist! I can live without the Arduino connector but need COM2 which is on pins 19 & 20 on the original MM (and on the Arduino connector on the CMM). So would it be possible to use COM2 with your board? Any plans to sell these ready made with MMBasic already loaded? If so you have at least one buyer in Sotland. 
Greg |
||||
| VK6MRG Guru Joined: 08/06/2011 Location: AustraliaPosts: 347 |
Once again, a fantastic job. And I would also be interested in a couple of units as well. Its easier to ask forgiveness than to seek permission! ............VK6MRG.............VK3MGR............ |
||||
| The Back Shed's forum code is written, and hosted, in Australia. | © JAQ Software 2026 |
