
|
|
Forum Index : Microcontroller and PC projects : MM2: 4.7b8, add on graphics
| Author | Message | ||||
| matherp Guru Joined: 11/12/2012 Location: United KingdomPosts: 11402 |
First, many thanks to Geoff for the huge amount of work he has put into the MM2. I'm always amazed at the times (in the UK) at which I receive emails. Geoff is hugely responsive to ideas and with the new facilities in 4.7b8 there is now little or nothing you can't do with a Micromite given a bit of effort. 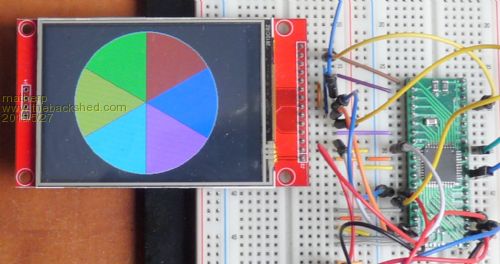
Given the limitations of space on the PIC32MX170, it was not possible for Geoff to include triangle drawing but with the new Cfunction capabilities in 4.7b8 it was trivial to convert drawing code to work as a Cfunction using the MM2's internal routines. This means that the user interface to the Cfunction is much simpler than my old routines. The code below will run on either the 28 or 44-pin chip and any of the three supported displays without any changes (don't forget the ILI9163, it works perfectly). Note that the code doesn't need to know about the pins in use or the display type as this is all taken care of by the MM2 firmware. I've tried to keep the calling sequence to the triangle routine as similar as possible to the internal routines so : funcreturn=triangle(x1,y1,x2,y2,x3,y3,outlinecolour,fillcolour) The only real difference is that the fill colour is a mandatory parameter and should be set to -1 if an outline shape is required. Triangles seem like a fairly useless drawing function but they are actually the basis of all computer 3D-graphics and they allow you to do things like the above. The code for this is : option default none option explicit CPU 48 const stepsize=3 ' this controls the accuracy of the circle segment, small for accurate, bigger for fast timer=0 dim integer radius if mm.hres<=mm.vres then radius=mm.hres/2-5 else radius=mm.vres/2-5 endif segment(mm.hres/2,mm.vres/2,radius,0,60, RGB(red)) segment(mm.hres/2,mm.vres/2,radius,60,120, RGB(Blue)) segment(mm.hres/2,mm.vres/2,radius,120,180, RGB(magenta)) segment(mm.hres/2,mm.vres/2,radius,180,240, RGB(cyan)) segment(mm.hres/2,mm.vres/2,radius,240,300, RGB(yellow)) segment(mm.hres/2,mm.vres/2,radius,300,360, RGB(green)) segment(mm.hres/2,mm.vres/2,radius,60,60,0) segment(mm.hres/2,mm.vres/2,radius,120,120,0) segment(mm.hres/2,mm.vres/2,radius,180,180,0) segment(mm.hres/2,mm.vres/2,radius,240,240,0) segment(mm.hres/2,mm.vres/2,radius,300,300,0) segment(mm.hres/2,mm.vres/2,radius,360,360,0) circle mm.hres/2,mm.vres/2,radius print timer end ' ' Routine to draw a segment of a circle ' Parameters are: ' x-coordinate of centre of circle ' y-coordinate of centre of circle ' radius of circle ' start radial of segment to be drawn (0-360 degrees) ' end radial of segment to be drawn (0-360 degrees) ' colour to draw segment ' ' NB if start radial and end radioal are the same a line will be drawn ' sub segment(x as integer, y as integer, size as integer, startradial as integer, endradial as integer, colour as integer) local integer i,j,x1,x2,y1,y2,sr,er if startradial=endradial then x2=sin(rad(startradial))*size + x y2=-cos(rad(startradial))*size + y line x,y,x2,y2,,colour else IF startradial<endradial then sr=startradial er=endradial else er=startradial sr=endradial endif for i=sr+stepsize to er step stepsize x2=sin(rad(i))*size + x y2=-cos(rad(i))*size + y x1=sin(rad(i-stepsize))*size + x y1=-cos(rad(i-stepsize))*size + y j=triangle(x1,y1,x2,y2,x,y,colour,colour) next i endif end sub ' ' Routine to draw a triangle ' ' Parameters are: ' x-coordinate of first point ' y-coordinate of first point ' x-coordinate of second point ' y-coordinate of second point ' x-coordinate of third point ' y-coordinate of third point ' colour to draw triangle outline ' colour to fill triangle use -1 for outline only ' CFunction triangle 00000000 27bdffa0 afb40048 8fb4007c 8ce90000 8e820000 afa50064 8fa30064 afa60068 afa7006c 8fa70070 afa40060 8c850000 8c660000 8fa40068 8fa30074 8ce80000 2407ffff afbe0058 afb70054 8c9e0000 8c770000 afbf005c afb60050 afb5004c afb30044 afb20040 afb1003c afb00038 00401821 104700f4 8e840004 0126202a afa60020 afa90018 10800005 00a09821 03c09821 afa90020 afa60018 00a0f021 8fa50018 02e5202a 10800006 afa80024 03c02021 afb70018 0100f021 00a0b821 afa40024 8fa60020 8fa70018 00e6202a 148000ac 02602021 8fa40020 509700b0 03d3182a 8fa70018 10f70002 8fa60018 24e6ffff 8fa90020 00c9202a 148000e1 8fa70024 8fa20018 03d32823 00f32023 0049b023 02e9a823 afbe0028 afb7002c afb4001c 01208021 00009021 00008821 3c029d00 00a0b821 0080f021 10000003 00c0a021 8fa4001c 8c830000 0236001a 02c001f4 02002821 02003821 02378821 26100001 00002012 0255001a 02a001f4 00932021 00804021 00003012 00d33021 00c4482a 11200003 025e9021 00c02021 01003021 afa30010 8c430048 0060f809 afa20030 0290182a 1060ffe6 8fa20030 8fb4001c 8fbe0028 8e830000 8fb7002c 00601021 02f0202a 148000ab 8fa70018 8fa50024 8fa90020 00b3b023 00be3023 02079023 02098823 02e92023 72368802 afb40018 afa6001c 02c0a021 72469002 0260b021 02e7a823 3c029d00 10000003 00809821 8fa40018 8c830000 0255001a 02a001f4 8fa6001c 02002821 02469021 02003821 26100001 00002012 0233001a 026001f4 009e2021 00804021 00003012 00d63021 00c4482a 11200003 02348821 00c02021 01003021 afa30010 8c430048 0060f809 afa20030 02f0182a 1060ffe5 8fa20030 8fb40018 8e830000 8e840004 8fa50078 8ca20000 1043005d 8ca50004 8fa3006c 8fa60060 8fa70064 8fa90068 24110001 8cc40000 8ce50000 8d260000 8c670000 3c109d00 afb10010 afa20014 8e020050 0040f809 00000000 8fa40078 8fa50068 8c820000 8fa6006c 8fa70070 8fa90074 8ca40000 8cc50000 8ce60000 8d270000 afb10010 afa20014 8e020050 0040f809 00000000 8fa30078 8fa50070 8c620000 8fa60074 8fa70060 8fa90064 8ca40000 8cc50000 8ce60000 8d270000 afb10010 afa20014 8e020050 0040f809 00000000 8fbf005c 8fbe0058 8fb70054 8fb60050 8fb5004c 8fb40048 8fb30044 8fb20040 8fb1003c 8fb00038 03e00008 27bd0060 afa70020 03c09821 0080f021 8fa40020 1497ff53 afa60018 03d3182a 1460002d 8fa50024 027e182a 14600030 03c03821 02603821 02602021 8fa50024 00a4182a 54600003 8fa40024 00e5182a 00a3380b 8fa60020 afa20010 3c029d00 00e63821 8c420048 00c02821 00e43823 0040f809 00803021 8fa50078 8e830000 8ca20000 8e840004 1443ffa5 8ca50004 54a4ffa4 8fa3006c 8fbf005c 8fbe0058 8fb70054 8fb60050 8fb5004c 8fb40048 8fb30044 8fb20040 8fb1003c 8fb00038 03e00008 27bd0060 5482ff0d 0126202a 1000ff90 8fa50078 03c02021 00a4182a 1060ffda 02603821 1000ffda 8fa40024 1000ffd2 02602021 00401821 1000ff84 8e840004 1000ff4f 8fb00020 End CFunction |
||||
| paceman Guru Joined: 07/10/2011 Location: AustraliaPosts: 1329 |
Just tried the above Peter and it's amazingly fast considering what it has to do. Mine ran at 492mS using 2.8" screen, MX170 and V4.7beta8. Greg |
||||
| Zonker Guru Joined: 18/08/2012 Location: United StatesPosts: 772 |
Got the same 492ms on the 4.2" touch panel... (nice)... |
||||
| paceman Guru Joined: 07/10/2011 Location: AustraliaPosts: 1329 |
Hi Zonker, Could you post a link for your 4.2" panel; also how much current does it draw? Greg |
||||
| Zonker Guru Joined: 18/08/2012 Location: United StatesPosts: 772 |
Good morning Greg... I measured the current from the USB Vbus wire going into the DIP-600-28 board wired into the display. The display unit is setup to use 3.3v drive from the MM as power instead of 5v, but shouldn't effect the overall current draw. I measured 113ma for the whole shebang.. I got the displays from china on the Ebay site... I will be getting more of these soon... I think it's time for a 44 pin layout for this unit... I love these little touch panels..!! Thanks to the new firmware, there are easy to use..! |
||||
| viscomjim Guru Joined: 08/01/2014 Location: United StatesPosts: 925 |
Hi Zonker, I went to Ebay to find these 4.2" displays with no luck. could you post a link? Are they SPI interface? Thanks!!!! |
||||
| Zonker Guru Joined: 18/08/2012 Location: United StatesPosts: 772 |
Ok.. Found it... 2.4" Touch Display Hey, for $7, it's a good little unit... |
||||
| viscomjim Guru Joined: 08/01/2014 Location: United StatesPosts: 925 |
Shucks!!! You had me all excited that there was a 4.2" panel that I didn't know about. 2.4" is a bit smaller.... 
Still waiting for my 2.4" and 2.8" to arrive. My 1.8" screen is making me very happy right now though! |
||||
| Zonker Guru Joined: 18/08/2012 Location: United StatesPosts: 772 |
Oh.. sorry Jim... I thought I saw 2.4... Yikes... 
I will poke around for the 4.2's with touch... back in a bit... EDIT: Ordered 5 more 2.4" units ant the digital RGB LED's while I was there... EDIT: I checked my post above... Sure as s*it... Dyslexic typing... |
||||
| viscomjim Guru Joined: 08/01/2014 Location: United StatesPosts: 925 |
did you get the apa102 rgb leds? |
||||
| Zonker Guru Joined: 18/08/2012 Location: United StatesPosts: 772 |
Nope... It was the WS2812 type that the MM supports.. (i think) 
I am going to use these to back illuminate the servo based gauges that Ed is laying out on the 3-D printer... (MM based of course)... |
||||
| viscomjim Guru Joined: 08/01/2014 Location: United StatesPosts: 925 |
You might want to take a look at this thread. These I think will be easier to use and are becoming quite popular. MolsonB put some nice code together and these things are not very timing critical. Just a thought. Here is a pretty cool 2-part video on how these units work. Very interesting and cool too. Speaking of servo based gauges, I tried my first servo with uMite last night. Pretty cool stuff, except for trying to make the servo sweep very very slowly and trying to get a smooth motion. After playing a bit, I think I may have to try a digital servo to see if they work smoother than my cheapy little analog servos. What type are you using for your gauges? Thanks Again!!!! |
||||
| Zonker Guru Joined: 18/08/2012 Location: United StatesPosts: 772 |
I found this on E-bay... These units appear to have the touch controller on board and use the SSD1963 type graphics chip... Check first for sure if the GPU is supported (i think it is) before you buy any... EDIT: Yep, it's supported... My 7" Touch panel has the same GPU... |
||||
| paceman Guru Joined: 07/10/2011 Location: AustraliaPosts: 1329 |
Just had a look Zonker - it says the've all got the 40 pin connector and a touch panel but the 5" and 7" ones use the SSD1963 controller and the 4.3" one uses an OTA5180A - whatever that is. Mind you at US$32, 46 and 60 bucks that's getting pretty pricey out here in OZ these days. Greg |
||||
| The Back Shed's forum code is written, and hosted, in Australia. | © JAQ Software 2026 |
