
|
|
Forum Index : Microcontroller and PC projects : Flashing an ESP8266 revisited.
| Author | Message | ||||
| banda Newbie Joined: 12/05/2014 Location: New ZealandPosts: 35 |
I can't go forward with my earlier attempt to flash an ESP8266-01 because even when I download a new copy of the flasher (which happens to be an exe file) the file locks into a permanent activity routine as I described, and I don't know how to fix it. Even when I download a new copy the same thing happens. But, never give up. I also bought a nodemcu lolin example of ESP8266 as shown. The module unexpectedly stretches EXACTLY across the working surface of a breadboard, which seems the most ludicrous design a dip chip could have for a breadboard. I have conquered that by butchering 2 mini boards as shown. I am proud of my ingenuity, and although I must be careful, the setup seems to work successfully. My hope is that someone can explain to me how I continue (in Basic or Lua) to make the thing work. Someone who can take my hand and lead me through the forest of gobble-de-gook that seems part of the hobby. In English. With painful simplicity. There must be someone out there who has succeeded. Thank you. Barry. 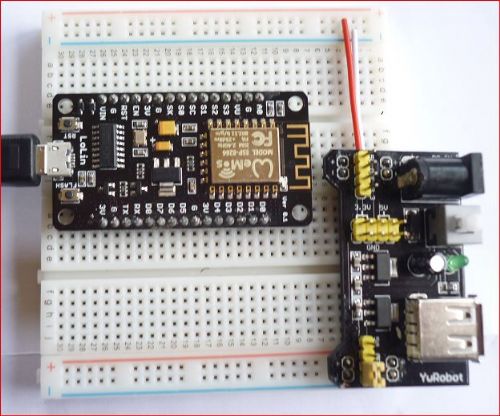
|
||||
| MicroBlocks Guru Joined: 12/05/2012 Location: ThailandPosts: 2209 |
I gave up on the Lua and basic stuff as it is still way to buggy. I went with the Arduino IDE. The support for this particular model is included and within a few minutes i had it up and running. Nut sure if you want to program in C(++) but for now this works the best with the most support. If that is what you also want to try there is a good description on how to get it setup on this github address: https://github.com/esp8266/Arduino A good video describing the whole process: https://www.youtube.com/watch?v=8J7zflVO8K0 Microblocks. Build with logic. |
||||
| viscomjim Guru Joined: 08/01/2014 Location: United StatesPosts: 925 |
Hi Barry, I am using this board also but there a different versions of this board right now. Could you take a look at the chip that is near the usb plug and let me know what the numbers are? These boards are coming out with at least 2 different usb to serial chips. This will determine which driver you will need. I am on my way to work, but I will describe how I flash this board. I actually use the nodeMCU flasher to flash the espbasic to it. Hang in there a bit, I will get back to you!!!! I am glad to see you are not giving up. |
||||
| viscomjim Guru Joined: 08/01/2014 Location: United StatesPosts: 925 |
Hi Barry, this is how I use the nodemcu flasher... Go to THIS page. Towards the top of the page, on the right hand side just above all the listed files, you will see a button that says "download zip". Hit that button. Do a "save as" and save it somewhere that you will be able to find it again. Navigate to that folder and you will see a zipped folder called "nodemcu-flasher-master". Open that folder (double click on it). You will now see a folder called the same name. On the top bar you will see "extract all files". Click on that. It will say "select a destination and extract files". Just click on the "extract" button on the bottom. The files will be placed in the nodemcu-flasher-master folder. That folder will open after you hit "extract". Open the extracted folder "nodemcu-flasher-master". You will see three folders, "resources", "Win32" and "Win64". As I am using windows 64 bit, lets assume you are too. (if not, just use win32 instead, the instructions are the same). Inside this folder, you will see a folder called "release". Open that folder. You will now see an application called ESP8266Flasher. This is what I use to flash the esp. If you want, make a shortcut to that on your desktop so that you can easily get to it. (Right click on it and hit create shortcut. Move that to your desktop). Don't start the program just yet as we are going to download the latest version of esp8266basic first. (I use the nodemcu flasher to initially flash the firmware, but with the board you are using, after the first time doing this, you will be able to update the board Over The Air (OTA). Your board has 4M of memory and can use this feature, the smaller boards esp-01 etc. don't have this yet. You can also use this flasher instead if you want, or wind up with a hosed unit.) Go to the esp8266basic website and hit the download tab at the top of the page. Click on "download flasher for windows" button and do a "save as" and save it somewhere you will be able to find it. Your security may kick in, tell it to go ahead and run the program. The flasher will start, just hit the X to exit the program. You are doing this just to get the flash firmware that we need. (I think you can get this from github also, I just haven't done that.) Go ahead and connect your esp to your computer using the usb cable. Take note of which comport is being used when you plug it in. If you can't see it, go to device manager and look at the com ports and see which one is being used for your esp. If you still can't see it, you may have to load a driver for your particular board. Now go to the shortcut for the nodemcu flasher and start it up. You will see 5 tabs across the top of the application. The first one says "operation". There you will select the comport your are using for the esp. Next click on the "Config" tab. You will see a green bar with some copy in it, then what looks like a gear and then a box with some numbers in it. It will probably say 0x00000. Click on the gear. An open box will appear. Here you need to go to the folder that you saved the esp8266basic flasher downloaded earlier. Open the folder called "Build". You will see 4 folders. Open the one that applies to your board, in your case it would be the 4M one. Click on the ESP8266Basic.cpp file and click open on the bottom of the box. You will see that file loaded in the flasher. Make sure the number box on the right says 0x00000. Now click on the "Operation" tab again and hit the "flash" button. If all is well, you will see the blue bar going from left to right to indicate progress of the flashing operation. You will also see the AP MAC address and STA MAC address of your board. Once it is done flashing, go ahead and close the program (X). Your esp now has the latest firmware. YEAH! Unplug the usb cable from the board to power it down and then plug it back in. This will reset the board. (I assume you can also hit the reset button on the board, but I do this out of habit.) I am assuming you have teraterm or the like as you have used the uMite before. Go ahead and start teraterm. Set it up with the correct com port and speed (9600). Hit the reset button on the board and you will see some action on the screen. As of today you would see "ESP Basic 1.62" and some other things. I always have tera term connected, even though you do most of the operations using a browser, you can see what is happening much easier if you have tera term running at the same time. Now go to your computer's wifi settings and you should see your ESP showing up on the list. Click on it and connect. There won't be a password until you set one later. Fire up your browser and type in 192.168.4.1 and hit return. You should see the esp menu bar on your screen. If so then BINGO. Now you have to follow the directions on the ESP8266 basic website. There is also great information in the forum, so take a look there to get a handle on things. This is fairly new and not really well documented as of yet, so take it slow and try some sample programs, etc. to wrap your head around things. I wish the documentation was as good as Geoffs for the uMite, but maybe that will come. I hope this helped. If you have any questions, I will try to assist, but this is new to me also and I am still learning too. Please don't give up, the more users the better! Jim |
||||
mbramwel Regular Member Joined: 10/07/2013 Location: CanadaPosts: 42 |
I also have a NodeMCU v0.9 I noticed it is too wide for a single proto board. I also do not like the fact that you need to push the reset/flash button every time you try to compile/load something in the arduino IDE. I recently received the v1.0 of the nodeMCU. It has the square USB chip instead of the rectangle. The board is narrow and you get proto board holes on each side. It also does not require you constantly push reset/flash. Much nicer board for about $1 more. I prefer the v1.0 board for dev work. I currently have a telnet server written for the ESP8266 that allows me to give networking to anything that has a serial console. |
||||
| WhiteWizzard Guru Joined: 05/04/2013 Location: United KingdomPosts: 2983 |
Does this mean you can program/debug/run a MM over LAN/WAN from TeraTerm (on TCP/IP; TelNet Service) using the Tx/Rx pins on the ESP8266 connected directly to the MM console's Rx/Tx pins?? Please do tell us more! 
WW |
||||
| banda Newbie Joined: 12/05/2014 Location: New ZealandPosts: 35 |
I can't read the chip, even with a magnifying glass. It has the wording ver 0.1 printed just below the antenna. I have just come across the following reference for the first time. http://www.averagemanvsraspberrypi.com/2015/11/esp8266-node-mcu-setup.html[URL=http: It seems that my version should work OK. Barry |
||||
| viscomjim Guru Joined: 08/01/2014 Location: United StatesPosts: 925 |
Hi Barry, the only reason I asked is to make sure you have the correct driver for your usb to serial chip on your board. When you plug it in to your computer, does it recognize it as a usb to serial uart, ie., does it see a new com port? If so, then this point is mute. Let me know if you got your esp loaded with basic. If not, let me know where you got stuck and we'll figure it out. You will not be defeated! |
||||
| banda Newbie Joined: 12/05/2014 Location: New ZealandPosts: 35 |
WE ARE SO NEAR! I became confused over the 2 Flasher programs I downloaded but chance or Divine Intervention put me on the right path and I finally saw the blue line inch its way across the box and a little green circle show my success. I loaded TeraTerm and checked that COM3 and 9600 were showing as you directed. SO CLOSE. When I pressed RESET this appeared. 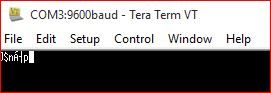
As well, no new wifi appeared. I can reconnect but only that happens each time. SO NEAR, sigh. Barry |
||||
| viscomjim Guru Joined: 08/01/2014 Location: United StatesPosts: 925 |
Maybe try powering down the board and bringing it back up again???? You are getting sooooo close! EDIT: You may want to try and flash the 512K code instead of the 4M code in case you have a esp8266-12. Give it a shot.... (not 100% positive about this, but try anyway) EDIT MORE: You seem to have the V0.9 board. If you can't get this going, you might want to get the V1.0 board. I know for certain that it works as that is what I am using. You can order from Banggood pretty cheap. HERE is the one I use and works fine. Just a thought if you can't get up and running. The V1.0 fits on a breadboard with 1 row of empty holes on each side of the board, the V0.9 doesn't leave any holes on the left and right of the breadboard. |
||||
| banda Newbie Joined: 12/05/2014 Location: New ZealandPosts: 35 |
I agree that we should be singing from the same song sheet. I've ordered what you suggest. That means that it'll be another 10 days or so before I hound you again. Thanks for all the help. Your notes were admirably simple. I hope you can brace yourself for another onslaught. Regards Barry |
||||
| viscomjim Guru Joined: 08/01/2014 Location: United StatesPosts: 925 |
Hi Barry, Maybe we can make it happen in time for you to control your Christmas tree lights from your phone. If not, theres always bluetooth. (joking of course. Again, never give up, thats what makes it all worthwhile!) As far as the "onslaught"... bring it. This forum has been such a great resource for me due to the GREAT members here. I could only hope to help you as much as this forum has helped me, even though this is also new to me. |
||||
| mbramwel Regular Member Joined: 10/07/2013 Location: CanadaPosts: 42 |
sorry, I just got back from being away for a week... I think yes but I have not tried your exact question. I wanted to add telnet to any serial device without the device knowing it was connected to a network. The ESP code is written in Arduino which means it replaces the LUA code on the ESP8266/NodeMCU. When the device powers up, it connects to the wifi network and grabs an IP address. It then waits for an inbound telnet connection. (currently it DHCP an address, this week I'll add static IP) When you telnet into the ESP, it clears the screen, displays the banner and presents a login prompt. you give the login username/pass and if successful, it provides a pass-through telnet-to-serial link out the RX/TX pins. If you do not configure a login ID, it instantly connects without prompting. I wrote it to add Telnet to a CPM 2.2/Z80 machine which wants 9600 baud on the COM port. If you want to give it a try, I can put it somewhere easy to grab. |
||||
| HankR Senior Member Joined: 02/01/2015 Location: United StatesPosts: 209 |
Mark, Would like to be able to establish a telnet connection, esp. for moving periodic data in the outbound direction, so would appreciate some sample code like you have. Arduino is fine. Hank |
||||
| WhiteWizzard Guru Joined: 05/04/2013 Location: United KingdomPosts: 2983 |
|
||||
| The Back Shed's forum code is written, and hosted, in Australia. | © JAQ Software 2026 |
