
|
|
Forum Index : Windmills : Making fiberglass blades
| Author | Message | ||||
Downwind Guru Joined: 09/09/2009 Location: AustraliaPosts: 2333 |
Making a set of fiberglass blades. Last xmas break I had a go at making a set of fibreglass blades. I had no real idea what a set of mill blades should look like and after a lot of internet searching found a actual size printable template guide for the blade profile. The profile was for a 800mm or something length blade, I wanted 1200mm length. I used the profiles and spaced them a little wider apart to make the 1200mm. I don�t think this is the correct thing to do, but what the hell I was only intending to see if I could actually make a blade in glass and find a way to do it. The paper profiles were printed and glued to some blocks of wood then cut out with a jig saw. 
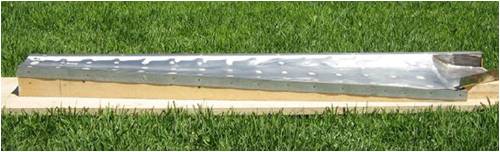
The blocks were spaced evenly and after some trimming of block lengths. They were assembled in a frame. 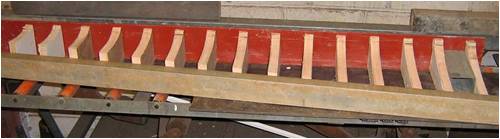
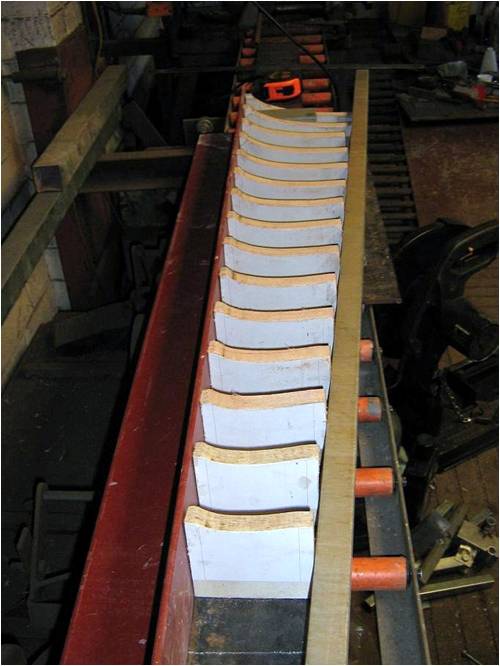
sheet metal was then skinned over the blocks buy using the blocks to form the shape. The sheet metal was cut to size and then clamped down onto the blocks at one end using the opposite cut half block to form the shape. And the same done to the 3rd block. I then nailed the sheet metal to the second block. Moved to the 4th block and clamped it down and nailed the 3rd block down and so on. This gave a ok result but i would shape the metal somewhat first if doing it again. 
The nail heads were filled over with auto bog and sanded back. A flat metal plate was added to the back as a guide to cut the glass off cleanly along. This was done when the resin had set but before it had hardened (30-40 mins in summer) 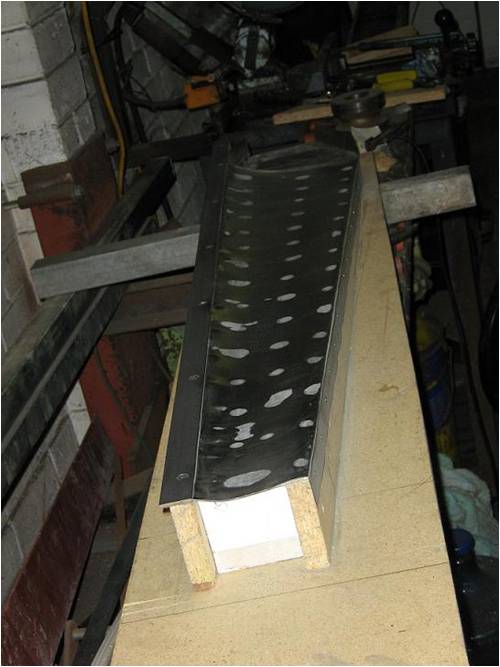
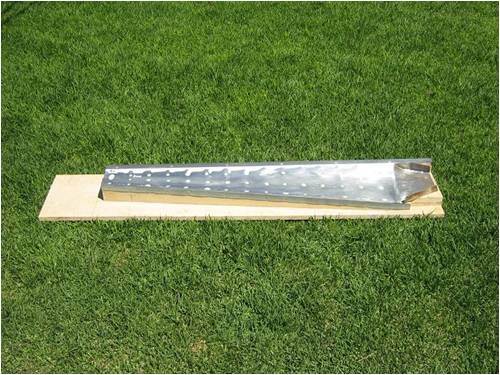
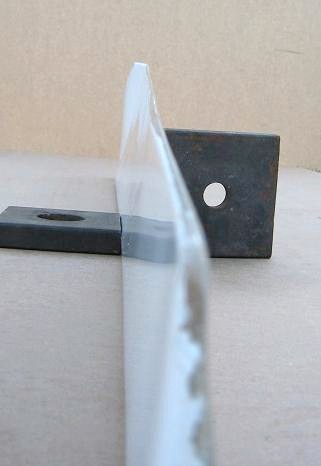
The root end was made and soldered onto the blade profile. It was polished up and waxed ready for a lite coat of gelcoat After the gelcoat had set, 3 layers of 450g /m2 chopped strand glass mat was resined onto the gelgoat. When removed from the mould the first result was pleasing. Now I needed a top half. I made a sheet metal mould to fit on top of the bottom mould by shaping a lip on one side of the cut sheet metal coming back to a flat sheet on the trailing side. 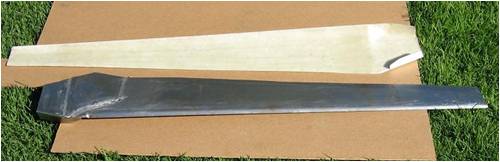
Metal top half of mould and bottom F/glassed half 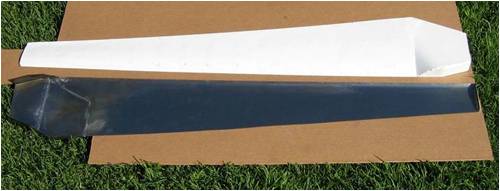
A root end piece was then made to mirror the bottom half and the two bits soldered together. I now had a one piece top half to match up the bottom half. This was then waxed and gelcoated and once hardened 3 layers of glass applied to it. 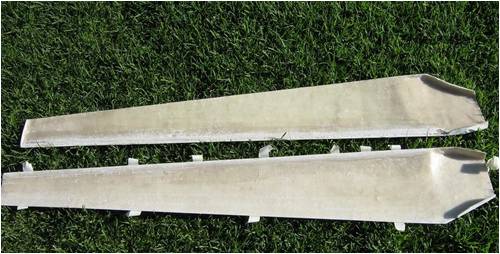
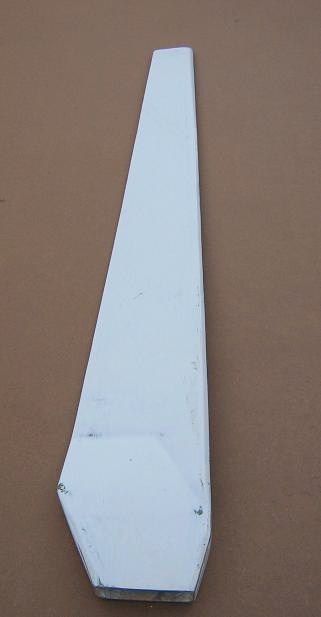
This is the two halves removed from the mould and sanded to match one and another. A flat lip of glass was added to the inside of the leading edge side of both halves so when stuck together there was a reasonable area to bond to, it also added some rigidity to the blade. 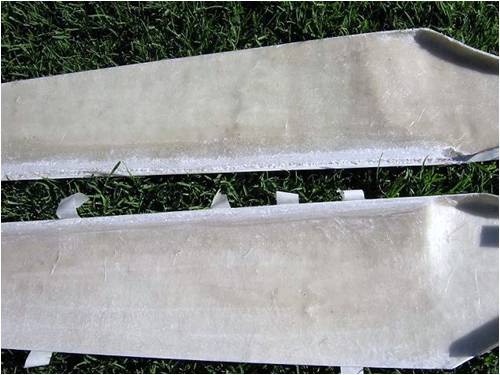
The trailing edges basically face up flat to each other for a inch or so inwards from the edge. The root end had some blocks of form ply cut to fill the root end void area for mounting strength and was glassed in prior to assembly. The blade was put back into the bottom mould for support when the two halves were stuck together with resin and clamped tightly. Overall it yielded a blade I felt worth while to do a full set of 3. I made 3 more blades and kept the original blade as a template should I need to make a fibreglass mould off of it in the future. 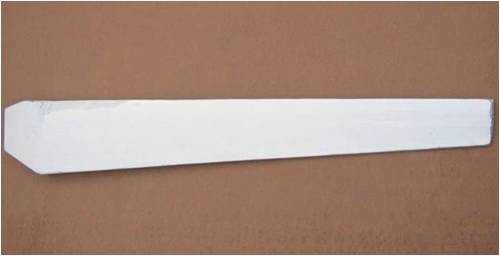
The surface of the blade has a few uneven spots in it from the sheet metal shaping but not enough to worry about. A bit of care with keeping the glass mat even in quantity and the resin amount even per blade throughout kept the weight reasonably even for all 3 blades. I can flex the blade over my knee by about the same amount as a broom handle without snapping like the broom handle. The blades have not flown yet as the intended mill is still down from earlier maintenance and ready for a blade refit. 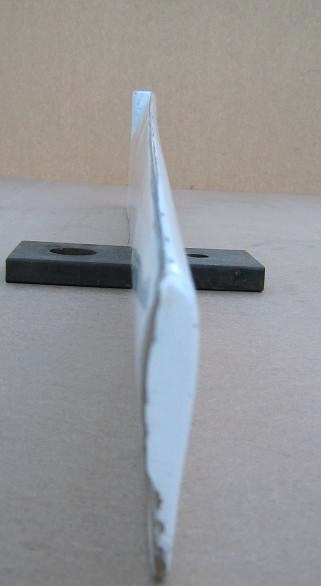
I am not totally happy with the top half transition point between the root and the blade and if was to make a mould from the proto type I would fill and reshape this section. Otherwise happy with the overall results. I still have the original article on file that the templates were printed from should anyone be interested in seeing it, but was unable to post it here and I do not have the address of the web site I found it on. I can email the article direct should anyone like a look at it. Pete. Sometimes it just works |
||||
MacGyver Guru Joined: 12/05/2009 Location: United StatesPosts: 1329 |
I used to be a model glider pilot and as such, made my own wings and stabs. I used a similar method, which you might want to consider for any future windmill blade builds. I used a small transformer called a rheostat and hooked it to what is called a "hot wire". This is a piece of high-nickel-content stainless wire suspended taught between the two electrical contacts. The 5-foot wire was mounted about 12 inches above the bench to allow a piece of surfboard foam to be drawn through it. A friend showed me how to pull the edge of the foam blank along a wooden mold of the wing surface to cut the proper shape. With a little practice, you can make a near-perfect foam mold as well as the foam "plug" all at once. Instead of making a mold and a plug to manufacture a true fiberglass body, I should think a fiber-glassed, solid-core foam wing would make for a very efficient windmill blade. The base could be made in such a way that it bolts to a hold-down piece and the core could be fitted with an aluminum tube to act as a root, which runs the full length of the blade. Such a blade would be aerodynamic and very light as well as very strong, not to mention inexpensive to manufacture. Just an idea, but I bet it could be a winner! Nothing difficult is ever easy! Perhaps better stated in the words of Morgan Freeman, "Where there is no struggle, there is no progress!" Copeville, Texas |
||||
| Downwind Guru Joined: 09/09/2009 Location: AustraliaPosts: 2333 |
I did consider using a foam core but you still needed to cut 3 identical foam cores. Where as making a outer mould I could make as many blades as I like all identical. I had considered filling the inside with expanding foam afterwards but there is little point as the strength is gained by the profile of the glass. I have built a hot wire system simular to yourself some years ago. Mine used a 2 amp 24 volt transformer from 240 volt. A standard household light globe was connected in series with one of the 240 volt inputs to the transformer to limit the power to the transformer. The 24 volt outputs of the transformer had a length of 0.6 mm mig welder wire connected between them. By changing the wattage of the light globes changed the temperature of the wire. It is a bit primitive but worked well. It is common now days that a block of foam is cnc machined or cnc cut with a hot wire to the shape required. Then several coats of auto spray putty applied to the foam. Sanded back smooth, well waxed and a fibreglass mould made off the foam template. I know of a few people using this method to make race car body parts and it gives a good result. My blades were made over xmas when everything was closed and using what s-crap I had about. ( no foam handy ) The biggest problem I had was not being able to visualise what the end design shape was, till I had created a blade that I could hold, twist, turn, and look at from all angles and profiles. It was a mental block thing, that I knew what I wanted but just could not see it in 3D. For this reason the shaping of foam was out of the question to begin with. Pete. Sometimes it just works |
||||
Dingdoc Regular Member Joined: 23/09/2009 Location: AustraliaPosts: 76 |
Good to see some practical input on making composite blades - please keep the info coming as you refine you techniques Pete. I would just add a couple of comments, which you are both probably aware of but which may catch others out, regarding foam and resin compatibility. MacGuyver, you mentioned using the hot wire cutter on surfboard foam - did you mean expanded polyurethane foam or polystyrene? Most hot wire cutting is done with polystyrene but this can only be glassed with epoxy resins - it will disappear before your eyes if you try to use polyester resin on it. Most surfboard foam is polyurethane - not sure how this would cut with a hot wire - would be interested to hear if it works. Polyurethane is OK with either resins. Just a word of caution too with hot wire cutting of polystyrene - the fumes are quite toxic so it should be done in a well ventilated area - produces a mixture of toxic gases including cyanide I think from memory. Trev |
||||
| Downwind Guru Joined: 09/09/2009 Location: AustraliaPosts: 2333 |
Trev, Glassing is only something i dabble in and no way a expert at it. You may well be better placed than me to comment on techniques. I dont find it difficult to work with but still much to learn and only practice make perfection. I do agree that polyurethane foam should only be used with polyester resins. I think you are right about it not cutting well with a hot wire and is why polyurethane is cnc machined to shape and not hot wire cut.( or hand cut and sanded ) Although there is several water based spray coatings available to seal polystyrene with, it is still a right bugger to work with and 1 small mistake will result in the plug melting before your eyes, as you already commented. A real sinking feeling!! As you know there is several forms of expanding polyurethane of different density with in them, and the stuff you buy in a pressure pac can is not much good for making plugs from, as the bubbles in the foam is to big and makes a poor foam for glassing, should anyone be tempted to try it. Pete. Sometimes it just works |
||||
KarlJ Guru Joined: 19/05/2008 Location: AustraliaPosts: 1178 |
some shapes, like blades would benefit (weight and structural integrity from vac bagging) use release film then your bag seal with mastic around the whole thing, use mastic over anything that protrudes so you dont punch a hole in the bag. Dont have a pump?....go shopping in hard rubbish, a fridge compressor works a treat, use nylon hose or copper pipe and seal with mastic. Green mastic is best but not that cheap. let the bagging film absorb some moisture from the atmosphere before using, makes it stretch rather than tear. KM1300 is the best bagging film but not cheap, green bag works fine for anything but a nose cone, probably wouldnt stretch far enough and doesnt need the extra strength. When done this way the fibre/resin volume fraction is much better...oh BTW use breather cloth or a trap to stop resin going into the vac pump. also can use foam for ribs, lay down some glass, then lay down the foam and glass over it. Cloth is far better for non complex shapes and carbon is surprisingly cheap if you are just buying wound tows, can use as a sort of a spar -needs to be straight or you're wasting your time. I like em though, great work. I'm a retired aeromodeler too, no time at present (not for the last 12 years truth be known!) its a great thing, learn lots of trades, I'll get back into it one of these days. Luck favours the well prepared |
||||
| Gizmo Admin Group Joined: 05/06/2004 Location: AustraliaPosts: 5187 |
You might find these forum threads interesting. Trevor and I set about making a set of fibreglass blades "as best we could". It was a long process but the blades did perform very well. I think Trev still has the mould and sells the blades. 
http://www.thebackshed.com/windmill/forum1/forum_posts.asp?T ID=800&PN=2 http://www.thebackshed.com/windmill/forum1/forum_posts.asp?T ID=802&PN=1 Glenn The best time to plant a tree was twenty years ago, the second best time is right now. JAQ |
||||
| Dingdoc Regular Member Joined: 23/09/2009 Location: AustraliaPosts: 76 |
Thanks for the links Glenn - didn't realize they were there. The forum is so vast now - got a lifetime of reading to catch up on everything. I haven't done much mould-making with composites so I will study the pix carefully. The whole mill looks very professional. Trev |
||||
| MacGyver Guru Joined: 12/05/2009 Location: United StatesPosts: 1329 |
Dingdoc Now that you mention it, I'm not really sure if it was actually surfboard foam. It was a big, long block about that size. I got it from a place called Clark Foam in San Clemente, CA. This was several (like 20?) years ago. A friend of mine and myself used to build planes as fast as we could wreck them (I takes chances!) and we could hot-wire out a wing section in just several minutes. The wings we made were strong enough to be used as "elevons" or "wingerons" as we used to call them, which is to say, the entire wing turned about a central axis, taking stunt flying to a new level! I'll look up my friend if he's still warm and breathing and ask for particulars. If I find out any more information, I'll post it here on the 4M. Nothing difficult is ever easy! Perhaps better stated in the words of Morgan Freeman, "Where there is no struggle, there is no progress!" Copeville, Texas |
||||
| carl1 Regular Member Joined: 16/04/2007 Location: AustraliaPosts: 79 |
I just found this info for foam core cutting: rc trader foam cutting ad is from the 11-11-2009 cheers Harald |
||||
| MacGyver Guru Joined: 12/05/2009 Location: United StatesPosts: 1329 |
Carl1 Tried the link; got the Error 404 thing! I'd love to take a look at it. Wanna give it another shot? Thanks; M. Nothing difficult is ever easy! Perhaps better stated in the words of Morgan Freeman, "Where there is no struggle, there is no progress!" Copeville, Texas |
||||
| carl1 Regular Member Joined: 16/04/2007 Location: AustraliaPosts: 79 |
try this way: rc trader then go to ads from 11-11-2009, was today on page 4 this might change with more listings Harald |
||||
| Downwind Guru Joined: 09/09/2009 Location: AustraliaPosts: 2333 |
I found the site that i printed the blade profiles from. The 15 profiles at the bottom of the web page is what i used as templates. They should print as actual size. Link here Pete. Sometimes it just works |
||||
| MacGyver Guru Joined: 12/05/2009 Location: United StatesPosts: 1329 |
Carl1 Tried the second link; got the same Error 404 message.  Nothing difficult is ever easy! Perhaps better stated in the words of Morgan Freeman, "Where there is no struggle, there is no progress!" Copeville, Texas |
||||
| Tinker Guru Joined: 07/11/2007 Location: AustraliaPosts: 1904 |
The link worked perfectly here, you must have another Mac problem 
Some good info there. Klaus |
||||
| The Back Shed's forum code is written, and hosted, in Australia. | © JAQ Software 2026 |
