
|
|
Forum Index : Windmills : Fatigue...
| Author | Message | ||||
| RossW Guru Joined: 25/02/2006 Location: AustraliaPosts: 495 |
I wasn't going to post this, but have been encouraged by the guys on IRC. Metal fatigue is a sneeky bugger, you can't tell from looking at something that it's in imminent danger of failure - it just lets go (at the most inopportune time, of course!) Here's my story. Yesterday started out nicely. Calm, sunny and warm. By lunch time we had broken cloud, temperature was up around 38 deg C (almost 100F) but the wind was kicking up a bit. About 13:30 I was outside watching the turbine - the wind was gusting to 54kmh and the turbine was right on the edge of furling. Every time the wind swung towards the south, the turbine furled, tracked the wind and then took off again. Output was about 850 watts. While I was watching, the top guy on the windward side of the tower suddenly dropped to the ground! The tower lurched to the east and I BOLTED inside and applied the (electric) brake (shorts all 3 phases). With the turbine going at these speeds, it slowed the mill a bit but didn't really do much good. I grabbed a long rope and ran up top, planning to try to secure the thing somehow. But how to (safely) get a rope up there? I couldn't throw a rope that far up in this wind - and even if I did, it would be a fair bet I'd just get it caught in the prop and do untold damage. I quickly took one end of the rope and went around (over the top of) the remaining 3 guys and took the two ends back to the anchor of the (missing) guy and "walked" the rope up the other guys until it was at the top attachment point. Truckies knot and I was able to tension the rope enough to pull the tower back to straight and tie off the rope. Good thing, because shortly after, the storm kicked up a bit more - I only saw 81 kmh, but the official wind gust was 107kmh. The place opposite me lost its roof - it was ripped clean off at the top of the walls. There was a brief lull after that, when I ran up, attached the winch and lowered the tower. Upon inspection, it became obvious that it wasn't a guy failure at all, it was the half-inch steel rod the manufacturer had originally welded to the mast, which had let go. Here are some pictures (click thumnails for larger photos): 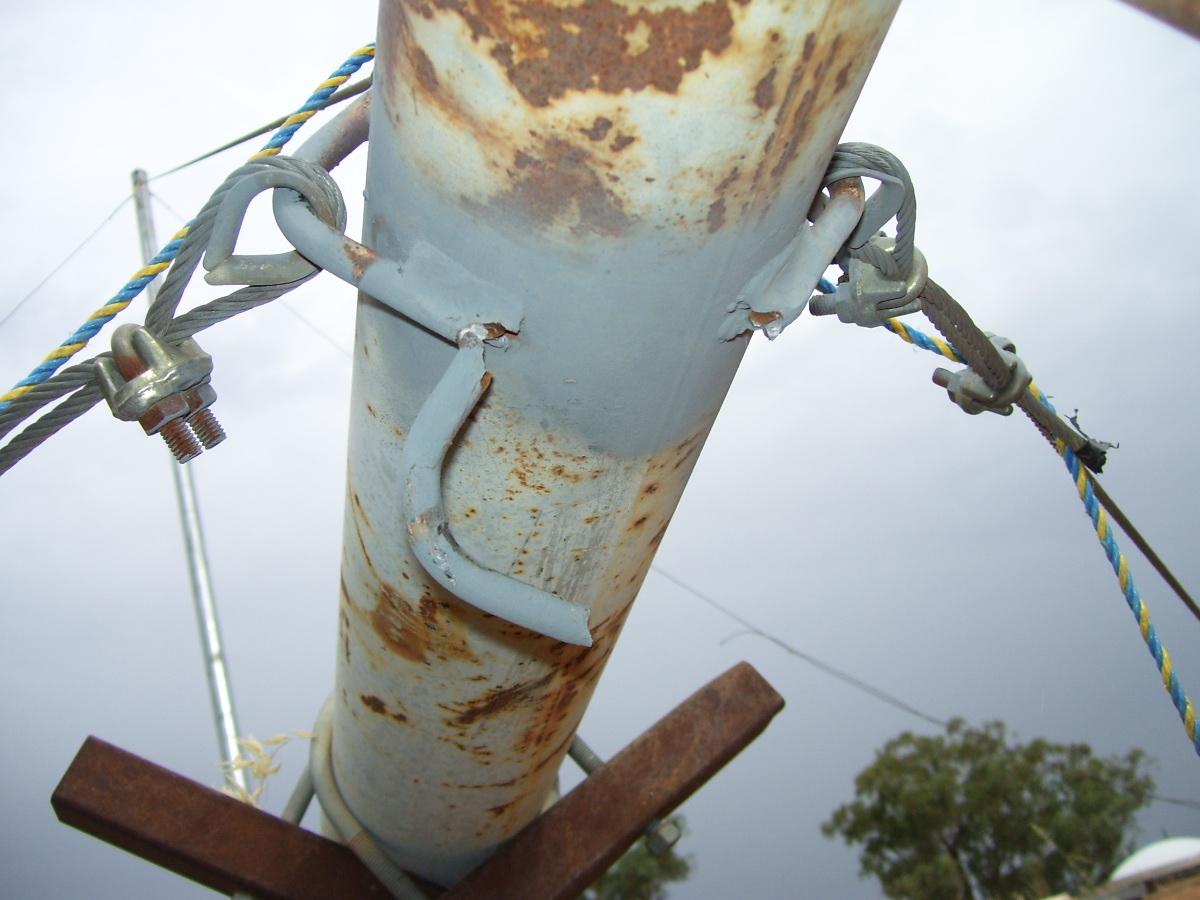


I'm pondering (unless anyone can give a good reason NOT to do this) - to re-string the guys, so each line comes up to the tower, in through the rebar loop, AROUND the tower, back out the loop - and then use the cable clamps to tie the two ends. This way, each guy will go completely around the mast. |
||||
| Janne Senior Member Joined: 20/06/2008 Location: FinlandPosts: 121 |
Thanks for sharing the failure. Might also serve a good reminder to those planning to make blades out of sheet metal... If at first you don't succeed, try again. My projects |
||||
| Dinges Senior Member Joined: 04/01/2008 Location: AlbaniaPosts: 510 |
Not to mention the fact that the tower has been up for less than 4 years. Notice the rust on the crack surface.... And notice how it was not the weld that failed, but the base material in the heat affected zone (HAZ). And how it failed right next to the weld. An endcrater may have acted as kerf/crack initiator as well. Peter. |
||||
| frepdx Newbie Joined: 16/11/2009 Location: Posts: 7 |
Protect the wire from abrading. Can you fabricate a thimble or sheath big enough to encompass the mast? |
||||
| Gizmo Admin Group Joined: 05/06/2004 Location: AustraliaPosts: 5187 |
Glad you posted this Ross, its the failures that we learn from. What about a short length of chain, fed through each guy cable loop, and joined with a D-shackle. Glenn The best time to plant a tree was twenty years ago, the second best time is right now. JAQ |
||||
| GWatPE Senior Member Joined: 01/09/2006 Location: AustraliaPosts: 2127 |
Hi Ross, Out of interest, How tight were the guys. If this was purely fatigue, I would expect some wear on the thimbles. The attachment point that failed was directly opposite the Gin pole. I suspect this may be a contributor. The guy wires are normally not too tight. A small amount of tower movement is good. There appears to be paint in the crack. There is certainly some rust in the crack, so this has been broken for a while. "it was the half-inch steel rod the manufacturer had originally welded to the mast" Is it possible that this was the join. The metal looks just like mild steel. I would ask for a please explain from the manufacturer. Given the size of the guy's, and the tower, the loops should have to be 5/8 or 3/4 rod. Are there 2 sets of guys, as normally when guys fail, there is no where but down. Bolt on attachments may be an option. Gordon. become more energy aware |
||||
| RossW Guru Joined: 25/02/2006 Location: AustraliaPosts: 495 |
Firm, but not what I'd call "tight". I don't. When the tower is up, the guys come off the gin pole and directly to the anchor. The original paint may or may not have been in there. It did get a squirt of cold-gal a while ago when it was down, so it's possible there was a small crack (un-noticed) then, that paint has crept in. It's also possible it's been there since manufacture. I will measure it. The size was an estimate based on what I remember it looking like, in the heat of the moment. The tower was supplied as 4 pieces. The bottom has a pin through the baseplate to allow it to lay over. The top has a flange that the generator bolts to. There are two more lengths in the middle. Except for the bottom piece, all the remainders have bell-ends and it all sits together under its own weight (and the generator, and guys). After the (near) disaster with a tree going through the prop last time, I took the precaution of welding all the segments so its one piece. There is a set of guys near the top (just below the blades), and a second set about 1/3 of the way up (around 12 feet above ground). Although the top guy let go, with a (now solid) tower, the bottom guy managed to hold it from going over (at least for long enough for me to secure the whole lot with a rope). I doubt either the manufacturer in china or the australian seller gives a proverbial rats @rse about it now - 4 years after the sale. |
||||
| GWatPE Senior Member Joined: 01/09/2006 Location: AustraliaPosts: 2127 |
Hi Ross, the amount of rust looks like the tower came from China on a submarine. I am in a coastal region just 400m from the southern ocean and I expect things to rust. Was the tower painted black steel, or galvanized? At least you will be able to rectify these faults with the new mill and tower. Gordon. become more energy aware |
||||
| HeadsUp Regular Member Joined: 06/12/2009 Location: AustraliaPosts: 43 |
i agree with him , it is a weld defect , that is the joint was only welded about 40 % of the round bar thickness also , it looks like reinforcing bar which can be poor quality steel and brittle .... notice the part that bent has cracked through 75 % of its thickness , it should have bent before tearing , it could be recycled scrap metal with impurities and high carbon contamination from your 1971 kingswood diff center. reminds us of the importance of weld and joint integrity that style of mounting could be okay if you replace it with a quality mild steel 1020 grade or so and perhaps use 16 mm diameter , and ensure the joint is either 100 % welded through , or overlap the joint zone 25 mm and use fillet weld on each side where it touches the pipe ensuring no undercut into the pipe. i wouldnt go as tough as K 1045 because it is affected differently by welding heat and requires different heat procedures to avoid embrittlement , keep it in the mild steel grades 1020 - 1030 wont hurt to give the whole tower a coat of etch primer too while its down thanks for sharing |
||||
| RossW Guru Joined: 25/02/2006 Location: AustraliaPosts: 495 |
I've had a better look, and made some measurements. The original was 10mm round bar. It definately looks like the side that seperated was the butted "join" of the 2 ends of the bar. All other welds seem to be one continuous piece of rod right through. I went out yesterday and got some 3/8" gal chain (the diameter of the rod that makes the links is 10mm) - was the heaviest chain I could find locally. My plan is to extract 4 intact links. The welded "side" of these links, I'll run against the grinder to make a flat. A quick clean of the tower where I plan to attach, and I'll weld the links "vertically" (ie, the long (now flat) side against the tower, running along the top-bottom axis of the tower). One at each compass point (N/S/E/W), re-attach the guys to the new attachment points, then run a 6mm gal wire through all the thimbles and clip off. Thinking I'll want a fairly decent welding current to get good penetration - but not so high that I create weakness in the tower, or make the links brittle. Thoughts? |
||||
| RossW Guru Joined: 25/02/2006 Location: AustraliaPosts: 495 |
Yesterday I ducked into town and grabbed a length of the heaviest chain I could get. Pity the links were made of only 10mm dia material. Anyhow, extracted 4 intact links and ground a flat on the "joined" side. (The idea being that if I affix this side to the tower, even if the link was poorly welded, it'd effectively be reinforced by having both "loose" ends affixed to the tower. Then I took an anglegrinder and cleaned a section of the tower back to bare steel big enough to work in: 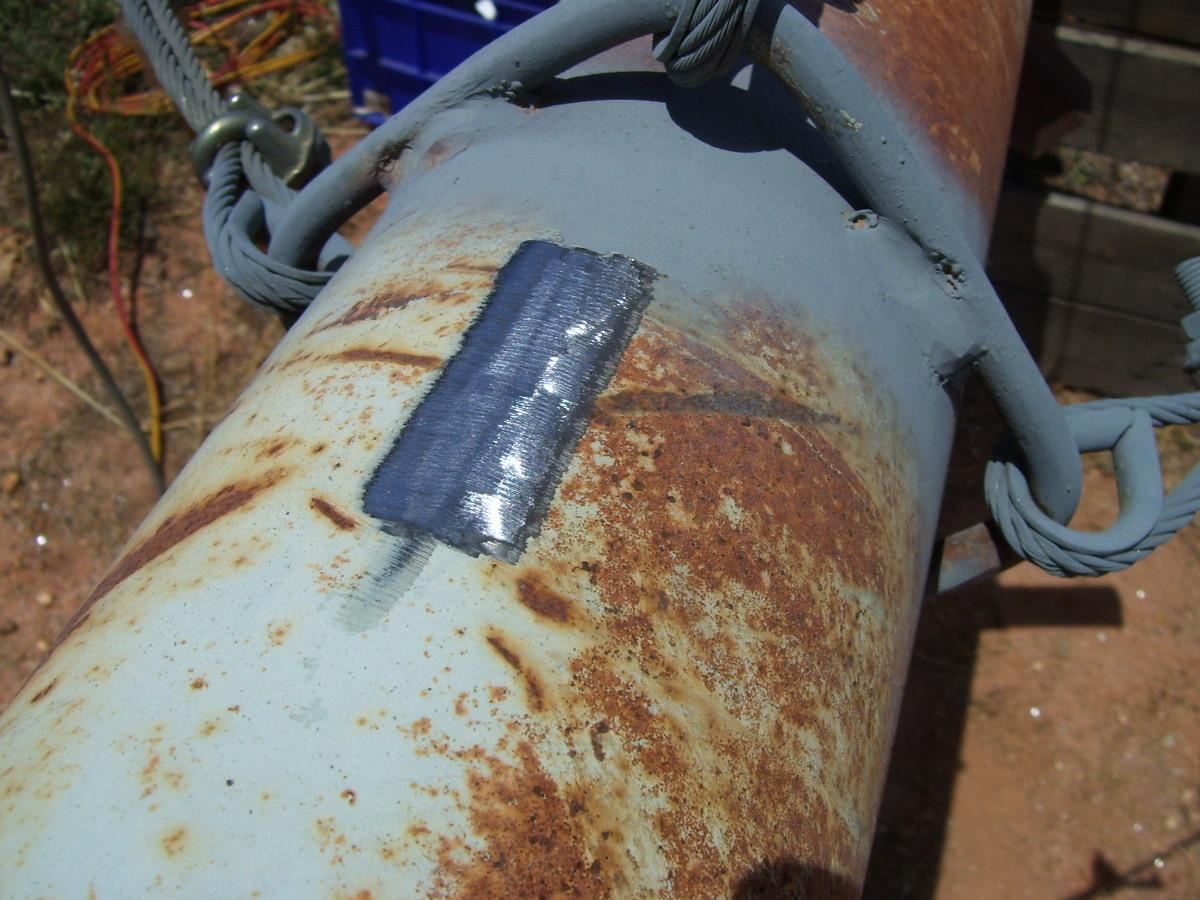
The plan is to add 4 links around the tower, like this: 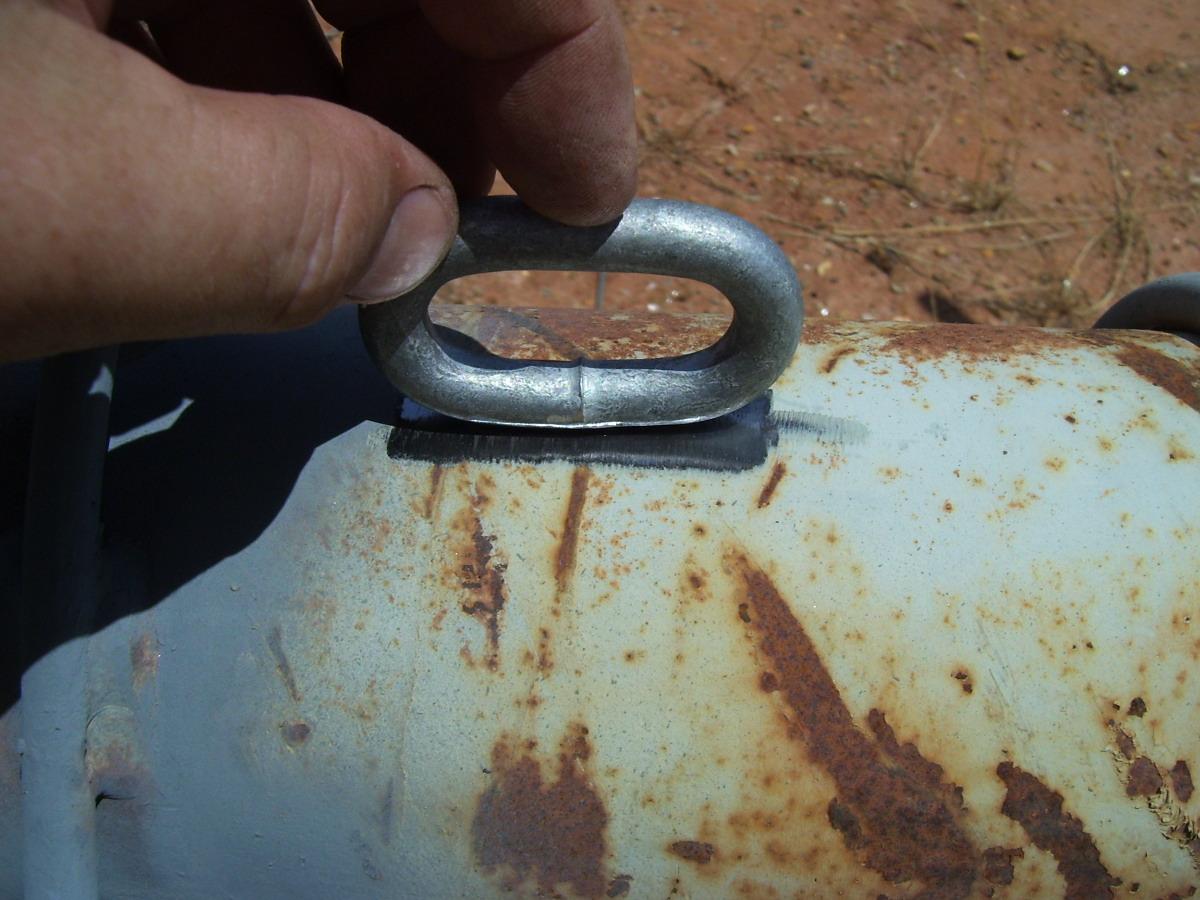
It's just as well I'm a good system admin, because I'm a lousy welder. (The little dings all over it were me making sure no more sl*g was comming off and that the weld was sound): 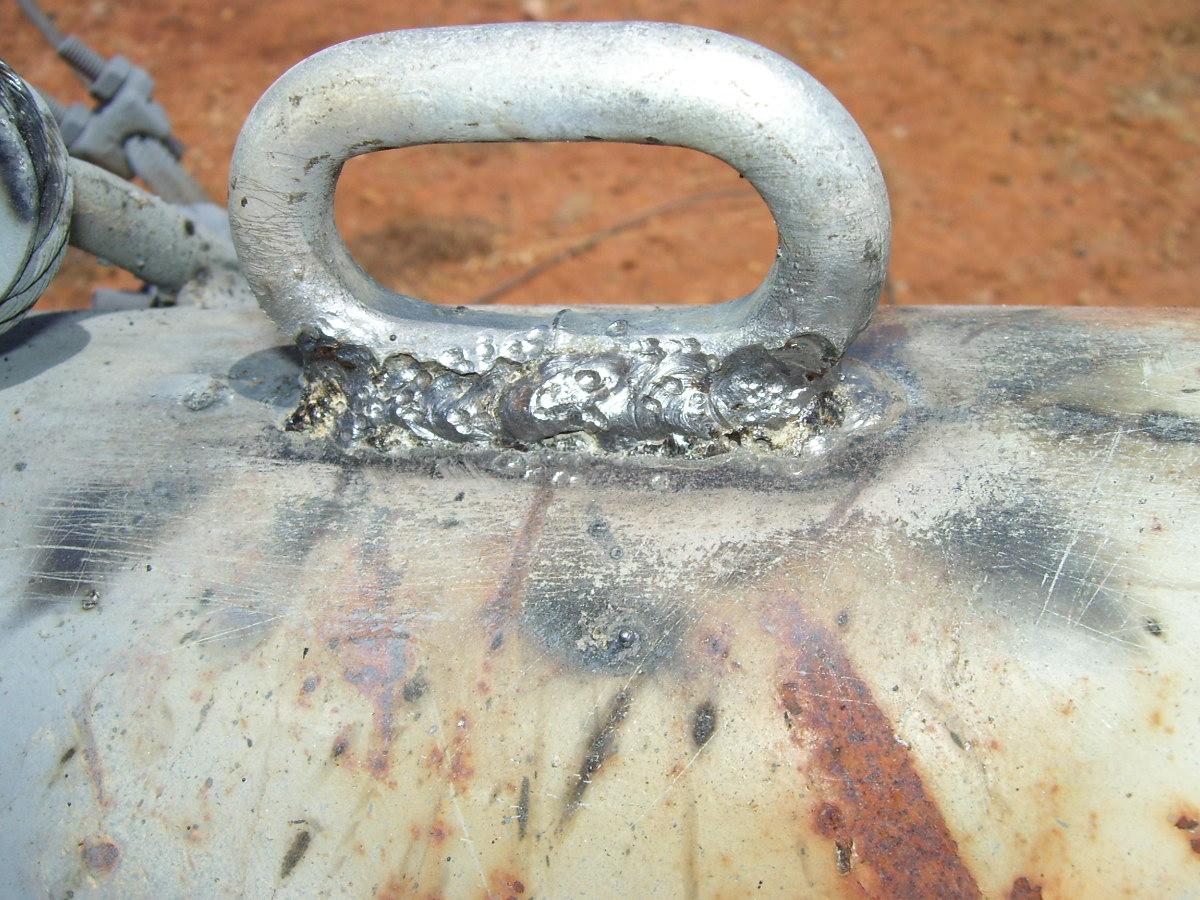
Welding upside down really sucks! 
Finally done, you can see the "easy" 3 here: 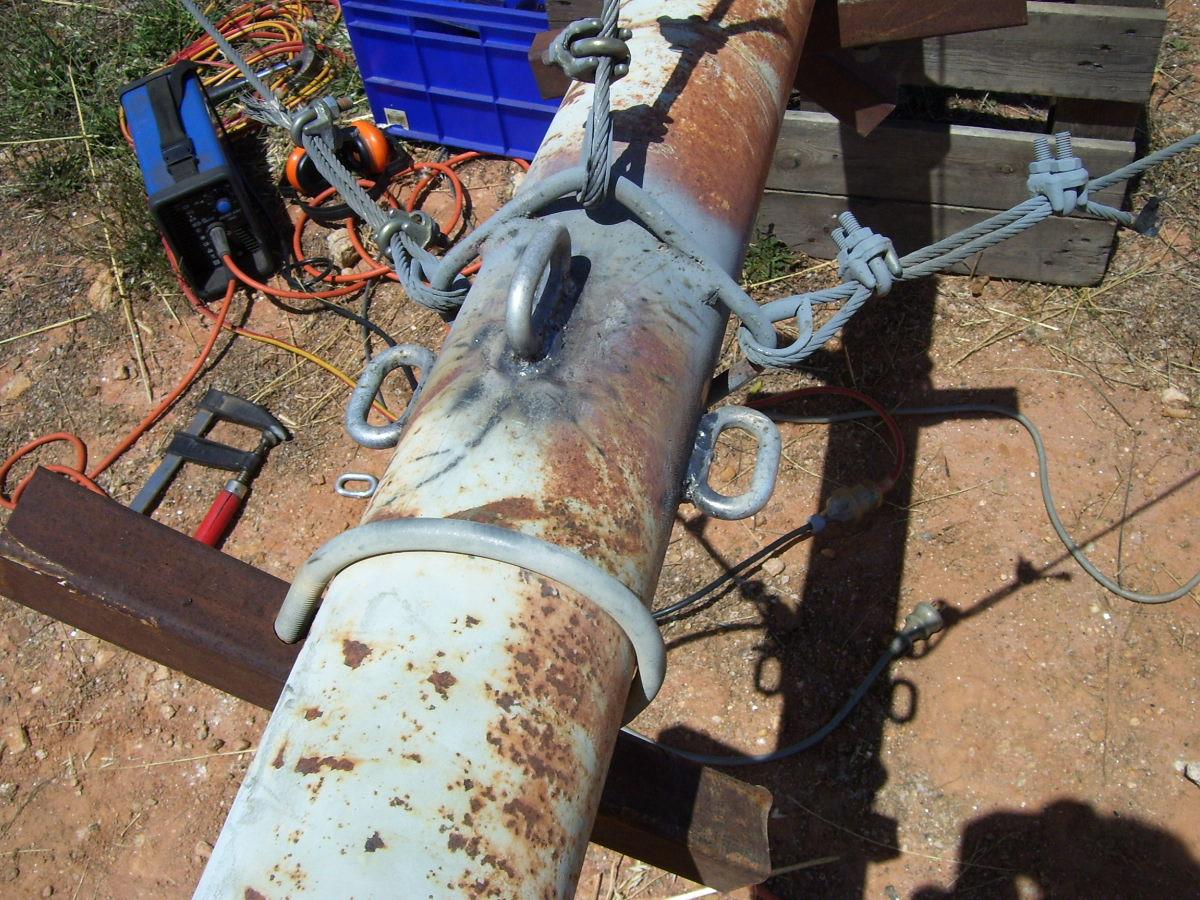
A lick of "cold-gal" and they look acceptable. I doubt they will fall off. 
After I moved the guys from their old mounting points to the new ones, I added another wire through all the thimbles. I ran out of clips (I did the same on the lower guy attachment point), I'll put another clip on this next weekend. 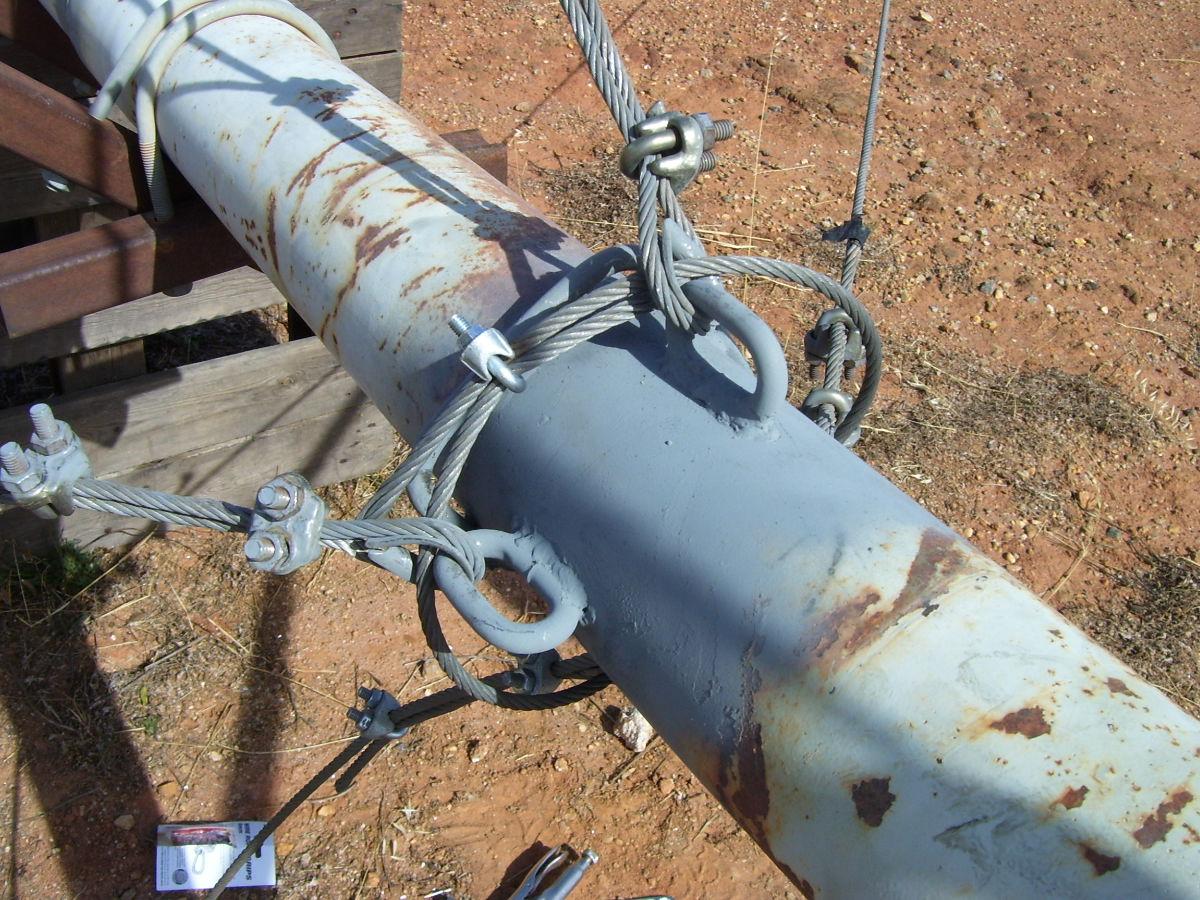
Someone was asking what the "truckies slip knot" was - here's another one I used to hold the gin pole while I moved its guy. (This provides a 2:1 mechanical advantage for tightening up ropes): 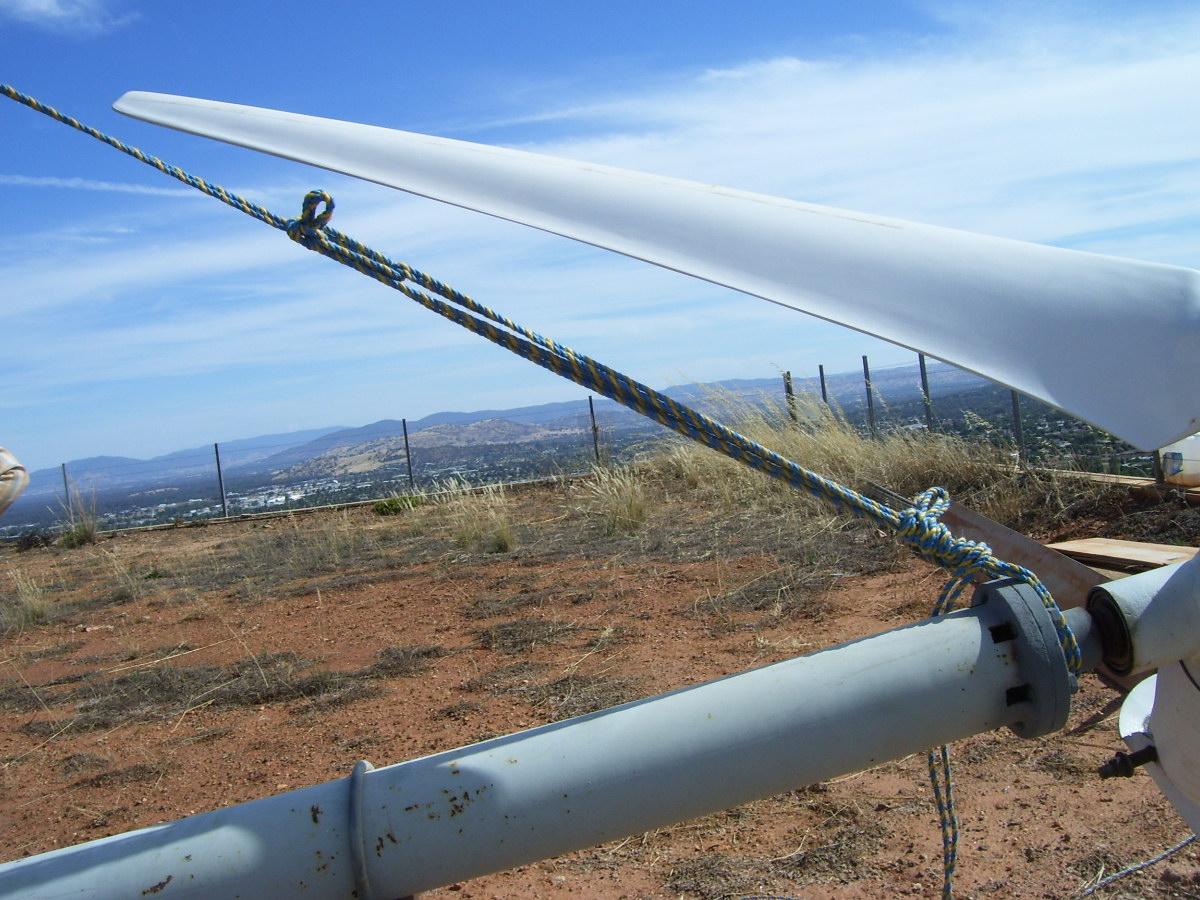
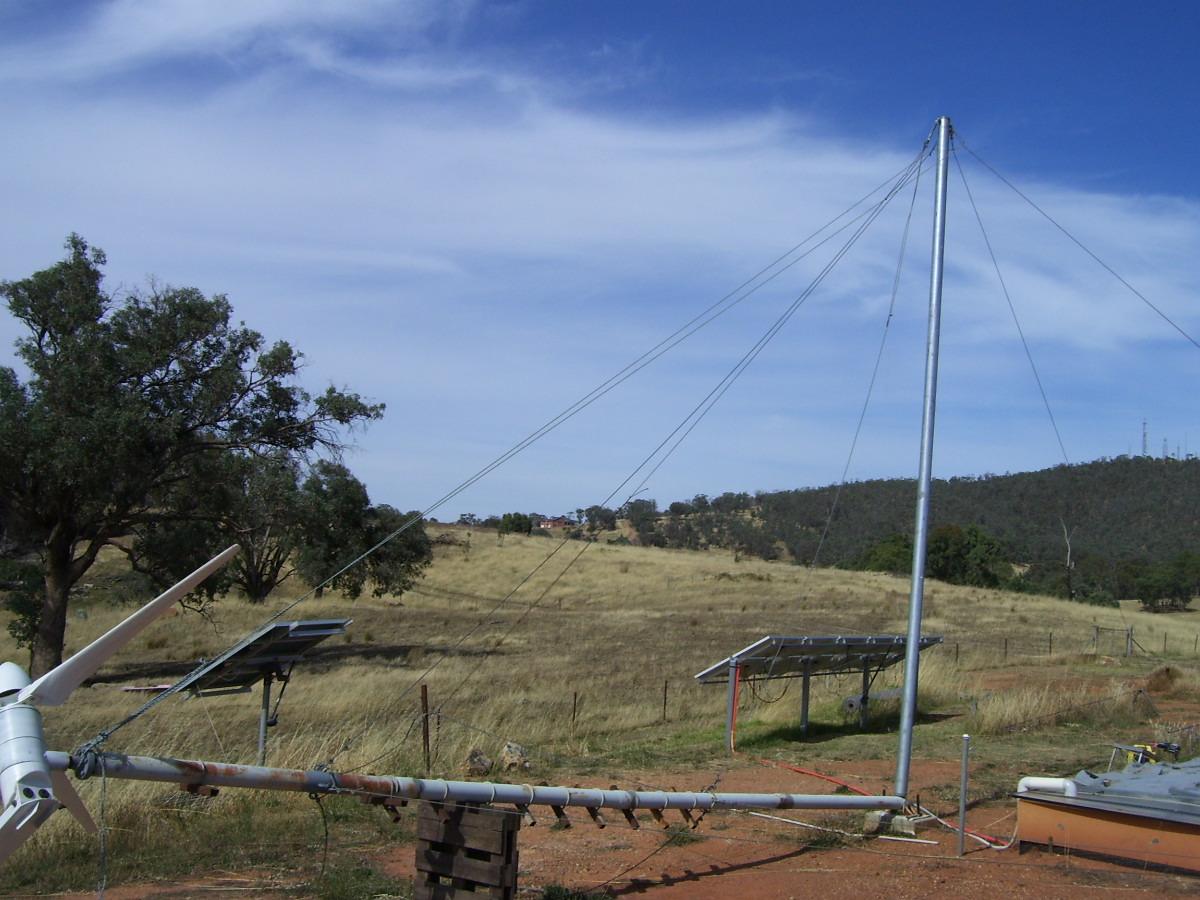
And a couple of shots - one down the tower from the generator head end, and one sideways, before I raised it again. It's back up and flying now. 
|
||||
MacGyver Guru Joined: 12/05/2009 Location: United StatesPosts: 1329 |
[Quote]Welding upside down really sucks! It's been over 40 years since I was in "welding school" in the US Coast Guard, but if I remember correctly, you can use d.c. and put the red clip on the top piece and the polarity will draw the melt up and not let it drip on you. Nothing difficult is ever easy! Perhaps better stated in the words of Morgan Freeman, "Where there is no struggle, there is no progress!" Copeville, Texas |
||||
| HeadsUp Regular Member Joined: 06/12/2009 Location: AustraliaPosts: 43 |
what grade was the chain ? if its galvanised mild steel from the hardware store then its not much better than what you had before , with the exception being the other failure was partly from the steel bar only being welded 40 % of its thickness gal chain without a load rating is not permitted in load lifting applications having said that though , a tougher grade 80 chain would become brittle when welded. if i was going to do it again i would still have replaced it with some 16 mm 1020 bright bar i like the way you welded the links vertically , that reduces stress nodes. |
||||
KarlJ Guru Joined: 19/05/2008 Location: AustraliaPosts: 1178 |
Ahh as he said in the post failed where the rod was butt welded to itself. That was the cause of the failure, not the material itself. Chain links will be tough as. Very common on tower joiners Luck favours the well prepared |
||||
GOFJ Newbie Joined: 22/12/2009 Location: AustraliaPosts: 27 |
It looks like the rod was high carbon (pretty hard) as it has not been pulled down by the cable tension and has a brittle failure in the heat affected zone. For insurance you could run some cable around the tower through each of the cable eyes and back on itself although the chain links should be more than adequate. If you use high tensil chain, use 316L welding rods. Jack |
||||
pancho43 Newbie Joined: 27/02/2009 Location: AustraliaPosts: 10 |
Ummm...... Jack I think you will find that 316 L rods should only be used for welding stainless to stainless. The correct rods for carbon steel to mild steel, or steel to stainless will be 309 mo. Cheers, Pete. Pete |
||||
| GOFJ Newbie Joined: 22/12/2009 Location: AustraliaPosts: 27 |
For high tensil (spring) steel I used to use Eutectic 680 rods (mining industry) but they are a little hard to obtain at Mitre 10, for field welds layed down by a kack handed operator (no offence intended) I don't think you would notice the difference. Jack |
||||
| HeadsUp Regular Member Joined: 06/12/2009 Location: AustraliaPosts: 43 |
correct Pancho welding of mild steel to 300 series or 400 series stainless steel should be done with 309 L ( L means low carbon to reduce carbide precipitation ) |
||||
| pancho43 Newbie Joined: 27/02/2009 Location: AustraliaPosts: 10 |
Yep been there done that. I used to own and operate 3 Prawn Trawlers in the Torres Strait and Far North Queensland which had a vast amount of 316 stainless in all of the wear areas and I very early on found that if you try using 316 L rods to weld stainless to steel you will get very small hairline cracks along the whole length of the weld. Apart from the fact of reduced strength the small cracks will allow (in the case of a vessel) the ingress of salt water which will bleed rust forever more. Not what you want on a D.P.I. export rated vessel. Pete |
||||
| GOFJ Newbie Joined: 22/12/2009 Location: AustraliaPosts: 27 |
If you don't pickle the welds to remove scale (or paint) you will get rusting in the weld area. Jack |
||||
| The Back Shed's forum code is written, and hosted, in Australia. | © JAQ Software 2026 |
