
|
|
Forum Index : Windmills : Convert chinese turbine to smart drive
| Author | Message | ||||
Smart Drives Senior Member Joined: 06/07/2009 Location: AustraliaPosts: 115 |
I have been wondering the last couple of months what to do with my 12v chinese turbine. I have a large 24v system and this pain in the but little 12v system. I didn't want to wreck the turbine in case my idea didn't work, so i decided to see if i could convert it with no cutting or welding of the unit. It isn't pretty but it worked, and it only took half a day. The structure of the chinese turbine is very strong , mine has withstood at least 30 massive storms with winds over 120km/h. The controller and wiring are their weak point. Step 1. Remove cover and undo long bolts. 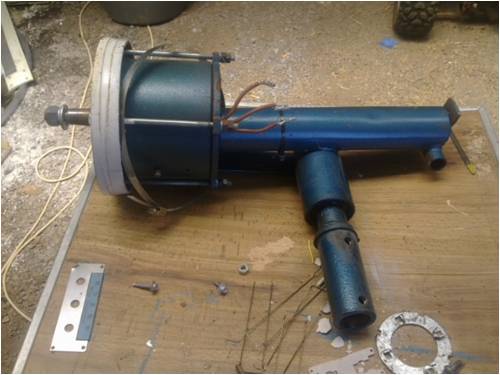
Tap off white face gently and remove the rotor. Then lever off stator with a screwdriver. 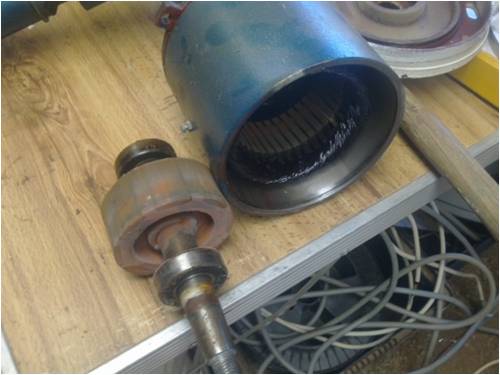
This will leave you with the thrust bearing and the tail furling pivot. 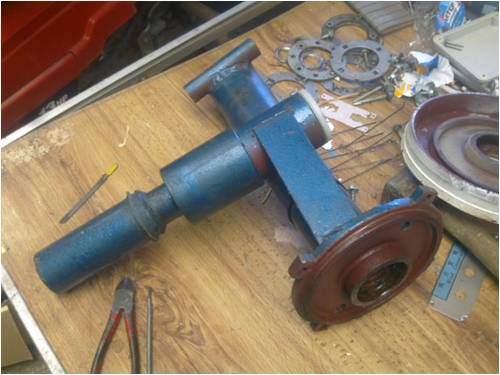
I have taken a photo of a smart drive alignment plate/washer to show how the screw holes will hit the raised bearing housing in the housing. This is why we have to lift our new backing plate off the housing face. The thread on the 8mm bolts i have only goes half way up the shaft of the bolt so i will use larger nuts as spacers. 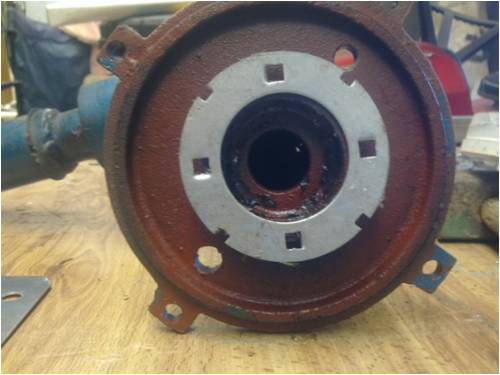
The next step is to get a piece of metal 4mm mild steel or i have used an old piece of 6mm aluminium (with lots of holes in it). Grab the face of the turbine that you removed and centre it, mark and drill your 4 bolt holes. It doesn't have to be round a square piece will be fine. You now need to centre your smart drive alignment/plate washer, mark and drill 4 holes. I have put screws in the holes to show which ones i am using. 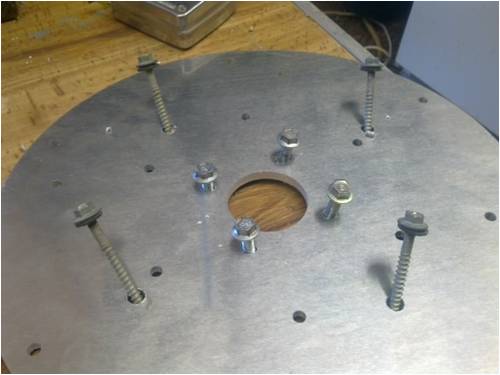
The next photo shows the spacers i used. Note that your backing plate will be put up against the nuts then another nut and washer are used to hold the plate on. 
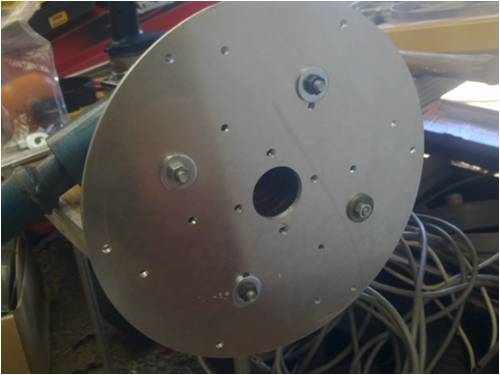
I had a prewired motor ready to go, all i had to do was tap 6mm holes into the back of the bearing housing. If you buy anything get a 6mm tapping kit they are only $40 and make life easy. Again i used the smart drive alignment plate, There are indents on the back of the smart drive bearing housings. Roughly line up the holes on the alignment plate with these and mark and drill with a 6.5mm bit , then use your tapping drill bit. 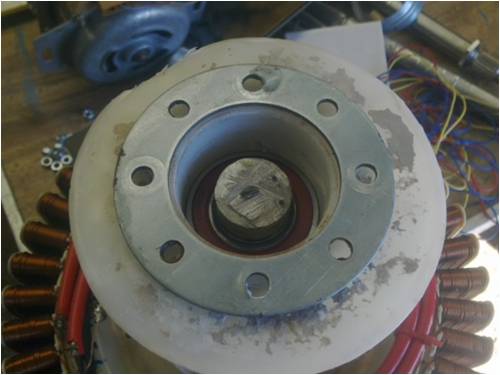
I took the new backing plate off and using the screws that come with the smart drive housing attached the motor to the new backing plate. Bolted the backing plate back on , slid on the rotor and now it is ready for my blade hub and blades. 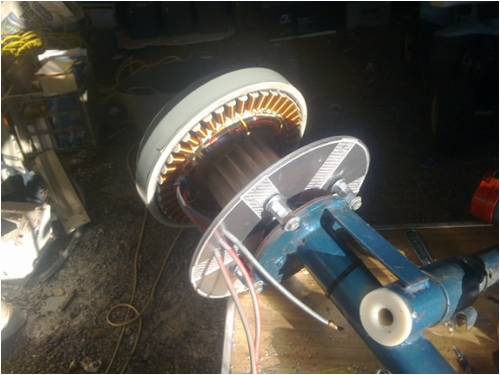
I use a 5mm thick mild steel hub 250mm dia. with a 50mm dia. x 10mm thick disc welded to the middle (on the back to lift blade bolts off the rotor) and get an engineer to tap a thread through both that the smart drive shaft fits on to. 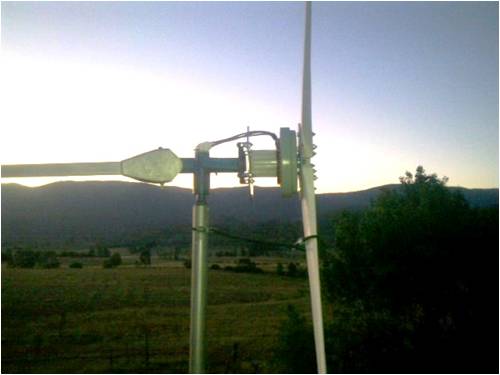
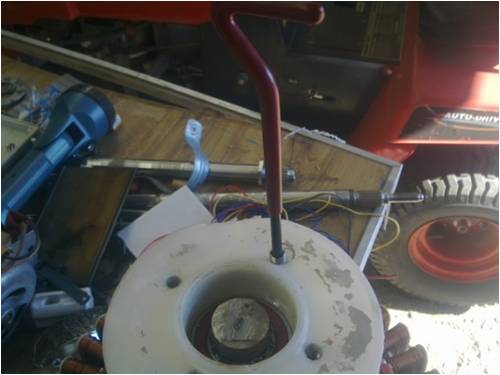
I had to put a rubber stopper on so the tail sat back in the right position. Job done. All smart drive parts sold Custom built turbine parts on Multicam flatbed CNC Router |
||||
Downwind Guru Joined: 09/09/2009 Location: AustraliaPosts: 2333 |
Nice job. Now what are you going to do with the pain in the ass gennie?? Another problem? Pete. Sometimes it just works |
||||
| Smart Drives Senior Member Joined: 06/07/2009 Location: AustraliaPosts: 115 |
Who ever gets in first can have the chinese blades/hub , stator and rotor for $150- cam. All smart drive parts sold Custom built turbine parts on Multicam flatbed CNC Router |
||||
| JimBo911 Senior Member Joined: 26/03/2009 Location: United StatesPosts: 262 |
Nice conversion work. Very interesting. Keep us informed on how well it performs. Jim |
||||
| KarlJ Guru Joined: 19/05/2008 Location: AustraliaPosts: 1178 |
I cant help but think that this idea is a good one Smart 600 He cuts out the original centre of the F&P stator and uses a steel disk for $50 (could also DIY) F&P adapter to chinese turbine I cant help but think this one will end in tears, the plastic thing really is weak as piss, perhaps cut it down some more and fit it inside some steel pipe. Its purpose of holding the stator should be second to supporting the shaft which now has a really big lever holding onto your plate with 4 tiny screws that are attached into a little aluminium and a little plastic. By looking at the photos, perhaps consider this. Adapt the existing lump of cast steel, to fit the smartdrive stator using method similar to the smart 600. run the shaft right through and have a bearing at the back too. This would shorten that huge lever. Alternatively, I believe a rewire is possible of the Chinese turbine to 48V, perhaps worth a look. From what I have heard there are two sets of windings in there, connect in series and star and you might be in luck. In all your progress far better than mine! I must worry too much, EG the yeasu thrust bearing looks like a rubbish piece of kit (especially for almost $100). Too much slop and no hardened surfaces at all. Luck favours the well prepared |
||||
| Smart Drives Senior Member Joined: 06/07/2009 Location: AustraliaPosts: 115 |
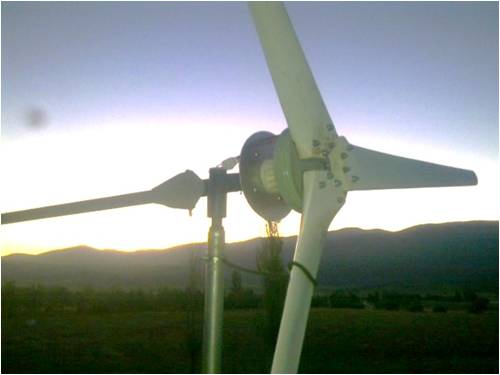
Yes i agree its not the strongest setup. I had some wind today and a wobble did develop when the wind picked up . I am going to add some weight to the tail as by moving the motor further forward the balance is now off. The MK1 chinese turbine as far as i am aware cannot be rewired but the MK2 can be. I wrote the other day on another topic that i didn't like the look of yaesu bearing either ($55- and isn't on this turbine) which is why i am switching to car wheel bearings. But i only have one at the moment which is going to be used on my induction motor conversion. If i can fix the wobble i am going to leave it up in the air and see if it can withstand a storm. STAY TUNED for the eulogy. All smart drive parts sold Custom built turbine parts on Multicam flatbed CNC Router |
||||
| KarlJ Guru Joined: 19/05/2008 Location: AustraliaPosts: 1178 |
 eulogy eulogy 
there must be an easy way to mount much closer to that front plate or ecoinnovation wouldn't have it. Perhaps the F&P could bolt to the front of the original generator arrangement..... Luck favours the well prepared |
||||
| Smart Drives Senior Member Joined: 06/07/2009 Location: AustraliaPosts: 115 |
I think you might be able to cut the bearing housing in half or less lets say and drill all the way through it , then you can bolt from the backing plate into the front of the motor ? I think in the end there are no short cuts , i just have to do some cutting so i can mount it flush with bolts and not screws. All smart drive parts sold Custom built turbine parts on Multicam flatbed CNC Router |
||||
fillm Guru Joined: 10/02/2007 Location: AustraliaPosts: 730 |
With a 1" unc bolt you could bolt one of my Dual stator bearing housing & Arm straight on to the front , the shaft hole might even be the right size to tap a thread 1" or whatever size into it . Then you will have adjustable offset and the blades will be not be sitting so far from the yaw pivot , as by the looks of this set up it would be very hard to keep square to the wind . PhillM ...Oz Wind Engineering..Wind Turbine Kits 500W - 5000W ~ F&P Dual Kits ~ GOE222Blades- Voltage Control Parts ------- Tower kits |
||||
| KarlJ Guru Joined: 19/05/2008 Location: AustraliaPosts: 1178 |
He he, the dual wins in so many ways it hardly seems worth doing anything else. BTW what stops the blades coming out the front, I cant see a nut on the shaft? Luck favours the well prepared |
||||
| KarlJ Guru Joined: 19/05/2008 Location: AustraliaPosts: 1178 |
BTW Phill, this may be a viable manufacturing idea for the fillm dual. Perhaps next step is a mill with "bolt on" chinese blades could be marketed as the chinese fix up or could use their cheap body and bades with the f&p and a PL20. I'll discuss with you when i'm up there. Luck favours the well prepared |
||||
| Smart Drives Senior Member Joined: 06/07/2009 Location: AustraliaPosts: 115 |
Yes there is a nut on the front. Good news the extra weight on the tail fixed the permanent wobble ,the windier it got the more stable it became. I got 10amps today in 25km/h winds (24v system). And it stayed straight into the wind. BUT the wobble still exists on startup and slow down . All smart drive parts sold Custom built turbine parts on Multicam flatbed CNC Router |
||||
| Smart Drives Senior Member Joined: 06/07/2009 Location: AustraliaPosts: 115 |
after changing the blade hub (with another set of blades aswell) i am convinced that the blades need balancing as it took longer at startup for the wobble to happen. Its probably a couple of things but i will start with the blades. All smart drive parts sold Custom built turbine parts on Multicam flatbed CNC Router |
||||
| Jarbar Senior Member Joined: 03/02/2008 Location: AustraliaPosts: 225 |
With that amount of overhang it may work better downwind without the tail. "Creativity is detirmined by the way you hold your tounge".My Father "Your generation will have to correct the problems made by mine".My Grandfather. |
||||
| Smart Drives Senior Member Joined: 06/07/2009 Location: AustraliaPosts: 115 |
might be worth a go... I will still have to see how much the blades are out of balance . If after balancing i have no luck i will definately try it. Cam. All smart drive parts sold Custom built turbine parts on Multicam flatbed CNC Router |
||||
| Smart Drives Senior Member Joined: 06/07/2009 Location: AustraliaPosts: 115 |
SUCCESS... I rigged up a temporary hanging string , not 100% accurate but enough to give me an idea and to my surprise 1 blade was significantly lighter(Here i was expecting the blades to be all the same ( or close anyway !). I thought i might have to add a couple of screws etc but ended up adding 3 pieces of 75mm x 50mm x 3mm steel angle ! The wobble is gone and turbine is purring. Thanks for all the suggstions Cam. 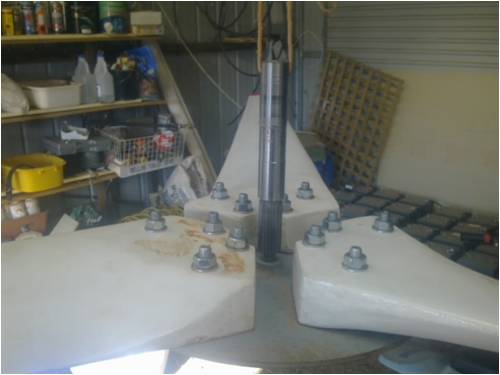
All smart drive parts sold Custom built turbine parts on Multicam flatbed CNC Router |
||||
| Tinker Guru Joined: 07/11/2007 Location: AustraliaPosts: 1904 |
Smart drives, did you know that the 4 bolt F&P stator mounting on the white bearing hub is duplicated on the far side of it? Its buried under the white plastic where the shaft seal normally fits. All you need to do is carefully turn the plastic off the end until you hit the embedded aluminium. You can then see the 4 bolt holes, just tap them with 1/4" withworth tread. Mounting your windmill from there would eliminate your cumbersome bracket arrangement and remove the excessive overhang. Klaus |
||||
| Smart Drives Senior Member Joined: 06/07/2009 Location: AustraliaPosts: 115 |
In my rush to do this conversion i had uploaded the wrong photo which probably explains everyones confusion. i also need to keep my thoughts about what i am going to do updated aswell as what i actually do. and dont do two different ideas at once. Cam. All smart drive parts sold Custom built turbine parts on Multicam flatbed CNC Router |
||||
| The Back Shed's forum code is written, and hosted, in Australia. | © JAQ Software 2026 |
