| Author |
Message |
MacGyver

Guru

Joined: 12/05/2009
Location: United StatesPosts: 1329 |
| Posted: 12:50am 13 Jun 2010 |
 Copy link to clipboard Copy link to clipboard |
 Print this post |
|
Crew
If you've ever wished there were some way you could pull down your wind genny when the weather turns nasty, but instead just had to leave it up and hope for the best, here's a solution to your problems.
This is a tower I first built in Florida 40 + years ago. It's easy to build, lightweight, affordable and doesn't take a Masters Degree to figure out. The one pictured here is only about 15 feet high (neighbors!) but the one in Florida stood at 40 feet and weathered several hurricanes without any problems. It was much bigger and set in two concrete-filled holes about 6 foot deep and a foot wide each.
When I was deciding what to call the thread, the name I chose reminded me of a place in Seattle, Washington (USA) called Ivar's Tower. It was once the tallest building west of the Mississippi River. Originally called Smith Tower, it was purchased in 1976 for $1.8 million by Ivar Haglund, a seattle fishing and restaurant magnate. Right across Market Street on the wharf is Ivar's Fish & Chips, a world-famous take-out restaurant.
Just thought I'd throw that in as a little bit of history. Now for the build:
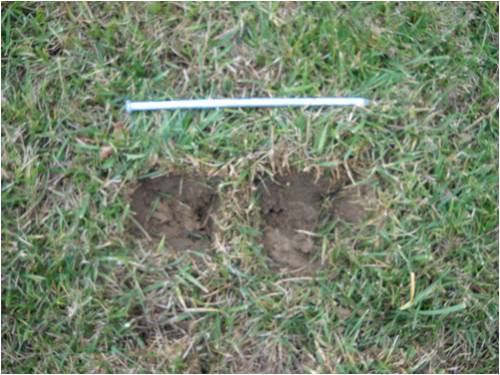
I started off by choosing a place in the yard and removing two 4" squares
of lawn (to be replaced after the posts are set). That pin lying there is
eventually going to hold things together and the pole-holding holes
must be no farther apart than the length of the pin.
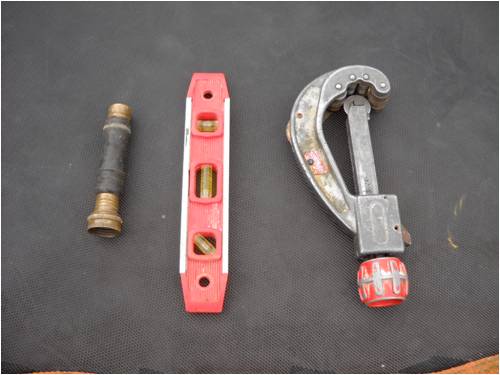
These are the only "special" tools I used. The thing on the left is what
I call a "water weenie". It expands inside a pipe, holding itself stuck
when the water is turned on while at the same time squirts out a small
stream inside the pipe. It was designed to "blow" out a clog in a drain
pipe and is often called a "blow bag". The other two tools are a spirit
level and a fancy plastic-pipe cutter (I'm a plumber by the way).
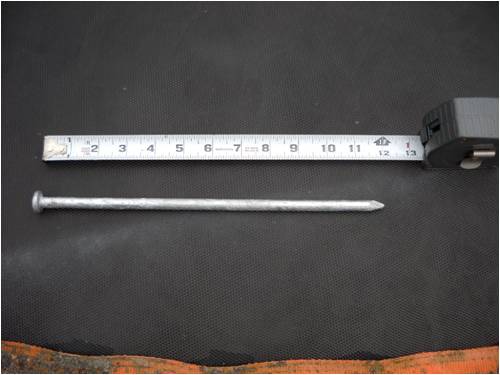
This has got to be the world's largest nail. I got it at Home Depot for
about $.59. It's galvanized steel and will become one of two pins.
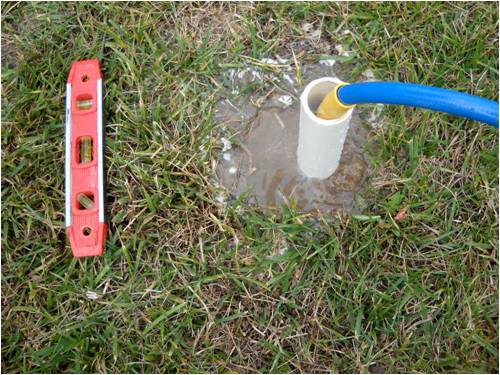
We start embedding one of two 18-inch pvc pipes (which are just
slightly larger than the metal posts that will support the tower) by
inserting the water weenie, turning on the water and baby sitting
while the water digs our hole, constantly pushing down and twisting
while maintaining a left-right & fore-aft vertical position of the pipe.
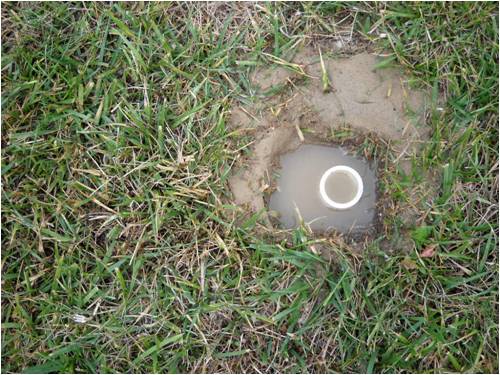
See, I told you it would work! Beats heck out of digging holes and
pouring in fence-post concrete, then waiting for it to hydrate (dry).
I did it twice making sure the second hole and holder were no wider
than the pin I am using to keep things together. It's just a patience
thing; not at all difficult, really.

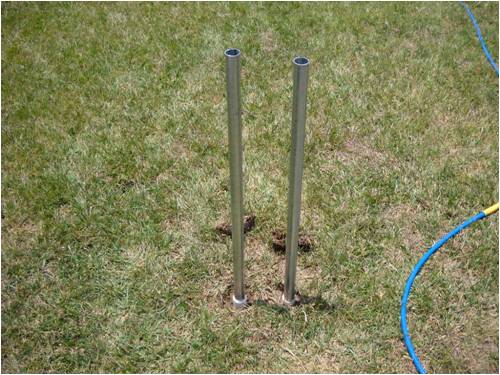
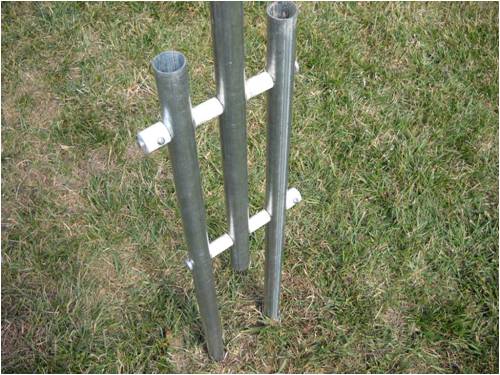
Here's a closer shot of both metal posts stuffed inside each of two
pvc guides we jammed into the ground using water to do all the
work.
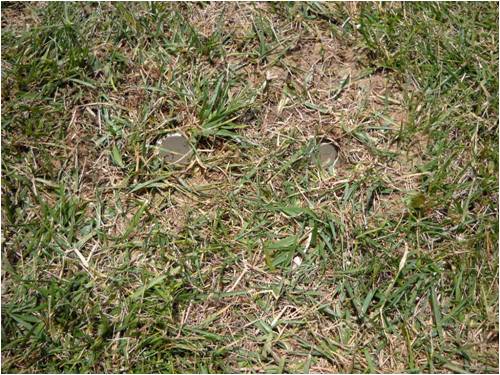
I used the sharp end of the metal pipe to remove a plug from each
of the two clumps of lawn I took out in the first step. Now it's almost
invisible; nobody but little ol' me and 13,000 forum members know
the post holders are buried there. Pretty cool, eh?
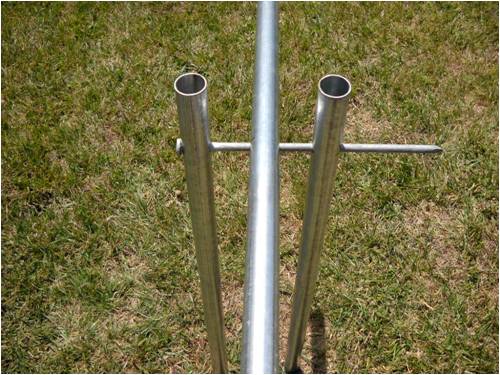
Next, after measuring where I wanted the pins to intersect both the
tower and the holder posts, I drilled all the holes. As easy as that
sounds, it took a couple of tries and several "blue" words to get 'er
done. It's always the "easy" part that stumps me.
Here it is bare bones with just a few remaining parts to be built and
installed.
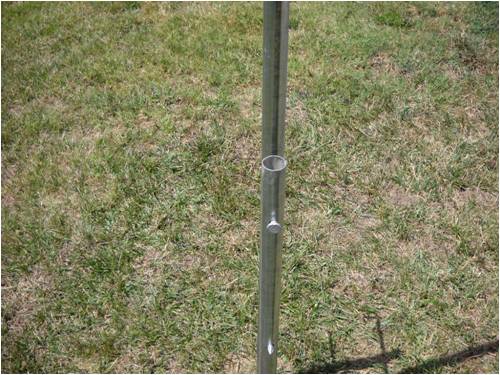
I took this shot from one side to show that by having just a little bit
of patience, you can get things to line up straight.
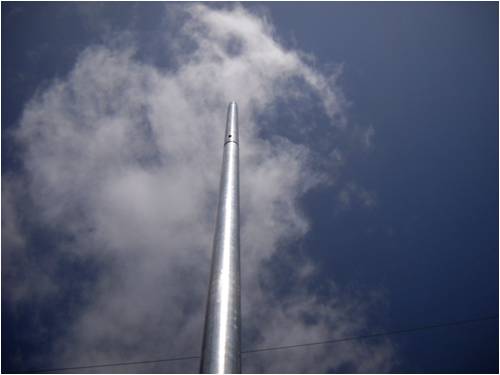
Here's a shot from the ground looking up at the top of the tower as
it is held securely by the holder. Yes, the top of the tower is all the
way up into that cloud!
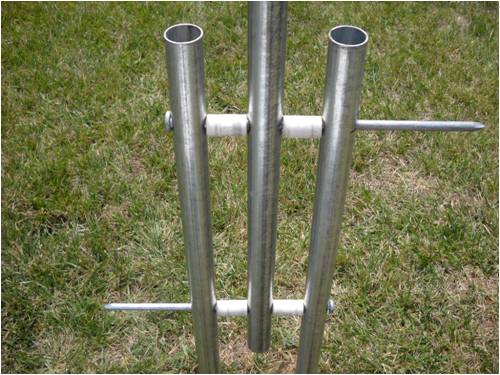
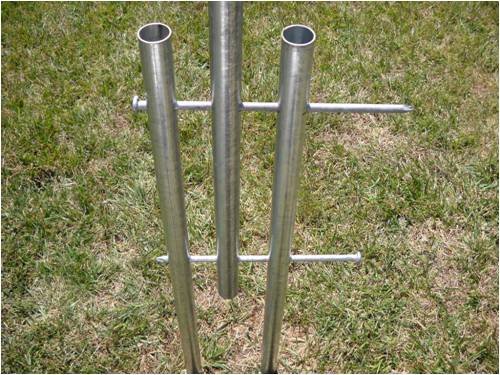
This shows 4 small chunks of 1/2" pvc sprinkler pipe (schedule 40 -
the thick stuff) being used as stand-offs. They hold everything in
the right place should this thing develop a mind of its own and want
to wander off somewhere. It's important that the holder actually hold
things taught as well as exactly vertical.
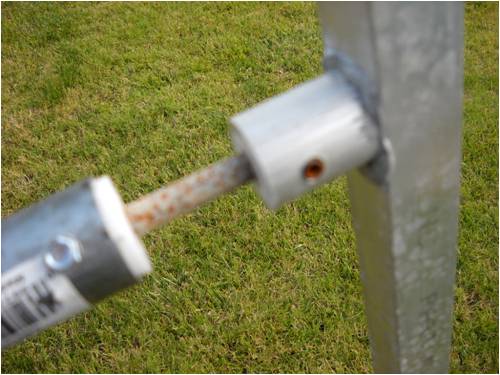
I fabricated two little "stops" one for each end of each pin. This lets
me cut off the remaining steel "nail" left over and lessens the chance
of someone (me!) snagging their britches on it.
Here's a shot of everything done and holding the tower. All that's left
to do is manufacture a bushing to be fitted into the top of the metal
tower's central spire and then the "mill" can be set in place. If things
get out of hand (weather) or I just want to work on the mill, all I have
to do is pull the bottom pin and the tower and mill both swing to the
ground as I control their descent.

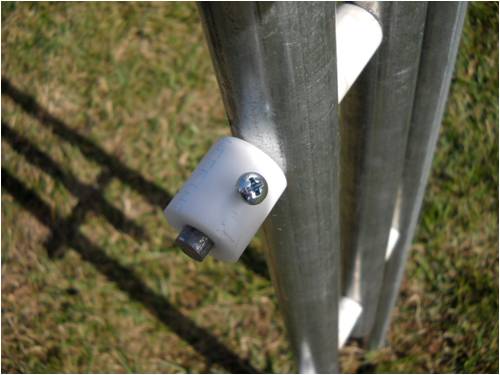
Here's a shot of that bushing. I pinned it in place with two set screws.
Recognize the windmimll? It's the skeletal remains of my backyard
toy, which threw a blade yesterday!
I snapped this shot merely to show the steel shaft, which extends
down the inside of the central tower riding inside the Delrin bushing
I carved out on my lathe.

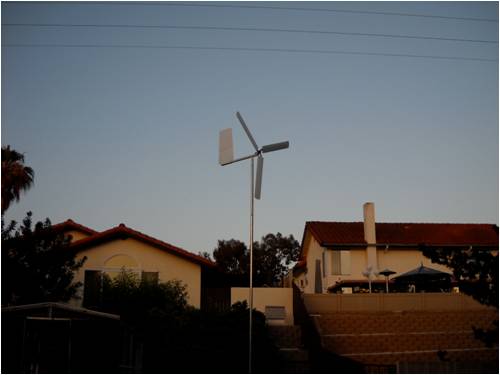
Here it is flying; largest weather vane on my block!
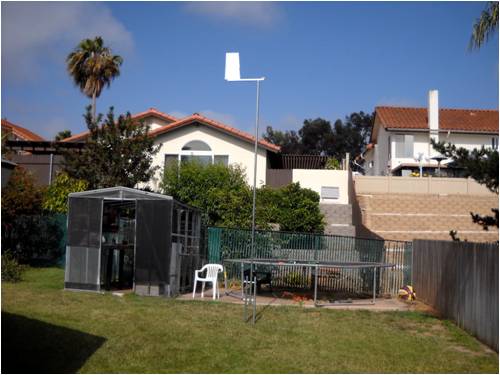
For perspective, this is exactly why I need to have a way to easily and
swiftly lower things out of (the neighbor's) view. You gotta know they're
gonna love watching my genny scream in the ocean breeze, eh?
By the way, I know I told everyone I would build a single-blade, controlled-pitch windmill today and the truth is, my day started out that way. Problem is, I ran out of glue. It's a special glue (cyanoacrylate) and I can get it only at the hobby shop about 20 miles down the path. So, I decided to throw this up instead. I've mentioned it several times and thought it about time to share all I've discovered. Hope you like it!
Edit: I scurried around and slammed my broken mill back together, lowered the tower and stuck it on top (without balancing it) for a quick picture before the "Edit" option magically disappears forever. I think I'll leave it up for the night and balance it tomorrow. This should be interesting. 
I kinda wonder if it'll be there in the morning. If it flies apart now, I will
have to chase around to find the blade(s)!
Oh, I almost completely forgot: In a larger version, the lower part of the center pipe (the spire) can be screwed through with several bolts or lag screws, then set into a plastic pail and concrete added. This makes a large counter-weight that balances the weight of your windmill situated at the top end. With the genny counter-weighted, lifting and lowering is a breeze (no pun intended).
By the way, those wires are 69 KVA electric lines that run over the back of the property. The little windmill and tower look like they're close, but in reality, the wires are still 25 feet higher than the top of the tower.
. . . . . Mac
Edited by MacGyver 2010-06-14
Nothing difficult is ever easy!
Perhaps better stated in the words of Morgan Freeman,
"Where there is no struggle, there is no progress!"
Copeville, Texas |
| |
isaiah

Guru
Joined: 25/12/2009
Location: United StatesPosts: 303 |
| Posted: 09:08am 17 Jun 2010 |
Copy link to clipboard |
Print this post |
|
What size is the pipe? conduit or antenna mast?
How do you control it coming down?
15 feet should be not much of a problem but 30-40 would be more interesting.
It could get away from one person pretty easy.
I like your design.
URL=http://www.motherearthnews.com/Renewable-Energy/1973-11- 01/The-Plowboy-Interview.aspx>The Plowboy Interview[/URL> |
| |
MacGyver
Guru
Joined: 12/05/2009
Location: United StatesPosts: 1329 |
| Posted: 04:54pm 18 Jun 2010 |
Copy link to clipboard |
Print this post |
|
isaiah
Asked and answered:
What size is the pipe? conduit or antenna mast?
The tower (center pole) as well as the two that insert into the PVC water pipe jetted into the ground are "top rail" cyclone fence sections (10' 6" each) purchased at Home Depot in the fence-building-materials section for about $9 each. Truthfully, I didn't measure them. I snagged a piece of PVC pipe from the plumbing section and made sure the fence rail slipped easily inside the PVC. That's the only measuring I did.
How do you control it coming down?
I'm built like Shrek. No, really, really big, but without those goofy ears. Anyway, this one is only 15 feet high, so I wait for a lull and just yank it down. My 40-foot one in Florida had a concrete counter weight affixed to the bottom end of the center (swinging) pipe. I drove large screws through the pipe first, then stuck the end into a plastic 5-gallon bucket and poured in fence-post concrete, then let it hydrate a few days before removing the bucket. Worked like a champ!
15 feet should be not much of a problem but 30-40 would be more interesting.
Unfortunately, I live in California now. Besides, I was looking at the old place in Florida using Google Maps and someone has taken my old tower down. It's likely in the Smithsonian (just kidding).
It could get away from one person pretty easy.
If that were a problem, I'd construct a yoke out of 2 by 4's and anchor it in the ground with pounded-in wood stakes and prop it such that the tower would have to fall only a foot or two before landing in the yoke. Then I'd lower the yoke-and-tower combination slowly to the ground. My keen resemblance to Shrek has its advantages for situations like this!
I like your design.
Thank you.
. . . . . Mac
Nothing difficult is ever easy!
Perhaps better stated in the words of Morgan Freeman,
"Where there is no struggle, there is no progress!"
Copeville, Texas |
| |
isaiah
Guru
Joined: 25/12/2009
Location: United StatesPosts: 303 |
| Posted: 04:56am 19 Jun 2010 |
Copy link to clipboard |
Print this post |
|
Mac,
Your 40' you say the pipes were in a foot sq of concrete 6 feet deep Did you dig these by hand or did you use the water weenie also?
We may be putting up a couple towers this summer.
Are the water weenie still available and about how much do they cost?
We will have 3 or 4 systems for each domicile here on the wind farm.
Ive got one for the house and one started for my shop and am working on a small one for live stock domicile's
Do you think that fence pipe will hold those GE ecm motors.
The 1 hp is around 18 lbs the smaller hp the lighter they are but the same outside dimension..
I may stick up some mini mills also.
Your tower design would work great for that.' ' '
These builders world's around here are hard to find everything you need in one stop.
''''''''Edited by isaiah 2010-06-20
URL=http://www.motherearthnews.com/Renewable-Energy/1973-11- 01/The-Plowboy-Interview.aspx>The Plowboy Interview[/URL> |
| |
Downwind

Guru
Joined: 09/09/2009
Location: AustraliaPosts: 2333 |
| Posted: 04:58am 19 Jun 2010 |
Copy link to clipboard |
Print this post |
|
Well Mac should all else fail the inground supports look like they will make a good set of cricket wickets for when the grand kids come to visit.
It would be a bit like playing cricket with the windies. 
Do you intend to place some guy wires on the tower as i would think it could be wise.
Pete.
Sometimes it just works |
| |
MacGyver
Guru
Joined: 12/05/2009
Location: United StatesPosts: 1329 |
| Posted: 06:58am 20 Jun 2010 |
Copy link to clipboard |
Print this post |
|
[Quote=Downwind]Do you intend to place some guy wires on the tower as i would think it could be wise.
Nah! It's only 15 feet tall and if the wind blows hard enough to bend that pole, my greenhouse will likely get airborne and be in the neighbor's yard, which will be my first concern. Hasn't happened in 27 years; likely won't.
Besides, the whole idea here is to have a tower that can be quickly raised and lowered. My 40-footer in Florida didn't have any guy wires either and it never went anywhere. Although, I looked on Google Maps and it's gone now. That's more than likely due to the fact that whomever lived there after I left just took the silly thing down.
Bet they cussed a lot when they discovered how much concrete was used to hold the posts in the ground!!
. . . . . Mac
Nothing difficult is ever easy!
Perhaps better stated in the words of Morgan Freeman,
"Where there is no struggle, there is no progress!"
Copeville, Texas |
| |
Aussiefarmer

Newbie

Joined: 23/04/2010
Location: AustraliaPosts: 1 |
| Posted: 11:18am 20 Jun 2010 |
Copy link to clipboard |
Print this post |
|
Hi Mac,
Glad to see this post, my cousin and i started building a tower this weekend along the same lines, good to know it works. Our pivot is about 2m of the ground, and sunk into a slit trench about 800 deep by 800 long by 300 wide, we couldnt dig any deeper in the hard clay we have here (none of the sheds are falling over).
The two legs are soil iron about 2 1/2 inch acros off an old Grizzly screen from an old mine and dm heavy! The mast is slightly larger diamiter pipe and 9.5m long, with a 'backbone' stich welded along the west side, im going to use guy wires on the north and south sides, with a winch to raise and lower it, also with a counter weight. should be done in a week or so (time for finishing touches).
It will stand about 12m high at the turbine.
Planning on putting a 1000watter on top - had a commercial 9 blade (american made) one offerd to me, had to take it - needed a tower for it 
Im happy to take some pics when im done if anyone wants to see it (unless it falls on my garage, then i'll definatly take some!)
If it�s free, efficiency doesn�t really matter. Does it. |
| |
MacGyver
Guru
Joined: 12/05/2009
Location: United StatesPosts: 1329 |
| Posted: 10:26pm 20 Jun 2010 |
Copy link to clipboard |
Print this post |
|
isaiah
The one in Florida was hand dug using a tool called a "clam shell". It's a common post-hole digging thing that is similar to a cylinder cut in half on it's side and hinged back together at one end with a handle attached to each side. The "digging" end is rounded slightly and filed to an edge.
All you do is slam it into the dirt, pull the handles apart, trapping a wad of soil between the two halves and then the tool is withdrawn, soil dumped and you do it again and again until your hole is as deep as you want it.
I wouldn't use a water weenie for any hole larger around than about 2 inches. It'd make a mess more work to clean up than just digging the hole by hand would. If you're heart is set on the water weenie, they are available at Home Depot in the "Plumbing" department and range in price from a few bucks to about $12 or so. I've actually used one on a 3-inch pipe, but it was a super hassle and where I live it's 99% sand!
You could probably just affix a PVC pipe to a garden hose and get nearly the same results to soften the soil for a hand dig, should your in-ground pole diameter be over 2 inches.
The posts on the Florida build were anchored in place with strings and wires to assure they were parallel and exactly vertical and post-hole concrete was dumped into the hole surrounding the metal posts. I let the concrete hydrate (dry) for about 3 days before I stripped the surface forms and took down the positioning wires. That baby was strong as the rock of Gibraltar! As proof, it survived several hurricanes over the years.
. . . . . Mac
Nothing difficult is ever easy!
Perhaps better stated in the words of Morgan Freeman,
"Where there is no struggle, there is no progress!"
Copeville, Texas |
| |
