
|
|
Forum Index : Electronics : Tinkers warpinverter
| Author | Message | ||||
| Tinker Guru Joined: 07/11/2007 Location: AustraliaPosts: 1904 |
Thought you may ask that  . Then I remembered I had posted a picture of it previously. Found it on page 9 of my 41 page mammoth thread link . Then I remembered I had posted a picture of it previously. Found it on page 9 of my 41 page mammoth thread link You may find more core winding ideas on this page, its of my first double stack toroid. The shot you are after is 3/4 down the page and shows the tool in action. I use it in my right hand, the cam is pushed with the thumb to lock the wire and the fingers turn the lever up against its fulcrum on the core. It pulls as hard as your thumb is strong  . If you re arrange the cam for a longer version you get more leverage by being able to grip the black handle further back. . If you re arrange the cam for a longer version you get more leverage by being able to grip the black handle further back.The cam and clamp base needs to be hard but not damaging the enamel. I used some scrap material like bakelite but with fabric within - can't think of the name for that. That stuff is good enough to cut gears from. Forget about 3D printing one, that plastic is way too soft. Klaus |
||||
| Warpspeed Guru Joined: 09/08/2007 Location: AustraliaPosts: 4406 |
Phenolic sheet. Cheers, ĀTony. |
||||
| Tinker Guru Joined: 07/11/2007 Location: AustraliaPosts: 1904 |
OK, time for another update. Here are the 4 transformers all in their copper clad finery  You will notice that the original stack of copper wire behind the bare cores had shrunk a fair bit by now, I had planned to use the reminder for the primary windings. Previous attempts shown on this forum to use small enameled wire for the primary did not appeal to me so I created my own version - proper spun 7 strand wire. For this I required a 'spinning' gadget, this is what I came up with: The 'spinning' side. 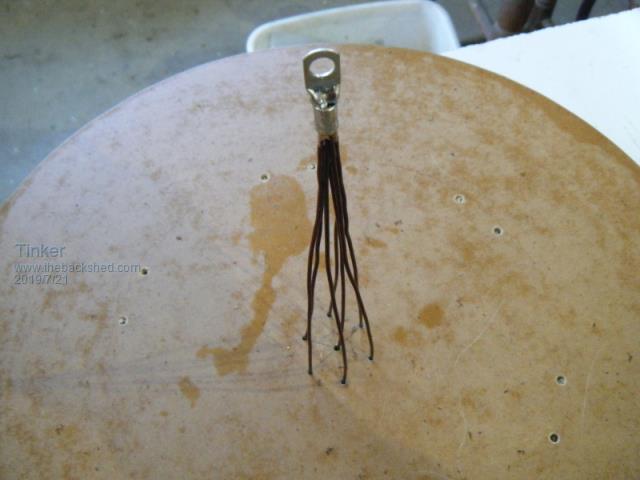 And the supply side. 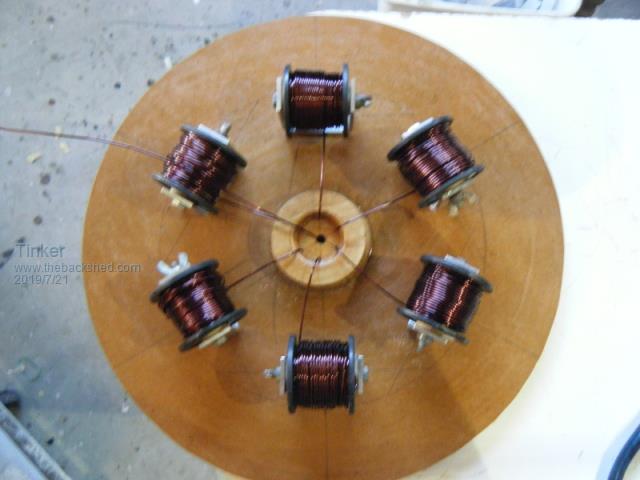 Well, it actually worked - once I had figured out there was a trick or two how to use it .Here is a close up of my 7 x 1.5mm spun wire. 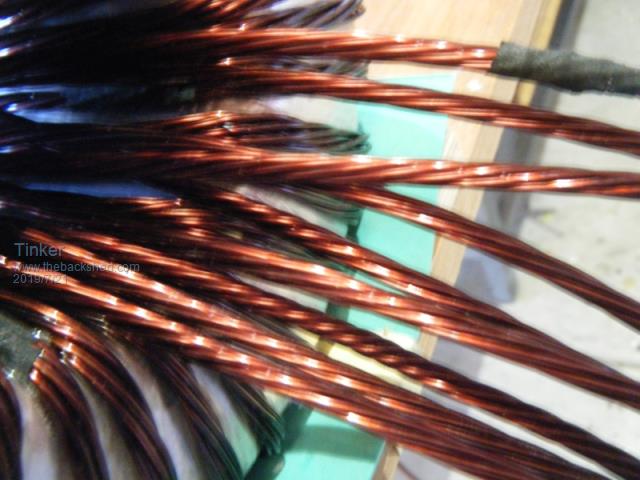 And now a picture of the first of the three in hand wound on. The white split PVC presses the wire out while the epoxy sets. 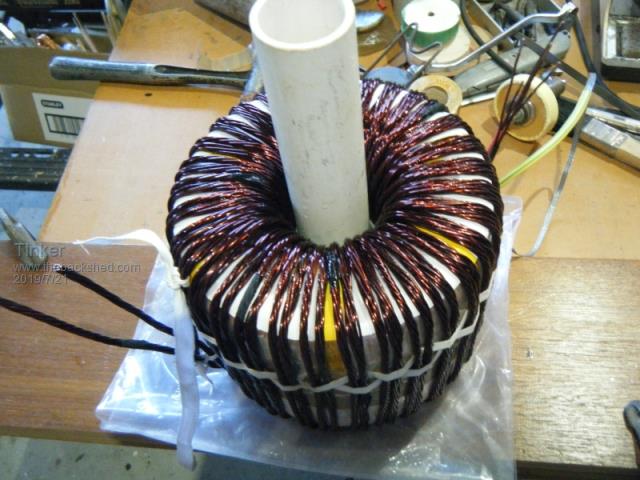 After winding on all three 'hands' the thing now weighs this much. 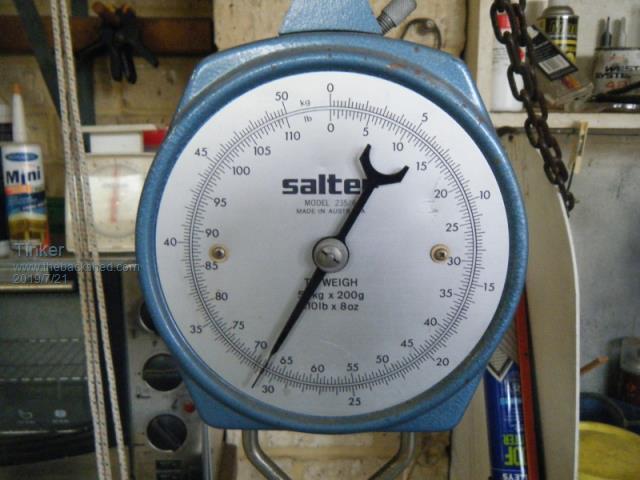 Real hernia danger to move that lump around, definitely not a job for the kitchen table. A view of the primary connections. 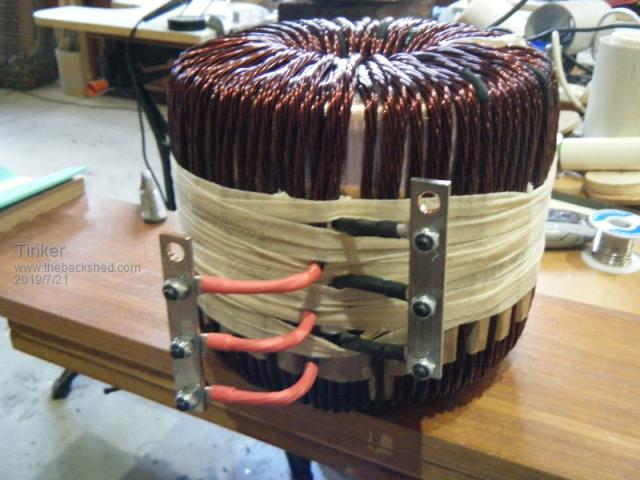 And another of the secondary. I placed the connections on opposite sides of the core. 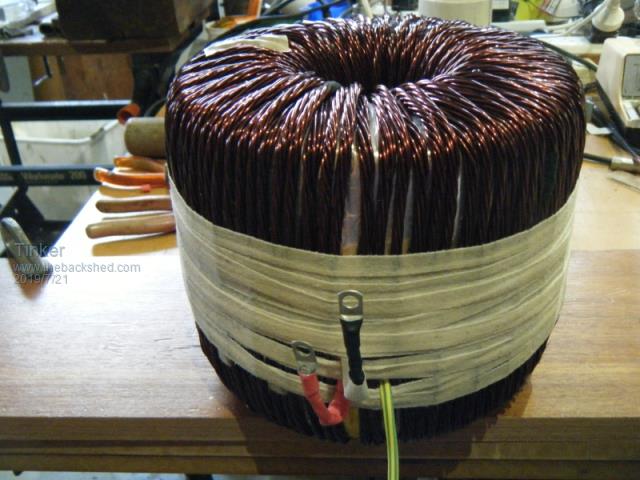 The other 3 transformers were terminated similarly. Here is the lot of them all done .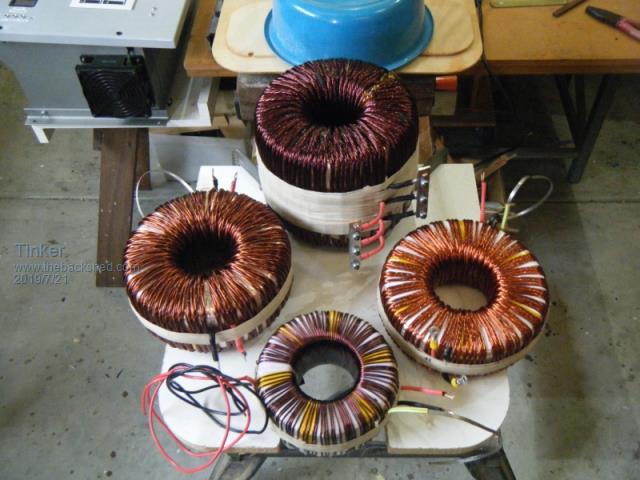 You may notice the pile of copper wire behind the transformers shown previously had disappeared. This is because I used *all* of it. There was just enough for transformer # 1, 2 and 4. I used some new 1mm wire I had sitting on the shelf to make the #3 transformer 7 strand spun wire. This, BTW, was a lot easier than spinning 1.5mm wire. For the 22.5m required, my back yard was just long enough to stretch it out. The combined magnetising loss of all 4 transformers is 19.95W - good enough for me All 4 transformers weigh in at 59.10kg (~130 lb) which might be a concern for some of the wannabe warpinverter builders here. The total weight of copper wire used was 15.3kg, fortunately all was recycled from these and other torodial cores. Torodial cores are usually not lacquered so the wire comes off in relatively good condition for straightening and re use. If the donor transformer had its winding lacquered its only good for scrap copper IMO. There is way too much work involved with winding the transformer(s) - about 70% of the total work of building a LF inverter - to risk iffy enameled wire. Anybody planning to start building a warpinverter with the PCB's, there is only about 10% of the total work involved spent with assembly of the dozen boards required. It would not be smart to spend money on PCB's and parts only to find out later the transformers were beyond one's capability. A low frequency inverter without a working transformer is about as useful as a car without an engine .My warpinverter is now about 90% complete, next is making a cabinet to fit all the parts and then connect it up & test it. Klaus |
||||
| johnmc Senior Member Joined: 21/01/2011 Location: AustraliaPosts: 282 |
Well done Tinker , That would have to be classed as beautiful, industrial ART. cheers john johnmc |
||||
| Warpspeed Guru Joined: 09/08/2007 Location: AustraliaPosts: 4406 |
I am certain it will all work as well as it looks. Certainly a major task, and definitely something to be really proud of. [quote]The combined magnetising loss of all 4 transformers is 19.95W - good enough for me [/quote] Those figures are for sine wave drive. The actual magnetising current with rectangular wave drive of a higher frequency should be even lower. I think you are going to have a very broad smile when you measure the final total dc idling power. Cheers, ĀTony. |
||||
| Tinker Guru Joined: 07/11/2007 Location: AustraliaPosts: 1904 |
Thanks, I really hope so. Well, it should work as I copied your circuit and use your control board .I keep harping on about starting with the transformer first when doing a low frequency inverter. Its really hard work and my blistered and cut hands are witness to that. So, all you newcomers who keep saying "I'm gonna build a warpinverter", you might regret trumpeting about that when the time comes to prove it. Its much harder to do than it looks. Its also quite a bit more expensive than you might think. Well, its the Rolls Royce of inverters after all, these hand build machines can be costly. To give an idea just how costly, I'm well beyond the $500 mark by now and that is despite paying scrap price for the transformers, wire, heatsink and several other recycled parts. My estimate is around $1000 for my inverter. There are a lot of small parts that must be bought and they all add up. If you had to pay somebody to do it, if you could find somebody crazy enough to take it on I guess the price easily would get way beyond the 10K range...Klaus |
||||
mackoffgrid Guru Joined: 13/03/2017 Location: AustraliaPosts: 460 |
A beautiful job Klaus  And your WarpInverter will be the Rolls Royce of Roll Royces And your WarpInverter will be the Rolls Royce of Roll Royces Cheers Andrew |
||||
| Warpspeed Guru Joined: 09/08/2007 Location: AustraliaPosts: 4406 |
It will work, and I think you are going to be surprised at how well it works when you start doing some testing and taking some serious measurements. Cheers, ĀTony. |
||||
| BenandAmber Guru Joined: 16/02/2019 Location: United StatesPosts: 961 |
Your work is absolutely beautiful just like a piece of art I have never seen anything laid out and put together so well You are a true master of your trade thank you for sharing your work so people like me can get inspired to do better be warned i am good parrot but Dumber than a box of rocks |
||||
