
|
|
Forum Index : Electronics : Good money after bad - Solar upgrade time
| Page 1 of 5 |
|||||
| Author | Message | ||||
| oreo Senior Member Joined: 11/12/2020 Location: CanadaPosts: 133 |
You’re probably wondering, can DIY solar payback be that bad? Well let’s look at a local headline. “The Ford government has spent more taxpayer money subsidizing hydro bills than it has spent on long-term care. In the four budgets since 2019, a cumulative total of $23.6 billion has been devoted to electricity cost relief programs, $2 billion more than budgeted for long-term care in the same time period.” as reported by CBC. Here is what the pricing has been for the last few years. Keep in mind that $1.12AUD =$1CAD=$.73USD and that on top of the per KW charge, there is a connection charge of ~$40/ month that goes up marginally as you use more KW. 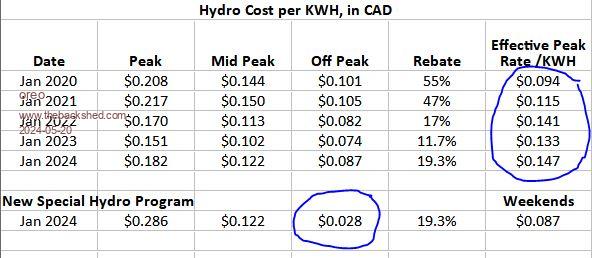 So when electricity is heavily subsidized, it’s hard to get a system to pay for itself. Regardless, I am now classifying this project as a hobby, so am moving ahead with an upgrade. So the plan now, is to upgrade the battery, inverter and panels. Hydro also has a special rate which I presume is tailored for EV owners, with the ultra low off peak rate of $.028/KWH on weekday evenings. To offset this, the peak rate is higher with this plan. I think I will switch to this plan, once I have everything up and running and use night Hydro to recharge my batteries when I don’t get enough solar. This way, theoretically there may be a break even point at some point in the future. Current system (~3yrs running): 5kw battery, 800w 8010 based inverter running some fridges and freezers. No BMS, no MPPT, no worries! 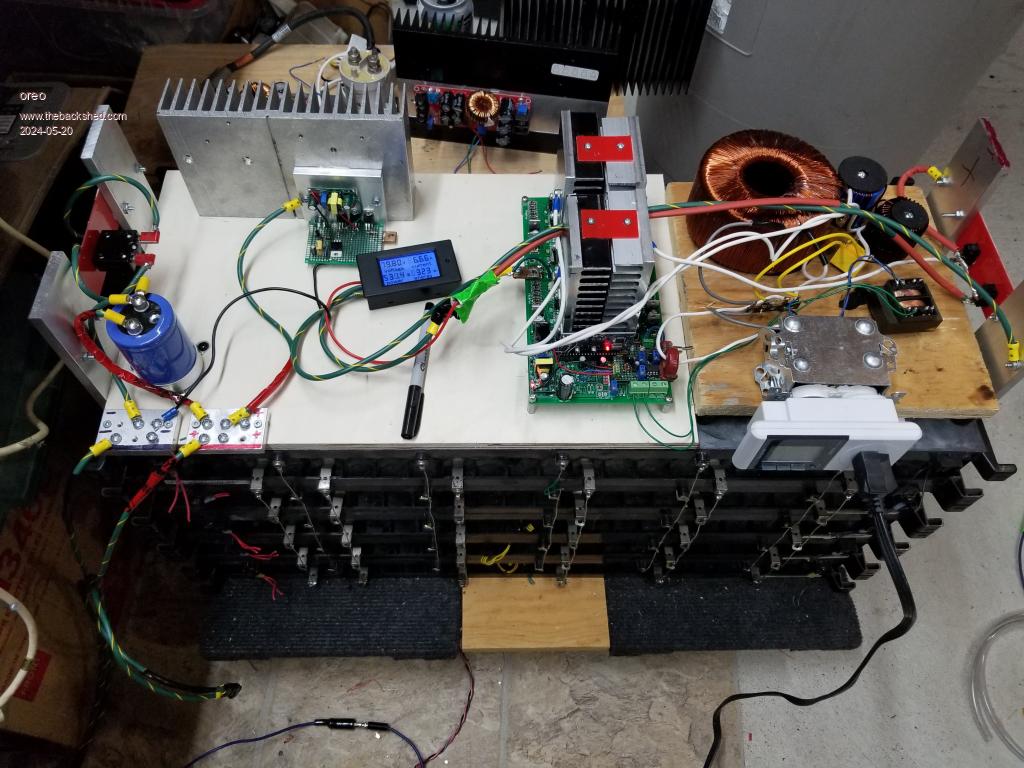 Cost payback would have been better if I had more solar. These 300w rated panels were free though. 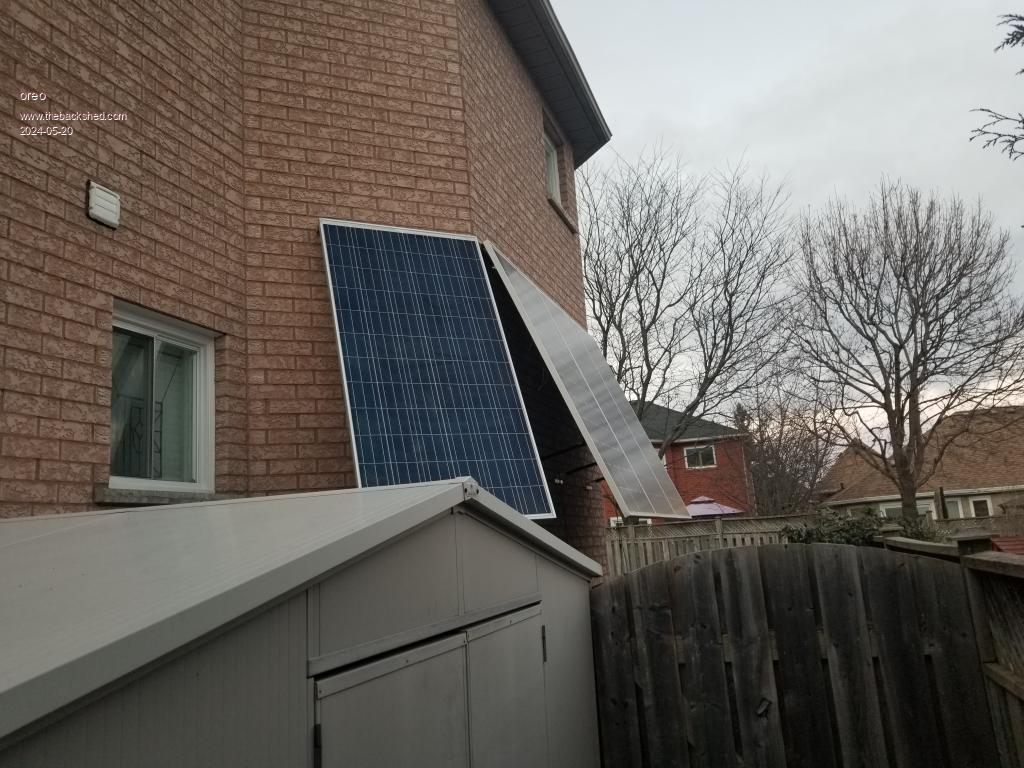 Greg |
||||
| Gizmo Admin Group Joined: 05/06/2004 Location: AustraliaPosts: 5181 |
In Australia Solar is cheap and effective. I can pick up second hand panels less than 4 years old for under $80 for 200 watts. This is because we had a big uptake of roof top solar and as people upgraded to bigger systems, the old panels were taken down and sold off by the installer. So we ended up with a strong second hand market in near new solar panels. What's the second hand solar panel situation like in Canada? The best time to plant a tree was twenty years ago, the second best time is right now. JAQ |
||||
| phil99 Guru Joined: 11/02/2018 Location: AustraliaPosts: 3220 |
The other incentive to go solar here (Aus.) is the power price. My standard rate is about double that of @Oreo's peak rate and the peak rate (3pm to 9pm) almost four times. |
||||
| KeepIS Guru Joined: 13/10/2014 Location: AustraliaPosts: 2140 |
Given the current global monetary agenda, one must also consider how much longer the subsidy for various uneconomical (for the masses) technology will be able to continue, we are seeing this already in sections of industry. I feel it's not wasted if it helps us become little more self reliant, and also being a hobby makes even more justifiable. As phil99 and Gizmo said, still some good second hand gear around in AU, and not having a power bill to pay is nice, and if you still have a mains power connection, and are lucky enough have a small solar grid feed in system, that cost and more is also covered as a bonus. The biggest cost is batteries, especially if you have limited space and other reasons for not using good second hand lead based batteries, but IMHO it's still worth it. DIY certainly keeps the brain cells working, think of the saving on medication alone  NANO:Inverter V 8.2ks - Linux AvrDude GUI script V4.1 |
||||
| oreo Senior Member Joined: 11/12/2020 Location: CanadaPosts: 133 |
I think one of the big differences, is the lack of used and broken inverters available around here. Sure would be nice to be able to scavenge some chokes and transformers. And yes, DIY keeps you learning new things... I am thinking that if the politics change, we will be seeing solar pricing that is more similar to yours. I think the pricing is similar in Ontario, Canada, however there is not much supply. We are not seeing homeowners upgrade in large volumes yet. I have seen solar farms upgrading, who are selling off the larger sized panels. Typically the sellers are not local. In the last 4 months or so, new solar panels have dropped to the low $.40's per watt for 2nd or 3rd tier manufacturers. This has depressed the used market. 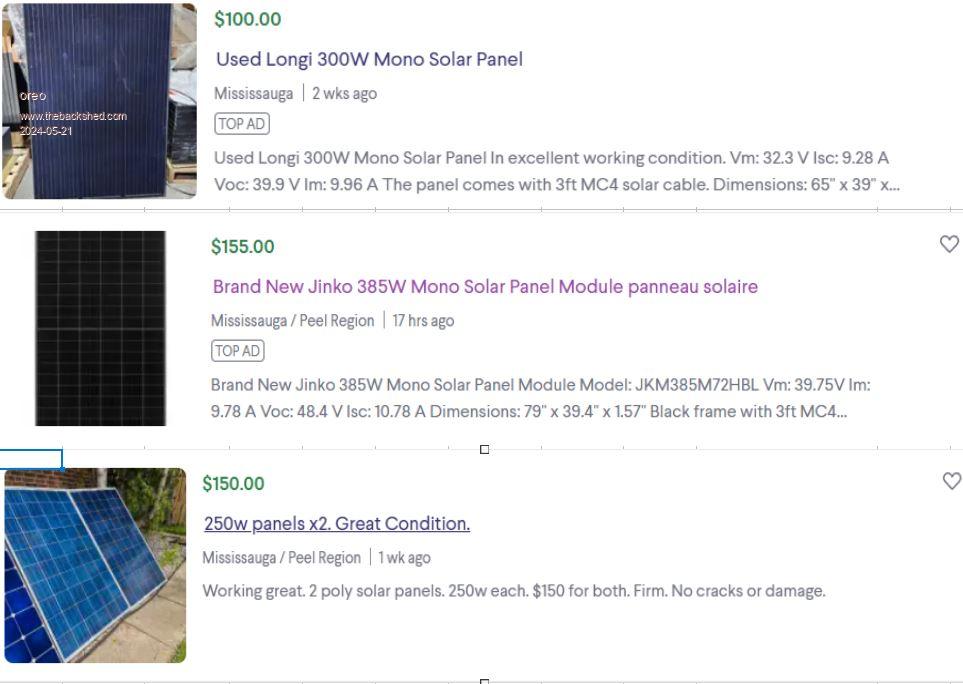 Since I have limited space for panels, and I wanted to keep the panel quantity to a minimum, I purchased 6 relatively large and heavy panels. They are made by Canadian Solar (made in China) and are bifacial 535w each. They are sitting in my garage right now, but I will be getting out there soon to install these. Link Canadian Solar Panels Greg |
||||
| KeepIS Guru Joined: 13/10/2014 Location: AustraliaPosts: 2140 |
I find old inverters are harder to get lately, some stupid prices when you can find a suitable device. Those panels are the way to go with limited space, most of mine are 430W panels on a 6m x 9m shed and another set of ten 480W panels on the 6m x 6m Carport. Thank you for giving us some insight into your situation. NANO:Inverter V 8.2ks - Linux AvrDude GUI script V4.1 |
||||
| oreo Senior Member Joined: 11/12/2020 Location: CanadaPosts: 133 |
Battery upgrade So Initially, I had purchased 10 battery packs, which were made up of 96 A123 anr26650m1a/b cells in a 12s8p configuration. I wired these into a 24s40p configuration yielding about 5kw of usable capacity. I charge these batteries to 3.4v per cell, and discharge to 3.08v per cell. Over time, I discovered that these batteries were used on hybrid busses, and I found the actual company who were removing them from busses. So I bought one of the decommissioned "modules" from this company for just under $500. This module contained 16 packs which I removed. After removal, I recovered just over $120 in steel, cast aluminum and copper. Some pictures: Module with cover removed 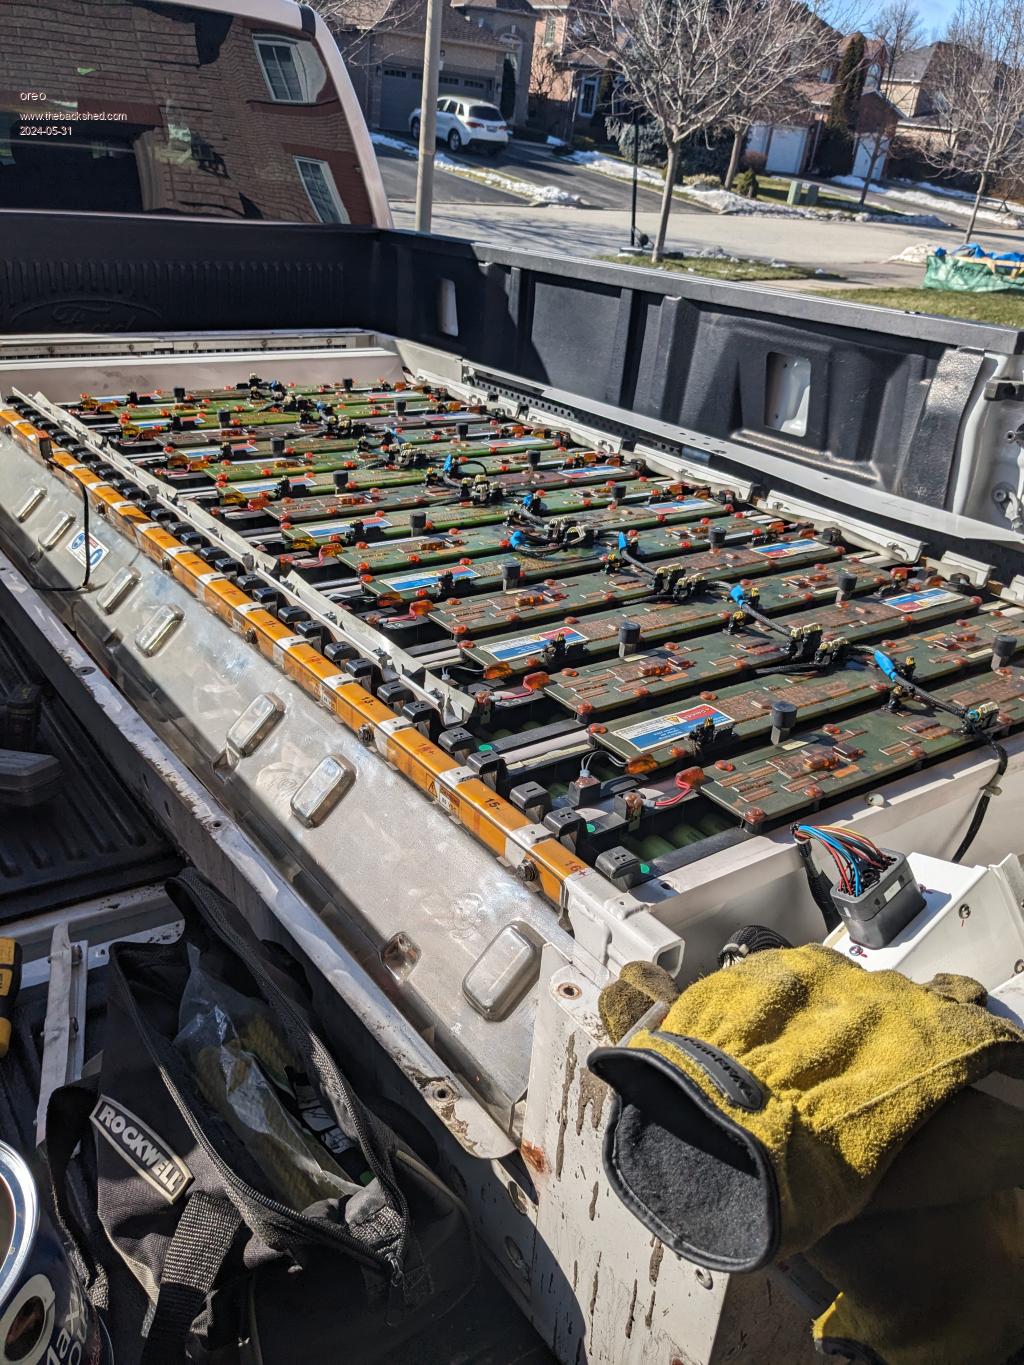 I added 2 packs to the original 10 and put them into a box. 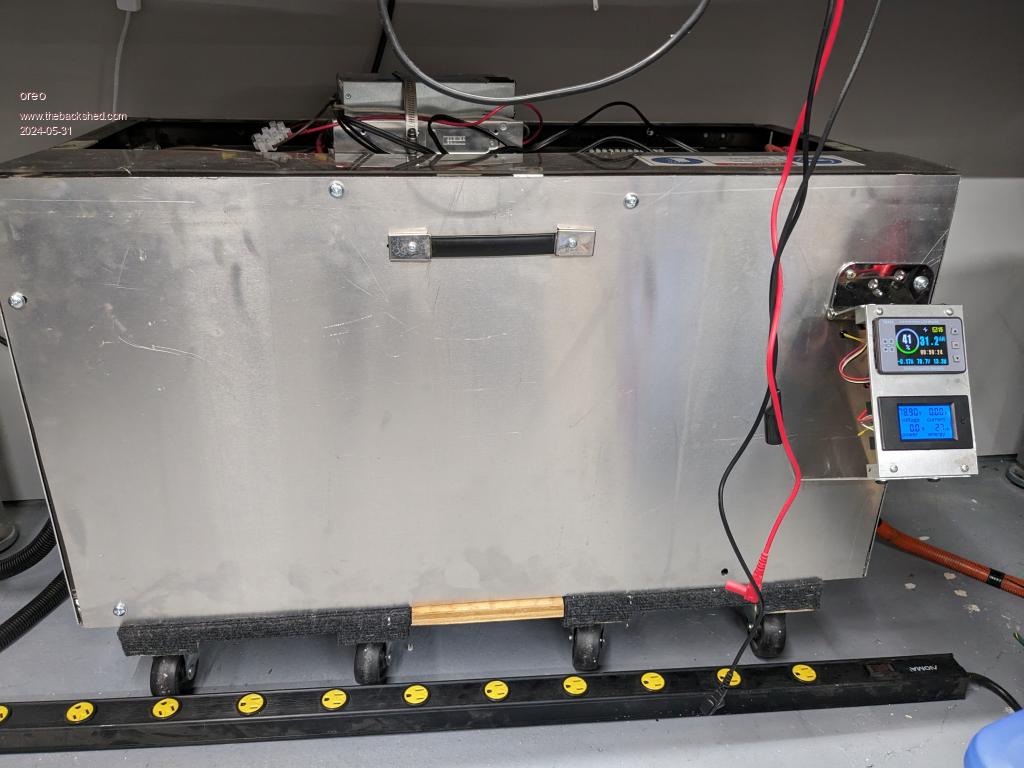 I used a cheap battery capacity meter, and a 80v 100a fuse. Each cell is rated at 50a continuous, so theoretically this pack could deliver 2400a continuous until it melted into a puddle. 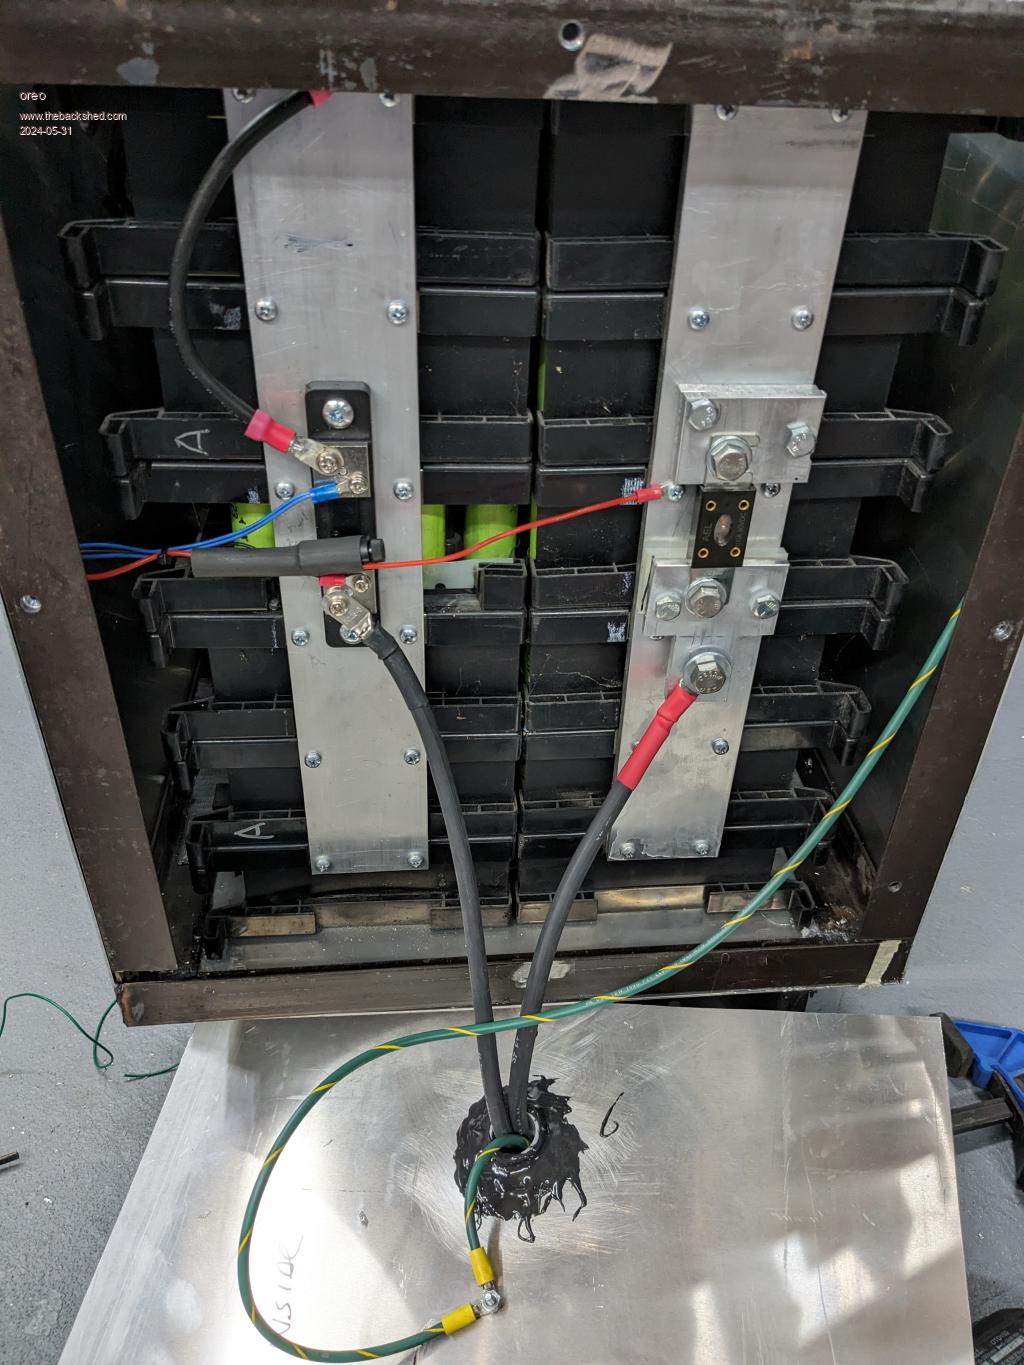 This left 14, which I still need to connect and put into a box.  Some further info on these batteries.  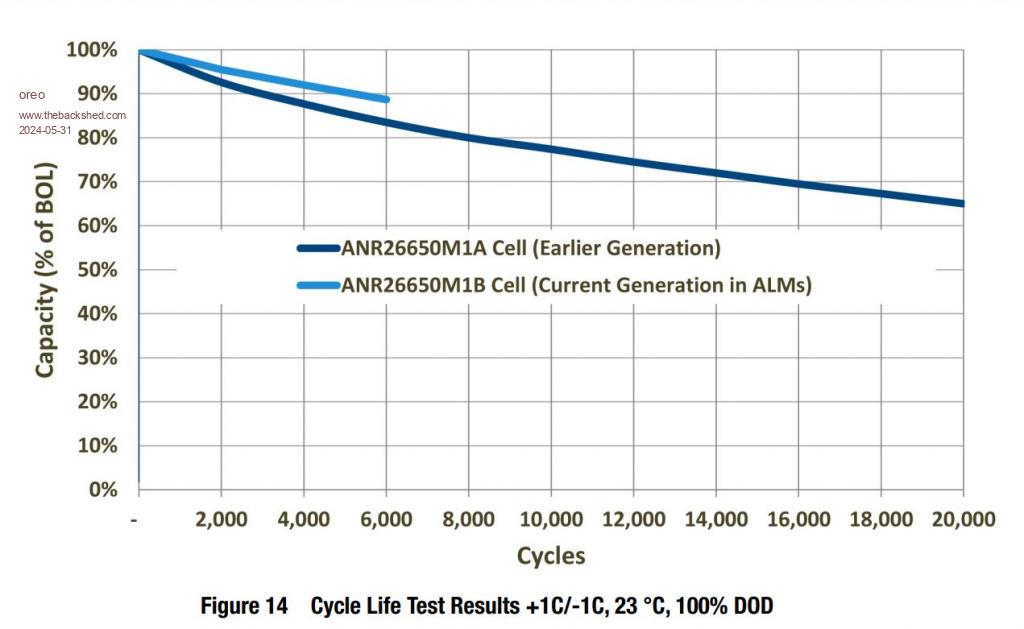 Greg |
||||
| oreo Senior Member Joined: 11/12/2020 Location: CanadaPosts: 133 |
Transformer So since getting the initial system working, I have been considering my options for a larger main transformer. I have lots of the original size transformer (about 600va), which I had scavenged (they had too much noise for the intended application), and I stripped off the copper off some of them with the intention of removing and rebuilding the laminations. 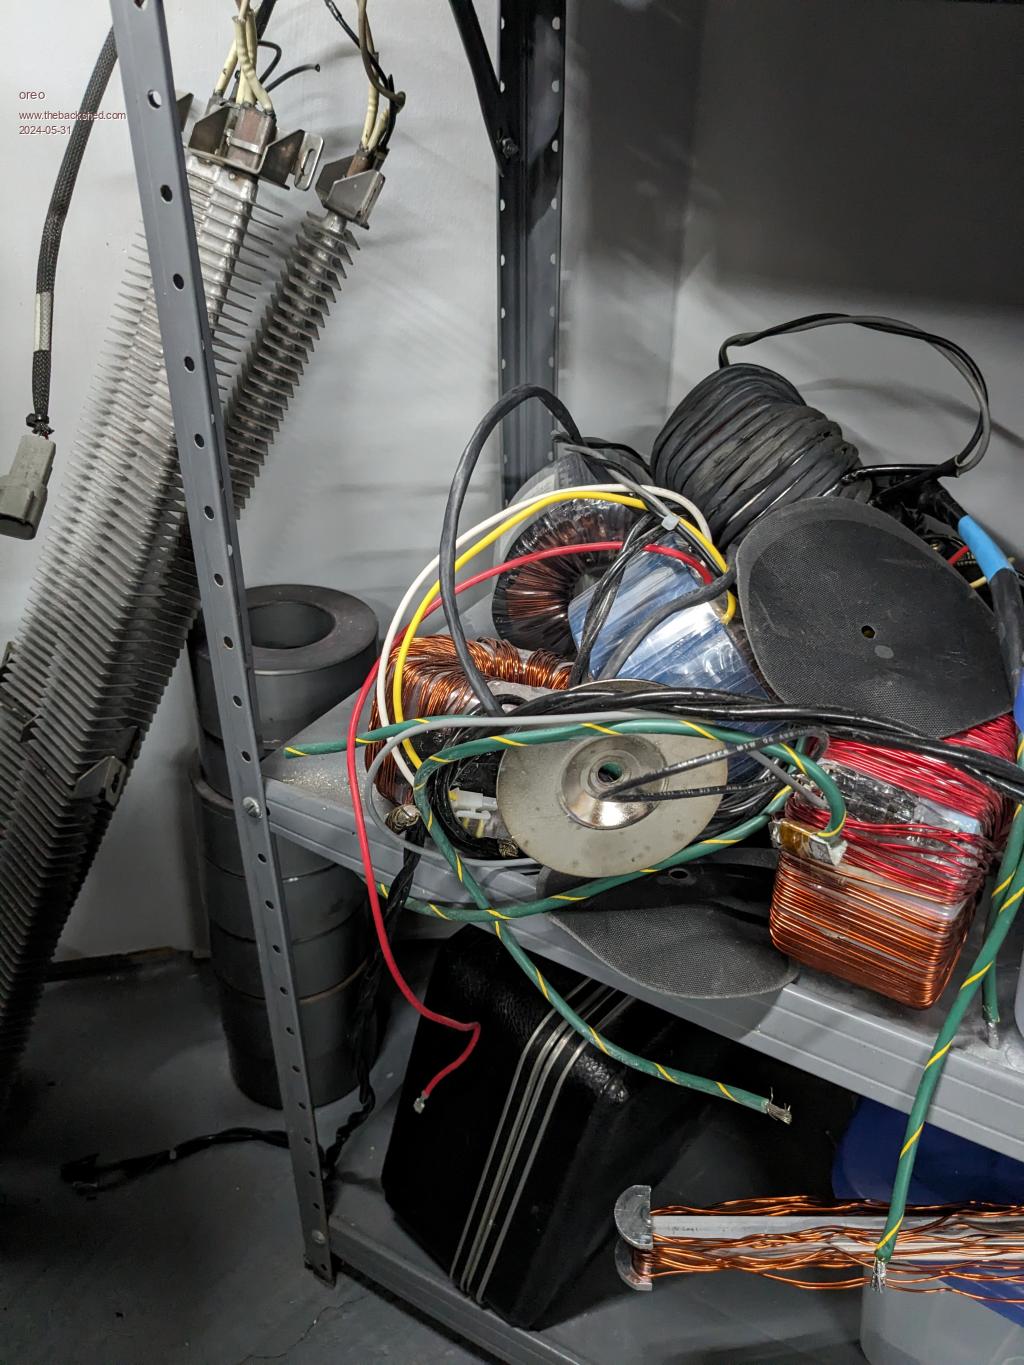 That would be a huge amount of work, with a bit of uncertainty, since unwinding and rewinding the laminations could result in higher core losses. So fortunately I found a great deal on a pair of 1500va Hammond 1182T117's on a local buy/sell. These have 4 120v windings, which I connected in series parallel to form the 120/120 volt output. Hammond transformer vs 600va transformer 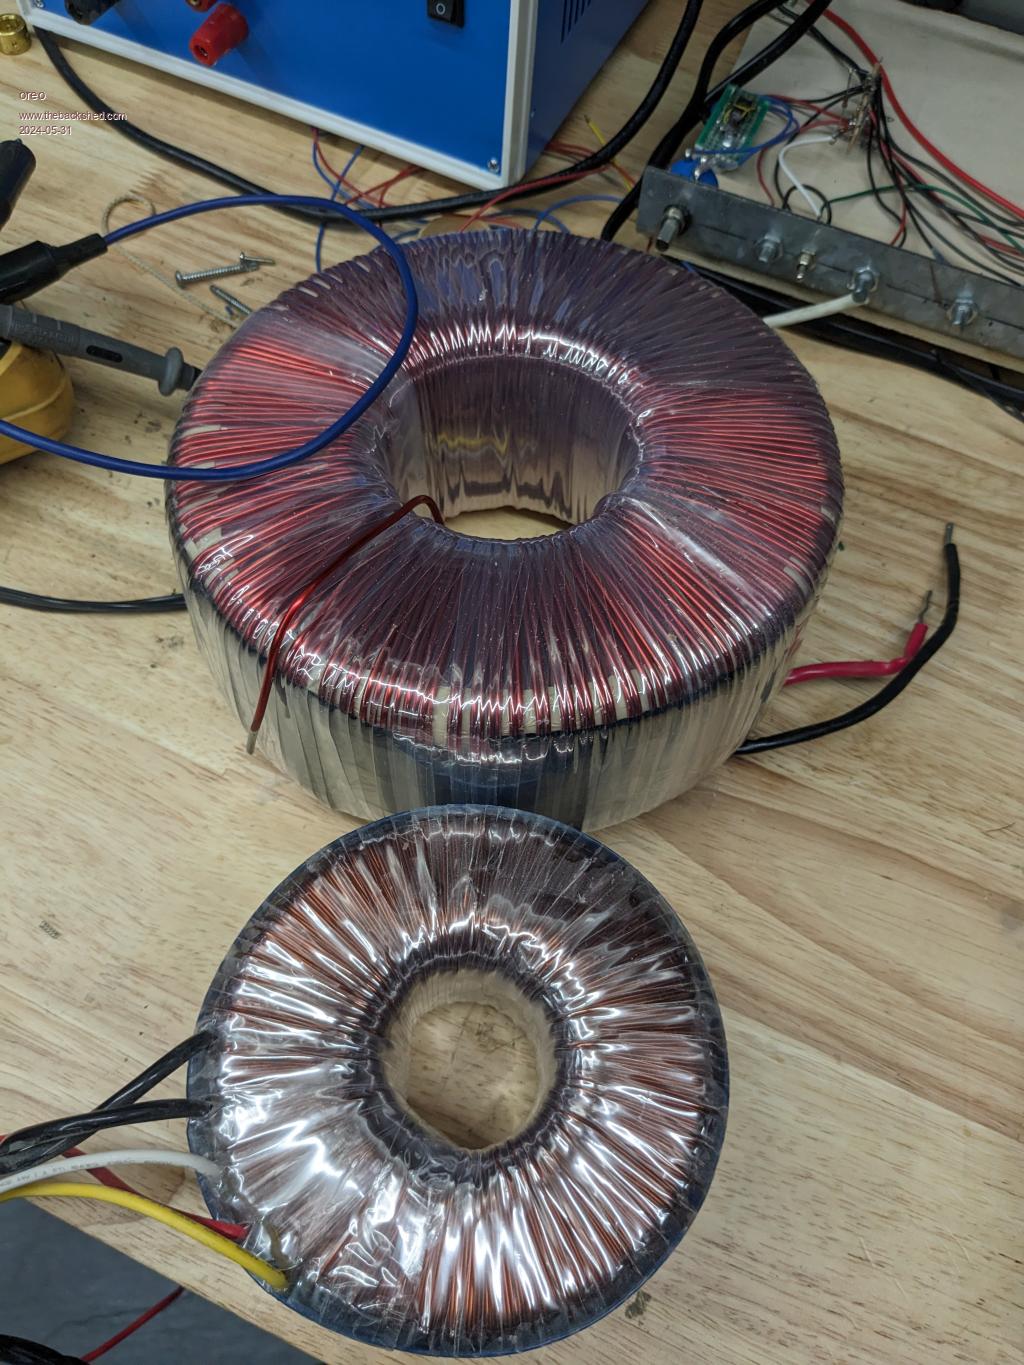 I added a couple of turns to the 120v primaries to give them the same ratio as the 120v secondaries and then added 7 more turns to improve the standby draw slightly. I then added the new primary using #4 welding wire. To get the wire to fit, I removed the insulation, and replaced it with a layer of heat shrink. I used a large neo magnet with a center hole, to pull a steel slug with attached string through the heat shrink. I then pulled the 55' of wire through the 3/8" shrink tubing. A bit of a hassle, but it allowed me to get everything on there.  The DCR of the 240v winding ended up being .165ohms and the 47v winding .0131ohms. I used a 5.1:1 turns ratio. I built an complicated mount for the transformer, that would have air flow around as much of the transfomer as possible. I have not tested it yet, so we will see if it works or not. 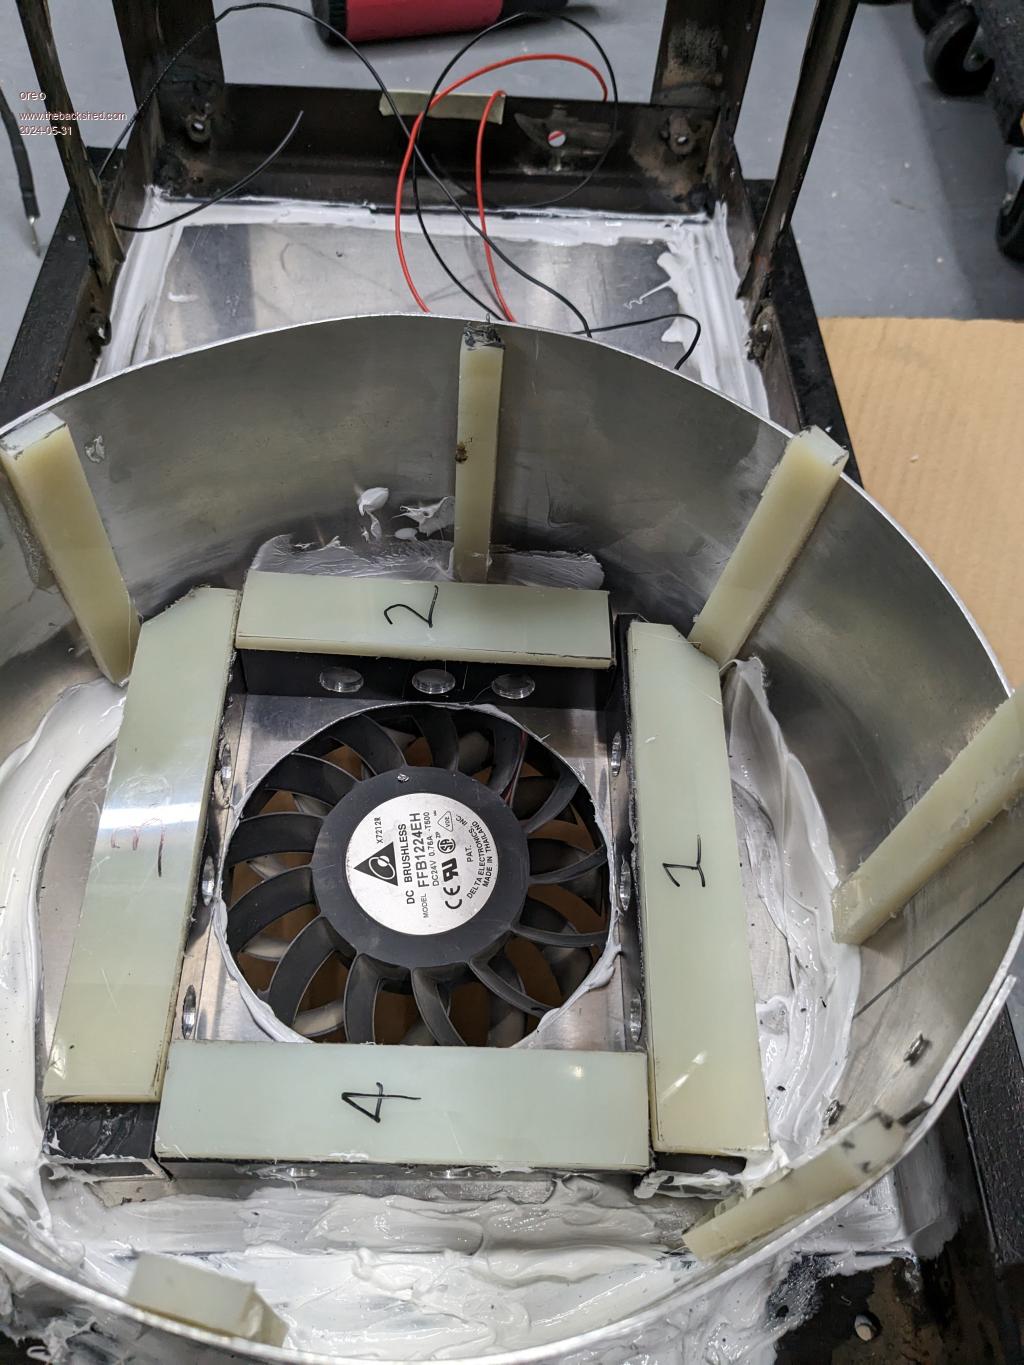 Since our typical hourly draw is ~1kw with peak hourly at 2.5kw (not including A/C), I think this transformer will be large enough to support things. I can always modify the second transformer to support A/C if global warming continues at it's present rate. Greg |
||||
| oreo Senior Member Joined: 11/12/2020 Location: CanadaPosts: 133 |
So for an inverter, I have been using an 8010 design using a PCB board designed by Awesome Tech on Youtube. They share the design, so I had 5 made. This uses sets of 6 TO-220 fets. It has worked fine these last few years, so I decided to just upgrade the FET's and send it. The initial FET's I was using were IRFB4227PBF (120v, max .024 ohms). The best cost/performance device I could find a while ago was the Toshiba TK72E12N1 (120v, max .044 ohm). It looks like there are some other China company options available now, but I pulled the trigger about a year ago and bought the Toshiba ones. One nice thing about 2oz copper boards, is they de-solder nicely. I revised the heat sinks too. 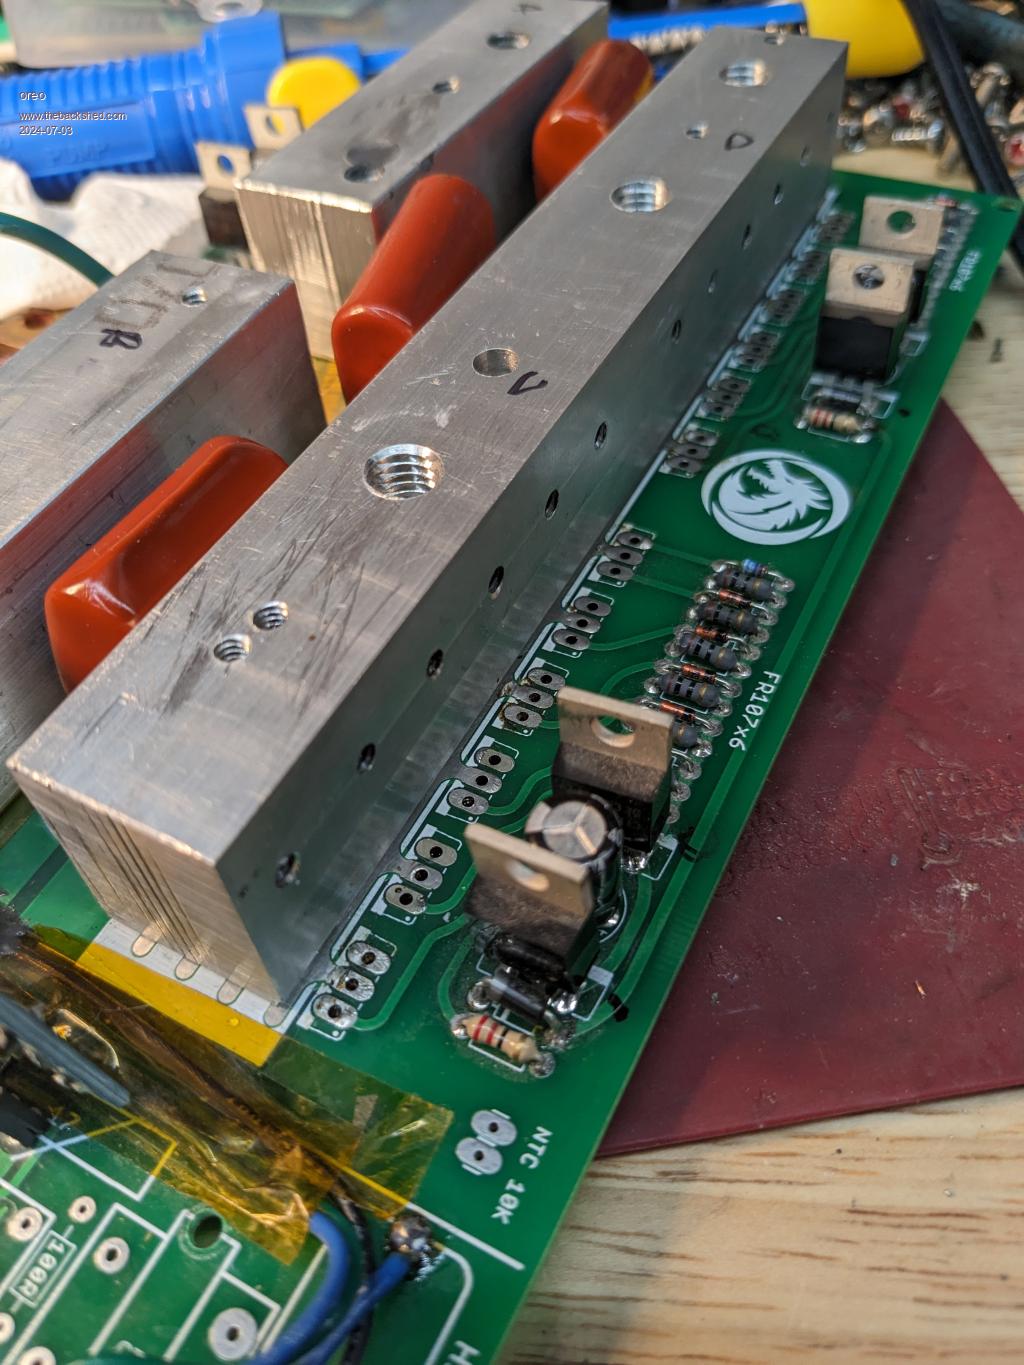 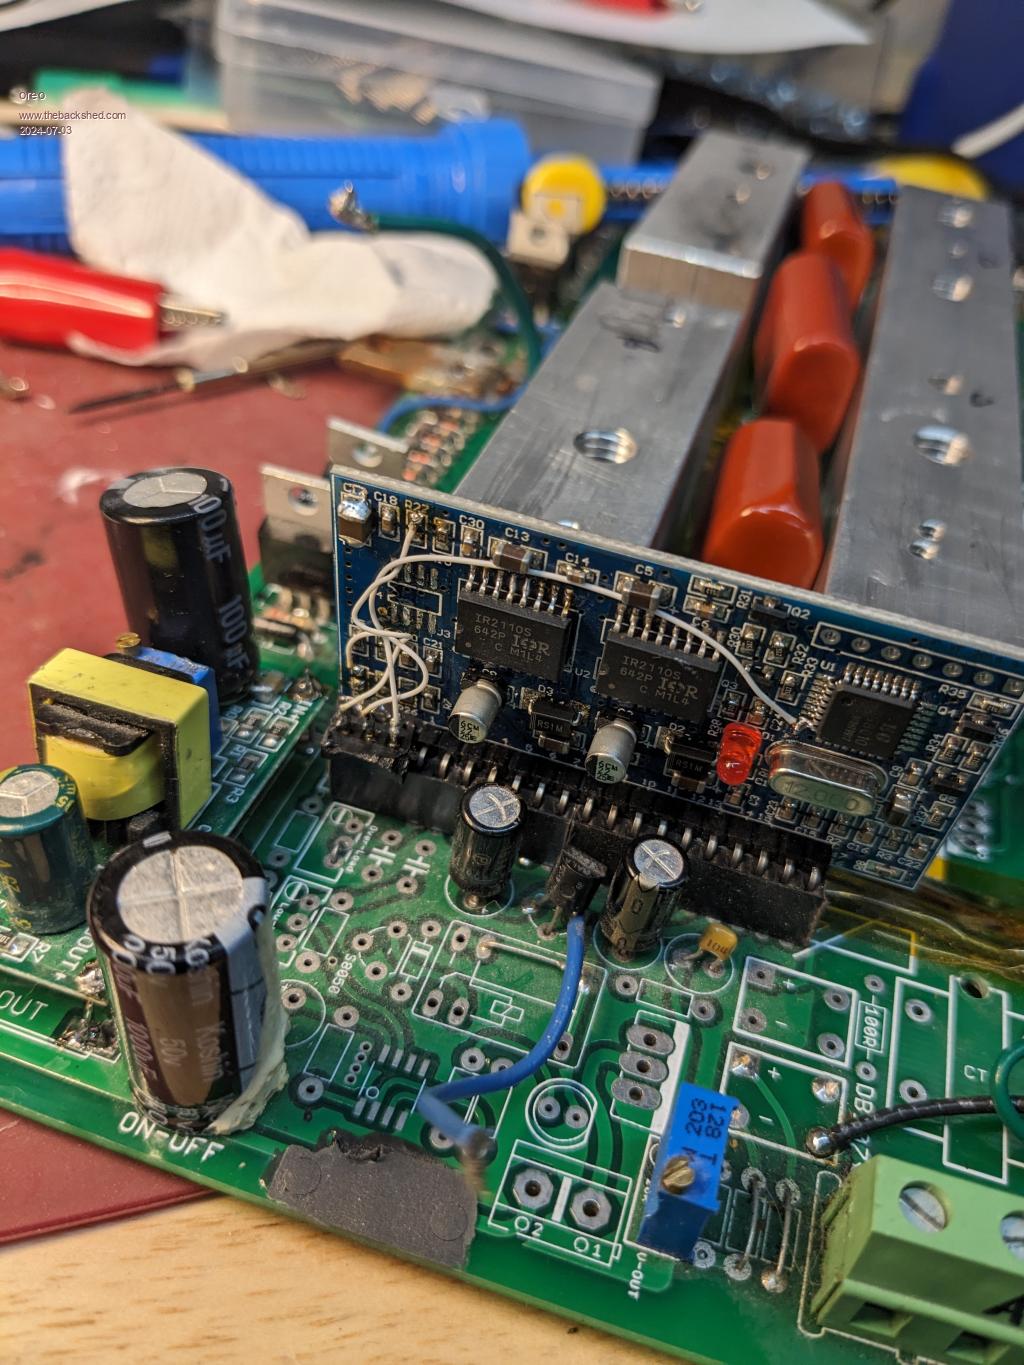 I modified Tinkers overcurrent/shutdown design slightly. It appears to work well, but I do have some more testing to do. 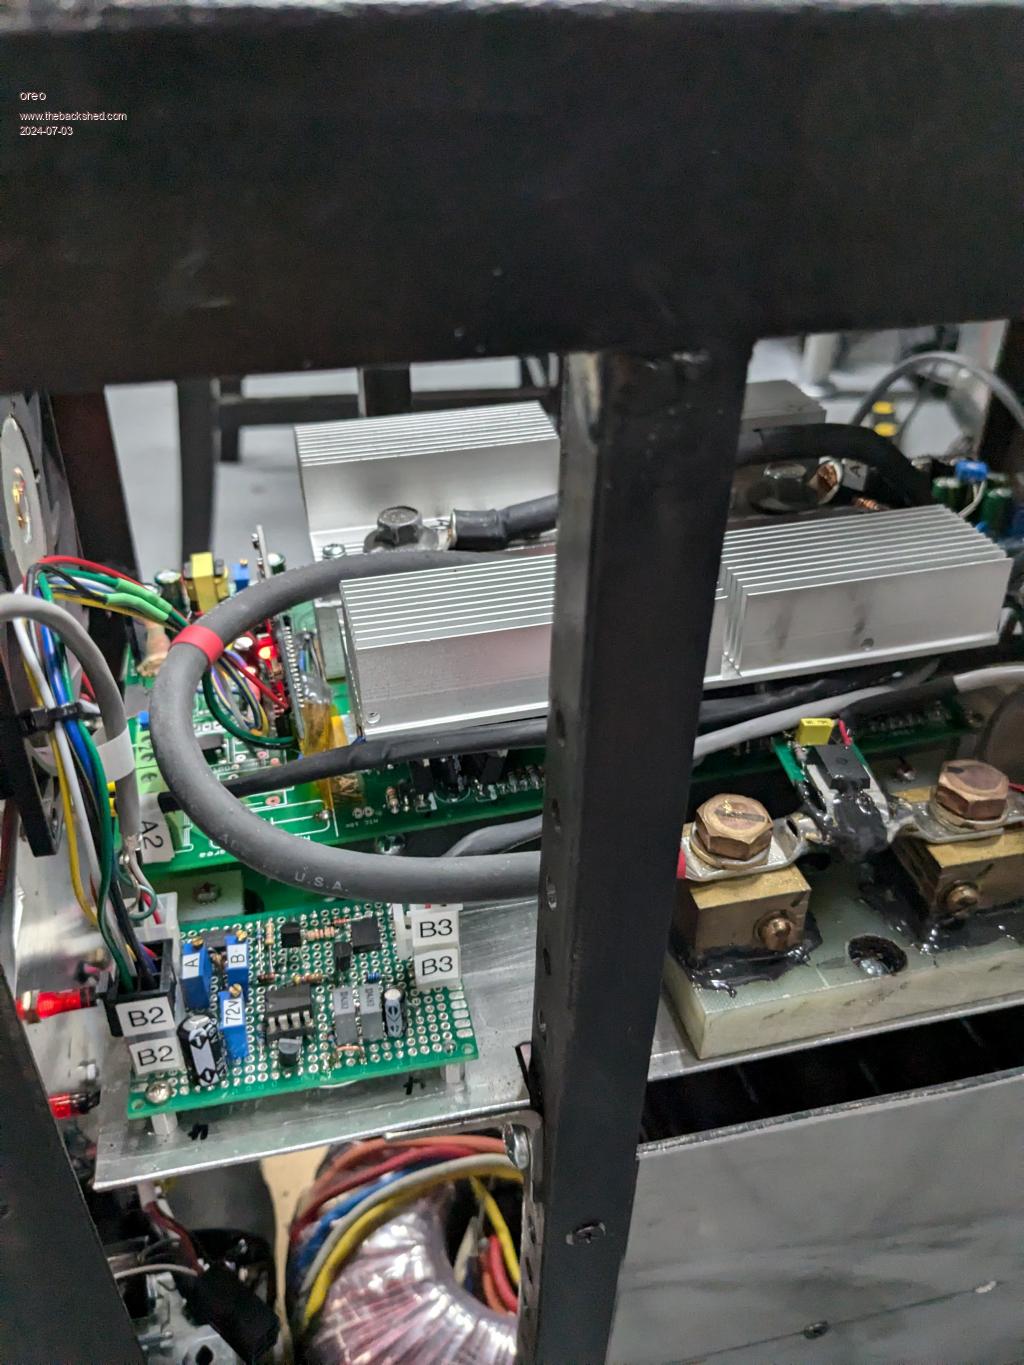 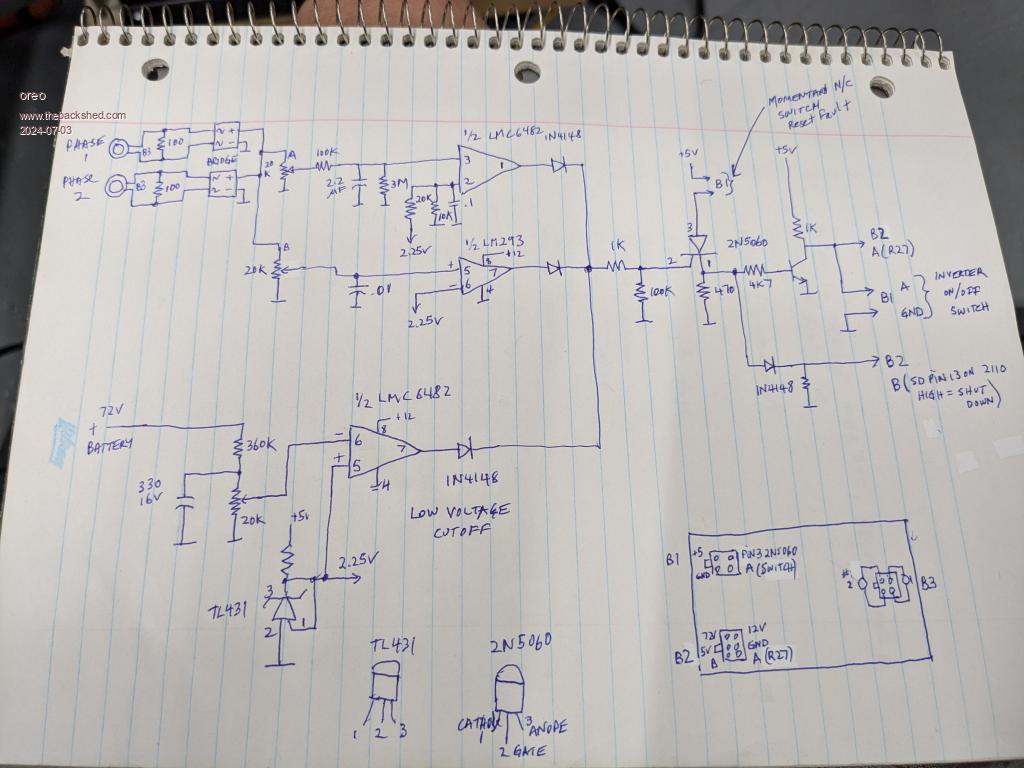 Greg |
||||
| oreo Senior Member Joined: 11/12/2020 Location: CanadaPosts: 133 |
So I hooked the revised inverter board to my new wound transformer/inductor and the standby current draw was 60w! What was going on? I temporarily moved the inverter back to the old transformer/inductor setup and rather than drawing 6.6w it drew ~11w. Increasing the dead time to 1.5uS, reduced standby to about 7w or so. Placing the revised inverter back into my new transformer/inductor the standby power was now 55w! This was where my inductor education began. First off, I didn't consider that putting inductors in parallel would reduce the overall inductance. I had 11 scavenged 52uH/8a inductors in parallel, yielding 5uH. I moved the inductor from my previous setup and tested a bunch of other values and ended up with these numbers. Ind Stdby Power 5uH 55w 26uH 20.2w 52uH 13.7w 78uH 12.9w 104uH 12.1w 156uH 12.1w So I figured, I needed to build a 100uH inductor with the largest wire possible. I ended up buying some large iron powder toroidal cores off ebay(fortunately I have another use for them). I managed to stuff 4awg wire on 4 stacked cores and ended up with the inductor in the foreground which measured about 110uH. 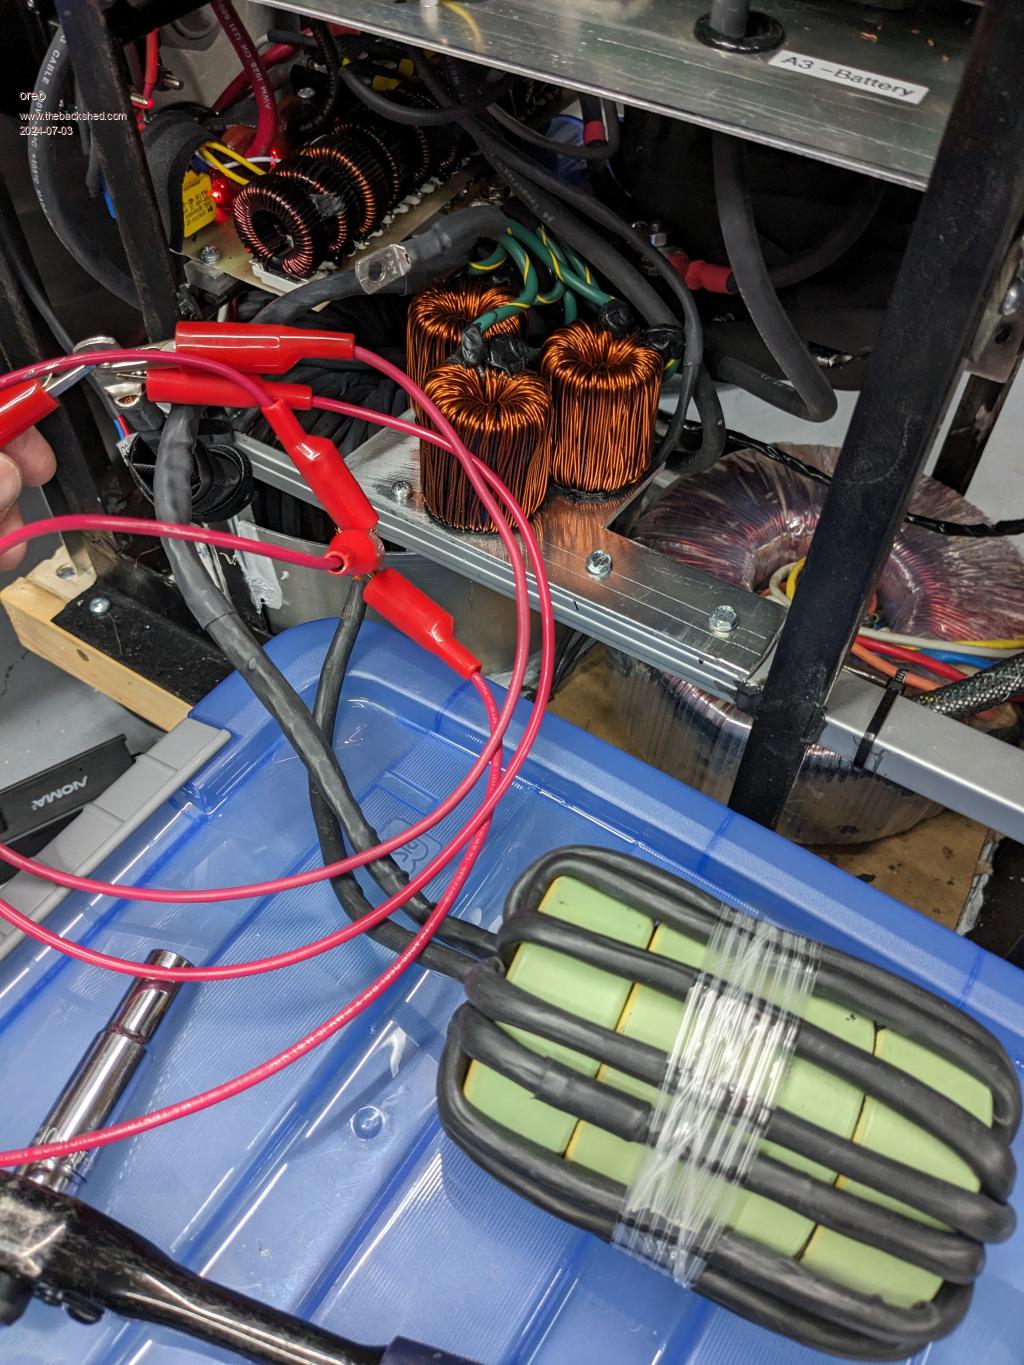 I connected it up and the idle power was now 16w! Grrr. So I unwound one of the inductor core sets I had used with the previous inverter and the cores were Kool Mu MS-157060-2 (stacks of 3). I signed up to use the Micrometals inductor calculator and was surprised to find that the calculator came up with the exact same results as I had measured for saturation when I first got these cores 3 years ago. So I played with the inductor calculator looking for a better solution at a reasonable price. Ultimately, having something in hand will always be far cheaper than buying something. So I added additional windings to the inductors I already had, and decided to put 3 of these completed inductors in parallel (each one individually measured 340uH). The base inductor had 36 turns of 14awg wire. 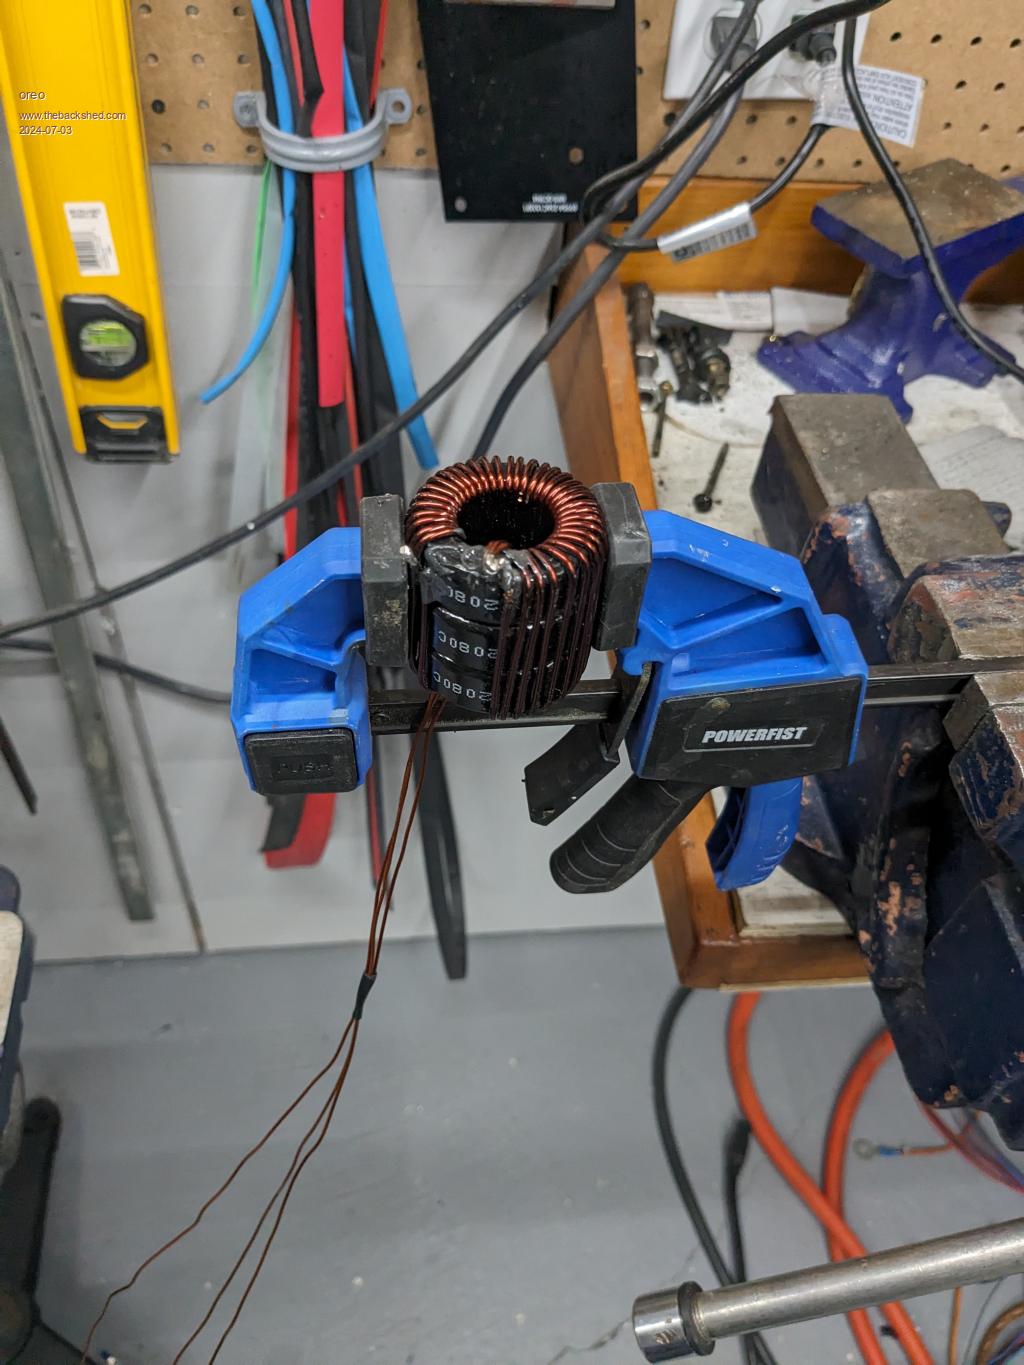 I added 3 parallel 18awg windings of 36 turns to each core. 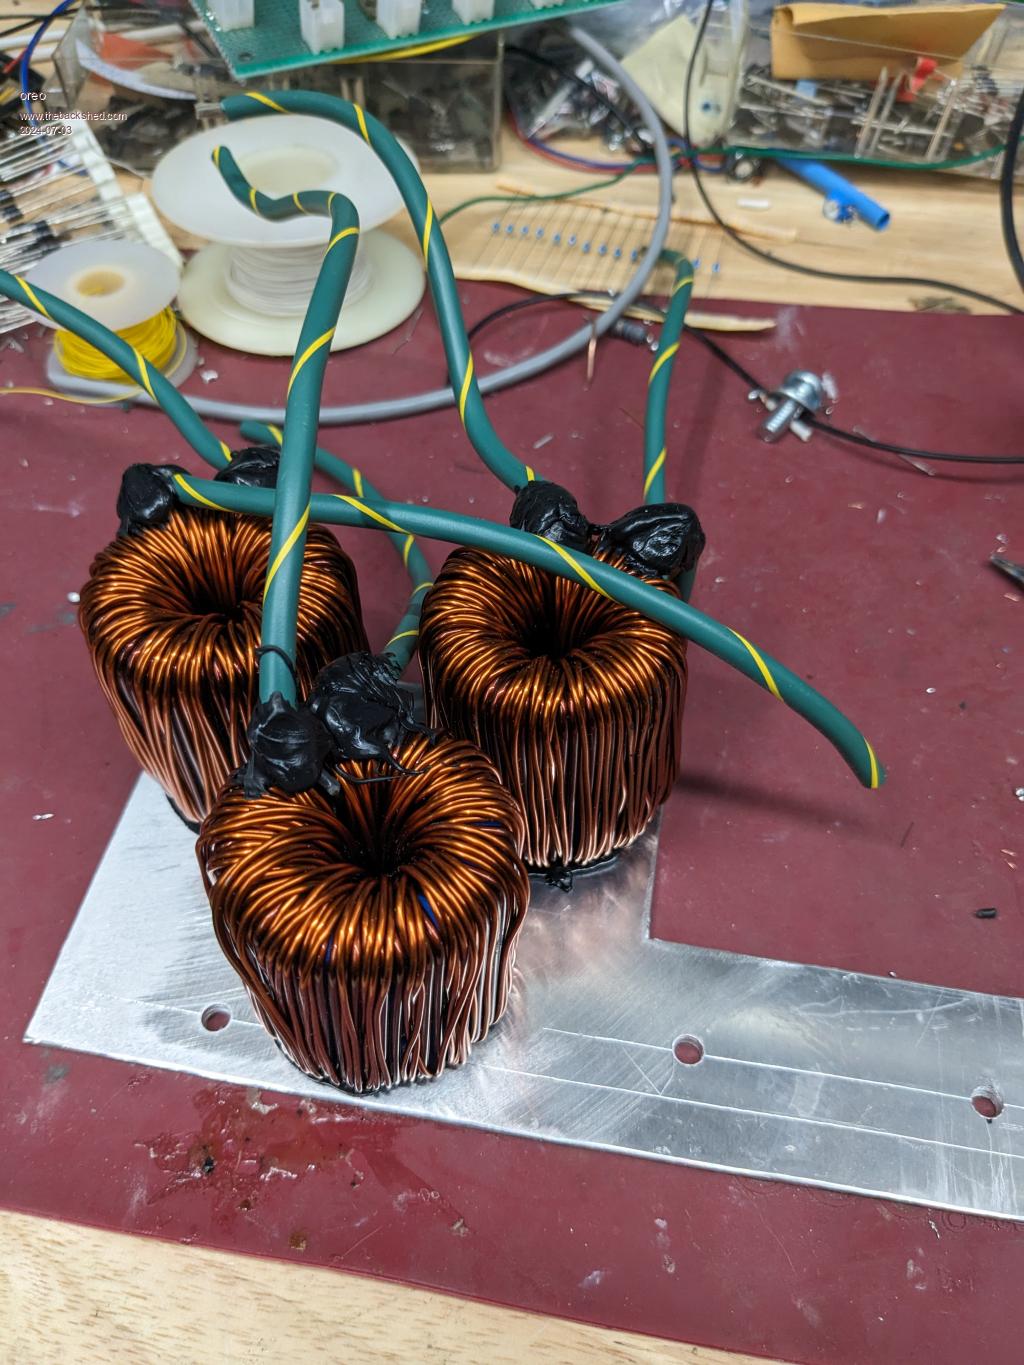 Calculated inductance for these 3 inductors in parallel and the 5uH (11 in parallel) is 90uH at 45A and 45uH at 86A. DC resistance was measured to be .0055ohms. Not fantastic, but should be good enough. However when doing some initial power/efficiency testing, the inductors were running hotter than I would have expected. Greg |
||||
| lizby Guru Joined: 17/05/2016 Location: United StatesPosts: 3758 |
In Nova Scotia, I'm very interested in your near-vertical wall mount, since the only available space I have for solar panels is on the front of my south-south-east facing barn. What azimuth(s) are your panels at, and what tilt have you used (optimized for summer, winter, year-round, or what)? Where did you get your panels--"Canadian Solar (made in China) and are bifacial 535w" -- and what did they cost? I find that the killer for solar in Canada is the tariff of up to 165%, implemented to protect a domestic production industry which will never be competitive globally, especially since about 74% of Canadian grid production is hydro or nuclear. Locally, I can get new 400W panels for about $.75CAD a watt (about $.56USD). In the U.S., new Adani 530W panels are available for ~$.31USD per watt: Adani 530W Panels (As an interesting note of international arbitrage, Adani (Indian company) makes (using Chinese materials) and installs lots of panels, but does not make what it installs--90% of what it makes is sold to the U.S., avoiding tariffs on Chinese goods, and it then installs Chinese panels in India. I don't know if the U.S. Adani prices will change with the recently tariff changes.) Battery prices in the U.S. have dropped nearly 40% in ~2 years for 100Ah 12V LiFePO4 batteries. It's possible to get 5.2kWh for a bit over $800USD--off of Amazon. Edited 2024-08-02 21:57 by lizby PicoMite, Armmite F4, SensorKits, MMBasic Hardware, Games, etc. on FOTS |
||||
| oreo Senior Member Joined: 11/12/2020 Location: CanadaPosts: 133 |
I can measure my azimuth(s) when I get back home next week. I am running a 26d tilt in the winter, and a 45D tilt during the summer. Due to the low panel count, and the fact that the panels are different types and at different azimuths and currently used in a less efficient series/parallel configuration, there is not a lot of difference in output with the different tilts. I plan on reviewing things when I get the 535w panels installed (later this month). I purchased the panels from Frankensolar, who are within 20km and accept small orders without consequence. These particular panels are the best deal I have seen for small quantities, being $225 per panel, or $.42 per watt pre-GST. These panels are listed as on the website as clearance. I see the pricing on panels has been going down recently, and there are many other panels from this same supplier, which are nudging the $.50 per watt, from tier 1 manufacturers. I am also now seeing lots of 2nd hand panels, from what looks like solar farms, with pricing down to about $.30 per watt (O/P when new). At this point the 2nd hand panels still seem to be slightly overpriced to me. Also I have seen some adverts on FBM, for 36+ panels and no Canadian stock, which are in the $.33 price range. Not sure how reputable those suppliers are though. I have heard from others that battery pricing has dropped recently. I have not been following pricing. Greg |
||||
| lizby Guru Joined: 17/05/2016 Location: United StatesPosts: 3758 |
Thanks for the response. That's an outstanding price for those 535W panels, especially in small quantities. I know of nothing remotely close to that in Nova Scotia Great project you have. ~ Edited 2024-08-04 03:16 by lizby PicoMite, Armmite F4, SensorKits, MMBasic Hardware, Games, etc. on FOTS |
||||
| oreo Senior Member Joined: 11/12/2020 Location: CanadaPosts: 133 |
^thank you lizby I did measure the bearing of the panels and 3 of them are at 128D with one being near 180D. I still have not mounted any of the new panels for a few reasons. First I have a shed blocking ground access for 2 panels. Also, I mounted the previous panels, by first strengthening the frame at the mounting points and then using hinges at the top and a bar near the base. The new panels have a narrower aluminum frame, so it took me a while to determine how I wanted to strengthen them and acquire the materials. Also, the last panels weighed in at a little over 70lb all in and this was low enough that I could muscle these into position myself. These new panels will be just over 80lb with bracing and I needed to figure out a smarter way of installing them. I plan to use a winch attached to a ladder. Should be fun. On another note, after all these years I finally bought an active balancer for my battery. Since I am adding another battery soon, I bought 2 sets of cables so I can move the balancer between batteries every couple of months. I purchased the 4A balancer, which has worked very well. Here is an video review and description of how the balancer works. Neey 4A active Balancer (5min on) Greg |
||||
| lizby Guru Joined: 17/05/2016 Location: United StatesPosts: 3758 |
Thanks for the response. Does 180° mean directly south-facing? And 128° about southeast? PicoMite, Armmite F4, SensorKits, MMBasic Hardware, Games, etc. on FOTS |
||||
| oreo Senior Member Joined: 11/12/2020 Location: CanadaPosts: 133 |
Hmm. Sorry lizby, I forgot to respond to your question. Yes, 180 means south facing and 128 about southeast. Since my last post, I found a website SunEarthtools.com which allows you to calculate and show the sun's position for your location and at different times of the year. My old panels were actually at 135D and 165D. At this time of the year, the sun is very low and rises at about 120D. So I am getting no direct sun at this time of the year unfortunately. I did mount 3 of the new panels over an exiting shed on this same wall that faces 135D. I had to remove the roof of the shed to get up there, and then realized I needed to use a linear actuator to change the ground angle, since I don't have access after the shed roof has been installed. Anyway, this array of 3 panels is not doing too much at this time of year, because a nearby 2 story house is shading part of one of the panels. By next month this will improve greatly as the sun will be higher in the sky. So to mount these panels, I mount 2 hinges on one end of each panel. I strengthen the aluminum where these 2 hinges are, using L aluminum and epoxy. The hinges get mounted to the wall and by using different sized struts at the other end of the panel, I can adjust the vertical angle of the panel for winter and summer. Hinge attachment  These panels are quite heavy at 71 pounds plus, so I needed to figure a way of getting them up on the wall. I attached a pulley wheel to my ladder, and used a manual winch attached to an old dresser with some automotive weights to keep it on the ground. 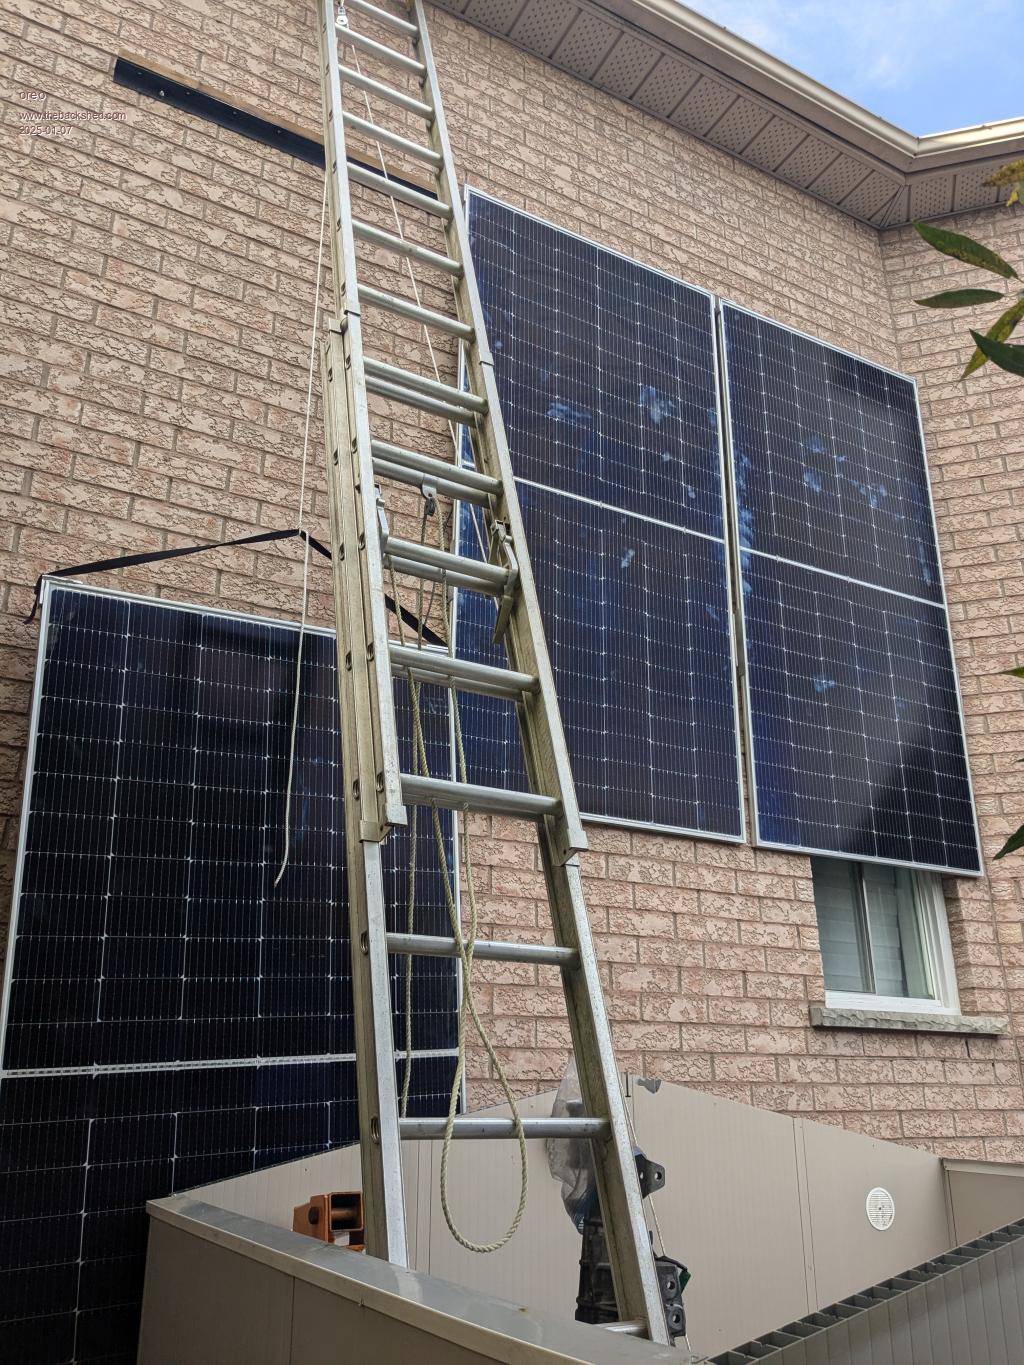  I used a 20" stroke linear actuator from Vevor which is supposed to be IP67 rated (It does not look like it). I initially intended to mount the actuator to give me the 40" of stroke I need, but I miscalculated and put the mount in the wrong spot. I ended up putting the actuator in the most convenient spot. I may redo things next year... 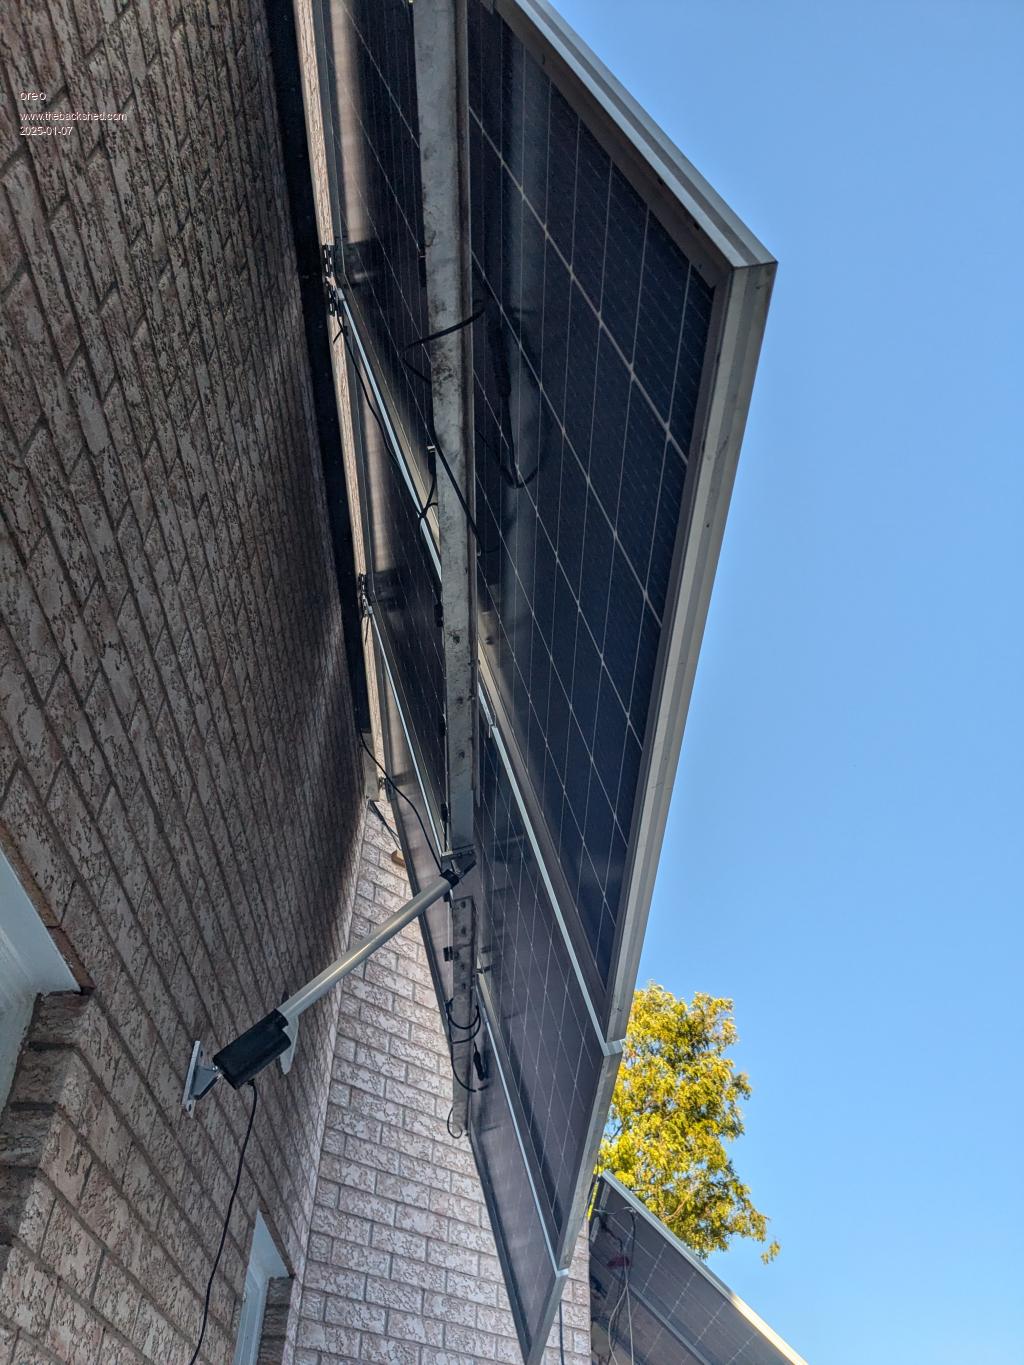 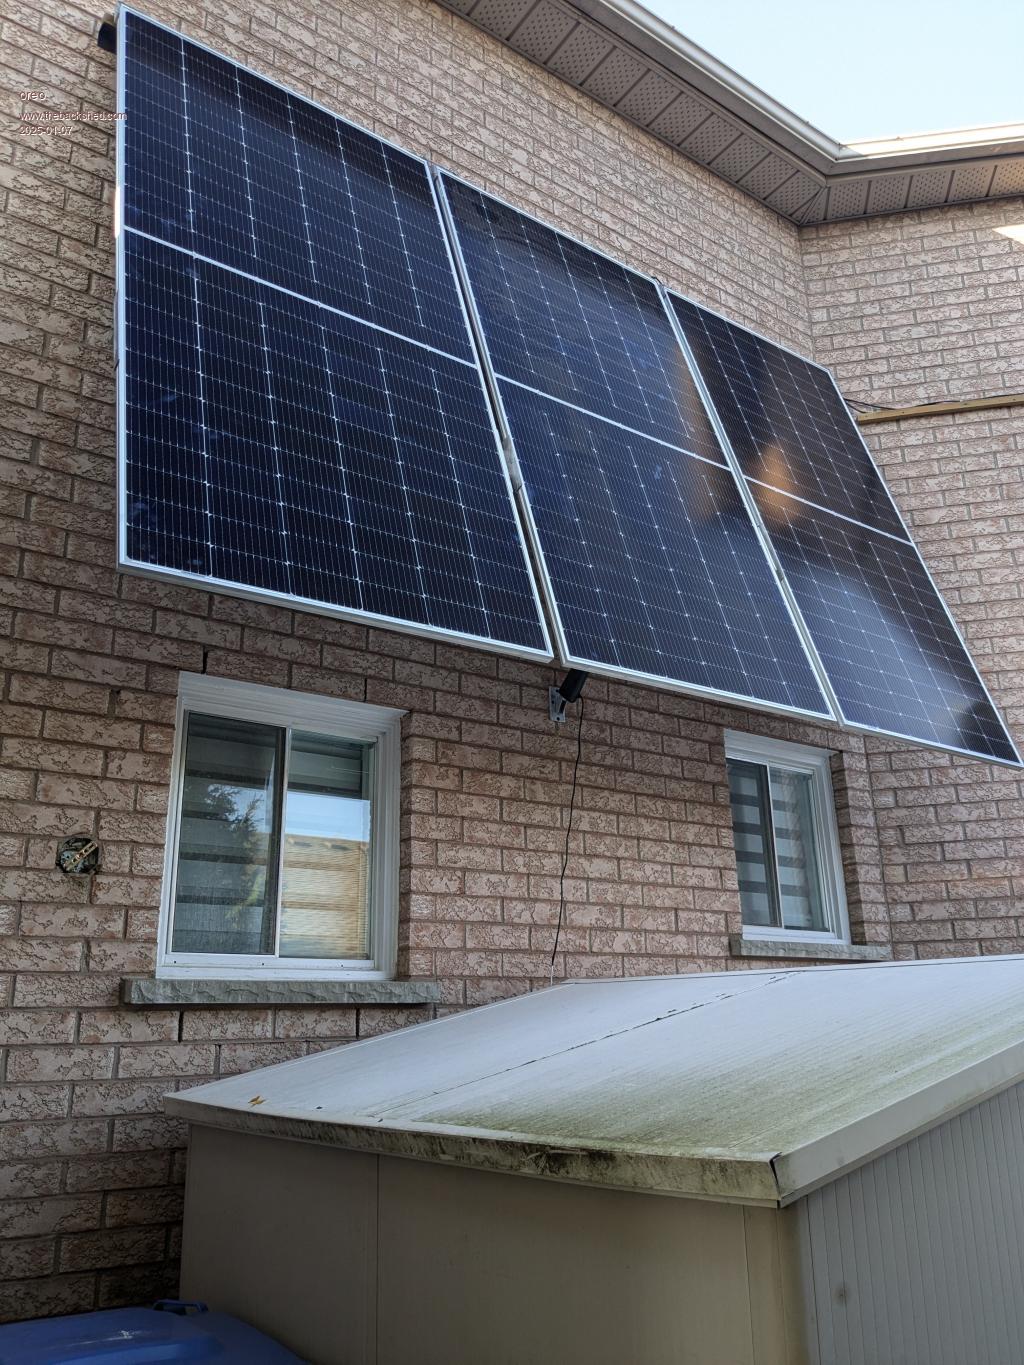 So for now, I have 3 new panels and 3 old panels in a 3S2P configuration. The old panels have a MPP voltage about 10v less than the new panels, and they are the most dominant panels at this time of the year. So not ideal. I won't be getting around to installing the other 3 new panels, until the spring. Greg |
||||
| rogerdw Guru Joined: 22/10/2019 Location: AustraliaPosts: 952 |
Good work Greg,and great to see the progress. Your winch arrangement looks like something I might do. Whatever works is good ... and you survived.  Cheers, Roger |
||||
| oreo Senior Member Joined: 11/12/2020 Location: CanadaPosts: 133 |
Thanks Roger. Surviving does have it's merits. Greg |
||||
| otto25 Newbie Joined: 08/01/2025 Location: United KingdomPosts: 2 |
Wow, that looks great, but solar panels don't always work so well in the winter. |
||||
| oreo Senior Member Joined: 11/12/2020 Location: CanadaPosts: 133 |
^Thanks Otto. I think the panels themselves work well, but with reduced sunlight and snow and clouds, the output can be considerably less. So after deciding to mount my solar panels in groups of 3, I figured I needed to buy or build a MPPT controller. Fortunately there are more low end MPPT commercial units around which support 72v systems. Amazon carry a brand called Solafans which was the lowest cost and had reasonable ratings. They cleared out some lower current versions, so I bought one. I did some testing and found (with my tools anyway) that the efficiency is pretty good. Not sure how close you can run this to 55A, but I really only need 30. 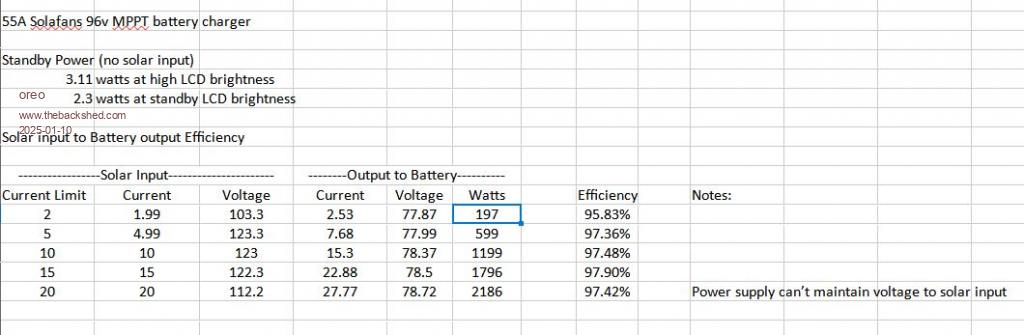 The power part of the MPPT uses a very similar circuit to Poida's thread, except it uses 3 inductors and for each inductor, one dual diode and mosfet. I thought at first that the unit was only using one inductor at lower power levels, but the board had a conformal coating, I I was just not pressing hard enough with the scope probe. When I pressed hard, I managed to short the ground tab on the probe, to one of the switching transistor/diodes and managed to vaporize the leads. Fortunately it only killed the Mosfet driver chip, and I happened to have one in a bad inverter on hand. 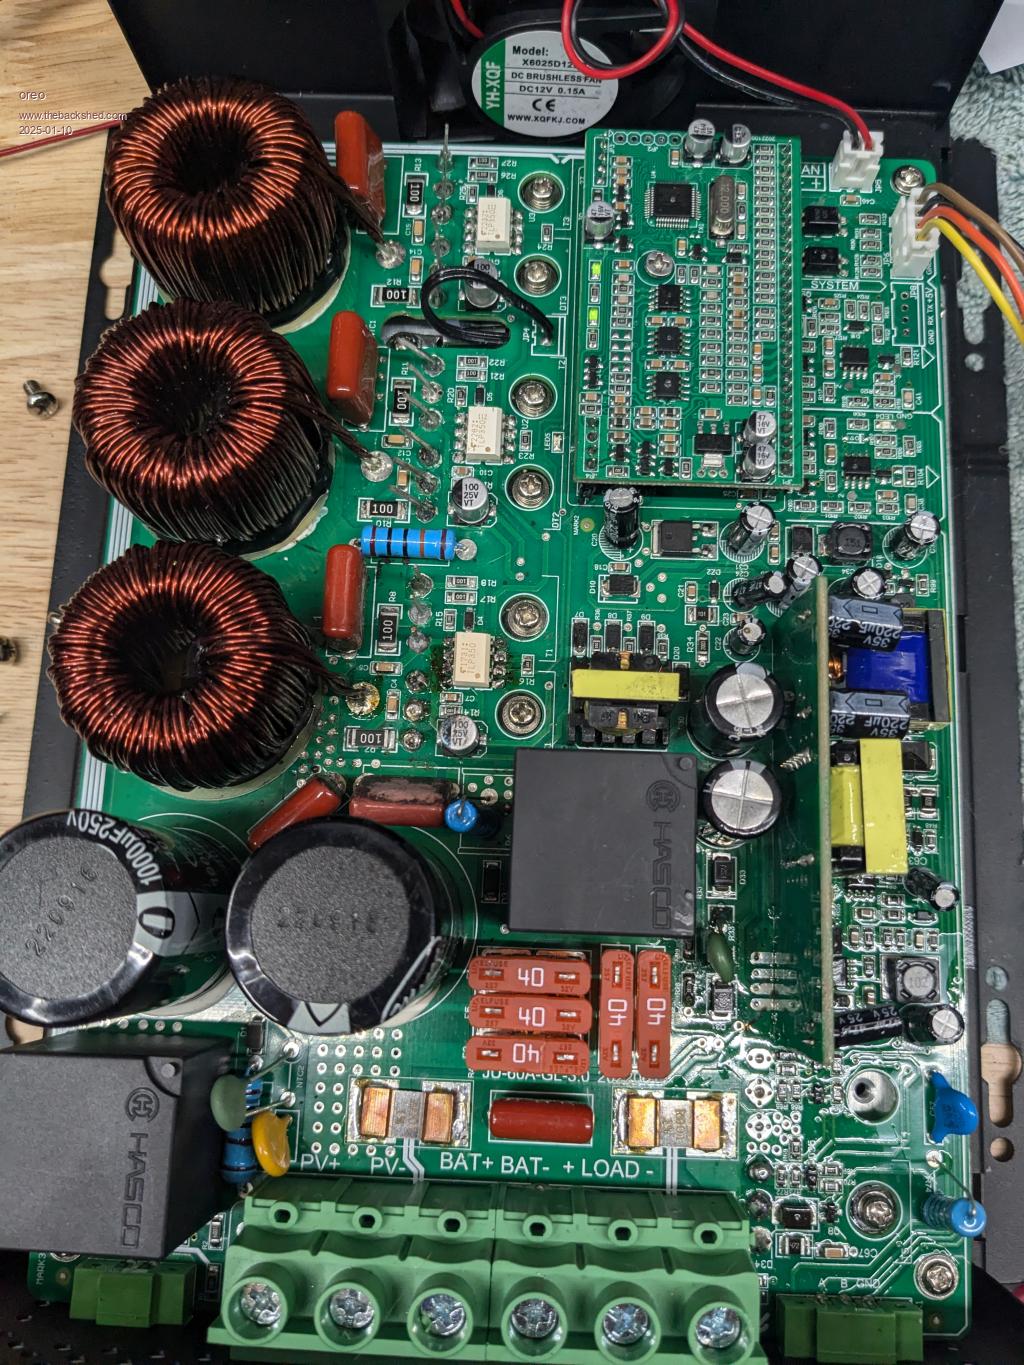 The unit has a relay on the input and output, so the output relay did not energize, due to the circuit fault. So thus far this month, I have averaged 2.8Kw per day into the battery with a maximum of 4.69kw today. It was a perfect day, being very cold with very few clouds.  At this time of year, this is enough power to run my gas furnace blower motor. So I need an utility powered battery charger which I can run at night. Greg |
||||
| Page 1 of 5 |
|||||
| The Back Shed's forum code is written, and hosted, in Australia. | © JAQ Software 2026 |
