
|
|
Forum Index : Electronics : How does PWM work in charging?
| Page 1 of 2 |
|||||
| Author | Message | ||||
Cornelius Newbie Joined: 26/12/2008 Location: NorwayPosts: 27 |
I need to build a simple charger to charge a small 36V, 17Ah bank of SLA batteries, and i'm thinking on using a PicAxe 08M to get good control of the charging. What i was wondering about is; how does the battery perceive the pwm output? For example a pwm with 50/50% duty cycle; does it see half the input voltage, or half the input amp available? Or would the pwmout on the 08M be useless for this purpose? Cornelius |
||||
| GWatPE Senior Member Joined: 01/09/2006 Location: AustraliaPosts: 2127 |
The PWM directly switching a mosfet type switch to the load will give proportional current, related to the ON/OFF ratio. If inductors and diodes are added, the system completely changes. A picaxe would be OK if regulation was not required as well. A usual Analogue PWM may be a better option. Gordon. become more energy aware |
||||
| Cornelius Newbie Joined: 26/12/2008 Location: NorwayPosts: 27 |
Thanks for your reply :) The power source will be a transformer at 32VAC; 2-3Amp. This would give me a peak voltage of 44VDC. I was planning to reduce the current to around 50-100mA as soon as the 36V bank reached 43,2V (14,4v/single 12v battery in the bank.) Shouldn't that be enough to not hurt/overcharge the batteries? |
||||
oztules Guru Joined: 26/07/2007 Location: AustraliaPosts: 1686 |
In the case of these batteries, hold them at float voltage rather than cycle voltage. (41.3) Try not to exceed this for extended periods... even at low current..., as it will run in electrolysis mode, and eat up the already spider web like lead internal/inter cell connections. A long time ago, we used them with little 4hp Honda's, with simple single diode for charging (1A max), and the batteries would fail... fully charged, but with eaten out inter connectors. After the bulk charge, (1A max), the small current still driving (maybe 100 ma) ate the lead internals, just like a zinc block on a outboard motor. So let the bank get up to 43v or so, and then drop back to 41.3v The current will then drop to almost zero, and hold at float. Do not exceed 41.3 in float mode, as it will slowly disintegrate the internal webbing, and dry out the electrolyte.... although the battery will go high impedance long before the electrolyte finally dries up. In short... trickle charging will kill them if left on without voltage control, and you need current control for the bulk charge anyway. A single 200w computer power supply (modified) would be ideal for this... and is free... and you won't need to buy the transformer either.... much better setup I think (and use). ..........oztules Village idiot...or... just another hack out of his depth |
||||
| Cornelius Newbie Joined: 26/12/2008 Location: NorwayPosts: 27 |
Thanks for your reply. :) I wasn't planning on keeping the bank at cycle voltage; i rather cut off the voltage after 43v are reached than let them cook. ;) I was hoping for a real simple construction by using the 08M, but i see it won't be the case... Computer psu's i have plenty of. ;) Any suggestions how to modify those? |
||||
| oztules Guru Joined: 26/07/2007 Location: AustraliaPosts: 1686 |
Cornelius, try this post here There are references to work done by Dinges, and I will probably do a how too on these things soon. I use them to charge my EV. It is 36v 220AH. I just set the current to 15A max, voltage to 41.3v max, and let it run all night. It fills the batts up after about 2-4 hours (don't go very far  1-12km/day ) and floats the rest of the time. 1-12km/day ) and floats the rest of the time.
I also use one for charging up my 17ah gell cell that I use for all manner of things about the place. I set max current to 3A, and 13.7v... and forget about it. .........oztules Edit: Usually the windmill charges the batteries, but it is down for maintenance at the present time  Village idiot...or... just another hack out of his depth |
||||
| Cornelius Newbie Joined: 26/12/2008 Location: NorwayPosts: 27 |
I'll be happy to be your guinea pig to your Howto. ;) I'm fluent with the soldering iron and with basic electronics theory, and color coding etc. I've just dug up this one: (A Qtec 550W PSU) 
The ic you can't read says: 'S494P' :) (Large version here.) I didn't quite manage to follow what to do from the post you linked to, so a short version on what needs to be done to get 41,3v like your EV charger (but max 4-5A) would be nice... 
Cornelius |
||||
| Cornelius Newbie Joined: 26/12/2008 Location: NorwayPosts: 27 |
Fyi: The 36V, 17Ah bank are for my Electric bike. 
I posted a story over at the Fieldlines forum. |
||||
| oztules Guru Joined: 26/07/2007 Location: AustraliaPosts: 1686 |
It looks an ideal candidate. A 200w one would have been enough for this project. The s494p is pin out similar to tl494... so all good. Curious... what transistors are used for switching... and what size electros are on the front filter (470uf etc). It is overkill which is all good. Next step is to get the pdf of the 494 and study it. I will scratch out some circuits to give you the current limit and voltage limit bits. There is not much else except for 41.3v we will need to modify the rectifiers from center tap to single secondary full wave rectifier (4 diodes, not 2 (or one in a packet)). Village idiot...or... just another hack out of his depth |
||||
| Cornelius Newbie Joined: 26/12/2008 Location: NorwayPosts: 27 |
I like overkill... 
The transistors on the HV side are two 2SC5071; the caps are 680uf. There are two double-diodes after the largest trafo marked D83-004, in parallel. (I found datasheet for ESAD83-004, which is a 30A Schottky.) This psu didn't manage my main computer anymore, but it's still putting out voltage; i've used it to testrun harddrives etc. And now i see why it didn't manage my computer: the 2x 2200uF caps at the 5V output has dried out and popped...
All the other caps seems ok. |
||||
| oztules Guru Joined: 26/07/2007 Location: AustraliaPosts: 1686 |
Ok, with those caps and those trannies, it really was a 500 watter. (I had to fix someones up the other day, it stated on the box 450Watts... but ran 330uf caps and 40W trannies... I don't think so) If you look at the latest post I did on the other thread, you will see how little is left on the low voltage side. Have a look at yours, and see if you can find the . A. oscillator cap and resistor, B. The two drive lines that drive the totem pole trannies and associated caps and resistors. c. the power lines from the small flyback transformer that provides the power in standby mode. All the rest can go, just leaving the pwm chip, it's output drive lines, and the diode and caps that provide startup power for the unit. In fact, for battery charging, the batteries can provide the power for the 494, and you could do away with the flyback system as well. We then need to put in a current sense system, voltage sense and control system, feedback components, bridge rectifier, output inductor and a few caps and a bleed resistor.... maybe 10-15 components. This schematic seems to be a good descrition of these types of supply. Try and get a feel for it from reading this: 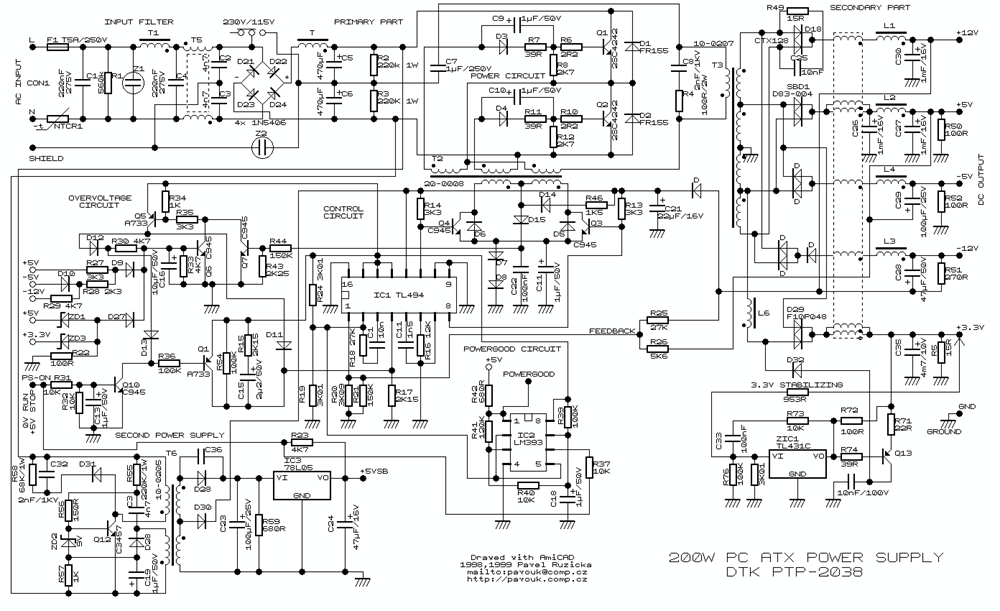
Looking at yours, you have an opto isolator, which I assume communicates with the flyback. I haven't seen this in my generic supplies, but should pose no problem (if it does then you can still use the batteries to power the PWM.). In the schematic, we are interested in keeping all the HV stuff, and only keeping the 494, it's oscillator cap and resistor, the totem pole trannies...and supporting gear.... ie the caps and diodes and resistors(follow pins 8 and 11) and then C21 and D30 in the LV side of the flyback supply for Vcc for the 494, and thats about it. All the rest is useless. We replace that with a few other parts... that I had best scrawl out for you when you think your ready to have a go. ..........oztules Village idiot...or... just another hack out of his depth |
||||
| Cornelius Newbie Joined: 26/12/2008 Location: NorwayPosts: 27 |
Looking at your circuit, i'll keep all the trannies. Would the tranny marked T2 in your circuit be the flyback supply, or T6; marked 'Second Power Supply'? (I've traced pin12 (VCC) of the 494 to the upmost tranny on my pcb.) Edit: Oh, you said keep D30 and C21. Then T6 are flyback. I guess i can keep that 78L05 also, for future 5V extensions? 
I'm guessing the 'Power Good' circuit goes, and also the bit marked 'Overvoltage Circuit'? Am i right in assuming that the LM339 chip on my pcb does those two jobs? (i.e. be gone with it?) How about everything right of T3 in your circuit marked 'Secondary part'? Remove all, and add some later? For the 494 part, it would be easier if you said which parts to keep according to your circuit above. |
||||
| oztules Guru Joined: 26/07/2007 Location: AustraliaPosts: 1686 |
I have spent some time fiddling that circuit. It is late here (1.20am), and I may have some mistakes, but I will check it out tomorrow. It should be very close to correct I think. You should be able to use T3 as is. In it's current form I would expect 25-27v (with all regulating circuits disabled), when full wave rectified, probably in excess of 45.... so 41.3 should be no problem. The regulator will not be terribly useful (5v) as very small current available really. T6 is the flyback (one of three side by side on your board....XF114A. More importantly, the 7805 takes up real estate on the heat sink... an you may want to use 4 dual diodes on that heat sink for the bridge. Tell me how you find this version perhaps.: 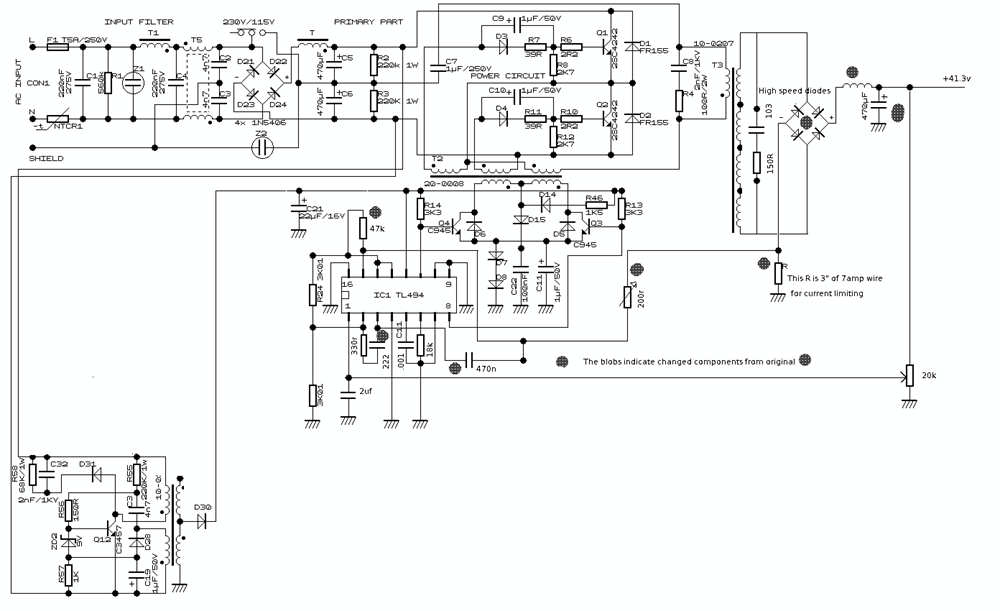
...........oztules Edit. Changed the feedback loop for the op amps to get rid of some small instability at very low load levels. Ditched the resistor on the pin 4 and go straight to ground. Changed the divider for the voltage, now the range is 1.5v to 29v. Village idiot...or... just another hack out of his depth |
||||
| Cornelius Newbie Joined: 26/12/2008 Location: NorwayPosts: 27 |
Ah, you're +9 hours ahead of me then...
Nice work on that schematic! With the original and the modified schematic, it should not be too much trouble translating it to my pcb.
The high speed diodes; any suggestion on what i can use? Any leftover from the downstrip of the pcb? Can i use those Schottky diodes? (i have some of those from another psu too...) Edit2: Uh, got to learn to read your post properly before asking i see...  4 doublediodes it is. 4 doublediodes it is.
The 5v... I was thinking of the possibility to use a picaxe to switch between bulk and float voltage/amp. How much current would be available on that 5V you think? 100mA? And a Picaxe 08M use? 10-12mA?
Edit: I was talking about the +5V marked +VSB. On the chassis for my psu, the +5VSB are rated 3.0A peak. Oh, well; I guess i'll concentrate on making the mod work first... |
||||
| oztules Guru Joined: 26/07/2007 Location: AustraliaPosts: 1686 |
If you want some power for other things, you have a heap of taps to use on the main transformer as well, resistor and zener will get you your 12ma without too much problem from the 41.3v rail. Usually, 25v or more is available at Vcc on the 494 from the flyback. I don't know how much current, but 12ma should be within it's grasp I should think. Take a good look at how the two error amps in the 494 actually work, and most of the mystery of these things evaporates. Pins one and two control the voltage, 15 and 16 control the current. I'll get back to this later. ...........oztules Village idiot...or... just another hack out of his depth |
||||
| Cornelius Newbie Joined: 26/12/2008 Location: NorwayPosts: 27 |
Ok, now i'm a bit worried... 
I've soldered off a good bit of the components, and have come to the point where i have to trace some paths to see which components i have to keep around the 494. I've removed the lm339, but not all the resistors around it. To the point: I could of course not resist applying power to the psu in the current state. The result was the 230v fuse blew for the whole floor...
I've checked for shorts, but couldn't find any. I tried applying power again, and this time i let the plug in and 'pumped' my fuse on 4-5 times. When i then checked the psu, the tranny for the flyback power was rather hot. Could some of the components still in place cause this? Or a runaway regulation of sorts? |
||||
| Dinges Senior Member Joined: 04/01/2008 Location: AlbaniaPosts: 510 |
Cornelius, nil desperandum; if Oztules managed to get me a working modified PC PSU, *anyone* can do it! My first one offered its life for the benefit of the advancement of science, but the 2nd one worked. 
Oztules is a bit more daring than I am (I bet he rides his bicycle with no hands too!); I normally remove only a few components at a time, then plug it in again. If it doesn't work anymore, I put the components back in again, do some more circuit tracing and try again. Sooner or later you'll end up with an ashtray full of components and a nearly empty circuitboard, but the PSU still works! Removing all components at once is a bit too risky for me, though, after about 8-10 modified PSUs, I'm beginning to feel confident enough to 'bulk remove' components. Not sure if you removed these, but the components connected to pin-4 of the TL494 I'd leave in place (soft-start of the PSU). The one or two diodes that connect lines from the LM339/393 to pin-4 of the TL494 can be removed, in essence disconnecting the entire LM339/393 block (which can then be physically removed too; or not, if you don't feel like doing it). The overvoltage/overcurrent error signals arrive via these diodes from the LM339/393 to the TL494 (pin-4) I expect one (or both) of your switching transistors are dead. You may want to check the rectifier too. Replacing these components, however, likely will simply cause the PSU to blow again. Personally I prefer a step-by-step approach: first modify for variable voltage; then disconnect the LM339/393 block; then remove the +5V/+3.3V/-12V/-5V components. Then add current control. After I get all that working, I'd try to modify the output to full-bridge rectification (+40V). That makes it much easier to not lose overview of what you're doing/what's happening. Small steps vs. giant leaps. Good to see Oztules is expanding his modified PC PSU business... more franchises... the royalties will really start to flow soon! Good luck, Peter. (who's eagerly reading the thread in the background) Edit: Cornelius, if the circuit breakers of the house blow *that* hard, it's usually either the input rectifier or electrolytic capacitors that are a dead short. |
||||
| Cornelius Newbie Joined: 26/12/2008 Location: NorwayPosts: 27 |
Thanks for the words of support Dinges, but... Sitting here in the morning with my first cup of coffee and my multimeter; i find both the rectifier bridge and caps to be ok. Also the two main switching transistors, but - a smaller switching transistor going to the flyback tranny; a 2SC3866 measures as short between all legs... in-circuit, that is... i'll desolder it later for verification...
Now, why did i start on this one without bother to test it before disassemble it?! It DID work a couple of years ago... |
||||
| oztules Guru Joined: 26/07/2007 Location: AustraliaPosts: 1686 |
Hmmmm. Looks like the flyback transistor has fried. Don't know why. I assume you have a track short somewhere on the secondary side that overloaded the transformer. The main switches didn't get any signal I assume, and that's why they are fine. (flyback didn't supply s494 with any power to turn them on) Look very carefully for solder splash. It may be that the opto isolator that controls the flyback, let it off the leash and it turned full on.... That still should not have killed it, unless the flyback transformer has a short across it's terminals (secondary side). It is unlikely that the tranformer would have saturated and taken the transistor for a ride. Replace the transistor, and put a 300R 3W resistor in series with the power leg to it... (I use an old fuse and solder the resistor across it... and plug it in for initial testing.. but doing that... also has the caps in circuit though ) This should give you a little time to run away if things are problematic.(if the resistor starts to get hot a... you can turn it off. It should also limit the current to a level that will not kill the transistor, and you will be able to find where the current loss is. Look for a short with the meter between the output diode of the flyback and ground. It is possible that without the opto working, the thing over voltaged and killed the 494 short... which would pull the flyback down as well. Maybe a zener across the Vcc of the 494 and a mild resistance will cure this if the case,... and can do away with the opto perhaps. Now is the time to learn a few things....... When you get the thing under control with the current limit working ... these things are very very robust and hard to kill. The only way I know of is to reverse the battery leads without a crowbar and fuse in the output... other than that I can't find a way to blow them up...... but you must achieve current control first... so use the resistor or similar when testing. If your a bit unsure, put a socket in for the 494, and remove the main switches until you master the flyback supply. If that is too hard, then use a resistor and 25v zener, and use your battery pack for the startup. .... even less components!... and it won't start until you plug the batteries in for charge.... The trouble with how Dinges does it is that it doesn't just work... it looks good too.... 
..........oztules Edit... you didn't fiddle with the doubler switch did you?? Village idiot...or... just another hack out of his depth |
||||
| oztules Guru Joined: 26/07/2007 Location: AustraliaPosts: 1686 |
Dinges, I'm not that excited about the soft start on pin 4. With the current limiting in place,... you don't need it. There is no surge beyond the current limit set.... so nothing to protect against..... I just ground it. Spud,s circuit needs soft start, as there is no over current surge protection apparently. "Removing all components at once is a bit too risky for me, though, after about 8-10 modified PSUs, I'm beginning to feel confident enough to 'bulk remove' components. "....... This puts you in "old hand" status..... Which reminds me, .. I seem to be missing some 8-10 Dutch royalties
..........oztules Village idiot...or... just another hack out of his depth |
||||
| Page 1 of 2 |
|||||
| The Back Shed's forum code is written, and hosted, in Australia. | © JAQ Software 2026 |
