
|
|
Forum Index : Electronics : Newbie with TL084 question(s)
| Author | Message | ||||
| stoichiometry Newbie Joined: 19/01/2011 Location: United StatesPosts: 8 |
Hello All!! I am a new user of wind/solar power and I love DIY projects. I have been 'lurking' around this site for a while, and decided to build thet TL084 charge controller. It works great! However, since I have the controller in a one room cabin and the LED's are quite bright at night in this remote location, I was wondering if anyone could tell me if there is a way to change the wiring so that the LEDs operate on a push button. That is, have the charge controller work per normal, but allow me to push a button to check the status via the LED (dump vs. charge). [In this case the LED's are off, until a pushbottun is pressed). Sorry if this question is 'too simple' or 'ignorant', I *just* picked up wiring books and am teaching myself electrical circuits ... Thanks for any help. Kindly, Matt |
||||
| Gizmo Admin Group Joined: 05/06/2004 Location: AustraliaPosts: 5185 |
Hi Matt Fair enough request. I recently used one of Petes circuit boards with a very bright blue LED that flashed every couple of seconds. At night, the LED lit up the whole house! I swapped it for a old weak green LED. The circuit below should work. Basically, break the -ve side ( cathode ) of each LED and run them together through a single momentary push button switch. New connections shown in red. 
My only concern is switching the dump load LED in and out may have a small effect on how the circuit operates, only testing will show for sure, but chances are it will work perfectly. I havn't tested this. Glenn The best time to plant a tree was twenty years ago, the second best time is right now. JAQ |
||||
| VK4AYQ Guru Joined: 02/12/2009 Location: AustraliaPosts: 2539 |
Hi Matt You could try putting a sheet of paper over it to filter the light down a bit. KISS All the best Bob Foolin Around |
||||
| stoichiometry Newbie Joined: 19/01/2011 Location: United StatesPosts: 8 |
Glen, Thanks for the help!! 
I assume that I can return both legs of the LEDs to a single common spot on the board? I am not sure if there is a veroboard convention for naming places, so I'll describe what I am about to try. Looking at the veroboard layout on the web (very similar to mine), I'm going to call the common vertical column that both LEDs are in as "B". Following this, POWER LED is in B6-B7 and DUMP LED is in B17-B18. Correct me if I am wrong, but I should be able to unsolder B6 and B17 and wire them to a momentary switch. Then return the output from the momentary switch to either B6 or B17. Yet another newbie question: So the switch is now on the "inflow" side of electrons? The general *current* convention for the flow of electricity is to reference the frame of "moving" positive charge, true? Thanks again. Kindly, MS |
||||
powerednut Senior Member Joined: 09/12/2009 Location: AustraliaPosts: 221 |
if your talking about this image: 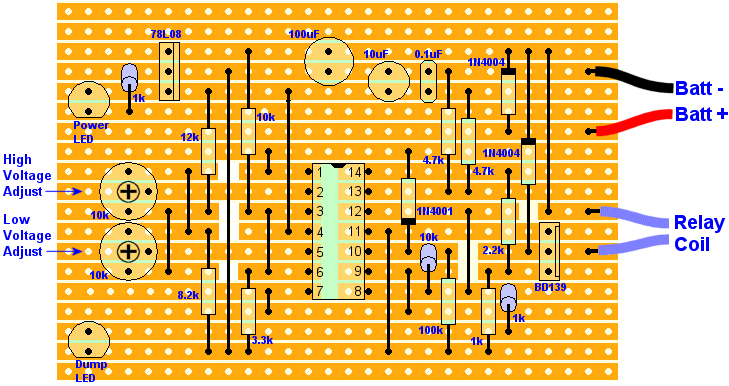
then its b5-b6 (instead of b6-b7). But apart from that yes, what you've proposed will work. The way I think about it is the switch is interupting the flow of current from the + of the power source to the - of the power source. Once you press the switch, current can then flow, completing the circuit. dunno if that helps, its just what works for me. |
||||
| Robb Senior Member Joined: 01/08/2007 Location: AustraliaPosts: 221 |
Just move the anode resistor of the dump led to TL084 4/4 pin 14. |
||||
| Alasdair Regular Member Joined: 12/01/2011 Location: AustraliaPosts: 62 |
I put window tint over my set top box led, it was like a blue arc welder burning your retinas. Three layers and it's perfect. Amc-elec |
||||
| stoichiometry Newbie Joined: 19/01/2011 Location: United StatesPosts: 8 |
Powderednut, Thanks! I will try this soon (by friday) and report. Cheers, M |
||||
| stoichiometry Newbie Joined: 19/01/2011 Location: United StatesPosts: 8 |
Robb, Ok ... I'm new to electronics. I assume you are refering to the 1k resistor, but I am not sure I follow what you are suggesting I do with it. Sorry. Kindly, Matt |
||||
| Gizmo Admin Group Joined: 05/06/2004 Location: AustraliaPosts: 5185 |
Yeah thanks Rob, that should work too. Glenn The best time to plant a tree was twenty years ago, the second best time is right now. JAQ |
||||
| Gizmo Admin Group Joined: 05/06/2004 Location: AustraliaPosts: 5185 |
This is what Rob means. The circuit is starting to look messy, but you should get the drift. 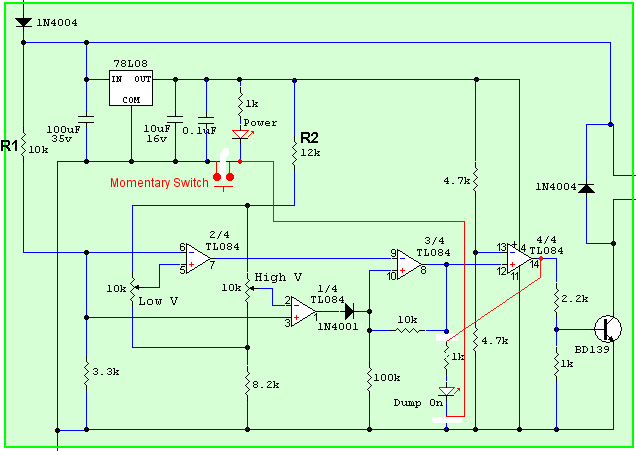
Glenn The best time to plant a tree was twenty years ago, the second best time is right now. JAQ |
||||
| stoichiometry Newbie Joined: 19/01/2011 Location: United StatesPosts: 8 |
Guys, We are moving along here! I'll post some pics soon. I have a few more general questions, yep I'm a newbie to solar/wind, too. (1) If I am using my new TL084 for solar inputs, is 14.4 Volts a good upper limit for flooded lead-acid batteries? (I conclude this after reading theLink to info on charge controllers (2) Also, should I set the low trimpot to 13.5 V, such that I am *always* charging the batteries (per the link above)? Or should it be set lower, so as to cycle the batteries more "deeply"? Again, Thank for your patience! :) Kindly, MS |
||||
| The Back Shed's forum code is written, and hosted, in Australia. | © JAQ Software 2026 |
