
|
|
Forum Index : Microcontroller and PC projects : PS2 mouse to HobbyTronics emulator
| Page 1 of 5 |
|||||
| Author | Message | ||||
TassyJim Guru Joined: 07/08/2011 Location: AustraliaPosts: 6541 |
I have been playing with a Arduino nano HobbyTronics emulator for PS2 mice with limited success. In theory, the software sends a copy of the most recent mouse data and then, once the data has been sent to the CMM2, it interrogates the PS2 mouse and prepares the next set of data. That's the theory. In practice, the software insist on interrogating the PS2 mouse before sending it's reply to the CMM2. As the PS2 takes about 7mS to send it's data, there is an unacceptable delay in the I2C routines. The I2C triggers every 16mS (same as nunchuk) and that means that half the time is spent waiting for the mouse. Not good!. 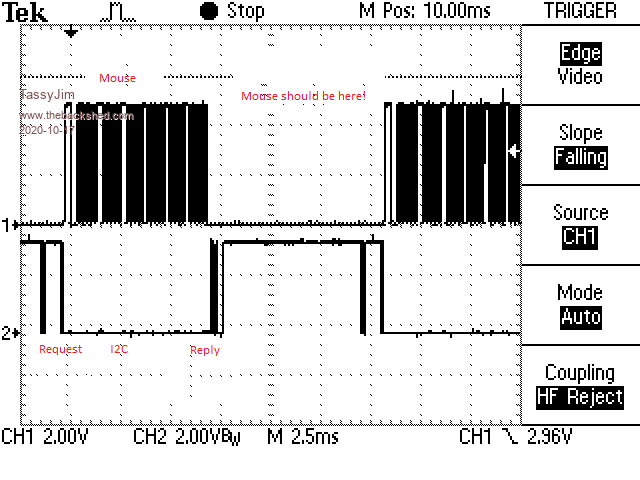 If anyone wants to fix my mess, please do. Because of the timing problem, the mouse doesn't shut down cleanly every time which means that it can take a few starts to get it going next time. So, not much use as is but hopefully a start on a simple PS2 to HobbyTronics mouse. HT_mouse1.zip Peter's integration of the mouse into MMBasic gives a smooth clear mouse with little work by the user. Nice to have, if only my software worked as well. Jim Edited 2020-10-17 16:21 by TassyJim VK7JH MMedit |
||||
| matherp Guru Joined: 11/12/2012 Location: United KingdomPosts: 11570 |
Jim I've had a very brief scan of the code. If you want to give it another try my recommendation FWIW is to re-write the PS2 code as a state machine with interrupts triggered on the clock line. Have a look at Geoff's code for the PS2 keyboard on the Micromite plus. |
||||
| vegipete Guru Joined: 29/01/2013 Location: CanadaPosts: 1181 |
Interesting. Must be an Arduino thing. I'm not having any timing problems with a little PIC chip. That's within the nunchuk protocol, mind you. My I2C routines are entirely interrupt driven. When the ISR has finished sending the I2C data, it sets a flag so the main routine can query the mouse. An entire mouse transaction takes about 6.5 milliseconds. The CMM2 I2C nunchuk transaction takes about 2 milliseconds to send a payload of 6 bytes. The Hobbytronics payload is 10 bytes so hopefully it won't be much more. That should leave lots of time. I guess I'll know for sure tomorrow when I update the firmware. There's something strange about your scope image. I would expect both mouse and I2C to idle high. 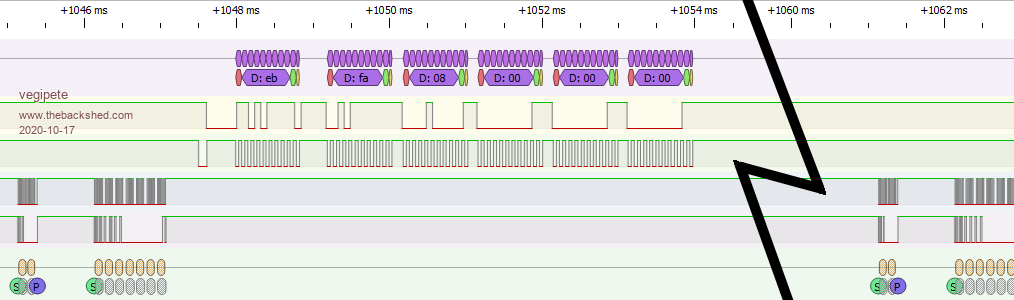 Mouse activity on the upper lines, I2C on the lower ones. Visit Vegipete's *Mite Library for cool programs. |
||||
| zeitfest Guru Joined: 31/07/2019 Location: AustraliaPosts: 684 |
There is a "USB shield" you can buy, it provides a USB host and gives serial output. From memory it has a USB host chip with SPI i/o which the arduino accesses. Plugging in a usb mouse, you can then access the mouse data via the arduino uno ok. �It worked ok for relative positioning via GUI visual feedback but was not absolute. The blurb says USB drives etc can be accessed as well but that requires upgrading from uno to mega etc, so I got burnt. ed - also this may be useful Edited 2020-10-17 20:56 by zeitfest |
||||
| vegipete Guru Joined: 29/01/2013 Location: CanadaPosts: 1181 |
As expected, the Hobbytronics I2C read routine used by the new CONTROLLER MOUSE command works nicely. The overall transaction takes a smidgen over 2 milliseconds, and repeats every 16 ms. The only nuisance I've seen are some occasional single glitches on SDA and/or SCL a few ms before the real show starts. Sometimes this fools my code so I may need to implement a timeout function...  Note, no real data in this yet, I'm still testing for robustness. Visit Vegipete's *Mite Library for cool programs. |
||||
| TassyJim Guru Joined: 07/08/2011 Location: AustraliaPosts: 6541 |
Some days nothing goes right. Other days, the first search for information gives a hit and all your problems go away. I found a site that explained the interrupts on the Arduino. 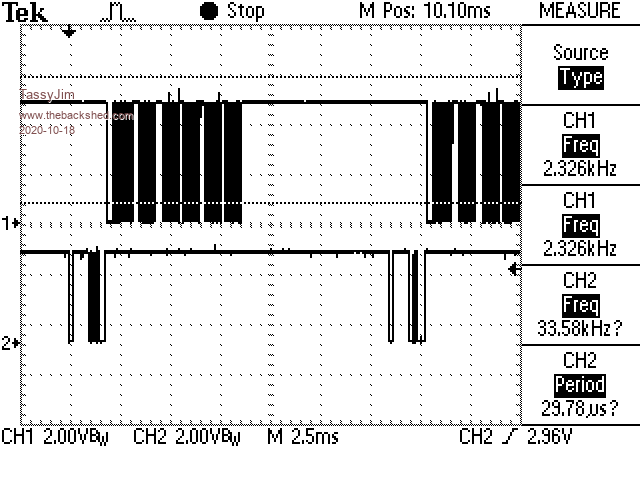 The PS/2 routines now happen in the correct sequence. It is now working how I want it. If you are using I2C for the link, there is no serial activity. If the I2C is not used, serial updates happen every 35mS Serial can be either the long winded HobbyTronics or a 4 byte compressed PS/2 format. The HobbyTronics is human readable so handy for debugging. I have had the occasional lockup with repeated stops and starts so I now need to put in a watchdog. Having a PS/2 HobbyTronics emulator using a cheap Arduino is a nice option. Now I have this working, I can go back to the joystick interface. HT_mouse1.zip Jim VK7JH MMedit |
||||
| Sasquatch Guru Joined: 08/05/2020 Location: United StatesPosts: 385 |
Nice Work TassyJim! I'm going to try this as soon as I get the Arduino IEEE488 interface sorted out (I haven't really had any time to work on it) The nice thing about open source is that if it doesn't do what you need you can modify a few lines of code and re-flash!!! -Carl |
||||
mclout999 Guru Joined: 05/07/2020 Location: United StatesPosts: 509 |
OK I am very interested in a easy inexpensive mouse interpase like this that works with the new Mouse functions. I have found a Nano on Ebay (https://www.ebay.com/itm/For-Arduino-5V-16MHz-Nano-V3-0-USB-ATmega328P-Micro-Controller-CH340G-Driver/283953769327 ) Will this one work and what else do I need to practicaly make the interphase. I have SEVERAL PS2 mice so I am good there. Is this usable on the Numbchuck port? They call me Shai-Hulud (The maker) |
||||
| TassyJim Guru Joined: 07/08/2011 Location: AustraliaPosts: 6541 |
Yes, that looks like the ones I use. You will need the Arduino IDE. The device is set as "Arduino Duemilanove or Diecimila" I don't think there are any other libraries to add. It will soon let you know... To connect to the CMM2, I would use the rear connector rather than the front but either will work. The front connector only has 3.3V and the mouse and Arduino need 5V which you get from the rear or an external power supply. A PS/2 socket will save having to cut the mouse tail. Jim VK7JH MMedit |
||||
| mclout999 Guru Joined: 05/07/2020 Location: United StatesPosts: 509 |
Thank you very much. I will order one now (hell 2 at $1.50 My soldering is less than stellar) I can get a PS2 port from my junk box. I am quite a noob with hardware and will use the back as that seems a better way but what exactly is the wiring I need and do I need any discreet components like resistors. Thanks. They call me Shai-Hulud (The maker) |
||||
| TassyJim Guru Joined: 07/08/2011 Location: AustraliaPosts: 6541 |
I used two resistors in the serial line to drop the voltage but you don't need to use it. Any debugging can be done via the USB built in to the nano. I will try and assemble my unit onto stripboard later today and do a circuit diagram. I am still working out the 'soon to be added joystick' pins. Jim VK7JH MMedit |
||||
| mclout999 Guru Joined: 05/07/2020 Location: United StatesPosts: 509 |
Thanks! I think this is the best option for our mouse standard and the way you reverse engineered it so quickly is really awesome. Thanks again. I think it would be nice to have a nano chip on a revision of the CMM2. I told the Polish developer of the deluxe about your idea and asked him if that could be done in his newist design. He planned to include a socket for the HT chip but this would be cheaper to implement and more flexible and open source for to other things as well. What else could we do with a Nano on the board? They call me Shai-Hulud (The maker) |
||||
| TassyJim Guru Joined: 07/08/2011 Location: AustraliaPosts: 6541 |
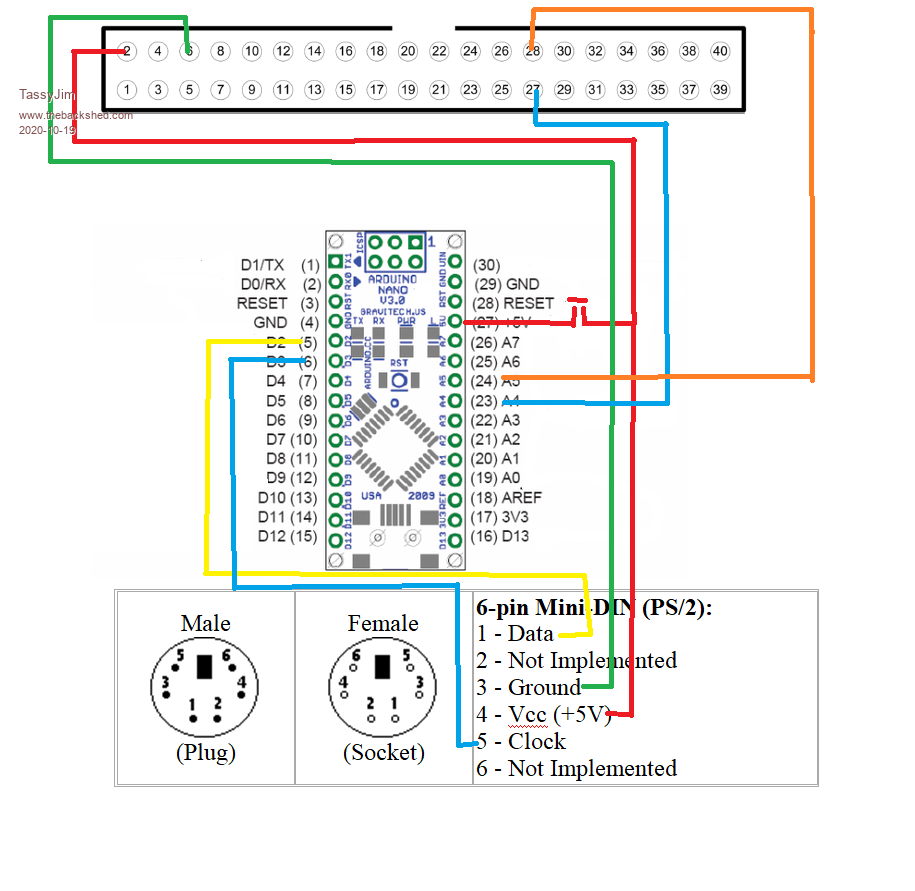 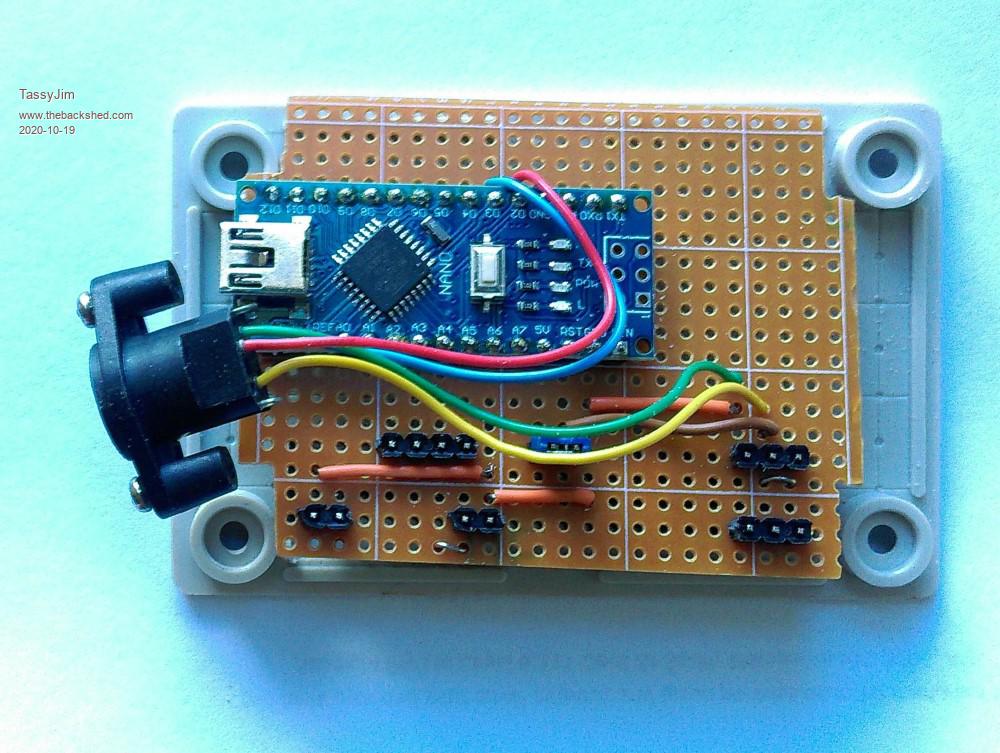  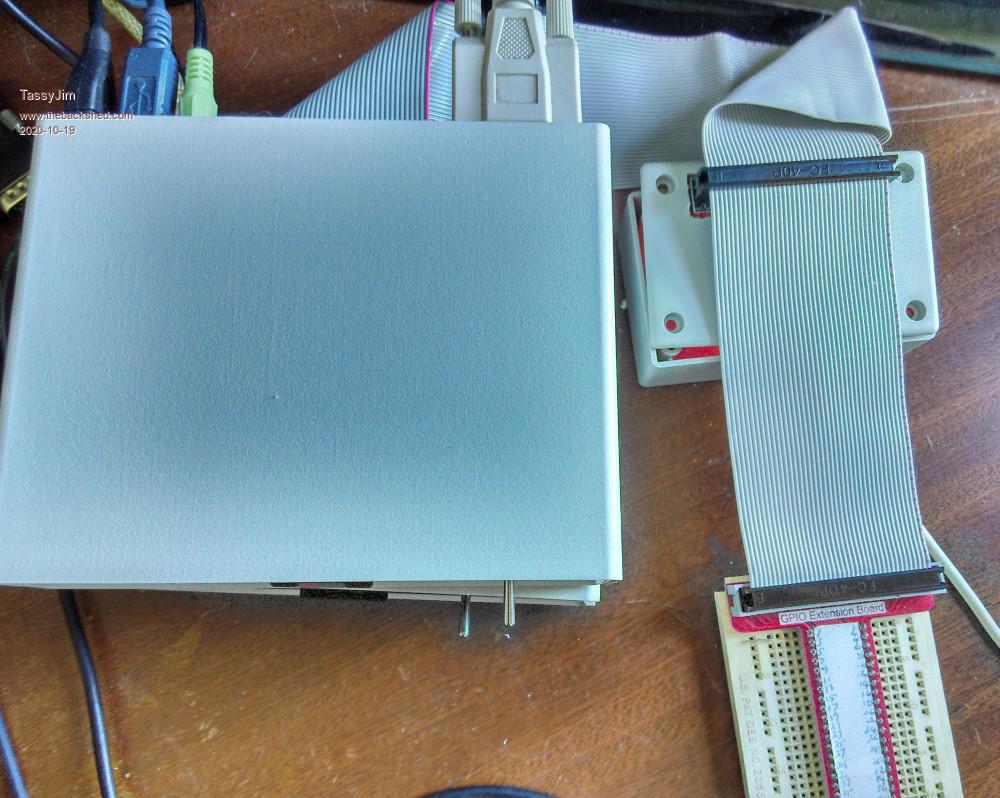 I fitted a jumper in the 5V supply to the Arduino so that I can power the Arduino via the USB during programming and monitoring without having the two 5V supplies linked. I chose I2C2 (pins 27 and 28) as that is the default for the CMM2 mouse. I used a daisy chain IDE cable so that I can still have the breadboard attached. I prefer this over an internal mouse house but that's a personal preference. Fitting a joystick connector to the box is going to be tight but I have a big hammer so it will fit. Jim VK7JH MMedit |
||||
| MauroXavier Guru Joined: 06/03/2016 Location: BrazilPosts: 307 |
Oh yes! Now I can put a mouse on my CMM2 buying the components in my country. It's fully compatible with the commands that Peter was recently implemented? Thanks a lot, TassyJim! PS.: And now finally I will begin a port of my GUI and OS to CMM2, but with no pressure, all at my time, as I have many games to finish yet. |
||||
| mclout999 Guru Joined: 05/07/2020 Location: United StatesPosts: 509 |
This is an exemplary post on to show how to make a device. Even I think I can do it with this, and that is saying a lot. Thanks so very much. I am just waiting on the Nano. I have found some of my most favorite mice of the past and all of them have tested out to work. I will be a TRUE OLD SCHOOL experance to use my old Key Tronic optical mainstay mouse. They call me Shai-Hulud (The maker) |
||||
| lizby Guru Joined: 17/05/2016 Location: United StatesPosts: 3790 |
@mclout999--Sorry in advance for the unsolicited advice, but it really isn't necessary to copy someone's entire post, including images, when commenting. It makes for better flow if you just copy text relevant to the comment you are making. Couldn't agree more with the sentiment, though. ~ Edited 2020-10-20 02:55 by lizby PicoMite, Armmite F4, SensorKits, MMBasic Hardware, Games, etc. on FOTS |
||||
| Volhout Guru Joined: 05/03/2018 Location: NetherlandsPosts: 5958 |
Missing a green wire (ground) from CMM2 to NANO (pin 29 or pin 4) Edited 2020-10-20 03:25 by Volhout PicomiteVGA PETSCII ROBOTS |
||||
| TassyJim Guru Joined: 07/08/2011 Location: AustraliaPosts: 6541 |
Woops! Thanks, it wouldn't go very well without that. In real life I used both 5V and a few GND pins on the 40 way connector. 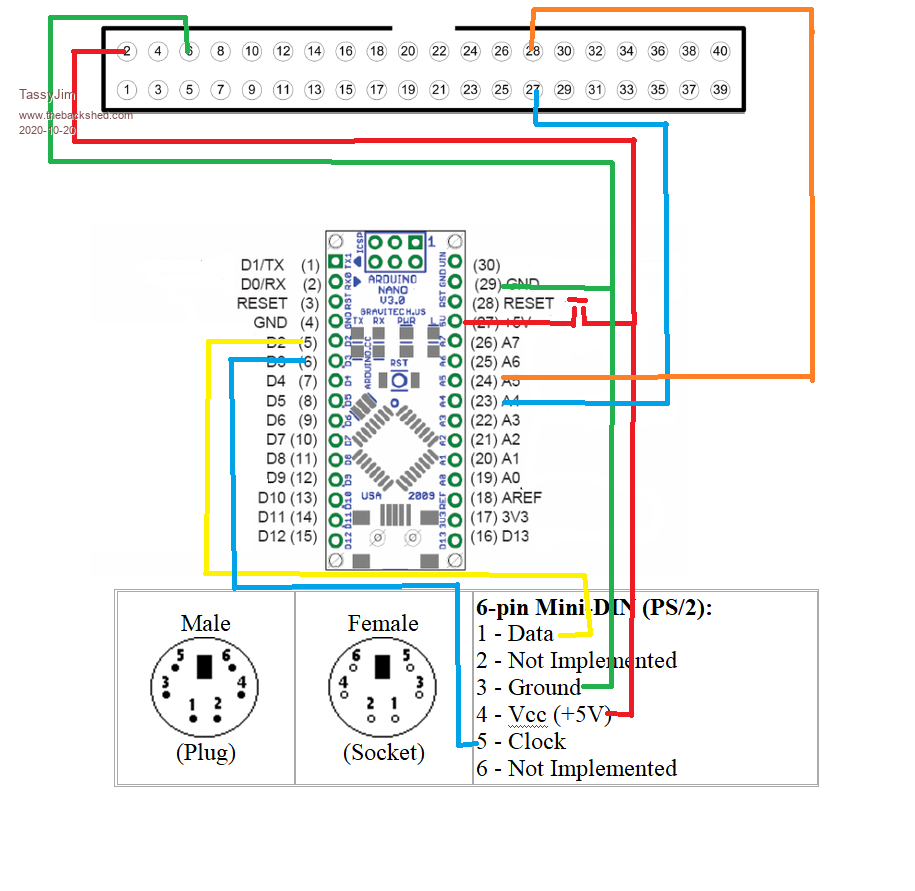 Jim VK7JH MMedit |
||||
| TassyJim Guru Joined: 07/08/2011 Location: AustraliaPosts: 6541 |
I certainly hope it is fully compatible with the HObbyTronics version. Last time my HobbyTronics was heard from, it was sitting at Langley airport UK waiting for a flight to Australia. That was on Oct 7th so not sure how much longer I will be waiting. Once I have it, I can fine tune the sensitivity to match the two systems. I also need to finish the watchdog routines. The first one I tried was not satisfactory but I think I have a library that claims to fix the problems with my first attempt. Jim VK7JH MMedit |
||||
| mclout999 Guru Joined: 05/07/2020 Location: United StatesPosts: 509 |
I did not intend to but did not do the preview. Thanks. They call me Shai-Hulud (The maker) |
||||
| Page 1 of 5 |
|||||
| The Back Shed's forum code is written, and hosted, in Australia. | © JAQ Software 2026 |
