
|
|
Forum Index : Microcontroller and PC projects : GUI screen pack pure MMBasic
| Page 1 of 4 |
|||||
| Author | Message | ||||
| CaptainBoing Guru Joined: 07/09/2016 Location: United KingdomPosts: 2171 |
Morning everyone. Just wanted to share my current "spare time" project. I have put WindowsCE/95-a-like GUIs in a lot of my projects on the smaller MicroMites that dominate my work. Larger 'mites (MM+, ARMMite etc.) have a GUI built into the firmware but size restriction on the Mk2 mean if you want a nice touch-screen display you have to build it yourself - and I have... from scratch, every time, resulting in rigid un-portable code. I have had some interest from other users on how I did it and it seems to surprise everyone that MMBasic is quite capable of producing a responsive display on these smaller machines. Not a CSUB in sight - which is my aim because I want portability between the 'mite platforms. So I have put together a more inclusive pack that you can simply insert in your code, a tiddly bit of config and start plopping your screen elements on the LCD panel and using them. It is about 10K at the moment - you can chop out the code for gadgets you won't be using easy enough, but I often had 6K of monolithic code for a far less capable GUI, so I don't consider it too much of a "waste". YMMV For now, the main screen service routine is polled and returns the number of the object touched or -1 (nothing). It has proper handling of enablement, visibility, grouping of radio buttons etc. Please remember it is very much a work in progress and there are some bits missing but I think these are the not-used-as-much bits. I just wanted to get it out there for critique. Note: I always poll for touches in the main loop of my code and the example code shows this. It wouldn't be a big task to do a touch interrupt handler with a wrapper to call the touch processor if that is your thing. Main article (detailing how to use it with example) and code is here Comments in the code are a bit thin but I will do a better job as releases occur. Screen grab is a bit bleached out but you get the idea. 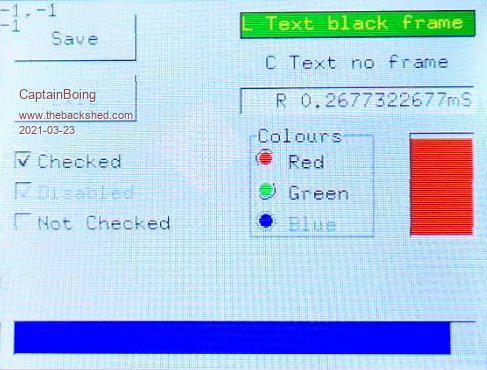 enjoy Edited 2021-03-23 20:10 by CaptainBoing |
||||
| Pluto Guru Joined: 09/06/2017 Location: FinlandPosts: 411 |
Excellent! I have just tested with 1) Standard 44 pin MicroMite (Micromite MkII, firmware 5.0502) using a ILI9488 display. 2) Micromite Plus 64 pin, version 5.0502 using a ILI9341 display. Plug and play with both of them.  This will enable me to make my hobby projects look more professional and be more functional. Usage of your code will definitively require some training. Looking forward to see more about your spare-time project! |
||||
| lizby Guru Joined: 17/05/2016 Location: United StatesPosts: 3796 |
Nice! Will reward study. PicoMite, Armmite F4, SensorKits, MMBasic Hardware, Games, etc. on FOTS |
||||
| Volhout Guru Joined: 05/03/2018 Location: NetherlandsPosts: 5975 |
Looks promising for the MM2 devices. Could we load this as a library ? So it becomes part of the MM2 until we erase it purposely ? The "frame" around some of the gadgets is a bit unlike W95. In your description you mention you still have to add it to some gadgets. Maybe you shouldn't... Edited 2021-03-23 22:12 by Volhout PicomiteVGA PETSCII ROBOTS |
||||
| CaptainBoing Guru Joined: 07/09/2016 Location: United KingdomPosts: 2171 |
I intend to add more stuff and it is fairly open... one of the ideas I have it to allow paging of sets of gadgets, because they can be hidden, you could have two or three pages and simply make invisible the ones you don't want, redraw the screen, make visible the ones you want (i.e. on the next "page") and redraw. Perhaps some tabs along the top of the display... I personally can't think of an application just now but it is that flexible. I will press on with sliders, menus and lists. I have plans for pop-up windows also - this should be easy because of the structure can remove any object cleanly and tell which have been damaged and those get redrawn. I'd like pop up windows. I will update the article as I go with more config (I just added the alignment details) glad it works for you |
||||
| CaptainBoing Guru Joined: 07/09/2016 Location: United KingdomPosts: 2171 |
yes you could load it and LIBRARY SAVE it without issues. if you wanted to get really clever you could them read the hex back out of the MM and save it as a custom build - I have done that with some production MMs I fitted in ceiling roses over snooker tables It's all flexible - the border and alignment section I just added to the wiki explains it. You could have a button with no border at all if you wanted that. The Frame (around the radio buttons) isn't part of the radio buttons - it is a distinct object with the radio buttons simply positioned inside it. In the code int he wiki, it is object 39. When drawn it will erase the area inside so if you want anything in it you must draw the frame first - in the code example other wise it will erase the radio buttons. I will definitely take on board suggestions like this though. it's got to be useful Someone has already pointed out there may be a problem with the progress bar because of the INTing nature of the scaling, e.g. if the extremity is 5000, 4999 is very close but in jumping at steps of 100, you you see 4999 as 4900. I need to look at that but for now I want to get the gadgets working and the fine tune comes later h Edited 2021-03-23 22:20 by CaptainBoing |
||||
| Volhout Guru Joined: 05/03/2018 Location: NetherlandsPosts: 5975 |
I always used it and never wondered how they did it, but it is so simple. W95 buttons....they only redraw the contour. The button text can even be part of the canvas... Never knew that... Thanks for razing my curiosity.  PicomiteVGA PETSCII ROBOTS |
||||
| CaptainBoing Guru Joined: 07/09/2016 Location: United KingdomPosts: 2171 |
Thanks for testing and feedback. This is all developed on my office F407. I am curious - what is the speed like on the Mk2? My gut says it should be fine but I have yet to test on my own '170s (haven't got one wired up to an LCD panel on the breadboard at the moment) h |
||||
| CaptainBoing Guru Joined: 07/09/2016 Location: United KingdomPosts: 2171 |
ha! yeah. As I explained to another shedder "it doesn't take much to fool the eye" This is an ultra simple example of what the French call "Trompe-l'oeil" https://en.wikipedia.org/wiki/Trompe-l%27%C5%93il Edited 2021-03-23 22:41 by CaptainBoing |
||||
| Pluto Guru Joined: 09/06/2017 Location: FinlandPosts: 411 |
Running your demo program I get these speed indications: -Mk2 shows R 0.833167ms -Plus shows R 0.587412587ms -In your picture above R 0.2677322677ms (suppose it is F407). Both Mk2 and Plus has fast response to the touches. (Using your demo program.) Will be interesting to see how it will be in "real" applications with more processing besides the GUI. |
||||
| lizby Guru Joined: 17/05/2016 Location: United StatesPosts: 3796 |
BigMik's Backpack 170 is an excellent utility board to provide an ILI9341 LCD connection for the MM2: Backpack 170 PicoMite, Armmite F4, SensorKits, MMBasic Hardware, Games, etc. on FOTS |
||||
| CaptainBoing Guru Joined: 07/09/2016 Location: United KingdomPosts: 2171 |
That is good to know. Thanks (those numbers don't actually mean anything). More often it is perception to how the interface works that is important. So long as the user feels their request has been immediately acknowledged, they are seldom bothered too much if it takes a moment to actually do some work. Yes, the response is directly a function of how often you poll the screen. If your main loop is just zipping round waiting for things to happen dropping in a call to the touch processor will probably be fine. If it gets to be a pain then an interrupt would probably be best - only thing I see there is waiting for the touch to go away (WaitNoTouch) would be operating inside the ISR... not ideal. |
||||
| Volhout Guru Joined: 05/03/2018 Location: NetherlandsPosts: 5975 |
I have actually seen this one: fake dome It was amazing when seen from the right angle.... Edited 2021-03-24 02:16 by Volhout PicomiteVGA PETSCII ROBOTS |
||||
| lizby Guru Joined: 17/05/2016 Location: United StatesPosts: 3796 |
Playing with the test program a little bit on an F4 with SSD1963_4_16, and I like it--very clean-looking. One thing I notice--perhaps it is because the the radio buttons are themselves red, green, and blue, but it's difficult to tell which one is selected. Very nice work on the FruitOfTheShed documentation, too. PicoMite, Armmite F4, SensorKits, MMBasic Hardware, Games, etc. on FOTS |
||||
TassyJim Guru Joined: 07/08/2011 Location: AustraliaPosts: 6543 |
A wet day in Tasmania today so I thought I would have a play. I am interested in how portable code can be and this is a good example of 'very portable' To run it on a CMM2, I had to include the MOUSE and CURSOR initialisation and change the TOUCH(X|Y) to a function that reads the mouse Simple enough. The only other gotcha I have seen is GUI BITMAP Not available on the CMM2 so I simply put a tick character in the box. (Image has it as a cross) The other obvious thing is the alignment of the text boxes. I haven't chased that one down yet. 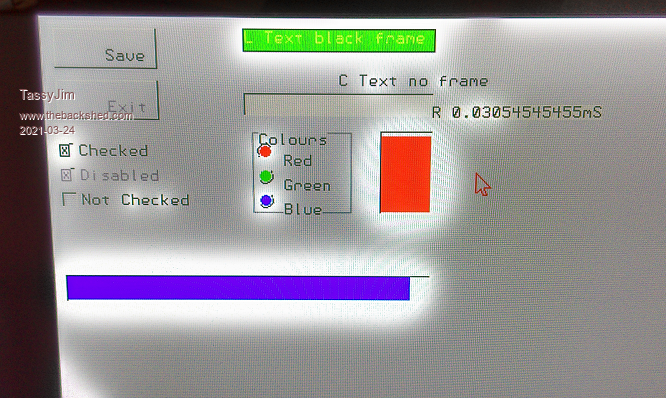 Jim VK7JH MMedit |
||||
| TassyJim Guru Joined: 07/08/2011 Location: AustraliaPosts: 6543 |
A better result after some work: 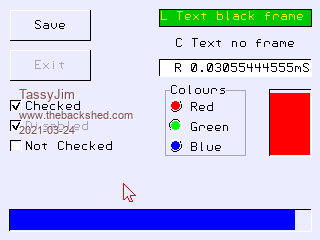 Jim VK7JH MMedit |
||||
| CaptainBoing Guru Joined: 07/09/2016 Location: United KingdomPosts: 2171 |
The "dot" inside the button can be any colour you like. Looking at the demo code, see the lines: res=GUIObjDef(40,2,170,100,,,"Red",1,&hff0000) res=GUIObjDef(41,2,170,120,,,"Green",1,&hff00) res=GUIObjDef(42,2,170,140,,,"Blue",1,&hff) last property is the hex for RRGGBB so if you want a black dot, use 0, if you want white use &hffffff or any combination for any colour you like. Selected buttons are "depressed". perhaps could make the line a bit wider. I will play |
||||
| CaptainBoing Guru Joined: 07/09/2016 Location: United KingdomPosts: 2171 |
Ah! that is a nice variation - I hadn't even considered using it with a CMM because it has mouse and stuff but I guess it is just as relevant. Good work Jim. what was the tweak necessary to straighten things up? In my head, it shouldn't have been necessary as I was using fontwidth etc and positioning things relative to the screen co-ordinates of the gadget. I don't have a CMM2 (not my "thing") but I am pleased to see it works there - truly portable. I think some of the mechanisms for graphics handling could take this to the moon - you could fork it on the wiki if you wanted, there is a custom CMM2 namespace. Edited 2021-03-24 17:08 by CaptainBoing |
||||
| CaptainBoing Guru Joined: 07/09/2016 Location: United KingdomPosts: 2171 |
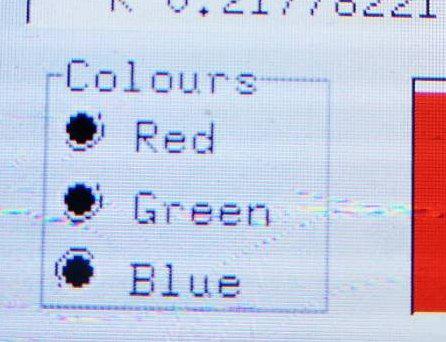 Actually, I think you have a good point. with a black dot, it is even less obvious. will do some work on them... have a close look at what W95 did with them - I don't remember any confusion there so obvs they had the mix right Edited 2021-03-24 17:21 by CaptainBoing |
||||
| TassyJim Guru Joined: 07/08/2011 Location: AustraliaPosts: 6543 |
Changes made to run on CMM2 At the beginning: if mm.device$ = "Colour Maximite 2" then mp = mm.info(option mouse) ' mouse port cmm2 = 1 option console serial GUI CURSOR ON 0, 100,100,rgb(red) CONTROLLER MOUSE OPEN mp mm.fontheight = MM.INFO(FONTHEIGHT) mm.fontwidth = MM.INFO(FONTWIDTH) endif That gets the mouse underway and makes MM.FONTWIDTH etc available Getting MM.FONTWIDTH working fixed all the alignment issues. GUI BITMAP was easy enough to handle. I put it into a SUB to make playing easier sub gui_bitmap x as integer, y as integer, o as integer local integer dx,dy, dc local cbin$ = bin$(o,64) if cmm2 then GUI CURSOR hide for dy = 0 to 7 for dx = 0 to 7 dc = &hFFFFFF * (1 - val(mid$(cbin$,dy*8+dx+1,1))) pixel x+dx, y+7-dy ,dc next dx next dy gui cursor show else gui bitmap x+2, y+2, o endif end sub While the CMM2 doesn't have TOUCH(), as such, it is used as a proxy for MOUSE() so I had to get creative there also. sub getTouch if cmm2 then ' GUI CURSOR MOUSE(x,0),MOUSE(y,0) ' here or main loop Xt = -1 if mouse(R,mp) then save image "gui.bmp",0,0,320,240 if mouse(L,mp) then ' left button down Xt = mouse(X,mp) Yt = mouse(Y,mp) endif else Xt = touch(X) Yt = touch(Y) endif end sub The same change was done in the waitnotouch sub 'waits for the stylus to be lifted off the panel Sub WaitNoTouch if cmm2 then Do 'Watchdog here if you want it Pause 10 loop until mouse(L,mp) = 0 else do 'Watchdog here if you want it pause 10 Loop Until touch(X)=-1 endif End Sub An interesting exercise that filled in the day for me. Jim VK7JH MMedit |
||||
| Page 1 of 4 |
|||||
| The Back Shed's forum code is written, and hosted, in Australia. | © JAQ Software 2026 |
