
|
|
Forum Index : Microcontroller and PC projects : Dittering Pictures to PicoMite
| Page 1 of 3 |
|||||
| Author | Message | ||||
| Martin H. Guru Joined: 04/06/2022 Location: GermanyPosts: 1471 |
I am writing a little Routine to convert Pictures from png sources to PicoMite compatible BMP Therefore I try to "ditter" Colors, wich do not fit, to values that can be used on Picomite. I started in MM Basic for Windows as it is able to read full Color PNG write BMP Here is my first try in MMB4W load png "london.png" for y%=0 to 239 for x%=0 to 319 cl%=pixel(x%,y%) oc%=0 if (cl% and &HFF0000)>&H7f0000 then inc oc%,&HFF0000 endif if (cl% and &HFF0000)<&H7f0000 and (cl% and &HFF0000)>&H400000 then inc oc%,&HFF0000*not (x% mod 2)*(y% mod 2) endif if (cl% and &HFF)>&H60 then inc oc%,&HFF endif if (cl% and &HFF)<&H61 and (cl% and &HFF)>&H40 then inc oc%,&HFF*(x% mod 2)*not (y% mod 2) endif select case (cl% and &H00ff00) case &H002000 to &H005f00 inc oc%,&H004000 case &H006000 to &H00AF00 inc oc%,&H008000 case &H00B000 to &H00FF00 inc oc%,&H00FF00 end select Pixel x%,y%,oc% endif next x% next y% save Image "London.bmp",0,0,320,240 the Results look like this: 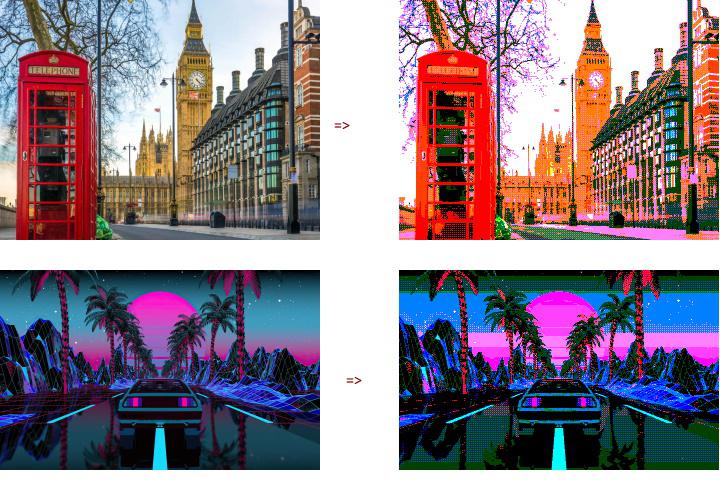 The result is promising but can certainly be improved Does anyone know of a smarter routine for down converting colors? Cheers Mart!n Edited 2022-12-21 23:25 by Martin H. 'no comment |
||||
| thwill Guru Joined: 16/09/2019 Location: United KingdomPosts: 4370 |
Hi Martin, Neat stuff. I think you mean "dither" though  . .Dither: display or print (a colour image) in such a way that it appears to contain more colours than are really available. Ditter: digital tittering, jabbering, to chat meaninglessly back and forth for several seconds or in just a few exchanges such as texting, commenting on social posts or ... Best wishes, Tom MMBasic for Linux, Game*Mite, CMM2 Welcome Tape, Creaky old text adventures |
||||
| Martin H. Guru Joined: 04/06/2022 Location: GermanyPosts: 1471 |
 eeeeeehhhmm .. eeeeeehhhmm ..Of course you are right btw: this is how/why it started: 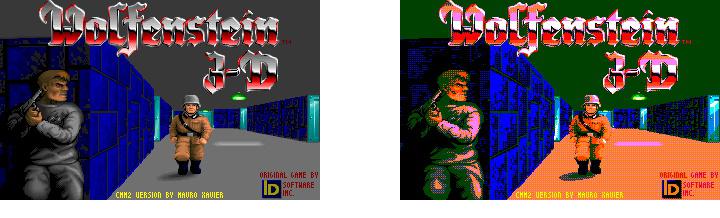  Edited 2022-12-21 23:54 by Martin H. 'no comment |
||||
| Amnesie Guru Joined: 30/06/2020 Location: GermanyPosts: 757 |
Hello Martin! I've done something similar in the past but only with Photoshop CS5 and came up with this (by using your original picture):  It seems there will be always some compromise between the more real effect in my attempt and your version with more color-filled area (which is easier to watch from near on a big monitor). In my attempt it looks great from far, but not so good from near. It is really cool to see that you managed to convert this via MMBASIC and not using some kind of "third party" sofware like me. As always it is inspiring to see your workt! Keep up those cool ideas! Greetings! Daniel |
||||
| phil99 Guru Joined: 11/02/2018 Location: AustraliaPosts: 3316 |
IrfanView is a good one for adjusting every aspect of a picture. Once you have found the right settings it can process a batch of pictures all at once. And it's free! |
||||
| Martin H. Guru Joined: 04/06/2022 Location: GermanyPosts: 1471 |
Hi Daniel, very nice, the (random) dithring from Photoshop is better for Photos than my little try in MM Basic. but the The target system is the PicoMite VGA and only the Colors it can display. When I enlarge your picture I see different red tones and sometimes gray pixels. All colors, that the Pico cannot geneate. So I don't think the picture on the Pico is presented correctly. Cheers Martin Edited 2022-12-23 06:59 by Martin H. 'no comment |
||||
| Martin H. Guru Joined: 04/06/2022 Location: GermanyPosts: 1471 |
Thanks for the response Yes, and you might be able to reduce the colors to 16, but can you determine which colors are used. Only colors should be used, which also the PicoMite VGA is able to display. Cheers Martin Edited 2022-12-23 07:04 by Martin H. 'no comment |
||||
| phil99 Guru Joined: 11/02/2018 Location: AustraliaPosts: 3316 |
Using IrfanView's default options for "Decrease Colour Depth" > "16 Colours" the result is similar to your program, but the file size is 38.4kB instead of 230kB. It seems that when PhotoShop or MMBasic save a 16 colour BMP they still use 24 bit format. "Decrease Colour Depth" changes it to genuine 4 bits / pixel. If you use the new Drive "A:" that is useful. Edited 2022-12-23 07:58 by phil99 |
||||
| Martin H. Guru Joined: 04/06/2022 Location: GermanyPosts: 1471 |
I changed the to process a ordered Dithering for Red and Blue.. (I left Green, as it has already 3 possible Values) depending on the brightness of the Color and the Pixel Position it will get a result, depending on this pattern. 00 01 01 01 or 11 00 00 10 11 11 load png "london.png" dim shd%(2,2) shd%(0,0)=64:shd%(1,0)=128 shd%(0,1)=192:shd%(1,1)=0 for y%=0 to 389 for x%=0 to 319 cl%=pixel(x%,y%) oc%=0 'red RC%=(cl% and &HFF0000)>>16 OC%=OC%+(shade (RC%))<<16 'blue RC%=(cl% and &HFF) OC%=OC%+(shade (RC%)) 'green select case (cl% and &H00ff00) case &H002000 to &H005f00 inc oc%,&H004000 case &H006000 to &H00AF00 inc oc%,&H008000 case &H00B000 to &H00FF00 inc oc%,&H00FF00 end select Pixel x%,y%,oc% endif next x% next y% save Image "London2.bmp",0,0,320,240 Function shade (Cl%) shade=255*(cl%>shd%(x% mod 2,y% mod 2)) end Function here is the result in comparison with the old version 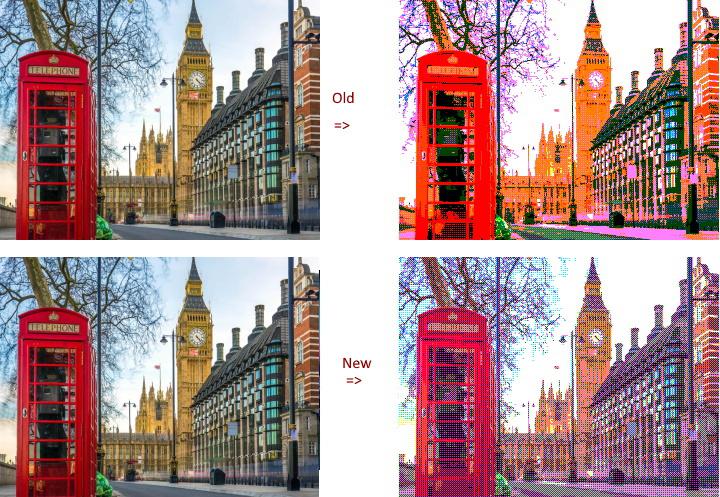 the result depends very much on the source. Maybee it would be better to convert the Floyd-Steinberg algorithm to MM Basic. 'no comment |
||||
| Mixtel90 Guru Joined: 05/10/2019 Location: United KingdomPosts: 8935 |
That's very nice! I think results will always depend on the source material - I don't think you'll get away from that no matter what algorithm you use. Mick Zilog Inside! nascom.info for Nascom & Gemini Preliminary MMBasic docs & my PCB designs |
||||
| Amnesie Guru Joined: 30/06/2020 Location: GermanyPosts: 757 |
Hello Martin! You are seeing some wrong pictures (colors) because of the convertion to jpg-format to show it in the forum here. My attempt via Photoshop just uses the the 16 colors! See this picture: 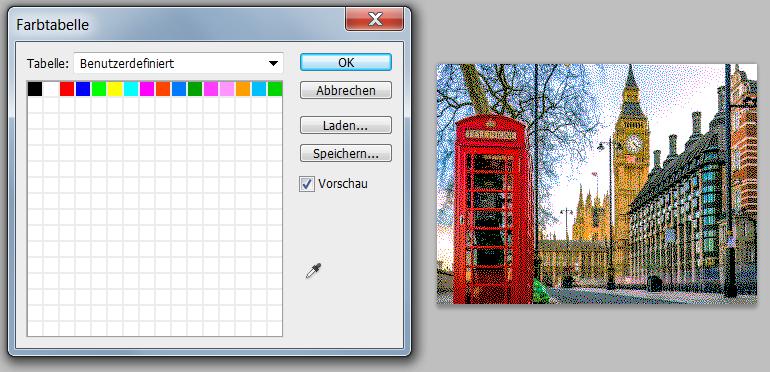 I attached the original BMP file for this reason here: london.zip The mentioned Floyd-Steinberg algorithm (I have never heard of) is really interesting, I am wondering wether Photoshop uses this. In fact I really like your newest version! I never thought one can convert those "normal" pictures to 16 color pictures just via MMBASIC. |
||||
| Martin H. Guru Joined: 04/06/2022 Location: GermanyPosts: 1471 |
|
||||
| Martin H. Guru Joined: 04/06/2022 Location: GermanyPosts: 1471 |
Hi Mic Your'e right. We still have to deal with 16 Colors on a 320x240 Pixel Screen. That is not much. So we'll never get really photorealistic results (unless you've taken enough mind-altering drugs). I just try to get the best out of the circumstances to see where the limits are, even if some things are doomed to failure. But a simple Color reduction could be helpfull to port old Computer Game graphics to the PicoMite and is easier than redrawing the Source pixel by pixel Cheers Mart!n Edited 2022-12-23 22:00 by Martin H. 'no comment |
||||
| Amnesie Guru Joined: 30/06/2020 Location: GermanyPosts: 757 |
Hello Martin, even though Photoshop does a good job (fully automatic as I defined my own color pallet) I think the best result will be something in between of my attempt and yours. There is always some trade off, because from near my picture is more like a pixel-cloud, to exaggerate a bit. My thoughts: With the Floyd-Steinberg algorithm, it seems, you can really achieve my Photoshop results but leads to the above mentioned "problem" by looking at this picture from close on big monitor. So it may be wonderful for small screens. So for big / normal monitor screens it would be interesting wether it is possible to fill more area with solid / same color... but here is the problem with only 16... Arg! The Floyd-Steinberg algorithm seems to make sense if you could get a bigger resolution. For small resolution I would prefer the picture with the cat on the wikipedia without Floyd-Steinberg algorithm , since it is better to see and not a pixel-noise-cloud: 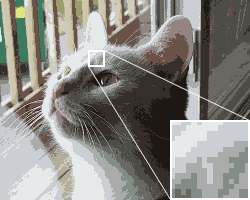 (Looks better on big monitors than the version with Floyd-Steinberg algorithm) I've tried both with photoshop, first do more areas with solid color and than do the (automatic) Photoshop filtering with my 16 color palette and surprisingly came to worse results due to the color palette. Maybe it is just me but I think the color palette for the C64 is better for what we want. But here is another Photoshop result I tried: 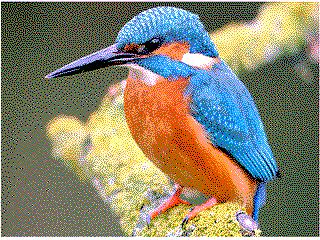 (Photoshop generated 16 Color palette for picoMite VGA)  (Original) And the photoshop processed image as an BMP file: bird_normal.zip Hmm.. I really don't know how to make it look better on bigger screens... Greetings Daniel |
||||
| Amnesie Guru Joined: 30/06/2020 Location: GermanyPosts: 757 |
Me again: just as an idea... If I remember correct peter said it is possible to convert the picoVGA to 16 "color" greyscale instead of the standard picoVGA color palette. If I a can have fifty shades of grey ehm sorry  16 shades of grey - it could be better to look at on bigger screens. Yes I know... it would be another trade off (no color)... 16 shades of grey - it could be better to look at on bigger screens. Yes I know... it would be another trade off (no color)...Hm... was just an idea. But my experiments with 16 grey shades look really promissing on bigger screens. In any case I love the idea to convert normal images to the 16 color palette via MMBASIC! And I fully understand the reason and thought behind it. It will be a huge benefit to convert maybe games or other applications with images "written" for the colour maximite.  Greetings Daniel Edited 2022-12-23 22:55 by Amnesie |
||||
| Volhout Guru Joined: 05/03/2018 Location: NetherlandsPosts: 5975 |
@amnesie: the "color palette" of the VGA mite is hardcoded in the resistors that drive the VGA pin. To bad... Greyscale can be achieved by adding 1.5k resistor in series with Red, and 3.3k resistor in series with blue, and connecting RGB together to 1 pin. Then converting the RGB info to "linear grey scale". PicomiteVGA PETSCII ROBOTS |
||||
| Martin H. Guru Joined: 04/06/2022 Location: GermanyPosts: 1471 |
greatly simplified: on FBAS you have to filter (lowpass) the Burst Frequency to get rid of the Colors. On RGB (VGA) roughly speaking, you only have to connect the 4 output signals from the Pico to one and then give that to all 3 inputs of the VGA monitor. Better use the 4 Bit with a simple R2R Resistor Network as D/A Converter. 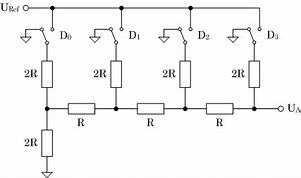 But I don't think I'll try that. Of course, the picture does'nt look great on a 22 inch flat screen. However, this is due to the low resolution, which does not improve if you display the image in grayscale. Edit: Volhout was faster Edited 2022-12-23 23:42 by Martin H. 'no comment |
||||
| Volhout Guru Joined: 05/03/2018 Location: NetherlandsPosts: 5975 |
Maybe the math is simpler using Atkinsons dithering (Apple uses it). 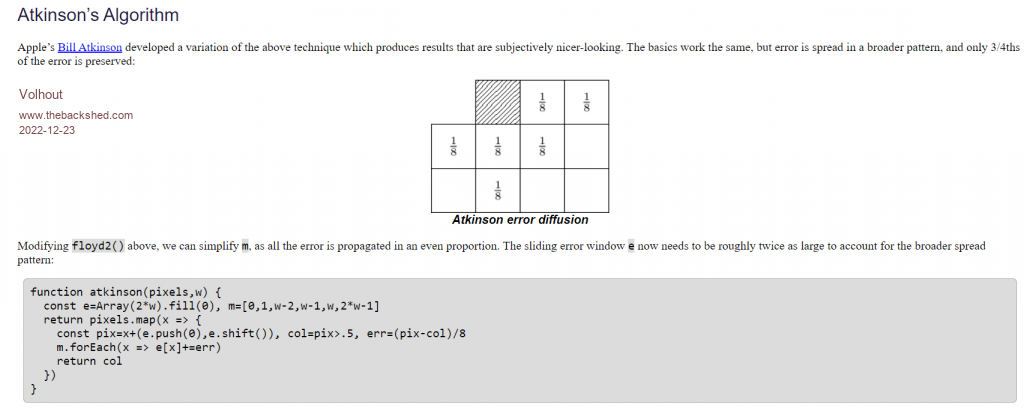 You might want to dither to mode 1 (monochrome), I did for SSTV, but not Atkinson. Just hard coded: 10 level per pixel -> 3x3 monochrome pixels But I think there is alread some dithering algorithm in picomite. When you load JPG there must be some form of dithering or is it only scaling... Edited 2022-12-24 00:10 by Volhout PicomiteVGA PETSCII ROBOTS |
||||
| Martin H. Guru Joined: 04/06/2022 Location: GermanyPosts: 1471 |
I'll give it a try next week.. This weekend was something completely different. OT  Translation: and so it came to pass that 2 dinosaurs fought over a circular table saw, while the star of Bethlehem shone in the sky   /OT Edited 2022-12-24 00:38 by Martin H. 'no comment |
||||
| scruss Senior Member Joined: 20/09/2021 Location: CanadaPosts: 101 |
A couple of other ways to make pre-dithered images using the venerable (okay, maybe just old) Netpbm toolkit: 1.) Ordered dither djpeg london.jpg | ppmdither -red=2 -green=4 -blue=2 | ppmtobmp > london_ordered.bmp Result: 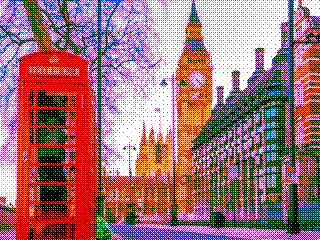 ppmdither has an additional option to change the size of the dithering matrix. While it does make a difference to the output, I didn't find I could see any difference changing it from the default 4×4 pixels. 2.) Floyd-Steinberg dither This command line appears a little longer, as we have to specify the whole RGB121 palette as a parameter. I could've used a file, but this way keeps everything tidy: djpeg london.jpg | pnmremap -floyd -mapfile=<(echo P3 16 1 3 0 0 0 0 2 0 0 2 3 3 3 3 0 3 3 3 0 3 3 0 0 3 1 0 3 2 3 3 2 0 3 1 3 0 3 0 3 3 0 0 1 3 0 0 3 0 1 0) | ppmtobmp > london_floyd.bmp Result: 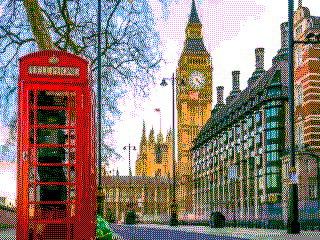 Perhaps slightly lumpy in the sky. pnmremap assumes you want it to choose the best palette, otherwise you have to tell it the colours you want. This, as far as I can see, is the RGB121 palette. I made it by feeding the output of ppmcie into ppmdither.  Here are the BMPs generated from the above two commands: dithering.zip |
||||
| Page 1 of 3 |
|||||
| The Back Shed's forum code is written, and hosted, in Australia. | © JAQ Software 2026 |
