
|
|
Forum Index : Microcontroller and PC projects : Introducing the Pi-cromite: first steps
| Author | Message | ||||
centrex Guru Joined: 13/11/2011 Location: AustraliaPosts: 320 |
Hi Matherp In early days in this post you state that the pin numbering is the physical pins. In the post above for the lcd display you seem to be using the gpio numbering. Can either be used or has it changed and I have missed it along the way. Thanks Cliff |
||||
| matherp Guru Joined: 11/12/2012 Location: United KingdomPosts: 11440 |
The pin numbers are the physical pins. e.g. SSD1963_WR_PIN is physical pin 32. I just included the gpio numbers in the table for reference. As with the MM+ these pins are fixed and cannot be changed. The only selectable pin is the RD pin in the OPTION command and this should be specified using the physical pin number - I use 33 |
||||
| cdeagle Senior Member Joined: 22/06/2014 Location: United StatesPosts: 269 |
Peter, If possible, it would be useful to have scrollback within the MMBASIC output on the Raspberry Pi. Thanks |
||||
jman Guru Joined: 12/06/2011 Location: New ZealandPosts: 711 |
Hi I have been playing around with the serial ports on a PI3 and a PiZero 1.3 and was wondering if somebody else could test the simple code below. Open Com1:38400" As #1 Test: Print #1, "QWERTY" Print #1, "12345" Print #1, "AD" Pause 500 Goto Test On my PI3 connected to Teraterm via a USB to Serial interface the results are perfect on the PiZero the results are very random incorrect characters or missing characters but almost every line has some odd character or characters. So not sure if this a issue with my PiZero or mmbasic on the PiZero Regards Jman |
||||
| Micro-80 Newbie Joined: 03/03/2017 Location: Russian FederationPosts: 26 |
Hi Matherp! The first message of this post shows the result of the test. On RPi3B I got the same results. On RPi zero w, the result is comparable to MMX 200 MHz. The result varies greatly with subsequent launches. After running mmbasic on RPi zero W, the CPU load is constantly equal to 100% without running the basic programm. |
||||
| matherp Guru Joined: 11/12/2012 Location: United KingdomPosts: 11440 |
All my testing on the Pi-zero has been done headless with the Raspbian Jessie Lite install. It is unlikely the timings in MMbasic can be maintained on a single CPU if you are trying to run a full install with desktop |
||||
| Micro-80 Newbie Joined: 03/03/2017 Location: Russian FederationPosts: 26 |
I'm using the full version Raspbian Jessie on the Pi-zero... Now it is clear what the problem is. Thank you. |
||||
| matherp Guru Joined: 11/12/2012 Location: United KingdomPosts: 11440 |
If you still find issues let me know. I switch between normal and real-time mode in the code in numerous places and it is possible I haven't done so in some areas that need it |
||||
| jman Guru Joined: 12/06/2011 Location: New ZealandPosts: 711 |
Hi All my serial tests are done headless with NO GUI running. Jman |
||||
| cdeagle Senior Member Joined: 22/06/2014 Location: United StatesPosts: 269 |
I'm currently using a PI 3B installed in a pi-topCEED device (~115 USD). It comes with the pi-top OS but i flashed a copy of Raspian which is the OS I'm using. The screen resolution is good and the pi-topCEED uses a 3 amp power supply. It includes an on/off switch and was really easy to set up. The Pi attaches to magnetic rails inside the case, and a speaker and protoboard are also available. |
||||
| jman Guru Joined: 12/06/2011 Location: New ZealandPosts: 711 |
Hi Not sure if anything can be done about this but thought I would ask High CPU on Pi Zero 1.3 and W Test platform has Jessie Lite (No GUI) See the screen shots below first one with out mmbasic running  Second one with mmbasic loaded and NO mmbasic program running  Regards Jman |
||||
| cdeagle Senior Member Joined: 22/06/2014 Location: United StatesPosts: 269 |
A quick way to start Linux MMBASIC is to edit the .bashrc file on Raspian with the following procedure; nano .bashrc Add the following anywhere within this file alias mm='sudo ./mmbasic' and re-save the .bashrc file. MMBASIC is started by typing mm in the terminal window after rebooting the Pi. |
||||
| cdeagle Senior Member Joined: 22/06/2014 Location: United StatesPosts: 269 |
This post talks about capturing screens using Peter's implementation of the SYSTEM command on the Raspberry Pi. First install scrot using the following sudo apt-get install scrot Scot is a utility for capturing screenshots. Its use via the SYSTEM command is illustrated in this Raspberry Pi version of the rocket1 MMBASIC program posted earlier. The following line of source code captures the "active" screen and saves it to a file named rocket1.png. system "scrot -u rocket1.png" Here's the screen capture image. 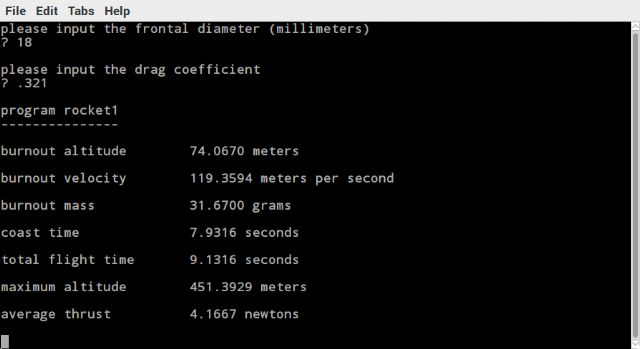 Here's the slightly updated source code listing. ' program rocket1_rpi.bas May 24, 2017 ' Raspberry Pi version ' determines flight performance ' of single stage model rockets ' altitude at burnout, meters ' velocity at burnout, meters per second ' coast time and total flight time, seconds ' maximum altitude, meters ''''''''''''''''''''''''''' option default float dim altsite, tempsite, tduration, impulse, massi, mprop, fd, cd ' surface gravity (meters/second^2) const gravity = 9.80665 ' sea level atmospheric density (kilograms/cubic meter) const rhosl = 1.22557 print " " print "program rocket1" print "---------------" do print " " print "please input the launch site altitude (meters)" print "(sites above sea level are positive, sites below sea level are negative)" input altsite loop until (abs(altsite) >= 0.0) print " " print "please input the launch site temperature (degrees fahrenheit)" input tempsite do print " " print "please input the thrust duration (seconds)" input tduration loop until (tduration > 0.0) do print " " print "please input the total impulse (newton-seconds)" input impulse loop until (impulse > 0.0) do print " " print "please input the initial mass (grams)" input massi loop until (massi > 0.0) do print " " print "please input the propellant mass (grams)" input mprop loop until (mprop > 0.0) do print " " print "please input the frontal diameter (millimeters)" input fd loop until (fd > 0.0) do print " " print "please input the drag coefficient" input cd loop until (cd > 0.0) ' convert mass to kilograms and diameter to square meters massi = 0.001 * massi mprop = 0.001 * mprop fd = pi * fd * fd / 4000000.0 ' compensate for launch site altitude and temperature rho = rhosl * density(altsite) / (1.0 + (tempsite - 59.0) / 518.67) ' determine altitude performance thrust = impulse / tduration mass = (massi - 0.5 * mprop) k2 = 0.5 * rho * fd * cd weight = mass * gravity b = tduration * sqr(k2 * (thrust - weight)) / mass c = exp(b) d = exp(-b) e = 0.5 * (c + d) f = (c - d) / (c + d) ' calculate burnout conditions altbo = (mass / k2) * log(e) velbo = f * sqr((thrust - weight) / k2) massbo = massi - mprop weightbo = massbo * gravity ' compute coast conditions tcoast = sqr(massbo / (k2 * gravity)) * atn(velbo * sqr(k2 / weightbo)) altcoast = (massbo / (2.0 * k2)) * log(k2 * velbo * velbo / weightbo + 1.0) ' calculate total flight time and maximum altitude tflight = tduration + tcoast altmax = altbo + altcoast ' print results print " " print "program rocket1" print "---------------" print "burnout altitude ", str$(altbo, 0, 4) + " meters" print " " print "burnout velocity ", STR$(velbo, 0, 4) + " meters per second" print " " print "burnout mass ", STR$(1000.0 * massbo, 0, 4) + " grams" print " " print "coast time ", str$(tcoast, 0, 4) + " seconds" print " " print "total flight time ", str$(tflight, 0, 4) + " seconds" print " " print "maximum altitude ", str$(altmax, 0, 4) + " meters" print " " print "average thrust ", str$(thrust, 0, 4) + " newtons" print " " pause 1000 ' save screen image system "scrot -u rocket1.png" end '''''''''''''''''''''''''' '''''''''''''''''''''''''' function density(x) as float ' atmospheric density function ' input ' x = altitude (meters) ' output ' density = atmospheric density (kilograms/cubic meter) '''''''''''''''''''''''''''''''''''''''''''''''''''''''' density = (1.0 - 0.000022556913 * x) ^ 4.256116 end function |
||||
| cdeagle Senior Member Joined: 22/06/2014 Location: United StatesPosts: 269 |
Another alias that I find useful is alias dir='ls -l' which is similar to the classic MS-DOS directory command dir. |
||||
| jman Guru Joined: 12/06/2011 Location: New ZealandPosts: 711 |
Hi Peter I did few tests with different versions of PI Mmbasic using a PI Zero w It seems any verison after 2017-05-04_191630_mmbasic maxes out the CPU See the screen shots below  And 2017-05-05_082859_mmbasic  This also happens on PI3 but it only maxes one core Regards Jman |
||||
| matherp Guru Joined: 11/12/2012 Location: United KingdomPosts: 11440 |
Please find attached version 5.4.a01 2017-06-11_075919_mmbasic.zip the Micromite Adds Field$ function Add Max function Add Min Function The TEMPR START command can now start temperature conversions on an unlimited number of I/O pins simultaneously (previously it was limited to one pin at a time). In addition the "{" character can now be included in html files by using "{{". This allows javascript to be included in the html e.g <TD>{{{tmin}}</TD> prints the value of tmin inside {} brackets. NB the "}" character does not need to be doubled. WW is doing some exciting work using this new facility - any chance of a demo program WW? other changes in 5.4 were already included: long filenames text command with rotated text Relevant changes not yet included: Changes to functioning of GUI numberbox and textbox Known issues: output to serial ports unreliable particularly on pi-zero. This is caused by the operating system disrupting the timing of the bit-banged output. Serial output is usable with a checksum/retry protocol but is not recommended without. Like all versions of MMBasic the code sits in a tight loop while waiting for console input and loops continuously when running a program. In addition the code switches to linux "real-time" execution mode when executing time critical commands (e.g.ds18b20). Normally it exits this mode at the end of the relevant command except in the case of PWM where it stays in real-time mode until all PWM outputs are closed. When in "normal" mode MMBasic executes at priority 0 so Linux can schedule any competing tasks against it using normal timeslicing |
||||
| WhiteWizzard Guru Joined: 05/04/2013 Location: United KingdomPosts: 2985 |
I am away from home until tomorrow; so in the meantime visit whitewizzard.ddns.net:1234 Currently have automatic updates to the webpage. You will see this with the clock near top of page. This is not using a client triggered REFRESH command in HTML which would re-draw the whole webpage. It uses AJAX to only update the relevant page parts from an XML file sent from the server (upon HttpRequest from the HTML webpage). I am learning this all from new so my 'terminology' my be incorrect.  In plain english, there is the ability to have 'traffic light' colour coding to show 'LIVE' status of MM pin inputs (I have some doors connected at the moment). Also can control lights on and off (and dimmable with PWM) with live information updated on the webpage if the lights are dimmed 'locally at the house'. My code is far from 'clean' but I am going through a learning curve. I hope to post something by the end of this week.  WW EDIT: Forgot to mention that PiZero also driving a 4" IPS touch-display. Radio button (check box) control also possible from here. So a truly versatile home-automation / security-system is possible using Peter's MMBASIC PiPort  |
||||
| matherp Guru Joined: 11/12/2012 Location: United KingdomPosts: 11440 |
NB: Version 5.4.a01 is compiled against PIGPIO V64. In case of problems please install the latest version of PIGPIO as per this site. I used method 2. You should also delete the existing options file before running this new version. "rm .options" |
||||
| WhiteWizzard Guru Joined: 05/04/2013 Location: United KingdomPosts: 2985 |
I have had a few emails about my test code currently running on whitewizzard.ddns.net:1234 This is NOT a finished version by a long way - it is just me playing with the HTML/javascript/MMBASIC 'building-blocks'. I have tested everything needed to have two-way live communication controlling my 'home' either via the web, or via an IPS touchscreen. Nothing new in terms of end-result, BUT all the I/O stuff is within MMBASIC making it very easy to 'learn' for people wanting their home 'automated'. Features such as automatic/random light patterns for when you're away are easy to implement thanks to MMBASIC - not yet coded as this overall solution will take time to totally finish. I will publish the simple code-chunks to allow the status of Pi-croMite input pins to be viewed in real-time, and to control output pins via Check-boxes. |
||||
| MicroBlocks Guru Joined: 12/05/2012 Location: ThailandPosts: 2209 |
Are PWM outputs 'bitbanged' on the Pi? Microblocks. Build with logic. |
||||
| The Back Shed's forum code is written, and hosted, in Australia. | © JAQ Software 2026 |
