
|
|
Forum Index : Microcontroller and PC projects : 3D Printers....
| Author | Message | ||||
Grogster Admin Group Joined: 31/12/2012 Location: New ZealandPosts: 9933 |
Yes, I watch everything.  Please post some photos if you get time. Smoke makes things work. When the smoke gets out, it stops! |
||||
| CaptainBoing Guru Joined: 07/09/2016 Location: United KingdomPosts: 2171 |
... bit creepy  |
||||
| ryanm Senior Member Joined: 25/09/2015 Location: AustraliaPosts: 203 |
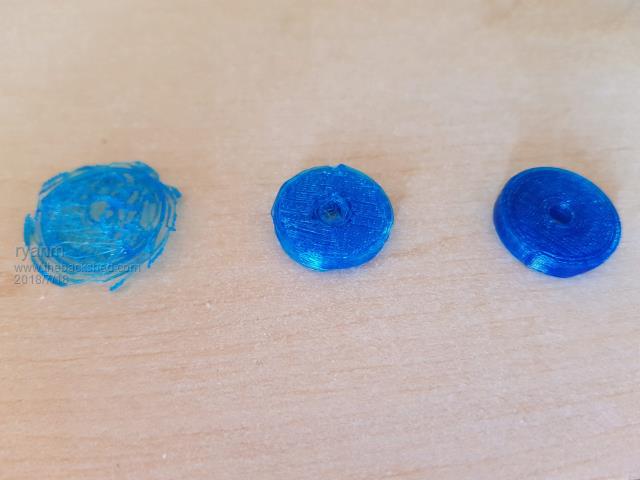 Here's the first few PETG prints I did. Just shows how much slightly tweaking the settings does. The one on the right looks better in real life than in the pic. I'm printing 100% infill, 110% extrusion real slow. Controlling it by extrusion volume, but probably in the 5-15 mm/s range. Parts are coming out TOUGH. |
||||
| Andrew_G Guru Joined: 18/10/2016 Location: AustraliaPosts: 874 |
I don't know if Grogster is "creepy" or not (I think not) . . . I'm watching this thread too because I hope that "someday" we'll be able to 3-D print simple PCBs. (eg simple one-sided instead of veroboard - or BigMick's excellent "MuP Proto"(type) board - I use the latter all the time now). Cheers, Andrew |
||||
| PeterB Guru Joined: 05/02/2015 Location: AustraliaPosts: 667 |
G'Day all. As well as 3D printing and CNC milling it is also possible to cast housings etc. I don't have a lot of info on it but it is used for small production runs. You do need to start with a mould so that is an extra cost and I imagine there will always be problems with air bubbles, dead ants whatever but it has to be faster than the alternatives. Peter |
||||
palcal Guru Joined: 12/10/2011 Location: AustraliaPosts: 2039 |
These Polymorph Pellets here are ideal for moulding but getting the mould would be the problem. I used them to make a knob for an old valve radio, but I had another knob to use to make a mould out of air drying clay. Paul. "It is better to be ignorant and ask a stupid question than to be plain Stupid and not ask at all" |
||||
| PeterB Guru Joined: 05/02/2015 Location: AustraliaPosts: 667 |
G'Day Paul Thanks for your response. Polymorph sounds like something from Red Dwarf. I will get in touch with my source in a couple of days for more info, but 3D printing sound like good fun but not much else. Many hours, poor finish ???? Milling would be nice but initial cost would be high and a lot of material must finish up in the bin. In the real world it would be a plastic mould. Peter |
||||
| CaptainBoing Guru Joined: 07/09/2016 Location: United KingdomPosts: 2171 |
it is like knitting but with strands of plastic. You can print almost anything but the finish always looks like it has a grain no matter how much time/effort I put into getting it removed, I only use it where it doesn't matter. It is ideal for printing out enclosures - especially when they have some complex requirements  9.9/10 for versatility 4/10 for finish for the other bit of the enclosure shown above (a human facing escutcheon plate) I sprayed with primer-filler then sanded with 800 wet & dry (wet) to fill all the gaps and then a final coat of satin black gloss for plastics - came out lovely, but not raw off the printer. I am no longer compromising on the enclosure - buying something I can tweak to be something else either size or features. Any "re-finishing" is because of the finish, not the product proper. For all its ills, I wouldn't be without it - just manage your own expectations - 3dp is not the panacea it is touted as, but pretty close. |
||||
| isochronic Guru Joined: 21/01/2012 Location: AustraliaPosts: 689 |
I can't remember where I saw it but - To get a smooth finish the object was sprayed with acetone (solvent depending on material) and then air-dried, giving a smooth glossy finish. Some extra polymer can be dissolved in the solvent for extra effect. Get it wrong though, and the result is a gooey blob  |
||||
| CaptainBoing Guru Joined: 07/09/2016 Location: United KingdomPosts: 2171 |
yep you can but i think the finish still isn't all that - you can even buy "cloud chambers" that will vapourize your favourite solvent and look pretty while they cook your production... it is a fraught process though as you point out, many slips twixt... |
||||
| PeterB Guru Joined: 05/02/2015 Location: AustraliaPosts: 667 |
G'Day all. Two pack polyurethane resin is the stuff I was talking about. It seems to be readily available, the mould can be made from almost anything, is a thin liquid so easy to pour with no bubbles, can be coloured, sets in a couple of minutes and can be machined etc. "The answer to a maiden's prayer" Peter |
||||
| MicroBlocks Guru Joined: 12/05/2012 Location: ThailandPosts: 2209 |
You get a smooth finish by using bondo (same stuff they use on car repair paint jobs). Supersmooth (after sanding :) ) and it adheres very well. Microblocks. Build with logic. |
||||
| ryanm Senior Member Joined: 25/09/2015 Location: AustraliaPosts: 203 |
Hoping someone else with a Geeetech i3 unit might be able to help me with some print issues. Was going strong for a week or two printing about 10 hours a day, but lately every print I do has the second layer not stick to the first. If it's not so bad that I cancel it the third layer onward sticks fine, but it looks pretty awful. I've tried changing pretty much every setting I could think of. Any thoughts?  |
||||
disco4now Guru Joined: 18/12/2014 Location: AustraliaPosts: 1109 |
Hi Ryan, It could be the first layer not thick enough. What slicer and version are you using. Some of my settings in Slic3r which may be relevant are: Layer Height 0.2mm First Layer Height 0.3mm First Layer Speed 30% Extrusion Width First Layer 150% So I print the first layer a bit thicker, and slower and pump out more filament. I have not had a failure since I replaced the original power supply some time ago. My original power supply turned out to be the cause of many failures, it would intermittently drop the voltage during prints and cause them to fail, you would just come back and it would be printing in mid air. Regards Gerry F4 H7FotSF4xGT |
||||
| ryanm Senior Member Joined: 25/09/2015 Location: AustraliaPosts: 203 |
Repetier with Slic3r. Not sure what version, but I downloaded it within the fortnight so recent. I've played around with 0.2-0.25 layer height, 0.3-0.35 first layer. Amazing how much quicker 0.25 is. (Well about 25% I suppose) Printer is set up in my office so I can't see the settings right now, but I think I may have cranked it up to 200% first layer. I print the first layer at snail's pace and it comes out really nice. Done some reading and I'm wondering if my hot end temp sensor is out. I'll try one tomorrow with the filament temp cranked up a bit. |
||||
Bill.b Senior Member Joined: 25/06/2011 Location: AustraliaPosts: 244 |
Hi Ryan I agree with Garry with the initial settings. If your are using PLA I set the bed temperature at 65 deg (if you have a heated bed) hot end temp at 200, and my cooling fan at 0% for the first layer. I use Cura for my slicer. My 3d printer is an Ender-3. Bill In the interests of the environment, this post has been constructed entirely from recycled electrons. |
||||
| MikeO Senior Member Joined: 11/09/2011 Location: AustraliaPosts: 275 |
Hi All, I agree re the first level thickness BUT if all was working OK for a while also have a look at your bed level , check your bed temperature is correct and also working correctly also that your extruder is not slipping. I have a Geeetech I3 and have just recently had two problems effecting the "of paramount importance" Ist Layer, I had a wonky solder connection of the control board screw connector for Bed heater, it was intermittent. I also had the PLA delivery slipping, I had to increase the spring tension in the extruder . This last problem may not yet be 100% but I have not yet done many runs since the "fix" been caught up with other things. I have been through all the slicers mentioned and was using KISSlicer quite a lot (horrible interface but good results) but just recently have been using IdeaMaker for Raise3D, its for their own (expensive) printer but it will work freelance and is quite good to use. I have put a couple of test .stl files on Dropbox for you to use to aid in setting up your printer. the 300 micro disk is particularly usefull as its all about getting the 1st layer perfect. dropbox share Mike Codenquilts |
||||
| ryanm Senior Member Joined: 25/09/2015 Location: AustraliaPosts: 203 |
Thanks for the advice Mike. Curious what you mean by 'delivery slipping?' I have noticed as I print more I've had to slow down the speed otherwise the filament makes a clunking noise and doesn't feed properly. |
||||
| MikeO Senior Member Joined: 11/09/2011 Location: AustraliaPosts: 275 |
Hi Ryan, thought when I wrote that it may not have come over very clear. I found on my extruder that the PLA was not being delivered constantly. So I set up a test, I measured up the PLA from the top of the extruder 100mm and marked the PLA with a black marker, then manually told the printer to feed 100mm. If it is feeding correctly it will dispense the whole amount of course. If not it could be a stepper motor/or drive problem or as in my case the brass wheel was turning but not always able to pull the PLA through. I had to stretch the spring to try to increase the pressure a bit as there is no other adjustment on this extruder model. I wonder in your case if you have a blockage in the extruder perhaps, as having to slow it down would suggest its not comfortable delivering the required amount. Mike Codenquilts |
||||
| Malibu Senior Member Joined: 07/07/2018 Location: AustraliaPosts: 261 |
Hey Grogster...  I'm just curious on what the final outcome was/is for your 3D printer? I just lashed out on an Anycubic i3 Mega (after years of procrastinating on 'if' I should get a 3D printer, I finally leaped in) So far, it's a ripper The only drama's I've had have been user problems - every time I tweak the settings to make it better, the print gets messed up. I go back to the defaults (apart from the temperature settings) and it's all good again Just wondered if you've taken the plunge yet and if you think it's been worth it? So far, I'm just doing downloaded models from Thingyverse and I'm having a blast with printing (hey, in 4 days - it's running full time! LOL) John |
||||
| The Back Shed's forum code is written, and hosted, in Australia. | © JAQ Software 2026 |
