
|
|
Forum Index : Microcontroller and PC projects : PS2 mouse to HobbyTronics emulator
| Author | Message | ||||
| Sasquatch Guru Joined: 08/05/2020 Location: United StatesPosts: 385 |
I finally found some time to build this circuit. It seems to work great! No problems with the few test programs I have to test. Works better than the HobbyTronic module due to that module having a bug in the "scroll" values (relative) for X,Y and Wheel positions in I2C mode. Thanks TassyJim for getting this all worked out for us!  -Carl |
||||
TassyJim Guru Joined: 07/08/2011 Location: AustraliaPosts: 6538 |
Glad it's working for you. I suggest that you install a reset button if you put it in a case. I have made some improvements and found that disabling the serial output makes it much more reliable. I am also working on a joystick addition, still staying with the HobbyTronics mouse emulation rather than the joystick. I hope my HobbyTronics board arrives soon so I can do some comparisons. Jim VK7JH MMedit |
||||
| TassyJim Guru Joined: 07/08/2011 Location: AustraliaPosts: 6538 |
Mouse mark 2. PS/2 mouse to HobbyTronics converter using an Arduino Nano Also includes joystick to HobbyTronics mouse converter. If you are only interested in the mouse function, all you need is the Arduino nano and a couple of connectors. For the joystick option, you need 4 10k resistors and a joystick post connector. A switch to change from mouse to joystick is also required or you could use a shorting jumper instead. For the mouse this is all the required connections: 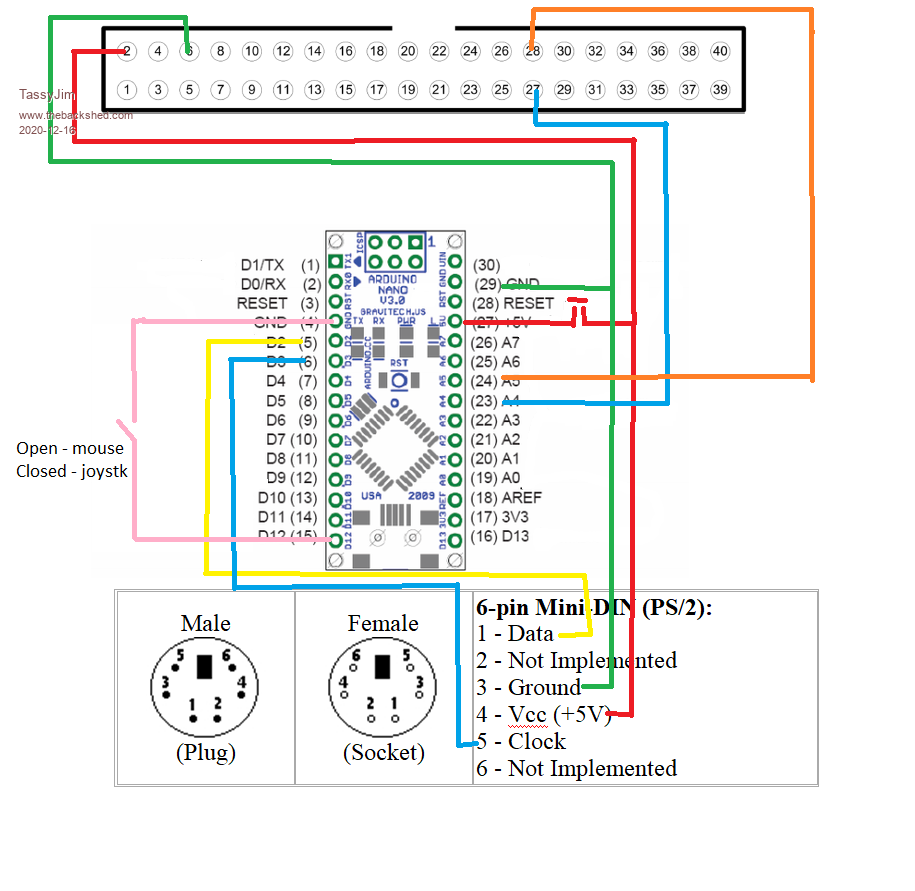 If you want the joystick, there are 4 10k resistors connected from A0 to D9 A1 to D8 A2 to D7 A3 to D6 These pins were chosen to make it easy to connect using a breadboard or stripboard. The joystick port is connected using the following table: 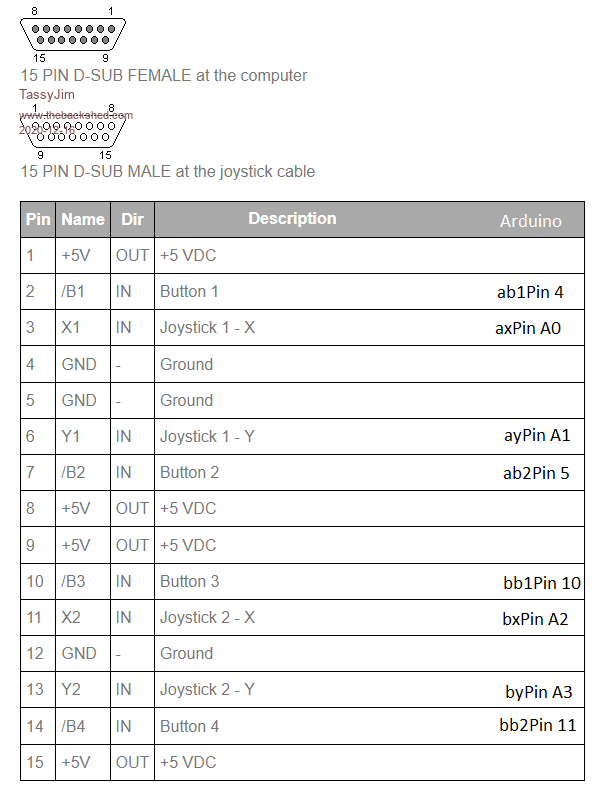 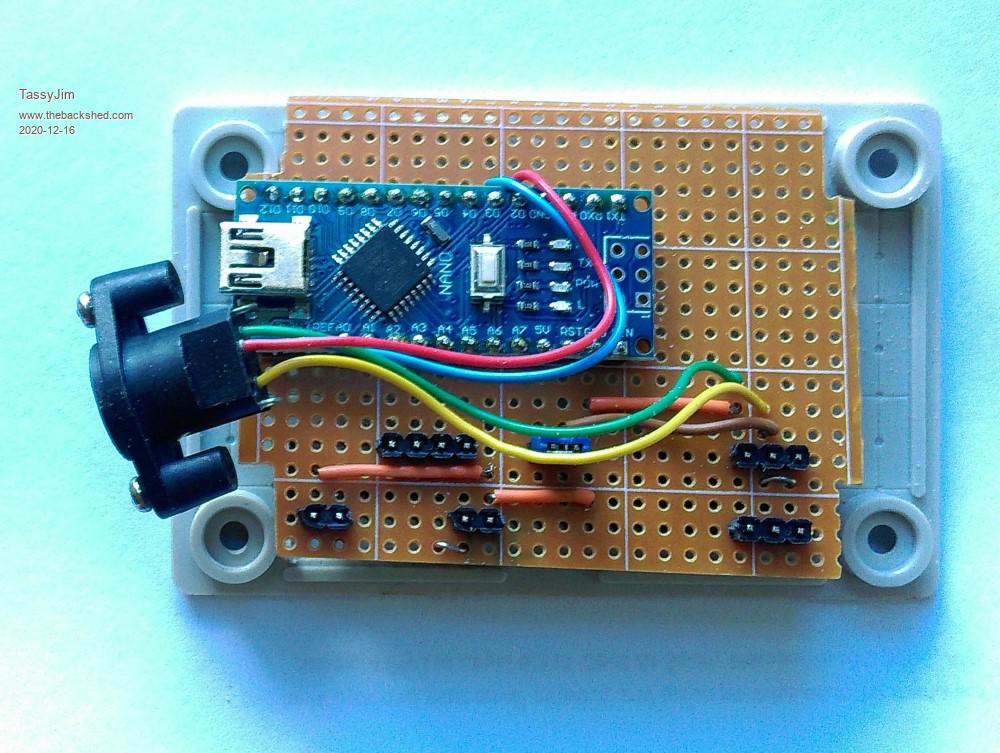 PS/2 mouse only .JPG) Underside with 10k resistors added. .JPG) Complete with external reset button, mode switch, joystick port. When programming, remember to isolate the 5V from the maximite so the two supplies don't get tied together. The system runs happily with the Arduino power coming from its USB port. To use with a PS/2 mouse, leave pin 12 open (Internal pullup) To use with a joystick, ground pin 12. You should be able to switch between the two modes with power left on but will need to re-initialise using CONTROLLER MOUSE OPEN If I2C polling is not present, it will spit out serial data. You can ignore this but the serial port monitor in the Arduino IDE is handy to see what's happening during experimentation. I haven�t tried a linear type joystick yet and don't have a digital/Atari style. I will need to do some tweaking of the gains to have them feel the same as the iBM style. I expect that joystick use will be better served with a Wii Classic emulator. I will revisit that one eventually, incorporating the improvements I have made for the mouse. The logic for switching between joysticks is: For IBM style, we need a 10k resistor to ground for each analogue input. For Digital styles which switch to ground, we need a 10k pullup resistor. For Linear style, they have 5v and ground connected to each end of the pot so we don't want any pullup or pulldown. By connecting the four 10k resistors to digital pins, we can switch high, low or high impedance in software, allowing all styles to be used. I also used this to determine what style joystick is attached. The digital joysticks need no setup. The IBM style should all have trimmers built in to the joystick so no software zeroing used. For the linear style, I assume that the joystick is in its centre rest position during startup and use those readings as the centre zero. This hasn't been tried in real life yet. HT_mouse1.zip Jim VK7JH MMedit |
||||
mclout999 Guru Joined: 05/07/2020 Location: United StatesPosts: 509 |
Hi Jim. �On the mouse only diagram, what is that symbol on the line from pin 2 on CMM2 going to pin 27 on nano and 5+ on ps2 port? Is that for a momentary switch normally closed? I am going to build this today and want to make sure I got everything right. �Thanks. Edited 2020-12-17 03:32 by mclout999 They call me Shai-Hulud (The maker) |
||||
| JohnS Guru Joined: 18/11/2011 Location: United KingdomPosts: 4335 |
A reset done via power? John |
||||
| TassyJim Guru Joined: 07/08/2011 Location: AustraliaPosts: 6538 |
That is a jumper so you can remove the 5V from the nano when programming it via it's USB cable. If you don't disconnect the micromites 5V, you will have both 5V supplies tied together and that is not a good idea. You could always unplug the device from the micromite every time you want to reprogram it but having a jumper on the power is much easier. That way you can use the Arduino IDEs serial port monitor to watch what is happening while using the mouse. I certainly needed that while developing the program. Jim VK7JH MMedit |
||||
| mclout999 Guru Joined: 05/07/2020 Location: United StatesPosts: 509 |
Thanks, Jim. �that makes sense. �I was just going to unplug each time but now I think I will add the jumper. �I am having trouble getting the fine soldering on the salvaged PS/2 port I ripped off an old PC motherboard. I hope to get it going soon. �I also took most of the day trying to get my PC to see the com port and it turned out I had way too many USB devices and Hubs plugged in and it just did not have enough system resources to add the USB serial port. �That was a first and I didn't know that was a thing. I will drop a line if I get it to work. �OH, where is that mouse testing program you had in early versions of the zip? �I looked back to all the downloads I made of it and this one is the most recent one. �Will it work with this? � mouse_duo.zip PS: Am I right that you have the reset switch on pins 3 and 4? Edited 2020-12-17 06:53 by mclout999 They call me Shai-Hulud (The maker) |
||||
| TassyJim Guru Joined: 07/08/2011 Location: AustraliaPosts: 6538 |
I use this for testing: 'mouse and cursor test mp = 2 CLS MODE 1 GUI CURSOR ON CONTROLLER MOUSE OPEN mp, leftclick, rightclick SETTICK 50, myint DO : LOOP UNTIL INKEY$ <> "" ' GUI CURSOR OFF CONTROLLER MOUSE CLOSE mp END SUB myint GUI CURSOR MOUSE(x,mp),MOUSE(y,mp) print @(10,10)MOUSE(x,mp);" ";MOUSE(y,mp);" ";MOUSE(s,mp);" "';MOUSE(z,mp) END SUB ' SUB leftclick STATIC INTEGER n LOCAL INTEGER x=MOUSE(x,mp),y=MOUSE(y,mp) GUI CURSOR OFF GUI CURSOR ON 1,x,y, RGB(RED) n=n+1 PRINT @(100,100)"left",n END SUB ' SUB rightclick STATIC INTEGER n=0 LOCAL INTEGER x=MOUSE(x,mp),y=MOUSE(y,mp) GUI CURSOR OFF GUI CURSOR ON 0,x,y n=n+1 PRINT @(200,100)"Right",n END SUB and then this: OPTION EXPLICIT OPTION DEFAULT FLOAT MODE 1,8 DIM INTEGER viewplane = 500 CONST CAMERA = 1 CONST mouse_port = 2 DIM q(4) DIM yaw=RAD(1),pitch=RAD(2),roll=RAD(0.5) DIM INTEGER nv=8, nf=6 ' cube has 8 vertices and 6 faces 'array to hold vertices DIM v(2,nv-1)=(-1,1,-1, 1,1,-1, 1,-1,-1, -1,-1,-1, -1,1,1, 1,1,1, 1,-1,1, -1,-1,1) MATH SCALE v(),100,v() ' array to hold number of vertices for each face DIM INTEGER fc(nf-1) =(4,4,4,4,4,4) DIM INTEGER cindex(9)=(RGB(RED),RGB(BLUE),RGB(GREEN),RGB(MAGENTA),RGB(YELLOW),RGB(CYAN),RGB(WHITE),RGB(BROWN),RGB(GRAY),0) DIM INTEGER fcol(nf-1)=(9,9,9,9,9,9) DIM INTEGER bcol(nf-1)=(0,1,2,3,4,5) 'array to hold vertices for each face DIM INTEGER fv(MATH(sum fc())-1)=(1,5,6,2, 1,0,4,5, 0,3,7,4, 5,4,7,6, 2,6,7,3, 0,1,2,3) DRAW3D CREATE 1, nv, nf, CAMERA, v(), fc(), fv(),cindex(),fcol(),bcol() DIM INTEGER c DIM INTEGER camx, camy DIM FLOAT inc_yaw, inc_pitch, inc_roll PAGE WRITE 1 CLS CONTROLLER MOUSE OPEN mouse_port 'draw3d diagnose 1,0,0,1000 GUI CURSOR ON 1,MOUSE(x), MOUSE(y) BOX 0,0,MM.HRES-1,MM.VRES-1 camx = MM.HRES/2 - MOUSE(x) camy = MOUSE(y) - MM.VRES/2 inc_yaw = 0 inc_pitch = 0 inc_roll = 0 DO IF MOUSE(w) THEN ' wheel button > reset box position camx = MM.HRES/2 - MOUSE(x) camy = MOUSE(y) - MM.VRES/2 inc_yaw = 0 inc_pitch = 0 inc_roll = 0 viewplane = 500 yaw=RAD(1):pitch=RAD(2):roll=RAD(0.5) ELSEIF MOUSE(r) THEN ' right mouse button > camera movement camx = MM.HRES/2 - MOUSE(x) camy = MOUSE(y) - MM.VRES/2 ELSEIF MOUSE(L) THEN ' left mouse button > roll and zoom inc_roll = (MM.HRES/2 - MOUSE(x))/4000 viewplane = MAX(viewplane + (MOUSE(y)-MM.VRES/2)/50,0) ELSE ' no button pressed > yaw and pitch inc_yaw = (MOUSE(x)-MM.HRES/2)/4000 inc_pitch = (MM.VRES/2-MOUSE(y))/4000 ENDIF 'GUI CURSOR MOUSE(x), MOUSE(y) DRAW3D CAMERA 1,viewplane,camx,camy MATH Q_CREATE roll,1,1,1,q() DRAW3D SHOW 1,0,0,1000 MATH Q_EULER yaw,pitch,roll,q() DRAW3D ROTATE q(),1 TEXT 10,10,"Yaw "+STR$(yaw,3,3)+" "+CHR$(241)+STR$(inc_yaw,3,3) TEXT 10,30,"Pitch"+STR$(pitch,3,3)+" "+CHR$(241)+STR$(inc_pitch,3,3) TEXT 10,50,"Roll "+STR$(roll,3,3)+" "+CHR$(241)+STR$(inc_roll,3,3) TEXT 10,70,"VP "+STR$(viewplane,7,0) INC yaw,inc_yaw INC pitch,inc_pitch INC roll,inc_roll PAGE COPY 1 TO 0,b GUI CURSOR MOUSE(x), MOUSE(y) 'PAUSE 15 LOOP UNTIL INKEY$ <>"" ' tidy up DRAW3D CLOSE ALL CONTROLLER MOUSE CLOSE mouse_port GUI CURSOR off CLS PAGE WRITE 0 CLS Jim VK7JH MMedit |
||||
| mclout999 Guru Joined: 05/07/2020 Location: United StatesPosts: 509 |
Just resubmitting this Jim as I think I was adding this PS as you were posting your testing programs and thank you for them. They call me Shai-Hulud (The maker) |
||||
| TassyJim Guru Joined: 07/08/2011 Location: AustraliaPosts: 6538 |
Yes. But since I sorted out a few programming issues, I haven't needed to use it. I know, as soon as I put it in a case... Jim VK7JH MMedit |
||||
| mclout999 Guru Joined: 05/07/2020 Location: United StatesPosts: 509 |
Well, I finally made my mouse interphase. This is my FrankinMouse setup until I get the parts to make a tidy one. 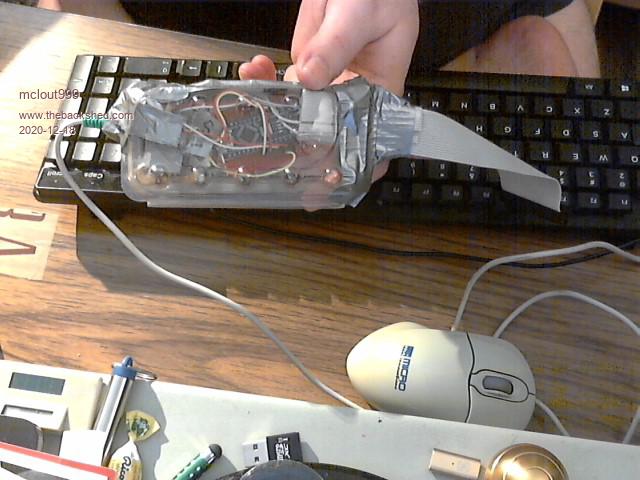 The scroll wheel is not working from your second test program. Not sure if that is an issue with the mouse. I get all three buttons and a smooth mouse movement. Thank Jim for a wonderful option and I love that it is open source and so affordable. because I had all the parts but the NANO it all cost me $1.30 shipped. That is very cool and I also did my first Arduino project and got some soldering practice. They call me Shai-Hulud (The maker) |
||||
| TassyJim Guru Joined: 07/08/2011 Location: AustraliaPosts: 6538 |
Good to see it up and running! I did the second program with the cube before the scroll wheel code was fixed by Peter so that is why it doesn't do anything. I might change so the wheel does the zoom in and out instead of left clicking. Jim VK7JH MMedit |
||||
| TassyJim Guru Joined: 07/08/2011 Location: AustraliaPosts: 6538 |
OPTION EXPLICIT OPTION DEFAULT FLOAT MODE 1,8 DIM INTEGER viewplane = 500 CONST CAMERA = 1 CONST mouse_port = 2 DIM q(4) DIM yaw=RAD(1),pitch=RAD(2),roll=RAD(0.5) DIM INTEGER nv=8, nf=6 ' cube has 8 vertices and 6 faces 'array to hold vertices DIM v(2,nv-1)=(-1,1,-1, 1,1,-1, 1,-1,-1, -1,-1,-1, -1,1,1, 1,1,1, 1,-1,1, -1,-1,1) MATH SCALE v(),100,v() ' array to hold number of vertices for each face DIM INTEGER fc(nf-1) =(4,4,4,4,4,4) DIM INTEGER cindex(9)=(RGB(RED),RGB(BLUE),RGB(GREEN),RGB(MAGENTA),RGB(YELLOW),RGB(CYAN),RGB(WHITE),RGB(BROWN),RGB(GRAY),0) DIM INTEGER fcol(nf-1)=(9,9,9,9,9,9) DIM INTEGER bcol(nf-1)=(0,1,2,3,4,5) 'array to hold vertices for each face DIM INTEGER fv(MATH(sum fc())-1)=(1,5,6,2, 1,0,4,5, 0,3,7,4, 5,4,7,6, 2,6,7,3, 0,1,2,3) DRAW3D CREATE 1, nv, nf, CAMERA, v(), fc(), fv(),cindex(),fcol(),bcol() DIM INTEGER c DIM INTEGER camx, camy DIM FLOAT inc_yaw, inc_pitch, inc_roll PAGE WRITE 1 CLS CONTROLLER MOUSE OPEN mouse_port 'draw3d diagnose 1,0,0,1000 GUI CURSOR ON 1,MOUSE(x), MOUSE(y) BOX 0,0,MM.HRES-1,MM.VRES-1 camx = MM.HRES/2 - MOUSE(x) camy = MOUSE(y) - MM.VRES/2 inc_yaw = 0 inc_pitch = 0 inc_roll = 0 DO IF MOUSE(w) THEN ' wheel button > reset box position camx = MM.HRES/2 - MOUSE(x) camy = MOUSE(y) - MM.VRES/2 inc_yaw = 0 inc_pitch = 0 inc_roll = 0 viewplane = 500 yaw=RAD(1):pitch=RAD(2):roll=RAD(0.5) ELSEIF MOUSE(r) THEN ' right mouse button > camera movement camx = MM.HRES/2 - MOUSE(x) camy = MOUSE(y) - MM.VRES/2 ELSEIF MOUSE(L) THEN ' left mouse button > roll inc_roll = (MM.HRES/2 - MOUSE(x))/4000 'viewplane = MAX(viewplane + (MOUSE(y)-MM.VRES/2)/50,0) ELSE ' no button pressed > yaw and pitch inc_yaw = (MOUSE(x)-MM.HRES/2)/4000 inc_pitch = (MM.VRES/2-MOUSE(y))/4000 ENDIF viewplane = MAX(viewplane + MOUSE(S),0) ' DRAW3D CAMERA 1,viewplane,camx,camy MATH Q_CREATE roll,1,1,1,q() DRAW3D SHOW 1,0,0,1000 MATH Q_EULER yaw,pitch,roll,q() DRAW3D ROTATE q(),1 TEXT 10,10,"Yaw "+STR$(yaw,3,3)+" "+CHR$(241)+STR$(inc_yaw,3,3) TEXT 10,30,"Pitch"+STR$(pitch,3,3)+" "+CHR$(241)+STR$(inc_pitch,3,3) TEXT 10,50,"Roll "+STR$(roll,3,3)+" "+CHR$(241)+STR$(inc_roll,3,3) TEXT 10,70,"VP "+STR$(viewplane,7,0) INC yaw,inc_yaw INC pitch,inc_pitch INC roll,inc_roll PAGE COPY 1 TO 0,b GUI CURSOR MOUSE(x), MOUSE(y) LOOP UNTIL INKEY$ <>"" ' tidy up DRAW3D CLOSE ALL CONTROLLER MOUSE CLOSE mouse_port GUI CURSOR OFF CLS PAGE WRITE 0 CLS zoom with wheel Jim VK7JH MMedit |
||||
| mclout999 Guru Joined: 05/07/2020 Location: United StatesPosts: 509 |
OK, thanks. So most likely the scroll is working and will be available. I will check out the new test program when you post it. I wonder if matherp made a test program somewhere for the wheel maybe when he announced the HT upgrade. I am going to go look for that. I might add that I have several MS optical mice that have USB to PS/2 adapters and none of those work. They light up but have no function at all. I wonder why? I have been checking out some of the programs that would not work without a mouse and it is nice to see them running. It is very cool to have a mouse. They call me Shai-Hulud (The maker) |
||||
| mclout999 Guru Joined: 05/07/2020 Location: United StatesPosts: 509 |
You are way too fast!!! I was posting my last while you posted the new test program and it works like a charm. Great demo and example of how to use the mouse right. Thanks They call me Shai-Hulud (The maker) |
||||
| TassyJim Guru Joined: 07/08/2011 Location: AustraliaPosts: 6538 |
I don't think I have any of those left. If I do find one in the shed, I will see what needs to be done to get them working. There are a few different protocols to play with. It's a big shed so I might get lucky... Jim VK7JH MMedit |
||||
| mclout999 Guru Joined: 05/07/2020 Location: United StatesPosts: 509 |
I would send you one of mine if it wouldn't cost me an arm and a leg of money I don't have right now. �I was just wondering what little trick they use in their chip to give both PS/2 and USB that messes with your interphase. Well, good luck digging around like I had to do to find the 10 mice that had PS/2 but only 2 of them work. �Both of them are ball mice and one only has Left and Right buttons. I plan a future expedition to my mountain of parts boxes in hopes of finding an optical PS/2 mouse. �Good hunting to us both. I even have MS mice with those tilt switches on the scroll wheel. No one does those anymore that I know of. EDIT: I just notice something that might be an issue with the MS mice as well. They all have two additional side buttons. Edited 2020-12-19 00:59 by mclout999 They call me Shai-Hulud (The maker) |
||||
| matherp Guru Joined: 11/12/2012 Location: United KingdomPosts: 11499 |
I believe these dual mode mice rely on something about the signal lines to decide which protocol to use. Try pulling both lines high with 10K pullup resistors to 5V Edited 2020-12-19 01:11 by matherp |
||||
| mclout999 Guru Joined: 05/07/2020 Location: United StatesPosts: 509 |
Jim, I tried to test BigMic's fix for controlling the mouse resolution(in your last test code) but it seems to have no effect. I had to add PAUSE 200 after that line or the mouse was not detected. Not a big deal but that was nice to be able to control that on the HT version. They call me Shai-Hulud (The maker) |
||||
| vegipete Guru Joined: 29/01/2013 Location: CanadaPosts: 1179 |
I put 2.2K pull-ups on my version. Plus I used a USB jack instead of a PS/2 jack. Precious few USB mice work, but I did find an ancient Logitec optical wheel mouse that does. (Sorry, the label is too worn out to read the model number.) Visit Vegipete's *Mite Library for cool programs. |
||||
| The Back Shed's forum code is written, and hosted, in Australia. | © JAQ Software 2026 |
