
|
|
Forum Index : Microcontroller and PC projects : CNC Router?
| Author | Message | ||||
| twofingers Guru Joined: 02/06/2014 Location: GermanyPosts: 1761 |
I found Plasmamac's CNC machine on the internet as CNC 1419 (~340 EUR for EU warehouse). Not bad! I would think upgrading to a 500W spindle motor is a good idea. This youtube video shows how to do that for a CNC 3018 ... and the weak points of the CNC 3018 machine. Just my 2c ... Michael causality ≠ correlation ≠ coincidence |
||||
| lizby Guru Joined: 17/05/2016 Location: United StatesPosts: 3784 |
Well, that was fun--but far beyond my abilities. PicoMite, Armmite F4, SensorKits, MMBasic Hardware, Games, etc. on FOTS |
||||
| Swartz Newbie Joined: 15/12/2020 Location: United StatesPosts: 18 |
Hello Jens. Would this board be equivalent to the one you mentioned? [except for cost that is ] Upgraded 3 Axis GRBL 1.1f USB Port CNC Engraving Machine Control Board and Offline Controller for 1610/2418/3018 DIY Engraving Machine Wood Router at: https://www.amazon.com/gp/product/B08G73NH5Q/ref=ox_sc_saved_title_2?smid=A1YE7GNQOUJKI9&psc=1 Thanks! Swartz Edited 2021-07-13 01:22 by Swartz |
||||
| jaybek Newbie Joined: 25/05/2020 Location: GreenlandPosts: 18 |
Yes & No. You link to a Motherboard that also comes with an offline module. If you purchase the machine that lizby refers to, it will already have the motherboard and you will only need the offline module (and that, only if you want to drive the machine offline). Regards Jens #MeTo ZX81 |
||||
| Swartz Newbie Joined: 15/12/2020 Location: United StatesPosts: 18 |
Hi I see what you are saying now. Thank you for clarifying this. So maybe more like one of these then: https://www.amazon.com/gp/product/B087BZBZB2/ref=ppx_yo_dt_b_asin_title_o00_s00?ie=UTF8&psc=1 3 Axis GRBL Offline Controller Board Remote Hand Control LCD Screen Off-line Control Module for 1610/2418/3018 PRO CNC Router Carving Milling Engraver Machine Wood Router Offline CNC Controller Cheers! Swartz Edited 2021-07-13 13:47 by Swartz |
||||
| CaptainBoing Guru Joined: 07/09/2016 Location: United KingdomPosts: 2171 |
this was precisely my thinking and it has delivered. the Ferric is horrible stuff, stains everything and drips and tiny splashes get everywhere even when you are very careful. It doesn't seem to dry either so it maintains its ability to just get everywhere when a long-undiscovered drip gets smeared by something else. It is truly ghastly stuff BUT, I find it very controllable in etching with the sponge method. I made Volhout's Tracker PCB last night. "traditional" raster board took about an hour on the laser. Etching - it was ready for drilling in about 2 minutes ... ah yes... drilling... has to be the least enjoyable part of the whole process. I'd rather staple my tongue to an electric pylon . Edited 2021-07-14 15:41 by CaptainBoing |
||||
| circuit Guru Joined: 10/01/2016 Location: United KingdomPosts: 305 |
I tried this method with my laser cutter - 40 watt HPC Laser unit - but found that the black acrylic spray did not burn off fully and left a pretty significant residue although there was a clear "colour free" area of copper showing. May I ask for a specific brand recommendation of black acrylic spray? Do you have a particular brand that works best? |
||||
| Volhout Guru Joined: 05/03/2018 Location: NetherlandsPosts: 5931 |
I am still working my way through the process, but the paint / laser part I did master. Use a THIN layer of paint, matte black (not shiny). It should "just" cover. Make sure it is dry. I use a cheap spray can, just few flashes over the board. I use a 2.5 watt laser, and it changes the paint into dust. You just "dust it off" with a brush and wet cloth. Up to now I have not been successful going the whole process because I wanted to use KiCAD. One of these days I will go and follow CaptainBoing's instructions when using Eagle. Eagle basically has a g-code module. Will be much simpler. It is just that I never used Eagle before. A friend is also walking the path, but is building a bigger CNC milling for PCB's. We'll team up when it comes to the last part of the process in making it a success. Edited 2021-07-14 17:09 by Volhout PicomiteVGA PETSCII ROBOTS |
||||
| CaptainBoing Guru Joined: 07/09/2016 Location: United KingdomPosts: 2171 |
Do you wash the boards after lasing? I suspect at 40W you are expecting clean copper where the laser touched. That would be nice!  I don't get that. There is a "soot" residue that I wash off with warm water, dish soap and a gentle scrub with a soft brush or micro-fibre cloth. I prefer raster scan (500mm/min and 0.075mm beam width) rather than track-outline as I prefer the traditional look. It is a *lot* slower but I don't get whiskers and shorts that can be very tricky to find). I don't consider the brand of paint or anything (will post later), I just buy matte black acrylic spray from the cheap shop. I do find it is best to lase when the spray is new. Old stuff flakes off (no primer). I scrub the copper clad board with a stainless steel scouring pad and dish soap under hot water. Dry. Acetone wipe. Dry with hot air. Spray the paint. Dry with hot air. Etch immediately. Perhaps I should document the process start to finish. I did the process for actually getting the lasing done but the prep and ferric etch I took as fairly standard. Happy to do it if it helps. h . Edited 2021-07-14 17:17 by CaptainBoing |
||||
| Volhout Guru Joined: 05/03/2018 Location: NetherlandsPosts: 5931 |
@CaptainBoing, I think you did once explain what you where doing on this forum. I remember reading about it. Regards PicomiteVGA PETSCII ROBOTS |
||||
| CaptainBoing Guru Joined: 07/09/2016 Location: United KingdomPosts: 2171 |
It does, but I have never used it. I export the PCB foil as a PNG graphic and then use that. If I am doing a raster lase then i skip the InkScape bit and import directly into LaserWeb. Would be keen to see the outcome of that! I did your Tracker PCB last night - came out very nice but I couldn't face drilling it at 10pm last night... later  Edited 2021-07-14 17:23 by CaptainBoing |
||||
| circuit Guru Joined: 10/01/2016 Location: United KingdomPosts: 305 |
Full process documentation would be met with much gratitude. |
||||
| PeterB Guru Joined: 05/02/2015 Location: AustraliaPosts: 669 |
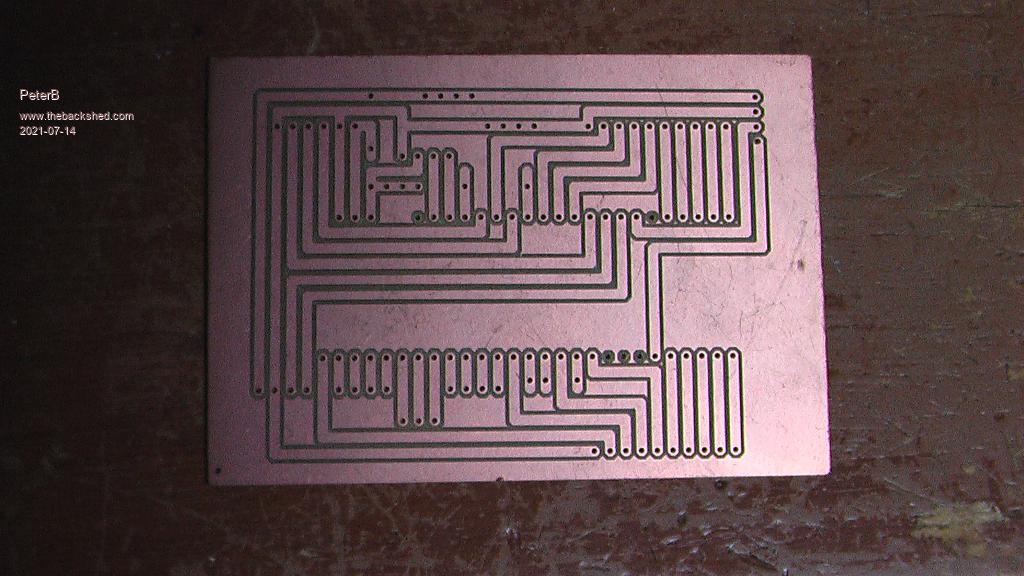 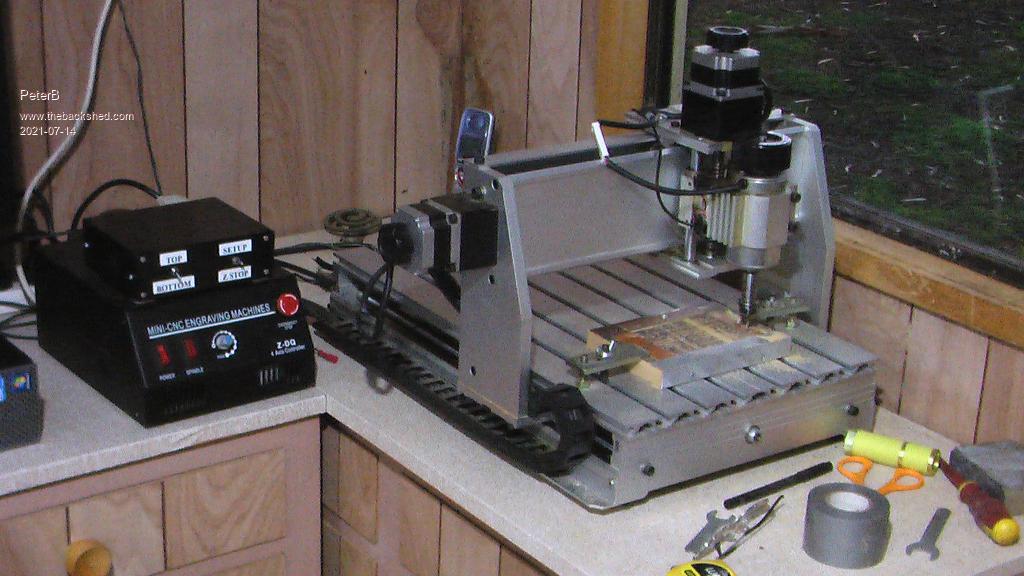 I have been using this system for quite some time with no real problems after the initial "OH DEAR"s It was fairly expensive at the time although Nancye promised to pay for it, She never did. It's the sort of thing I can sit and watch for hours.  |
||||
Revlac Guru Joined: 31/12/2016 Location: AustraliaPosts: 1277 |
Nice work Peter. Cheers Aaron Off The Grid |
||||
| Volhout Guru Joined: 05/03/2018 Location: NetherlandsPosts: 5931 |
CaptainBoing's earlier proces descrition is here... Etchin Boards the Easy way Volhout Edited 2021-07-14 18:11 by Volhout PicomiteVGA PETSCII ROBOTS |
||||
| Plasmamac Guru Joined: 31/01/2019 Location: GermanyPosts: 620 |
@PeterB : siting for Hours in Front of a CNC or a 3d Printer is an extra Hobby. Plasma |
||||
| Plasmamac Guru Joined: 31/01/2019 Location: GermanyPosts: 620 |
@PeterB : siting for Hours in Front of a CNC or a 3d Printer is an extra Hobby. Plasma |
||||
| PeterB Guru Joined: 05/02/2015 Location: AustraliaPosts: 669 |
G'Day Plasma & Aaron My CNC cost several hundred dollars several years ago so I think yours is better value however I can claim that mine is bigger than yours  Also, it was very wrong of you to mention 3D printers because I am a very old, weak, man and have been resisting buying one for years. Just think of the damage you may have done. Peter |
||||
| Volhout Guru Joined: 05/03/2018 Location: NetherlandsPosts: 5931 |
Just imagine .... Spending hours watching a CNC mill a circuit board... Spending days watching a 3D printer build up a box to put around it .... Imagine ... the amount of coffee that takes .... Volhout PicomiteVGA PETSCII ROBOTS |
||||
| The Back Shed's forum code is written, and hosted, in Australia. | © JAQ Software 2026 |
