
|
|
Forum Index : Microcontroller and PC projects : PicoMiteHDMIUSBV6.00.02b10.uf2 did not run on Olimex RP2040-PICO-PC
| Author | Message | ||||
| stanleyella Guru Joined: 25/06/2022 Location: United KingdomPosts: 2807 |
the rpi2350 pico 2 has stuff the 2040 didn't but it's a drop in replacement imho it gives more observable increased performance on lcd or vga and the hdmi stuff is brill the 2040 breakout board is good. Mick knows the faults and the link for stereo and adc problem but it's a nice board with 2350, no soldering needed. I did use female to male header on pico which is a pain to solder but I can access the few pins remaining. it's displaying lissajours now. test simple graphics on all res/modes to test. sound is "sharp" but no lc filter just rc stan Edited 2025-02-11 08:38 by stanleyella |
||||
| ManiB Senior Member Joined: 12/10/2019 Location: GermanyPosts: 144 |
Hello everyone, I received the Raspberry PI Pico 2 (RP2350) today and, as expected, successfully installed the PicoMiteHDMIV6.00.01.uf2 by typing "OPTION RESET OLIMEX" via PuTTY on the Pico's USB connector. However, I tried for a long time because my EIZO monitor persistently did not display an image. Only after a lot of back and forth did I connect my Samsung monitor, and lo and behold, I could see something immediately. I had already connected the 5V solder bridge on the underside of the Olimex board yesterday. But I can't get the PicoMiteHDMIUSBV6.00.01.uf2 to work. After the installation I have to blindly type “OPTION RESET OLIMEX” with my USB keyboard. So I connected my Logitech USB keyboard to the Pico using a USB-C adapter cable and typed it in blindly - without success. And the suggestion to connect to the Olimex board via USBtoSerialAdapter in order to make the entries via PuTTY also fails with the error message > option serial console com2,gp8,gp9 Error : Pin 11/GP8 is in use Now I'm really at a loss ;( 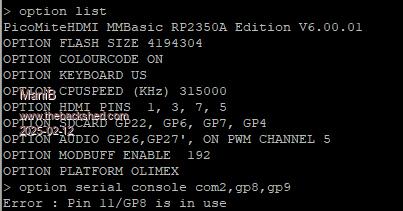 |
||||
| WhiteWizzard Guru Joined: 05/04/2013 Location: United KingdomPosts: 2991 |
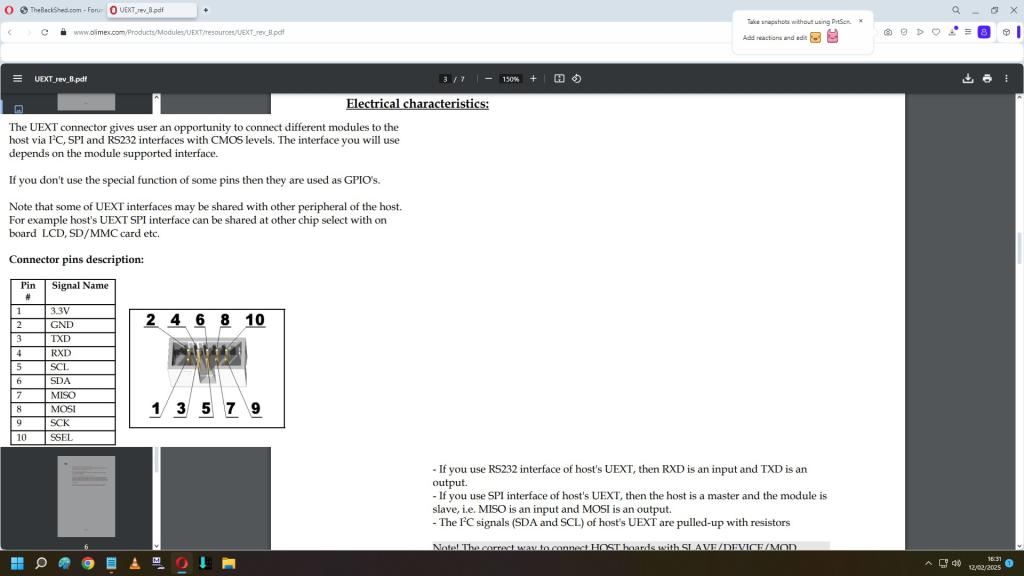
Confusingly, your screenshot shows you have the HDMI version of the firmware installed, not the USB HDMI version. My comments below assume you have the USB HDMI version installed (if you want the USB keyboard to work!) With the USB variant of the firmware installed, the serial port is automatically set for you. Simply connect your USB-to-Serial module to GP8 & GP9 (refer to manual for which is Tx and which is Rx) and provide the Pico with power too via the Vsys input (or Vbus - again, refer to manual). You also need to set your terminal baud speed to 115,200. This will hopefully get you going….. (Sorry for editing this multiple times; I initially mis-read the info in your screen shot) Edited 2025-02-12 10:18 by WhiteWizzard |
||||
| phil99 Guru Joined: 11/02/2018 Location: AustraliaPosts: 3316 |
Yes, without USB enabled GP8 & GP9 would be for a PS/2 keyboard. Type LIST PINS to see what all the pins do. |
||||
| matherp Guru Joined: 11/12/2012 Location: United KingdomPosts: 11604 |
OPTION RESET OLIMEX USB sets the console on GP0,GP1 to match the header on the olimex board. Can't remember when I added this but the latest 6.00.02 beta should work fine IFF you install the HDMIUSB firmware |
||||
| Frank N. Furter Guru Joined: 28/05/2012 Location: GermanyPosts: 1141 |
Are you sure about “OPTION RESET OLIMEX USB”? I made a note of “OPTION RESET OLIMEXUSB” and it worked like that! Frank |
||||
| matherp Guru Joined: 11/12/2012 Location: United KingdomPosts: 11604 |
Either |
||||
| stanleyella Guru Joined: 25/06/2022 Location: United KingdomPosts: 2807 |
I thought option reset olimex was for a different board. is it the same as olimex 2040 breakout board. I had to write the options with forum help but works with usb to ttl. Connected to COM3 at 115200 > option list PicoMiteHDMI MMBasic USB RP2350A Edition V6.00.02b0 OPTION SERIAL CONSOLE COM2,GP8,GP9 OPTION AUTORUN ON OPTION FLASH SIZE 4194304 OPTION COLOURCODE ON OPTION KEYBOARD UK, 0, 0, 600, 150 OPTION CPUSPEED (KHz) 315000 OPTION HDMI PINS 1, 3, 7, 5 OPTION SDCARD GP22, GP6, GP7, GP4 OPTION AUDIO GP26,GP27', ON PWM CHANNEL 5 > got search for circuit again. posted here somewhere. 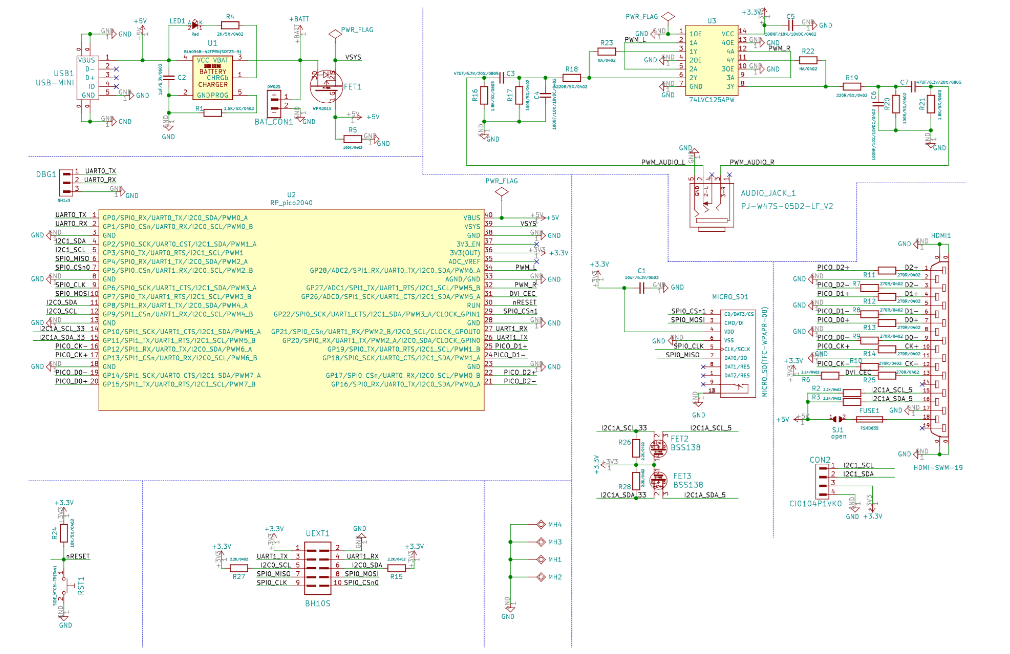 Edited 2025-02-13 02:19 by stanleyella |
||||
| ManiB Senior Member Joined: 12/10/2019 Location: GermanyPosts: 144 |
Thanks WhiteWizzard, my screenshot is from when I installed PicoMiteHDMIV6.00.01.uf2. Later after installing PicoMiteHDMIUSBV6.00.01.uf2 I could not take screenshots anymore because nothing is displayed and the console could not be connected. Edited 2025-02-13 03:04 by ManiB |
||||
| ManiB Senior Member Joined: 12/10/2019 Location: GermanyPosts: 144 |
Hello, i ordered a new USB to Serial converter, because I think mine is not working correct. I'll keep you up to date. Great support here! |
||||
| ManiB Senior Member Joined: 12/10/2019 Location: GermanyPosts: 144 |
When I read all of your tips and advice, I come to the following conclusion: 1. After installing PicoMiteHDMIUSBV6.00.01.uf2, only a few options are set. The necessary options for the Olimex RP2040-PICO-PC are definitely NOT set. 2. I am supposed to enter the command "OPTION RESET OLIMEX" using the console, but the serial ports are not actually active at this point (or my USB to serial module is actually broken) 3. Shouldn't the USB keyboard on the USB-C port of the RP PICO 2 work? It was mentioned here that I could type in the command "blindly". Can I use any USB keyboard here? Or does it have to be a PS/2 compatible keyboard? |
||||
| stanleyella Guru Joined: 25/06/2022 Location: United KingdomPosts: 2807 |
if I can help but is is it the same board? 1- use the option list I posted for olimex usb which sets sound and sd card and usb to ttl converter. 2- as above 1 3- a usb keyboard should show on boot. it can be a wireless dongle for a mini keyboard with a mouse touch Connected to COM3 at 115200 > option list PicoMiteHDMI MMBasic USB RP2350A Edition V6.00.02b0 OPTION SERIAL CONSOLE COM2,GP8,GP9 OPTION AUTORUN ON OPTION FLASH SIZE 4194304 OPTION COLOURCODE ON OPTION KEYBOARD UK, 0, 0, 600, 150 OPTION CPUSPEED (KHz) 315000 OPTION HDMI PINS 1, 3, 7, 5 OPTION SDCARD GP22, GP6, GP7, GP4 OPTION AUDIO GP26,GP27', ON PWM CHANNEL 5 > |
||||
| matherp Guru Joined: 11/12/2012 Location: United KingdomPosts: 11604 |
The Olimex board has a three pin header connected to GP0 and GP1 which can be used for a serial console (DBG1 in the schematic). If you use OPTION RESET HDMIUSB it will set the serial console on GP0,GP1 to use this header rather than GP8,GP9. So, load the HDMIUSB firmware, connect a USB-UART to pins GP8,GP9 (easiest direct on the Pico2 before plugging it into the Olimex and on a computer console type: OPTION RESET HDMI USB Everything will then be correctly configured Now plug the Pico2 into the Olimex board and connect the USB/UART to the three pin header, plug in the HDMI and you are good to go. Edited 2025-02-13 04:03 by matherp |
||||
| stanleyella Guru Joined: 25/06/2022 Location: United KingdomPosts: 2807 |
is it this board? 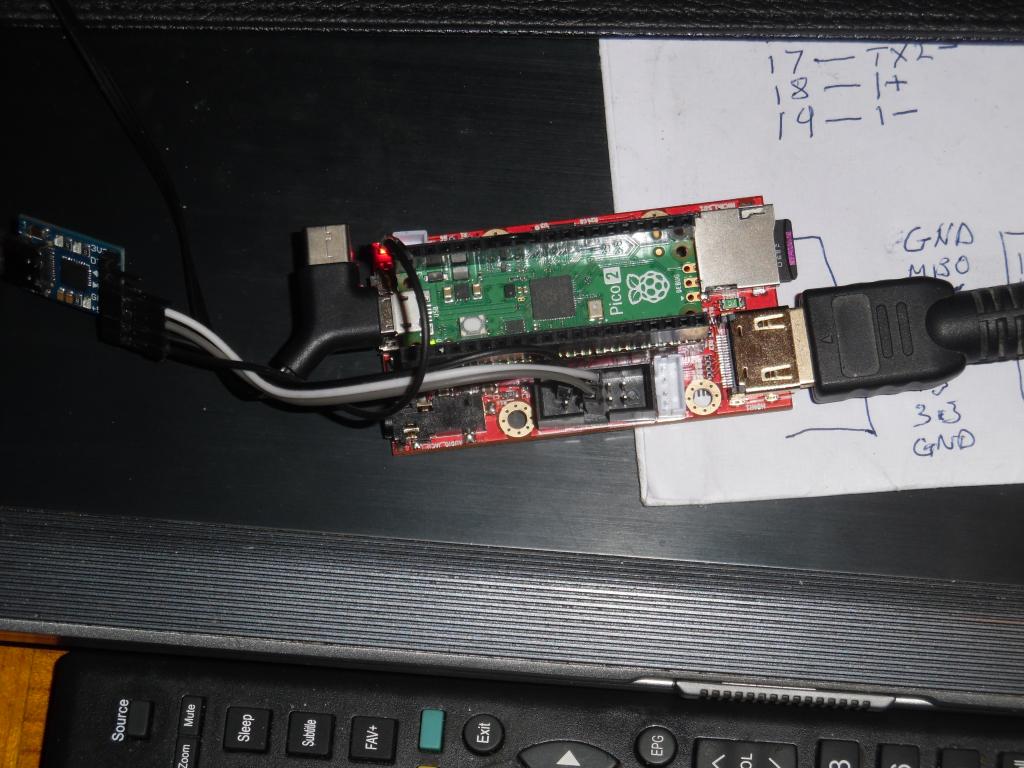 |
||||
| stanleyella Guru Joined: 25/06/2022 Location: United KingdomPosts: 2807 |
 I connected usb to ttl to this socket. Edited 2025-02-13 04:14 by stanleyella |
||||
| stanleyella Guru Joined: 25/06/2022 Location: United KingdomPosts: 2807 |
didn't 3 pin option but don't have a 3 pin plug and too small for molex. please show me option list after option reset olimex. |
||||
| stanleyella Guru Joined: 25/06/2022 Location: United KingdomPosts: 2807 |
if it's the same board I use the usb to ttl to program from mmedit and it supplies the vcc pin but the board has a mini usb to power the pico and the 5v from usb to ttl is not needed. both ways work ie power board from 5v or use the usb to ttl 5v . but that was frowned about |
||||
| ManiB Senior Member Joined: 12/10/2019 Location: GermanyPosts: 144 |
Hallelujah, I've got it working after all. It's actually done in just four simple steps: 1. Flash the Pico 2 with PicoMiteHDMIUSB flash 2. Connect a USB keyboard to the Pico 2 (if necessary with a USB-C to USB-A adapter) 3. Type in the following command and confirm with ENTER OPTION RESET OLIMEXUSB 4. Reset the Olimex board and be amazed |
||||
| stanleyella Guru Joined: 25/06/2022 Location: United KingdomPosts: 2807 |
happy days you got it working. now you got to try audio and adc.. very weird, a link for stereo and no adc. like can't generate a sine audio and feed it to adc to display. Mick knows this was why I built a strip board version that was no problems |
||||
| ManiB Senior Member Joined: 12/10/2019 Location: GermanyPosts: 144 |
Now HDMI, USB and SD-Card is working. My USB to serial adapter cable is also OK. I have now connected it to the three pins of the DBG1 connector on the Olimex board and these are the results: 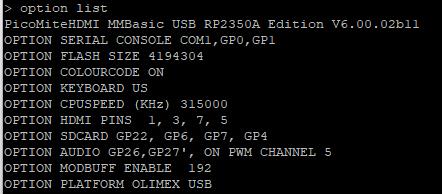  I can't wait to try out the rest of the features ;) |
||||
| The Back Shed's forum code is written, and hosted, in Australia. | © JAQ Software 2026 |
