Notice. New forum software under development. It's going to miss a few functions and look a bit ugly for a while, but I'm working on it full time now as the old forum was too unstable. Couple days, all good. If you notice any issues, please contact me.
Perry Senior Member Joined: 19/11/2009 Location: Posts: 190
Posted: 12:02am 26 Feb 2010
Copy link to clipboard
Print this post
That's too bad that for a Science Olympiad they should put so low of a priority on the importance of a repeatable experimental setup.
I am routing for you.
Perry
gabymuino Newbie Joined: 25/02/2010 Location: United StatesPosts: 26
Posted: 12:07am 26 Feb 2010
Copy link to clipboard
Print this post
These two last answers are not helping me at all�
So anyway thanks for your intend to help me.
By the way the distance between the fan and the windmill has to be the same for every team at the time of the competition. Edited by gabymuino 2010-02-27Gaby Muino
Downwind Guru Joined: 09/09/2009 Location: AustraliaPosts: 2333
Posted: 02:46am 26 Feb 2010
Copy link to clipboard
Print this post
Hi Gaby,
It sounds like you cd motor (generator) is a DC motor and not a 3 phase AC motor like my one.
That makes it simple for you.
The other guys are right in what they said but as you said it is outside of your control.
Neilomac gave a good mounting method that will allow you to test a few things without gluing it to the disc untill the very last.
AS several have mentioned balance is important and can make a big difference as you get up speed. You will need to balance the blades just like you would for a big turbine.
The amount of glue you use must be even on both sides and kept to a minimum so not to add too much weight and effect the balance.
A quick look around the workshop for something round other than pvc i found a couple of ideas that you could try and could cut out with a pair of metal snips.
My only concern is not all plastics will stick to glue very well.
Most bottles are LDPE and not many adhesives will stick, try a PET (soda/soft drink) bottle, it is light, strong and easy to glue. Jack
gabymuino Newbie Joined: 25/02/2010 Location: United StatesPosts: 26
Posted: 03:28am 26 Feb 2010
Copy link to clipboard
Print this post
Thank you Downwind !!! I�m going to use that kind of bottles�
So, is going to be one blade as you show me on the mini-mill attached to the CD with glue. I have an other question do I modify the size of the CD?
Thank you GOFJ too!!! if the white bottles doesn't work I'm going to try with the soda bottles.
Gaby Muino
Downwind Guru Joined: 09/09/2009 Location: AustraliaPosts: 2333
Posted: 03:58am 26 Feb 2010
Copy link to clipboard
Print this post
I think you will need to cut away any section of the cd that the blade in not covering as the excess cd will block or effect the air flow over the blade.
Get the blade all in position first and remove the excess after.
Try to keep the removed bit even on both sides so as to keep balance.
The cd area near centre is not as important to remove as it is out near the edges.
I would recommend you use paper templets to guide in the blade cutting and keep a copy of each templet as then you can repeat a design or make simple changes.
Just glue or tape the paper to the cylinder and cut along the line.
There is a lot more work in this than you proberly thought but all your efforts will pay off in the end.
Stick with it.
Sticky tape the blades to the CD for trial runs untill you find what position/shape works best. Use a table top fan for a standard breeze and the tip of your finger (lightly) against the back of the CD to measure torque (if you have a spindle you can hang it on), alternatively use your finger tip for the spindle. It is best to make a series of configurations before testing as it is easier to compare (seat of the pants) results if they are done sequentialy with no lost time between each test rather than doing the cuting and shuting on only one. Jack
Downwind Guru Joined: 09/09/2009 Location: AustraliaPosts: 2333
Posted: 04:17am 26 Feb 2010
Copy link to clipboard
Print this post
Do you realize you can cheat a little here and set your printer to landscape and print off the drawing that Gizmo posted on the mini mill. (click on the image to open in another window b4 printing)
That way you will have a templet to work from and can add or subtract blade material.
You might want to try different dia. bottles or cylinders to see what works better as this will change the pitch of the blades and effect the speed and torque
Pete.Edited by Downwind 2010-02-27Sometimes it just works
If the loading from the generator is fairly small meaning that you need lots of RPM and not much torque you could just put a series of radial cuts and (heat gun) bend the CD to make the prop. A shallow pitch = high revs low torque, a steep pitch = low revs tigh torque. Adding larger diameter will give less revs and more torque.Jack
Downwind Guru Joined: 09/09/2009 Location: AustraliaPosts: 2333
Posted: 07:31am 26 Feb 2010
Copy link to clipboard
Print this post
Hi Gaby,
I had a hunt around and found a dc cd motor in an old home cd player (previous ac motor was out of a cd-rom) this prompted me to make a blade.
I printed off Gizmos blade design and glued it to a piece of 75mm dia pcv stormwater pipe and cut it out with a set of tin snips and drilled a hole in the centre the same size as the cd hole, then cut a cd down to the same shape leaving the centre ring (bit without the lable) then clamped the cd bit to the blade with 2 clothes pegs and stuck the 2 bits together with a couple of dobs of hot glue.
Then attached the blade to the motor with double sided tape.
All i had was a industral fan to test it with and at 1 metre away i got up to 2 volts from the motor, at 2 metres i got 0.7 volts from the motor.
The fan used is stronger than what you will have but the results were good from a rough test.
The edges of the blade was still rough and altogether it took less than an hour to throw it all together.(including finding the bits)
I am sure with more effort and testing with different dia. pipe the results can be improved even more.
Please keep us all posted with your developments.
Pete.
Gaby>>> i edited the link from previous post incase others involved in the same project try to gleem off your hard work.
I dont see it fair you to put in the research and time to find someone else steals your idea.
You might like to edit some of your postings too.
If you have trouble finding the information again PM me and i will send you the link.
Edited by Downwind 2010-02-27Sometimes it just works
neil0mac Senior Member Joined: 26/12/2009 Location: AustraliaPosts: 210
Posted: 10:19am 26 Feb 2010
Copy link to clipboard
Print this post
A trick to reduce stress on the glued surfaces might be to use a hacksaw to cut two slots into the hub end of the bottle so that it can be glued to the front and back of the CD.
______________________________________________
As an aside, If you win the competition, do the 'Back sSedders' share in the prize?
Downwind Guru Joined: 09/09/2009 Location: AustraliaPosts: 2333
Posted: 11:16am 26 Feb 2010
Copy link to clipboard
Print this post
From my playing around here just as a rough couple of tests i found hot glue and Bbl sided tape worked well, but hot glue can add a lot of weight fast.
Dont use DVD's i found as the one i tried shatteded and left a thin disc layer of plastic.
Neilomac,
To share in the prize, would be to know the final results and to think this young lady kicked butt up against others with big budgets.
Win or come close im sure she will shake the field with a simple design that many here have proven to work well in full scale.
I agree with you underlying comment.... Lets see if us at the backshed can actually pull this one off with the information we collective hold in many fields.
I see it as a 14 yr old asking for help to kick butt, and she might well be a bitten by the wind energy bug for life afterwards.
I dont see it as what we leave for them. Rather what we teach them along the way, which is what will change what is left in the future.
Pete.Sometimes it just works
KarlJ Guru Joined: 19/05/2008 Location: AustraliaPosts: 1178
Posted: 11:38am 26 Feb 2010
Copy link to clipboard
Print this post
Looks to me like there is a much R&D going on here as your tracker project Neil.
Focus (pardon the pun )
BTW how's that going?Luck favours the well prepared
gabymuino Newbie Joined: 25/02/2010 Location: United StatesPosts: 26
Posted: 01:15pm 26 Feb 2010
Copy link to clipboard
Print this post
Good morning guys,
Sorry for didn�t answer before but because you guys are in Australia our days start in different hours
This is �AWESOME� I feel so special ...I have wonderful teachers �Thanks for your important help�
Last night I was looking around my house, and I found some containers that probably can help me. I�m sending you some pictures!!!
Also I cut my CD and I�m going to take your advice regarding to copy the template from the Mini-mill.
Last night I made a quick test with a plastic cup and wasn�t not bad, of course the material was so wick, but today I�m going to try with the other containers.
I�m planning to attach the blade to the CD with glue, and as on it�s on the Mini-mill picture I�m going to make a hole on each blade and put a wood pin for more security.
I�m going to be up date you to the progress of my work!!!
I got a go to school!!! see you later
Thanks again guys!!!
Gaby
Edited by gabymuino 2010-02-27Gaby Muino
gabymuino Newbie Joined: 25/02/2010 Location: United StatesPosts: 26
Posted: 01:39pm 26 Feb 2010
Copy link to clipboard
Print this post
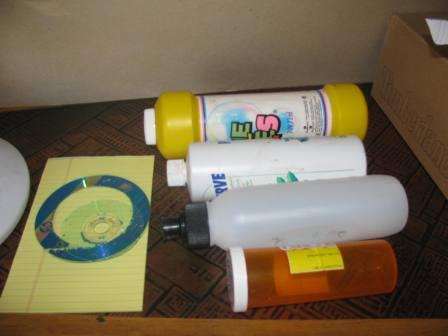
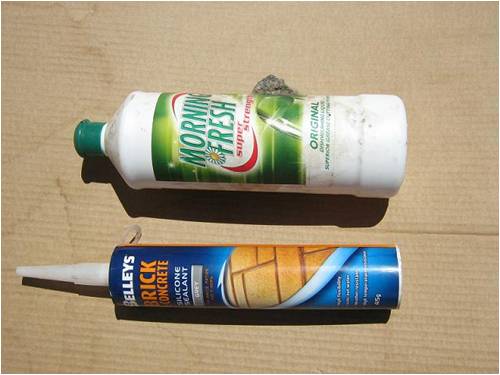
Here you have the pictures!!!
The first one is my wick try...& second one are the materials, the harder is the one that is clear brownish with the white cap. As you see everyone have different diameters� I�ll going to try with all and see.
See you later!
Gaby Muino
Downwind Guru Joined: 09/09/2009 Location: AustraliaPosts: 2333
Posted: 02:59pm 26 Feb 2010
Copy link to clipboard
Print this post
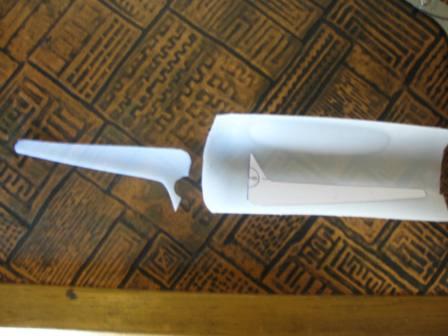
Your first attempt looks that you blades are upside down. or back to front or the wrong way around, but far from right.
You will soon see what i mean when you cut a blade out correctly as per the template.
Good to see you trying all the same.
Pete.Sometimes it just works
gabymuino Newbie Joined: 25/02/2010 Location: United StatesPosts: 26
Posted: 04:54pm 26 Feb 2010
Copy link to clipboard
Print this post
Hi Pete,
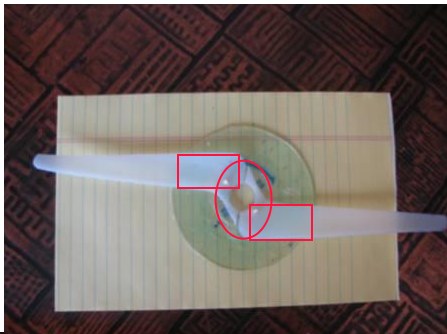
I'm finished with my first try� Ooopsss, the one that I sent to you from last nigh, I didn�t notice that I putted the blades upside down. I just turned off my computer for check. Here you have some pictures� it�s working OK, but I�m having trouble with the starting!!! I have to help the windmill with my hand to start (I�m not allow to do that) the voltage that I have now is 0 mVDC at low and almost 300mVDC in high velocity .
I don�t know if I'm measuring correctly. I have the voltmeter In the side of the VDC in 2000m. I asked my teacher and he told me that it�s correct what do you think.
Last year score winer was 600
The distance between the fan and my CD that I�m using is 40 cm.
By the way I sent you the PM but I don't know how attached the pictures Gaby Muino
gabymuino Newbie Joined: 25/02/2010 Location: United StatesPosts: 26
Posted: 05:02pm 26 Feb 2010
Copy link to clipboard
Print this post
I just sent an email to the person in charge of the event at the science olympiad. I'm asking for the distance between the fan and the CD and also the kind of fan they are going to use... Let's wait for an answer!!!Gaby Muino
Downwind Guru Joined: 09/09/2009 Location: AustraliaPosts: 2333
Posted: 05:33pm 26 Feb 2010
Copy link to clipboard
Print this post
Im not sure what the 2000m referers to on your meter but i would start off on a low volt setting like 2 volts or 20 volts.
Just remember there is 1000 mV to 1 volt.
So 0.300 volts = 300 mV.
The volt reading is taken with a meter probe attached to each wire off the motor.
You might want to reduce the cd disc size in the middle as this would be not helping startup.
A lot of the starting torque comes from the wider centre part of the blade and all that disc area will be preventing the airflow across the blade.
Get rid of it you dont need that.
The part of the blade where the centre line was must be flat down on the disc so the back edge cocks up in the air out towards the fan.
The centre line bit is the "leading " edge and must cut through the air, so if it is not flat than it will cause drag and work poorly.
Try to trim the disc down like this and keep the red bits. Loose the rest.
Its good you are trying to get some data on the real setup you will be tested against.
Its late here and i will take some photos tomorrow/today of a blade i made, but must say that this is a better looking blade than the first photo you posted.
One last thing is you could try making the blade section wider in the middle tapering off out to the ends as the wider middle section should give more start up torque.
Must be off.
Pete.Sometimes it just works
Downwind Guru Joined: 09/09/2009 Location: AustraliaPosts: 2333
Posted: 09:06am 27 Feb 2010
Copy link to clipboard
Print this post
Hi Gaby,
I spent a few hours this afternoon testing a couple of blade sizes and shapes etc.
I figure my resources are a bit better than yours and it was old secondhand pvc pipe i was using.
I too noticed startup was difficult at times.
Because the air flow off a fan is very turbulent this effects startup greatly.
Also the position of the mill to the fan makes a big difference to.
Directly in front at centre is not the best spot either as its like a hole in the air with higher flow around it.
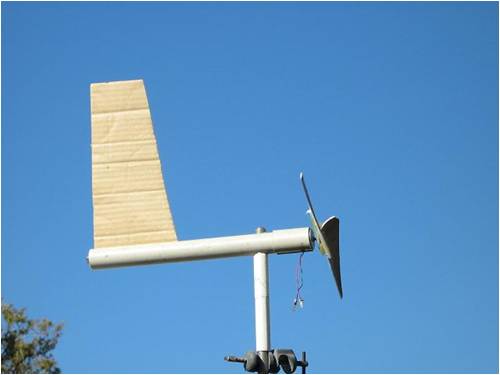
For testing today i mounted my generator up like a mini mill so it could piviot with a tail and this lets it track the wind better.
What is noticeable is how the turbulance makes the mill hunt in the air stream.
My set up was quick and rough it involved a bit of pvc pipe that i put a saw cut in, to slide a chunk of cardboard into (the cardboard i just ripped off a box)
Drilled a hole through the pipe for a piviot point.
Then cut a smaller length of pvc pipe and cut it length wise to make a snap around clamp to hold the motor on.
Bunged it ontop of a stand and that was it.
You could try the cardboard tube out of a roll of lunch wrap to experiment with to mount the generator up as a mini mill.
There is a lot to learn by doing this setup as you will notice how the mill tracks the air flow and will not always sit face on to the fan, but by moving the mill left and right and up and down you will see the changes that will teach you a lot about placement of the mill.
It also lets the mill hunt left and right and in doing so makes startup easier.
The size of the tail fin and the weight of the tail will effect things to. I needed to add some weight to the tail to dampen the hunting effect.(i just shoved a bolt up the tube end for weight)
I also found it easier to gauge some results outside in a light breeze as it was not effected as much from turbulance.
Its a matter of finding what works best with the generator and then how to get the best out of it with the fan air flow.
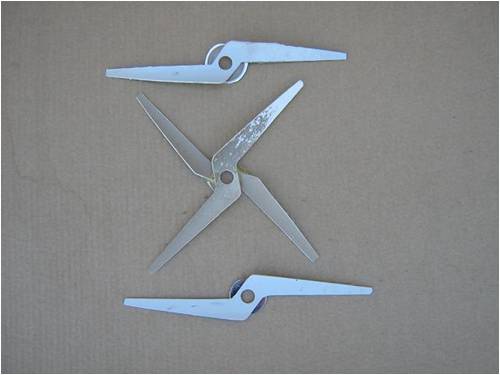
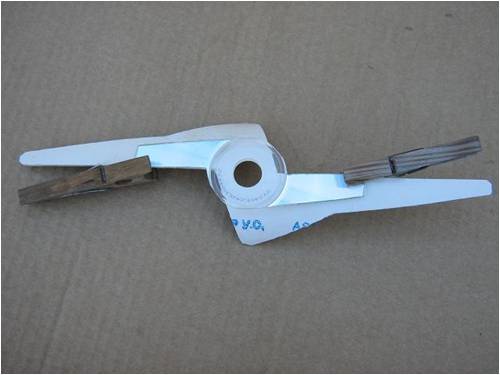
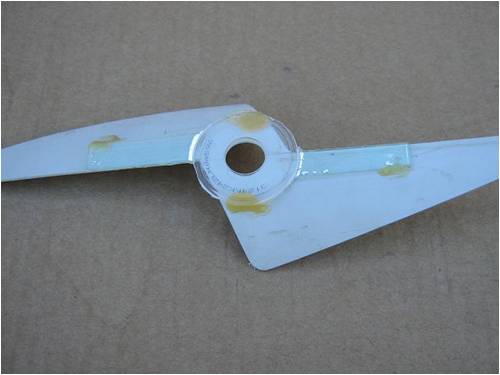
Heres some photos of my dodgie setup and a few rough blades i tried.
Do you see here what i mean about the centre line needs to be flat with the disc as i am using 2 pegs to clamp the disc to the blade for gluing.(pegs right on the very edge)
Also the shape of the disc after a serious cut down.
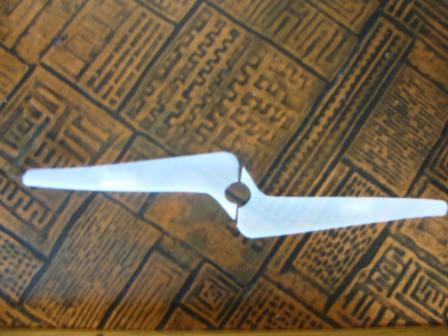
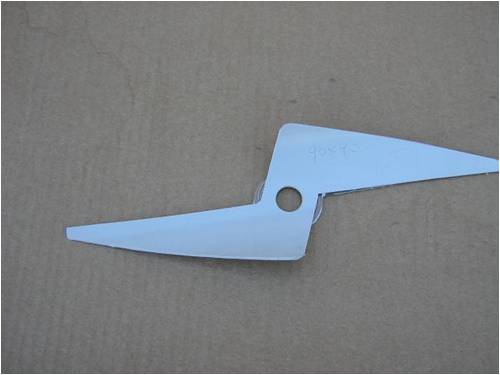
As an overall proformer this blade worked best.
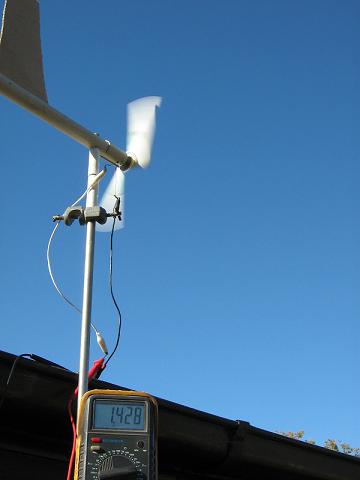
It was cut from a section of 90mm dia pvc pipe and is 90mm wide across the centre.
I used the template and measured 45mm each side of centre line across the centre, then drew a line out to the tip of the template.
The meter is reading volts and here we have 1400mV or 1.4 volts in a light to medium breeze.
It did hit over 2 volts in a light gust.
Useing the fan at 2 meters away i got around 0.7 volts average with periods of 1.2 volts when the turblance settled down.
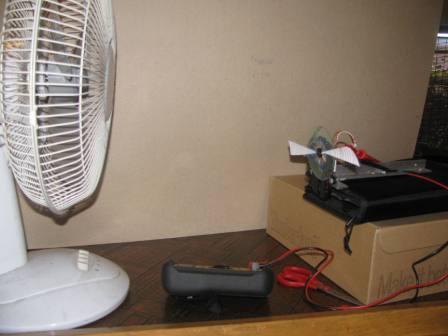
You will need the generator mounted so there is little behind it to effect the air flow past the blades (i noticed in a previous photo you had it on top of some books.....This is a No,No.)
Even the pole it is mounted on will cause a wind shadow.
You need to understand its all the little bits that add up and effect preformance.
If you think you can make 1 set of blades and get outstanding results first up you will be kidding yourself or very lucky.
We often say to newbies wanting to build a big mill to build a mini mill and learn from it, and i must say i have learn a lot more from the few tests i have done here.
To some it might seem a waste of time but it is cheap and very informative.
Although the cost of CD's and beer is adding up.
Pete.
Sometimes it just works
Page 2 of 4
Print this page
The Back Shed's forum code is written, and hosted, in Australia.


 )
)