
|
|
Forum Index : Microcontroller and PC projects : MM2: Searching for the perfect gauge
| Author | Message | ||||
| Gizmo Admin Group Joined: 05/06/2004 Location: AustraliaPosts: 5182 |
Yeah have to agree, nice. Sure looks better that a 4 line 20 character LCD. Glenn The best time to plant a tree was twenty years ago, the second best time is right now. JAQ |
||||
OA47 Guru Joined: 11/04/2012 Location: AustraliaPosts: 1050 |
That is great use of graphics on the Micromite Peter. Well Done. For those who want to use the 6 gauge code above, there have been two spaces that need to be removed in line 110. Designated here as � |
||||
| viscomjim Guru Joined: 08/01/2014 Location: United StatesPosts: 925 |
The first space that you show the circle R needs to be there but the other one does not. It should be text x... Try taking the "pause 500" out of the "run the pointer backwards and forwards" do loop to see how fast this can update. Very cool!!! |
||||
| OA47 Guru Joined: 11/04/2012 Location: AustraliaPosts: 1050 |
My typo  there were two spaces in that area. there were two spaces in that area. |
||||
| paceman Guru Joined: 07/10/2011 Location: AustraliaPosts: 1329 |
Wouldn't last long at that rate if they were analogue eh Jim! |
||||
| viscomjim Guru Joined: 08/01/2014 Location: United StatesPosts: 925 |
Thats for sure. Time to hook up some analog pins and other sensors and play.... |
||||
donmck Guru Joined: 09/06/2011 Location: AustraliaPosts: 1314 |
WOW! Super cool Peter. I had no idea how far the journey had gone until Mick dropped off one of these working units to me an hour ago. To see it in the flesh, and play around with (or delete) the software delay to see how fast the gauges can be updated, it just mind boggling. The pictures on their own, explain very little. You need it in your hand. Full marks to Geoff and everyone that has contributed to the journey. To think in terms of LCD displays and HEX keypads or whatever, is simply light years behind us now. And the prices even in one offs. Unbelievable. Like Mick, I may have to mount this thing up near my main PC monitor to remind me of what can be done with the Basic language and modern technology. Cheers Don... https://www.dontronics.com |
||||
| OA47 Guru Joined: 11/04/2012 Location: AustraliaPosts: 1050 |
Thought I would combine Peters great work and use the 6 gauge screen as the main screen and when one gauge is tapped the LCD shows only that gauge for closer inspection with an icon on the top right to return to the 6 gauge screen. 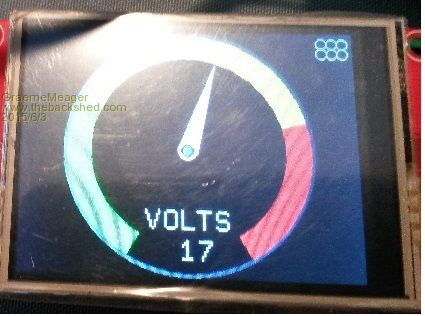
GM |
||||
BobD Guru Joined: 07/12/2011 Location: AustraliaPosts: 935 |
Graeme I was looking at this thread last night and I was thinking that the next evolution of this should be exactly what you have done today. Excellent work. Now all you need is Mick's suggestion of flashing the background red when a gauge goes into the red. Bob |
||||
| OA47 Guru Joined: 11/04/2012 Location: AustraliaPosts: 1050 |
I will look into it, even giving the icon coloured in circles representing the state of the 6 gauges. GM |
||||
| donmck Guru Joined: 09/06/2011 Location: AustraliaPosts: 1314 |
Or a Home Icon? Lower right, a Menu Icon for additional system, or individual gauge settings? Cheers Don... https://www.dontronics.com |
||||
jman Guru Joined: 12/06/2011 Location: New ZealandPosts: 711 |
Graeme that's fantastic care to post the code ? Jman |
||||
| WhiteWizzard Guru Joined: 05/04/2013 Location: United KingdomPosts: 2991 |
All, I think Peter's post title (Searching for the perfect gauge) should be changed asap to 'Found the Perfect Gauge' 
This is really fantastic stuff - and like others have said - you have to try it to appreciate it. Well done to all involved  |
||||
| OA47 Guru Joined: 11/04/2012 Location: AustraliaPosts: 1050 |
Jman, in the middle of the earlier mentioned modifications. Will post code when I get it all working. GM |
||||
TassyJim Guru Joined: 07/08/2011 Location: AustraliaPosts: 6538 |
All I need now is a decent way of mounting them. The BOSS has conceded to having one on the wall for a weather station display. My effort so far with a 2.4" display: 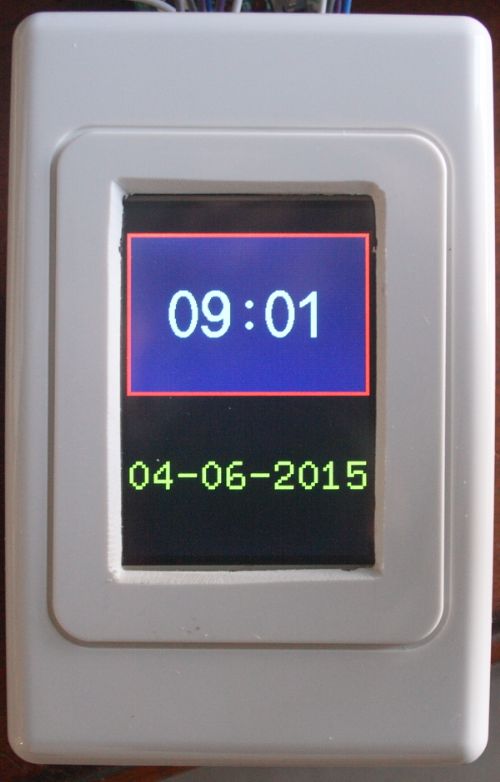
It is a 'Delta' brand light switch/blanking plate (from Bunnings) with the innards cut out. I made the hole a bit too big but it allows fat fingers to 'touch'. The standard mounting holes had to go but there are plenty of other mounting holes to use. It might look a bit strange on the dash of a plane/boat/car but the BOSS is happy so I am happy. Jim VK7JH MMedit |
||||
| matherp Guru Joined: 11/12/2012 Location: United KingdomPosts: 11513 |
Here is an additional feature, the ability to put small scale marks on the display 
Call for the above was: initgauge(0,mm.hres\2,mm.vres\2,mm.hres\2-5,1,-150,-150,105,105,150,"EGT",15) where the final 15 is optional but specifies putting marks at 15 degree intervals. The revised routines are given below. Also attached as a zip file is a fully implemented EGT program ready to go into the aircraft 2015-06-04_111036_egt.zip See this if you want to know more about EGT measurement ' ' Routine to initialise a gauge ' Parameters are: ' gaugeindex ' x-coordinate of centre of gauge ' y-coordinate of centre of gauge ' radius of gauge ' font size ' start radial of white segment (-180 to 180) ' start radial of green segment (-180 to 180, must be greater or equal to start of previous segment) ' start radial of yellow segment (-180 to 180, must be greater or equal to start of previous segment) ' start radial of red segment (-180 to 180, must be greater or equal to start of previous segment) ' start radial of black segment (-180 to 180, must be greater or equal to start of previous segment) ' string to display as gauge title ' spacing in degrees for any scale markers, set to zero or omit if not required ' sub initgauge(gaugeindex% , xpos%, ypos%, gsize%, fontmult%, whitestart%, greenstart%, yellowstart%, redstart%, blackstart%, displaystring$, tickspace%) local ticks% Circle xpos%,ypos%,gsize%+3,0,,RGB(210,210,210),RGB(210,210,210) 'background to create the bezel segment(xpos%,ypos%,gsize%,whitestart%,greenstart%, RGB(white),0) segment(xpos%,ypos%,gsize%,greenstart%,yellowstart%, RGB(green),0) segment(xpos%,ypos%,gsize%,yellowstart%,redstart%, RGB(yellow),0) segment(xpos%,ypos%,gsize%,redstart%,blackstart%, RGB(red),0) segment(xpos%,ypos%,gsize%,blackstart%,whitestart%+360, 0) segment(xpos%,ypos%,gsize%,greenstart%,greenstart%, 0) segment(xpos%,ypos%,gsize%,yellowstart%,yellowstart%, 0) segment(xpos%,ypos%,gsize%,redstart%,redstart%, 0) if tickspace% then for ticks%=whitestart% to blackstart% step tickspace% segment(xpos%,ypos%,gsize%,ticks%,ticks%, 0, (gsize%*19)\20) next ticks% endif Circle xpos%,ypos%, (gsize%*4)\5,0,,0,0 text xpos%-len(displaystring$)*4*fontmult%,ypos%+gsize%-fontmult%*28,displaystring$ ' string centred in black segment x(gaugeindex%)=xpos% y(gaugeindex%)=ypos% radius(gaugeindex%)=gsize% fontsize(gaugeindex%)=fontmult% lastx1(gaugeindex%)=xpos% lastx2(gaugeindex%)=xpos%+2 lastx3(gaugeindex%)=xpos%+2 lasty1(gaugeindex%)=ypos% lasty2(gaugeindex%)=ypos%+2 lasty3(gaugeindex%)=ypos% whitesec(gaugeindex%)=whitestart% greensec(gaugeindex%)=greenstart% yellowsec(gaugeindex%)=yellowstart% redsec(gaugeindex%)=redstart% blacksec(gaugeindex%)=blackstart% end sub ' ' ' Routine to draw a segment of a circle ' Parameters are: ' x-coordinate of centre of circle ' y-coordinate of centre of circle ' radius of circle ' start radial of segment to be drawn (0-360 degrees) ' end radial of segment to be drawn (0-360 degrees) ' colour to draw segment ' inner radius for drawing radial lines, leave blank or set to zero if not required ' ' NB if start radial and end radial are the same a line will be drawn ' Sub segment(x As integer, y As integer, outsize As integer, startradial As integer, endradial As integer, col As integer, insize as integer ) Local integer i,j,x1,x2,y1,y2,sr,er,xx0(1),yy0(1),xx1(1),yy1(1),xx2(1),yy2(1),tcol(1) If startradial=endradial Then x2=Sin(Rad(startradial))*outsize + x y2=-Cos(Rad(startradial))*outsize + y x1=Sin(Rad(startradial))*insize + x 'insize is 0 if not specified so a complete line from the centre is drawn y1=-Cos(Rad(startradial))*insize + y Line x1,y1,x2,y2,,col Else If startradial<endradial Then sr=startradial er=endradial Else er=startradial sr=endradial EndIf For i=sr+stepsize To er Step stepsize x2=Sin(Rad(i))*outsize + x y2=-Cos(Rad(i))*outsize + y x1=Sin(Rad(i-stepsize))*outsize + x y1=-Cos(Rad(i-stepsize))*outsize + y xx0(0)=x yy0(0)=y xx1(0)=x1 yy1(0)=y1 xx2(0)=x2 yy2(0)=y2 tcol(0)=col j=triangles(1,xx0(),yy0(),xx1(),yy1(),xx2(),yy2(),tcol()) Next i EndIf End Sub |
||||
centrex Guru Joined: 13/11/2011 Location: AustraliaPosts: 320 |
Trying to run the gauges by Matherp but I keep getting a cpu error. 28 pinner with ver 5.1 Have there been any updates???? Cliff Cliff |
||||
| Frank N. Furter Guru Joined: 28/05/2012 Location: GermanyPosts: 1102 |
Hi Cliff, take a look here! Geoff posted here "2016-01-23_080615_PeterMDemo.zip" and wrote that this is a "a slightly modified version of PeterM's demo program" (...but I don't tried it). Frank |
||||
| centrex Guru Joined: 13/11/2011 Location: AustraliaPosts: 320 |
Thanks Frank that all works now to find something to use it for!!! Works like a charm. Cliff Cliff |
||||
| matherp Guru Joined: 11/12/2012 Location: United KingdomPosts: 11513 |
Not sure what version you were running Cliff but I've just loaded and run my code and it works fine on 5.1. The only change I had to make was to alter the font as the font numbers changed at some stage in the development of 5.1 Here is my version tested on 5.1 ILI9341 Option default none
Option explicit CLS Const stepsize=1 const maxgauges=8 dim integer x(maxgauges), y(maxgauges), radius(maxgauges), fontsize(maxgauges) dim integer lastx1(maxgauges), lastx2(maxgauges), lastx3(maxgauges), lasty1(maxgauges), lasty2(maxgauges), lasty3(maxgauges) dim integer whitesec(maxgauges),greensec(maxgauges),yellowsec(maxgauges), redsec(maxgauges),blacksec(maxgauges) dim integer i,j dim s$ const font2size=1 ' Adjust to suit size of display font 1,font2size initgauge(0, mm.hres\6, mm.vres\4, mm.vres\4-10, font2size, -150, -90, 0, 75, 150, "EGT", 15) initgauge(1, mm.hres\6*3, mm.vres\4, mm.vres\4-10, font2size, -150, -120, 0, 120, 150, "CHT") initgauge(2, mm.hres\6*5, mm.vres\4, mm.vres\4-10, font2size, -150, -50, 0, 50, 150, "OIL") initgauge(3, mm.hres\6, mm.vres\4*3, mm.vres\4-10, font2size, -120, -120, 0, 75, 120, "AMP") initgauge(4, mm.hres\6*3, mm.vres\4*3, mm.vres\4-10, font2size, -90, -90, 0,75, 90, "OAT") initgauge(5, mm.hres\6*5, mm.vres\4*3, mm.vres\4-10, font2size, -150, -150, 0, 75, 150, "VOLT") do ' run the pointer backwards and forwards for j=0 to 5 i=rnd(22)* (blacksec(j)-whitesec(j)) + whitesec(j) s$=str$(i,4) needle(j,i,rgb(white),s$) next j pause 500 loop End ' ' ' Routine to initialise a gauge ' Parameters are: ' gaugeindex ' x-coordinate of centre of gauge ' y-coordinate of centre of gauge ' radius of gauge ' font size ' start radial of white segment (-180 to 180) ' start radial of green segment (-180 to 180, must be greater or equal to start of previous segment) ' start radial of yellow segment (-180 to 180, must be greater or equal to start of previous segment) ' start radial of red segment (-180 to 180, must be greater or equal to start of previous segment) ' start radial of black segment (-180 to 180, must be greater or equal to start of previous segment) ' string to display as gauge title ' spacing in degrees for any scale markers, set to zero or omit if not required ' sub initgauge(gaugeindex% , xpos%, ypos%, gsize%, fontmult%, whitestart%, greenstart%, yellowstart%, redstart%, blackstart%, displaystring$, tickspace%) local ticks% Circle xpos%, ypos%, gsize%+3,0,, RGB(gray), RGB(gray) 'background to create the bezel segment(xpos%, ypos%, gsize%, whitestart%, greenstart%, RGB(white), 0) segment(xpos%, ypos%, gsize%, greenstart%, yellowstart%, RGB(green), 0) segment(xpos%, ypos%, gsize%, yellowstart%, redstart%, RGB(yellow), 0) segment(xpos%, ypos%, gsize%, redstart%, blackstart%, RGB(red), 0) segment(xpos%, ypos%, gsize%, blackstart%, whitestart%+360, 0) segment(xpos%, ypos%, gsize%, greenstart%, greenstart%, 0) segment(xpos%, ypos%, gsize%, yellowstart%, yellowstart%, 0) segment(xpos%, ypos%, gsize%, redstart%, redstart%, 0) if tickspace% then for ticks%=whitestart% to blackstart% step tickspace% segment(xpos%, ypos%, gsize%, ticks%, ticks%, 0, (gsize%*19)\20) next ticks% endif Circle xpos%,ypos%, (gsize%*4)\5,0,,0,0 text xpos%-len(displaystring$)*4*fontmult%, ypos%+gsize%-fontmult%*28, displaystring$ ' string centred in black segment x(gaugeindex%)=xpos% y(gaugeindex%)=ypos% radius(gaugeindex%)=gsize% fontsize(gaugeindex%)=fontmult% lastx1(gaugeindex%)=xpos% lastx2(gaugeindex%)=xpos%+2 lastx3(gaugeindex%)=xpos%+2 lasty1(gaugeindex%)=ypos% lasty2(gaugeindex%)=ypos%+2 lasty3(gaugeindex%)=ypos% whitesec(gaugeindex%)=whitestart% greensec(gaugeindex%)=greenstart% yellowsec(gaugeindex%)=yellowstart% redsec(gaugeindex%)=redstart% blacksec(gaugeindex%)=blackstart% end sub ' ' ' Routine to draw a segment of a circle ' Parameters are: ' x-coordinate of centre of circle ' y-coordinate of centre of circle ' radius of circle ' start radial of segment to be drawn (0-360 degrees) ' end radial of segment to be drawn (0-360 degrees) ' colour to draw segment ' inner radius for drawing radial lines, leave blank or set to zero if not required ' ' NB if start radial and end radial are the same a line will be drawn ' Sub segment(x As integer, y As integer, outsize As integer, startradial As integer, endradial As integer, col As integer, insize as integer ) Local integer i, j, x1, x2, y1, y2, sr, er, xx0(1), yy0(1), xx1(1), yy1(1), xx2(1), yy2(1), tcol(1) If startradial=endradial Then x2=Sin(Rad(startradial))*outsize + x y2=-Cos(Rad(startradial))*outsize + y x1=Sin(Rad(startradial))*insize + x 'insize is 0 if not specified so a complete line from the centre is drawn y1=-Cos(Rad(startradial))*insize + y Line x1,y1,x2,y2,,col Else If startradial<endradial Then sr=startradial er=endradial Else er=startradial sr=endradial EndIf For i=sr+stepsize To er Step stepsize x2=Sin(Rad(i))*outsize + x y2=-Cos(Rad(i))*outsize + y x1=Sin(Rad(i-stepsize))*outsize + x y1=-Cos(Rad(i-stepsize))*outsize + y xx0(0)=x yy0(0)=y xx1(0)=x1 yy1(0)=y1 xx2(0)=x2 yy2(0)=y2 tcol(0)=col j=triangles(1,xx0(),yy0(),xx1(),yy1(),xx2(),yy2(),tcol()) Next i EndIf End Sub ' ' Routine to draw a pointer ' Parameters are: ' gaugeindex ' radial of pointer to be drawn (0-360 degrees) ' colour to draw pointer ' Sub needle(gaugeindex as integer, angle As integer, col As integer, value$ as string) Local integer x1,y1,x2,y2,x3,y3,x4,y4,j, xx1(1),yy1(1),xx2(1),yy2(1),xx3(1),yy3(1), tcol(1), size size= radius(gaugeindex)\5*4-1 x1=Sin(Rad(angle-90))*size/10 + x(gaugeindex) y1=-Cos(Rad(angle-90))*size/10 + y(gaugeindex) x2=Sin(Rad(angle))*size + x(gaugeindex) y2=-Cos(Rad(angle))*size + y(gaugeindex) x3=Sin(Rad(angle+90))*size/10 + x(gaugeindex) y3=-Cos(Rad(angle+90))*size/10 + y(gaugeindex) xx1(0)=lastx1(gaugeindex) yy1(0)=lasty1(gaugeindex) xx2(0)=lastx2(gaugeindex) yy2(0)=lasty2(gaugeindex) xx3(0)=lastx3(gaugeindex) yy3(0)=lasty3(gaugeindex) xx1(1)=x1 yy1(1)=y1 xx2(1)=x2 yy2(1)=y2 xx3(1)=x3 yy3(1)=y3 tcol(0)=0 tcol(1)=col j=triangles(2, xx1(), yy1(), xx2(), yy2(), xx3(), yy3(), tcol()) Circle x(gaugeindex), y(gaugeindex), size\10, 0, , col, col) Circle x(gaugeindex), y(gaugeindex), size\15, 0, , 0, 0 Circle x(gaugeindex), y(gaugeindex), size\20, 0, , RGB(gray), RGB(gray) lastx1(gaugeindex)=x1 lastx2(gaugeindex)=x2 lastx3(gaugeindex)=x3 lasty1(gaugeindex)=y1 lasty2(gaugeindex)=y2 lasty3(gaugeindex)=y3 text x(gaugeindex)-len(value$)*4*fontsize(gaugeindex)-3*fontsize(gaugeindex), y(gaugeindex)+radius(gaugeindex)-fontsize(gaugeindex)*16, value$ ' string centred in black segment End Sub ' ' ' Routine to draw multiple triangles, ' can be used to draw an existing triangle in the background colour and then re-write it somewhere else ' ' Parameters are: ' number of triangles to draw ' array x-coordinates of first points ' array y-coordinates of first points ' array x-coordinates of second points ' array y-coordinates of second points ' array x-coordinates of third points ' array y-coordinates of third points ' array colours of triangles ' CFunction triangles 00000000 27bdff90 afbf006c afbe0068 afb70064 afb60060 afb5005c afb40058 afb30054 afb20050 afb1004c afb00048 afa40070 afa50074 afa60078 afa7007c 8c820004 5c400007 afa00024 144000cc 8fbf006c 8c820000 104000ca 8fbe0068 afa00024 afa0002c 3c159d00 8fa30074 8fa40024 00641021 8c510000 8fa50078 00a41021 8c5e0000 8fa3007c 00641021 8c570000 8fa50080 00a41021 8c420000 afa20018 8fa30084 00641021 8c420000 afa20028 8fa50088 00a41021 8c560000 8fa3008c 00641021 8c540000 8fa40018 009e102a 10400008 8fa50018 03c01021 0080f021 afa20018 02201021 02e08821 0040b821 8fa50018 02c5102a 10400007 8fa30018 afb60018 00a0b021 02e01021 8fb70028 afa20028 8fa30018 007e102a 10400006 03c01021 0060f021 afa20018 02201021 02e08821 0040b821 17d6001b 8fa50018 02f1102a 14400006 02203821 0237102a 10400005 8fa40028 01000002 02e03821 02e08821 8fa40028 0091102a 54400003 8fb10028 00e4102a 0082380b 8ea20048 00fe3821 afb40010 8c420000 02202021 03c02821 02203021 0040f809 00f13823 01000063 8fa4002c 00b61026 0002102b 00a21023 afa2001c 005e102a 1440002f 03c08021 02f11023 afa20020 8fa30028 00711823 afa30030 00009021 00009821 00be2023 afa40034 02def823 afbe0038 afb7003c afb60040 0060f021 0080b821 03e0b021 0277001a 02e001f4 00002012 00912021 0256001a 02c001f4 00003012 00d13021 00c4102a 50400005 8ea20048 00801021 00c02021 00403021 8ea20048 afb40010 8c420000 02002821 0040f809 02003821 26100001 8fa20020 02629821 8fa3001c 0070102a 1040ffe6 025e9021 8fbe0038 8fb7003c 8fb60040 02d0102a 1440002a 8fa40028 00972023 afa4001c 8fa50018 02059023 72449002 8fa20028 00511023 afa20020 021e9823 70539802 02c51023 afa20018 02def023 8fa30018 0243001a 006001f4 00002012 00972021 027e001a 03c001f4 00003012 00d13021 00c4102a 50400005 8ea20048 00801021 00c02021 00403021 8ea20048 afb40010 8c420000 02002821 0040f809 02003821 26100001 8fa2001c 02429021 8fa30020 02d0102a 1040ffe5 02639821 8fa4002c 24840001 afa4002c 8fa50024 24a50008 afa50024 000417c3 8fa50070 8ca30004 0043182a 1460ff45 8fa30074 8ca30004 14620006 8fbf006c 8ca20000 0082202b 1480ff3e 8fa30074 8fbf006c 8fbe0068 8fb70064 8fb60060 8fb5005c 8fb40058 8fb30054 8fb20050 8fb1004c 8fb00048 03e00008 27bd0070 End CFunction 'MIPS32 M4K |
||||
| The Back Shed's forum code is written, and hosted, in Australia. | © JAQ Software 2026 |
