
|
|
Forum Index : Microcontroller and PC projects : PS2 mouse to HobbyTronics emulator
| Author | Message | ||||
| vegipete Guru Joined: 29/01/2013 Location: CanadaPosts: 1180 |
I found my version benefited from having the CONTROLLER MOUSE OPEN inside a loop with an ON ERROR SKIP just before. Up to 5 tries with a slight pause between was pretty reliable. ' try a few times to find a mouse for i = 1 to 5 on error skip controller mouse open mouseport, LeftClick if MM.ERRNO = 0 then exit for endif pause 100 next i if 5 < i then print @(300,300) "Sorry, this program needs a mouse." end endif Visit Vegipete's *Mite Library for cool programs. |
||||
mclout999 Guru Joined: 05/07/2020 Location: United StatesPosts: 509 |
Update. I did not turn off the CMM2 during testing so when I turn it off later and turned back on the optical mouse will not start up unless I unplug it and replug it. Still not a deal-breaker. But you may be able to use that info. They call me Shai-Hulud (The maker) |
||||
TassyJim Guru Joined: 07/08/2011 Location: AustraliaPosts: 6538 |
I have added some print statements to the code so we can do some debugging HT_mouse1.zip With the Arduino serial monitor running,lets see what we get. The first line is just to show the code is running. Next there is a basic reset by toggling the lines and we time how long for a response from the mouse. Then we check for the mouseID which should be zero initially. We then try and put it into 'intellimouse' mode where the ID should be 3 There are lots of other modes to try but any mouse should default to basic if it can't do 'intellimouse' The next line is the time taken to initialise the mouse. Finally we get some live data. My Microsoft USB notebook mouse is one that fails: Start here mouseOK 0 For my generic PS/2 scroll mice Start here mouseOK 40 DeviceId 0 DeviceId 3 404 400,300,0,0,0,0,0,0 399,299,0,0,0,-1,-1,0 398,299,0,0,0,-1,0,0 398,299,0,0,0,0,0,0 397,299,0,0,0,-1,0,0 The 3 button mouse without scroll gave the same result. I don't have a two button mouse but it should stay with DeviceId 0 For my generic USB optical mouse and Microsoft basic optical mouse V2.0 (which does state USB/PS2) Start here mouseOK 41 DeviceId 0 DeviceId 3 444 400,300,0,0,0,0,0,0 442,285,0,0,0,42,-15,0 491,272,0,0,0,49,-13,0 498,270,0,0,0,7,-2,0 With the USB mice, I am using a Microsoft USB-PS2 adapter. There are different brand one out there and I know that not all adapters are wired the same. As far as I can see, if you get mouseOK 0, it's time to give up with that mouse. Remember to reset the Arduino when you change mice to restart the program. There are a few sites if you want some light reading Start here: https://www.win.tue.nl/~aeb/linux/kbd/scancodes-13.html Jim Edited 2020-12-23 14:34 by TassyJim VK7JH MMedit |
||||
| thwill Guru Joined: 16/09/2019 Location: United KingdomPosts: 4369 |
Thank you Jim. Might not get around to it today, depends on the kids. I have some of those USB-PS2 adapters (I didn't think they would work) so that gives me a couple of more mice I can try. I have also sourced an alternative manufacturer Nano and will solder up a second PS2 socket so I can eliminate some other potential sources of failure. Thanks for the reading, much appreciated. Cheers, Tom MMBasic for Linux, Game*Mite, CMM2 Welcome Tape, Creaky old text adventures |
||||
| TassyJim Guru Joined: 07/08/2011 Location: AustraliaPosts: 6538 |
I knew that many of the first USB mice were PS/2 as well but I was very surprised when I checked my "Microsoft Basic Optical Mouse" It was purchased about 3 years ago and the local Harvey Norman store still has it listed as current. The description in their adverts doesn't mention PS/2 but I must go in and have a closer look at the current offering and see if it still has PS/2 written on the underside. Not much time to play for the next couple of days... Jim VK7JH MMedit |
||||
| mclout999 Guru Joined: 05/07/2020 Location: United StatesPosts: 509 |
I noted this little anomaly while testing and no one commented on it but how did the USB connection on the NANO power up my CMM2 when I had pulled the 5V pin off the NANO? Thanks. They call me Shai-Hulud (The maker) |
||||
| mclout999 Guru Joined: 05/07/2020 Location: United StatesPosts: 509 |
Jim: Hi. I have been trying to decipher your NANO code and had a thought that you might look into. I think from all of the myriads of testing of the 24 mice I have That it might be a problem with the initial power-on of the MOUSE. If I apply only power to the optical mice and no data at all the LED sensor NEVER lights. When connected to the data lines on power up I get random lightings. The new version does allow some optical mice to work but only after the NANO is fully up and running(I have to plug the mouse in after it is booted.) If you get a chance and tell me if this has no merit or you are already doing something like this, could you try two steeps at the beginning of the initializing of the PS/2 mouse? First, turn on the ports and strobe them for a moment to allow the dual mice to identify what they are connecting to. Second, close the ports momentarily again to allow enough time for the mice to initialize themselves. I am really trying to figure out how the mice and the interphase chips on the original PS/2 Ports interacted with devices as they both evolved and added features. Like I said maybe this has no merit and I wish I understood C code well enough to figure how your code works. I will continue to study it and other sources. Thanks. They call me Shai-Hulud (The maker) |
||||
| TassyJim Guru Joined: 07/08/2011 Location: AustraliaPosts: 6538 |
If you plug the mouse in after the nano has booted, the mouse misses out on the initial test I give it. That might be upsetting the mouse so you could try disabling that part of the code. Change this section: Serial.println("Start here "); mouseOK = checkMouse(); Serial.print("mouseOK "); Serial.println(mouseOK); readStart = millis(); mouse.initialize(); readTime = (millis() - readStart); Serial.println(readTime); to Serial.println("Start here "); // mouseOK = checkMouse(); Serial.print("mouseOK "); Serial.println(mouseOK); readStart = millis(); mouse.initialize(); readTime = (millis() - readStart); Serial.println(readTime); You could also rem out the mouse.initialize(); line but I think that would confuse the issue further. My knowledge of C is very limited and relying on Arduino code found on the net is not a good way to learn good practices. The PS/2 code is definitely not my work. But it works. Some optical mice have their LED on all the time, others wait until they are needed. A PS/2 mouse should reset either by applying power or sending a reset command. After the reset, the code interrogates the mouse to see if it can do the wheel. If the mouse is not present during boot-up, the wheel wont work. Jim VK7JH MMedit |
||||
| mclout999 Guru Joined: 05/07/2020 Location: United StatesPosts: 509 |
Everything I tired with delays or trying your suggestions change nothing. I still have to leave the mouse unpluged, boot the CMM2 and plug in the mouse and sometimes reset the NANO to get the mouse running Just from my experiments on power only from the NANO or a different 5V source the lights NEVER turn on. I was assuming from this that if the mouse has not negotiated a connection with a PS/2 interphase they do initialize and turn on their sensor. So when they do have both 5V and the data lines and do not turn on their sensor, I am assuming that they also have not initialized themselves. There is some magic happening during the time of the power-up of the NANO that is not meeting the needs of the mouse to allow its power-on sequence and initialization process because if I plug it in after The NANO has fully booted I can get the mice to work every time most often with a reset. I am going to do some research on other PS/2 interphases on microcontrollers to see if anyone else has reported this issue of some PS/2 mice not initiating. My VGA32(http://www.lilygo.cn/prod_view.aspx?TypeId=50033&Id=1083&FId=t3:50033:3) uses similar code and every mouse I can throw at it works. I will look at their codebase (https://github.com/fdivitto/FabGL) ( for the mouse interphase. They are using ESP32 based devices on Aurdino but maybe I can find something. I hope I find something to help. I have the workaround but I would like for anyone to be able to just plug in any mouse and get it running without an issue. Thanks for all your help. They call me Shai-Hulud (The maker) |
||||
| matherp Guru Joined: 11/12/2012 Location: United KingdomPosts: 11512 |
Have you got pullup resistors on the mouse clock and data lines? If not try 4K7 to 5V |
||||
| TassyJim Guru Joined: 07/08/2011 Location: AustraliaPosts: 6538 |
If it always starts after a reset, it could indicate that the mice need time to settle after applying power and before initialising. You could try putting a long delay at the start of the program. void setup() { delayMicroseconds(1000); // new line added If you haven't already done it, try the external pullups. Any value from 4.7k to 10k. I will probably make that standard for all. Jim VK7JH MMedit |
||||
| mclout999 Guru Joined: 05/07/2020 Location: United StatesPosts: 509 |
That is what I have been trying to get across and failing so that is good. I did add a DELAY (1000) command at that location and it did not help. I will try your delay and the resisters. �I just put them in line with the data pins D2 and D3 correct? I will have to find some resister. � Thanks. EDIT: I found some 8.2K resistors. Edited 2020-12-26 07:32 by mclout999 They call me Shai-Hulud (The maker) |
||||
| lizby Guru Joined: 17/05/2016 Location: United StatesPosts: 3784 |
Not in-line--pullups. If one 8.2K (per signal) doesn't work, try two pullups per line in parallel. PicoMite, Armmite F4, SensorKits, MMBasic Hardware, Games, etc. on FOTS |
||||
| TassyJim Guru Joined: 07/08/2011 Location: AustraliaPosts: 6538 |
Connect then from D2 to 5V and D3 to 5V Jim VK7JH MMedit |
||||
| mclout999 Guru Joined: 05/07/2020 Location: United StatesPosts: 509 |
[QUOTEConnect then from D2 to 5V and D3 to 5V] I did that and now I can start with my new optical plugged in and it works right off. There are 3 other optical mice models that will not work but I can live with that. I did not have to use the pause at all. It is a good solution but we should note that not all mice will work. I have 7 mice models and now 4 work without a reset or anything. I am still researching mouse code for my own edification as I am beginning to understand a little how microcontrollers work. Now I just want to reorder some parts to be able to button this little beauty into a sleek small safe box. The only parts that did arrive were the NANOs. After 3 months 9 other parts orders never came from China. Thanks. They call me Shai-Hulud (The maker) |
||||
| TassyJim Guru Joined: 07/08/2011 Location: AustraliaPosts: 6538 |
I did that and now I can start with my new optical plugged in and it works right off. That's good news. I should have included the pullup resistors in the original circuit. I was led astray by the knowledge that my 3 ball mice and 2 optical mice all worked without them. The optical mice use a USB to PS/2 adapter and that does include 4.7k pullups in it which explains why I didn't need the pullups for them. Hope the experience of being a guinea pig wasn't too bad. This is a dump of the communication when initializing the PS/2 mouse Bytes preceded by 'h' are from the host to the mouse, all other bytes are from the mouse. It starts with FF to do a reset, plays around to see if it's a wheel mouse and ends with F0 to get it ready to give data on demand. I used the CMM2 to monitor the lines and do the decoding, just for fun... Jim VK7JH MMedit |
||||
| mclout999 Guru Joined: 05/07/2020 Location: United StatesPosts: 509 |
It was great here in my little cage(Covad cage) and I learned a hell of a lot and have developed some new interests. That is what the CMM2 is all about. Thanks for the help along my way. They call me Shai-Hulud (The maker) |
||||
| thwill Guru Joined: 16/09/2019 Location: United KingdomPosts: 4369 |
Hi Jim, Just a few lines to say I'm still playing with this. I think I now have the Nano <-> PS/2 working with a nasty old mini/laptop USB mouse that I dug out of a crate and a green Microsoft PS/2 <-> USB adapter, looks like I am getting the expected output on the Serial monitor but haven't had opportunity to connect it to my CMM2 yet. My new PS/2 mouse still isn't co-operating and the Nano appears to "hang" after printing the initial Mouse OK. I'll get back to you with some more information the next time I find time. One thing I notice even in the working case is that I sometimes have to Reset the Nano two or three times before things get moving. 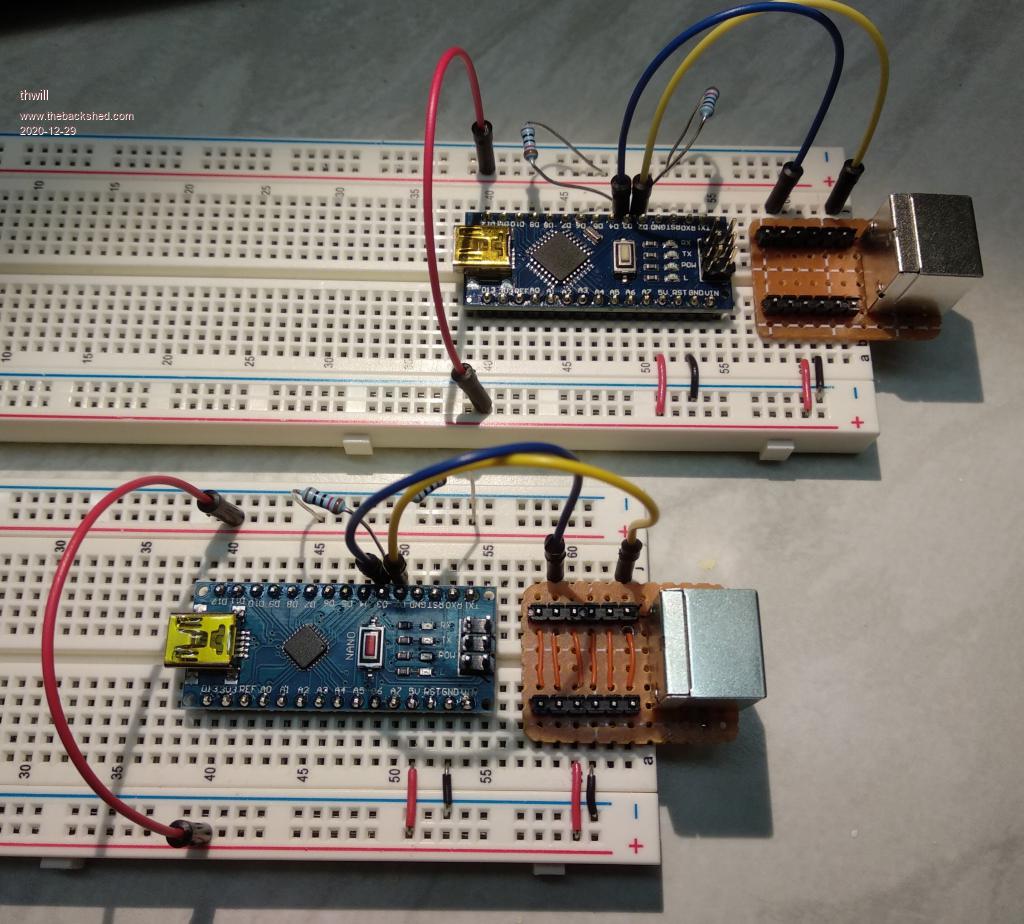 Best wishes, Tom MMBasic for Linux, Game*Mite, CMM2 Welcome Tape, Creaky old text adventures |
||||
| TassyJim Guru Joined: 07/08/2011 Location: AustraliaPosts: 6538 |
Tom, What you need is a PS/2 analyzer. Here's one I prepared earlier. OPTION EXPLICIT OPTION DEFAULT NONE const clk_pin = 8 ' connect to PS/2 clock line via 100k resistor const dta_pin = 10 ' connect to PS/2 data line via 100k resistor const clk2_pin = 12 ' connect to clk_pin const samples = 9000 ' enough time to store a startup sequence dim integer state ' 0 = device to host, 1 = host to device dim float time_now, time_start dim integer Pbyte, ready = 1 dim float clk_dta(samples), dta_dta(samples) cls setpin clk2_pin, din ADC OPEN 200000, dta_pin, clk_pin, ,alldone ' read inputs every 5uS adc trigger 2, -1.5 ' trigger on falling edge do if ready = 1 then ready = 0 'do : loop until pin(clk2_pin) = 1 ' wait for clock to go high time_start = timer do if pin(clk2_pin) =0 then time_start = timer loop until (timer - time_start) > 0.4 ' clock must be high for 400uS adc start dta_dta(), clk_dta() ' aquisition will start on the next falling edge endif loop until inkey$ <>"" adc close sub alldone local integer n, st, tm, last_clk_state, startB, stopB, parityB, ackB, bitcount local integer bit_state, clk_state, bit local d$ time_start = timer 'state = 1 clk_state = (clk_dta(0) > 1.6) bit_state = (dta_dta(0) > 1.6) for n = 0 to samples-1 time_now = timer clk_state = (clk_dta(n) > 1.6) ' convert analog to digital bit_state = (dta_dta(n) > 1.6) if (n-st) > 100 then exit for ' no activity for 500uS if clk_state <> last_clk_state then 'if n > 2 then print clk_dta(n-2),clk_dta(n-1),clk_dta(n),clk_dta(n+1),clk_dta(n+2) tm = n - st ' number of time interval for last clock period st = n 'print tm; if tm > 28 or (tm > 20 and bitcount > 5) then if bitcount > 10 then print d$+hex$(Pbyte,2)+" "; state = clk_state bitcount = 0 Pbyte = 0 endif if state = clk_state then if bitcount = 0 then if state = 1 then d$="h" else d$ = " " endif bit = bit_state ' host to device = rising edge, device to host = falling edge select case bitcount case 0 startB = bit ' start bit should always be 0 case 1 to 8 Pbyte = (Pbyte >> 1) + (bit << 7) case 9 parityB = bit ' ignored for now case 10 stopB = bit ' stop bit should always be 1 case 11 ackB = bit ' acknowledge bit 0 = good (host to device only) end select inc bitcount endif endif last_clk_state = clk_state next n print d$+hex$(Pbyte,2) ' the last byte in the sequence ready = 1 end sub On the nano, comment out the lines at the start that do the checkMouse() leave the mouse.initialize(); as the only active line in that area. if (in_mode == 0) { // Serial.println("Start here "); // mouseOK = checkMouse(); // Serial.print("mouseOK "); // Serial.println(mouseOK); // readStart = millis(); mouse.initialize(); // readTime = (millis() - readStart); // Serial.println(readTime); } else { joy_initialize(); } connect CMM2 pin 8 to PS/2 clock line (nano pin D 3) via 100k resistor connect CMM2 pin 10 to PS/2 data line (nano pin D 2) via 100k resistor connect CMM2 pin 12 to clk_pin (CMM2 pin 8) Once the program is running on the CMM2, do a reset on the nano to force the initialize routine. Jim VK7JH MMedit |
||||
| thwill Guru Joined: 16/09/2019 Location: United KingdomPosts: 4369 |
Jim, Should the rotating cube demo you posted in this thread work with the PS/2 mouse support in the 5.07.00b4 firmware? It doesn't seem to do so for me though the simple "mouse and cursor test" example does. Best regards, Tom MMBasic for Linux, Game*Mite, CMM2 Welcome Tape, Creaky old text adventures |
||||
| The Back Shed's forum code is written, and hosted, in Australia. | © JAQ Software 2026 |
