
|
|
Forum Index : Microcontroller and PC projects : Stepper Project
| Author | Message | ||||
Bryan1 Guru Joined: 22/02/2006 Location: AustraliaPosts: 2102 |
Ok with the X axis I measured and 25mm can be cut off the shaft and I'm not going to bother with that old slide so the mount will be closer. Phenix I did put a new thrust bearing on the Y axis so the only backlash will be in the screw and I did need to use a 25 thou feeler to start now if the backlash count does go over 25 thou it a simple case of turning the leadscrew around to get more clearance and drill a new seat for the grub screw. Tomorrow I'm going to get the LCD going so I can test this Y axis and measure with my dial indicator the backlash. In my past life on mine sites also construction sites my job was aligning couplings where we found a guy trying to use use a laser to align a coupling and was having fun so I put my 2 dial test indicators on did one rotation then put the right packers in to get a 0.001 error  now that was back in the 90's when we built Pelican Point power station where me and mate had well over a 100 couplings to align. now that was back in the 90's when we built Pelican Point power station where me and mate had well over a 100 couplings to align.Going the solid coupling to align was the easiest way for me in this application. |
||||
| PhenixRising Guru Joined: 07/11/2023 Location: United KingdomPosts: 1963 |
Bryan, that is the best G-Code list that I've ever seen....even has canned cycles  I had the first Haas VMC-10 (10 foot bed) in the state of Michigan. Visited the factory and I was being given the grand tour by a couple of sales guys. Everyone was immaculately dressed in Haas uniform but as I was chatting, I saw this guy standing in the background, long hair, jeans, t-shirt and I am thinking, how did this guy get on the factory floor wearing sandals Then my host said "anyway let me introduce you to Gene". It was Gene Haas, the founder/owner 😂🤣 |
||||
| Bryan1 Guru Joined: 22/02/2006 Location: AustraliaPosts: 2102 |
So today thought to have a play with this Y axis and at first I just used the inverted circuit with the transistors and found the stepper motor was nice and noisy and hammered when trying to do some steps so stopped it straight away. Went and found some 1K and 22K resistors and wired it up to Lyles circuit next thing the stepper was working  So been having some fun calibrating the stepper and settled on 3200 steps with 2.7 amps which at full current when switch 4 is on gave a holding current of 284mA. Found 258 steps to be pretty spot on using my dial indicator and just spent an hour so resetting the thrust bearing on the rear of the leadscrew and found 1.92mm backlash repeated several times. Now on reading the stepper PDF with the Stepper Close it states it releases the resources and shuts down the Stepper sub system now by using my programmable power supply that 284mA is still there holding the stepper in position. So I did think after a Stepper Close the holding current for the stepper would be off. So it good to see this Y axis does work Here is a pic of the breadboard setup 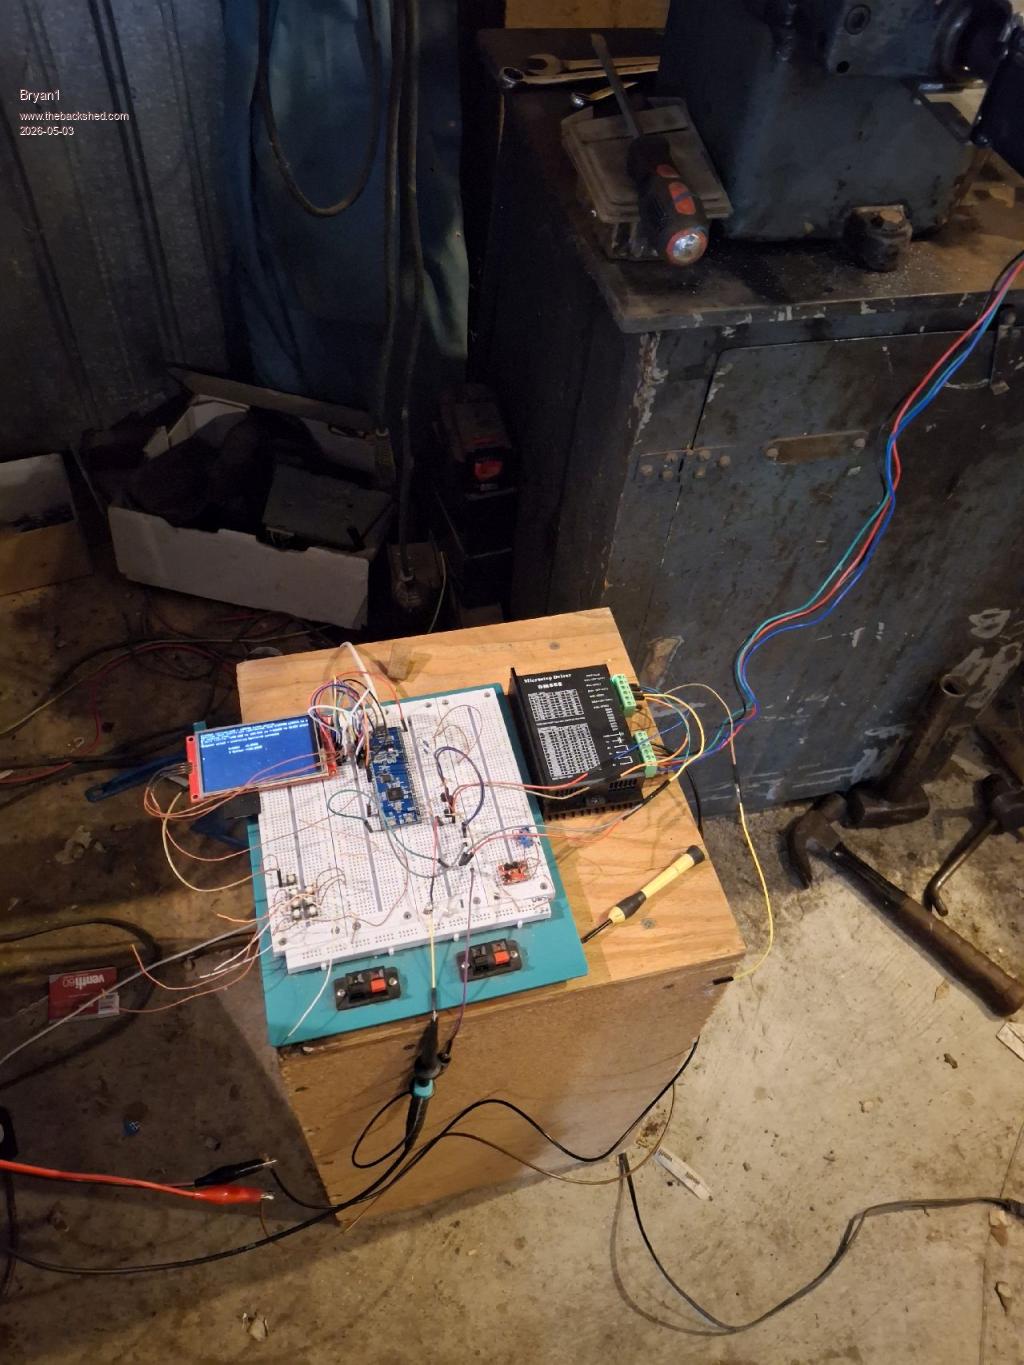 Regards Bryan |
||||
| phil99 Guru Joined: 11/02/2018 Location: AustraliaPosts: 3294 |
In that case after Stepper Close use SetPin GPxx, OFF for all the pins. |
||||
| Bryan1 Guru Joined: 22/02/2006 Location: AustraliaPosts: 2102 |
Stepper close SetPin GP26, off Setpin GP25, off Ok tried that and the power supply didn't change and the holding 283mA current is still there. |
||||
| dddns Guru Joined: 20/09/2024 Location: GermanyPosts: 848 |
I think the holding sets in when enable is high. Edit: I think the higher the micro stepping, the lower the torque. 1/100mm can usually be done with 1/16 stepping Edited 2026-05-03 16:19 by dddns |
||||
| Mixtel90 Guru Joined: 05/10/2019 Location: United KingdomPosts: 8913 |
Wow... Such a thing of beauty, Bryan! The delicate, understated plinth and the presence of the percussive adjustment instruments adds a touch of pure class. :) I'll be honest though, I can't follow this conversation. You may as well be speaking in Chinese for all I know. :) Looks like a fun project though. . Edited 2026-05-03 17:28 by Mixtel90 Mick Zilog Inside! nascom.info for Nascom & Gemini Preliminary MMBasic docs & my PCB designs |
||||
| matherp Guru Joined: 11/12/2012 Location: United KingdomPosts: 11541 |
To reduce the holding current to zero you need to use the enable pin, otherwise the driver will stay powered Edited 2026-05-03 18:20 by matherp |
||||
| Mixtel90 Guru Joined: 05/10/2019 Location: United KingdomPosts: 8913 |
I suppose it might be a case of whether braking is wanted. Disabling the driver, by killing the current, will remove the braking. I've absolutely no idea what is wanted here. :) Mick Zilog Inside! nascom.info for Nascom & Gemini Preliminary MMBasic docs & my PCB designs |
||||
| mozzie Guru Joined: 15/06/2020 Location: AustraliaPosts: 387 |
G'day Bryan, Great to see you are having a win with the surface grinder As others have pointed out, the ENABLE input on a lot of these stepper drivers is really a DISABLE input, if you APPLY a signal it will DISABLE the driver. The circuit posted a while back has the base resistor for the enable transistor going to +3v3, this applies the ENABLE signal when the stepper system is closed and disables the driver (I hope) I finally got access (it was a squeeze) to the machine here today, it is the cheaper knock off version of the unit you have there. I am thinking the X-Axis drive might be better off with a toothed belt reduction to increase the torque available, there is a fair amount of weight to shift back and forth so momentum / acceleration is going to be an issue, also working against the grinding wheel. I get 165mm travel (6.5") per rev of the handwheel on this machine, so possibly 4:1 or 6:1 depending on what pulleys I can find hiding in a box somewhere. I'll post some pics when time allows. Mick, good to see he has multiple sizes of percussive adjustment instruments available Regards, Lyle. |
||||
| PhenixRising Guru Joined: 07/11/2023 Location: United KingdomPosts: 1963 |
Yeah some breadboards can be petty tight |
||||
| Bryan1 Guru Joined: 22/02/2006 Location: AustraliaPosts: 2102 |
As the DM556 has the enable on by default I left the connection off yesterday so yes another BC337 needs to be added so the enable can be hooked up which I will do today so can test when the program ends the holding current is turned off. One thing I didn't do yesterday was work out the resolution per step 258 step per mm equates to 0.0038 mm per step Now when setting up the Z axis which is the next kettle to boil getting close to that resolution or better can mean when putting on a cut with the grinding wheel only 1 or 2 steps are needed. Now with the X axis toothed drive the handle is machined to take the backlash out of the drive shaft so yes my thought was to just use the handle and machine it to suit the driven gear where the tapered pin is the locking drive which will take care of the backlash. I had a good read of the graphical PDF last night and by using the drop down number box one can input the required movement in which will be a string, Now getting that string data into the Stepper G-Code will be the challenge and once all the parameters are inputted in a GUI switch can start the stepper. Now with the feature of doing multiple pages each Axis can have it's own page so the data be inputted in and as each axis will be need to be toggled that same axis page can be setup so the grinder can be setup to do the job. Those pico 2 boards should be here this week so when they get here I will set one up for the stepper project to use as it will have enough pins to drive a SSD1963 Touch screen LCD along with the 3 axis and limit switch's. With the Y axis I will find some micro switch's to use for the limit switch's and set them up so that axis is complete. Now with the percussive adjustment instruments I may just have to include my some of my range in the next picture Regards Bryan |
||||
| Bryan1 Guru Joined: 22/02/2006 Location: AustraliaPosts: 2102 |
Ok having a heap of fun just trying to get the CONST setup in my program so how is [4] Const X-position = 1, X-goleft = 2, X-goright = 3, X-boundry+ = 4, Error : Invalid syntax] That a syntax error and have spent close to an hour trying to past this OPTION EXPLICIT OPTION DEFAULT NONE option console serial Colour RGB(white), rgb (black) const X-position = 1, X-goleft = 2, X-goright = 3, X-boundry+ = 4, const X-boundry- = 5, Y-position = 6, Y-goin = 7, Y-goout = 8, const Y-boundry+ = 9, Y-boundry- = 10 Const Z-position = 9, Z-goup = 10, Z-godown = 11 const Z-+boundary = 12, Z-boundary = 13 const AENABLE = 14 XSTEP = 15 XDIR = 16 YSTEP = 17, YDIR = 18 const ZSTEP = 19, ZDIR = 20, PAGE_1TITLE = 21 cls font 2,2 : gui caption PAGE_1TITLE, "MMBasic Surface Grinder" 10, 0 As one can see it has been a long time since I tried to code  Edited 2026-05-04 11:03 by Bryan1 |
||||
| phil99 Guru Joined: 11/02/2018 Location: AustraliaPosts: 3294 |
[4] Const X-position = 1, X-goleft = 2, X-goright = 3, X-boundry+ = 4, Error : Invalid syntax] Arithmetic operators "-" and "+" etc. in Const declarations are one problem. The other is the coma at the end of the line. Replace them with "." or "_". Eg. Const X.position = 1, X.goleft = 2, X.goright = 3, X.boundry_ = 4 Edited 2026-05-04 11:24 by phil99 |
||||
| Bryan1 Guru Joined: 22/02/2006 Location: AustraliaPosts: 2102 |
Thank You for that Phill finally got my program uploaded without errors so on I march finding a heap more as I go |
||||
| Bryan1 Guru Joined: 22/02/2006 Location: AustraliaPosts: 2102 |
Ok next stumble and I'm sure there is going to be quite a few, now with the 3 led's I want to setup with a new GUI page when the LED is depressed with the stylus Now in the manual it states GUI PAGE #n [,#n2, #n3, etc] So I tried on the command line > gui setup #22, #23, #24, #25, #26 Error : Invalid syntax also tried > gui setup #22,[ #23, #24, #25, #26] Error : Invalid syntax Edited 2026-05-04 15:28 by Bryan1 |
||||
| Bryan1 Guru Joined: 22/02/2006 Location: AustraliaPosts: 2102 |
Ok I'm on reading, reading and did I say reading I'm trying to set multiple pages yet everytime I click on the either button that is shown as text I get the error [32] Select Case click(ref) Error : REF is not declared Now either I'm going blind as I reckon I have declared everything OPTION EXPLICIT OPTION DEFAULT NONE option console serial Colour RGB(white), rgb (black) const X_position = 1, X_goleft = 2, X_goright = 3, X_boundryleft = 4 const X_boundryright = 5, Y_position = 6, Y_goin = 7, Y_goout = 8 const Y_boundryin = 9, Y_boundryout = 10 Const Z_position = 9, Z_goup = 10, Z_godown = 11 const Z_boundaryup = 12, Z_boundarydown = 13 const AENABLE = 14, XSTEP = 15, XDIR = 16, YSTEP = 17, YDIR = 18 const ZSTEP = 19, ZDIR = 20, PAGE_1TITLE = 21, ysetup = 23 const page_1 = 27, xsetup = 25, zsetup = 26 const page_2 = 28, page_3 = 29, page_4 = 30, page_6 = 31 cls gui setup 1 font 1,2 : gui caption PAGE_1TITLE, "MMBasic Surface Grinder", 70, 20 GUI button #22,"X Axis", 350, 160, 80, 20, rgb(red) gui button #23,"Y Axis", 350, 210, 20, 10, rgb(red) gui button #24,"Z Axis", 350, 260, 20, 10, rgb(red) gui interrupt TOUCHDOWN do loop sub TOUCHDOWN select case click(ref) if case #22 : rgb(green) gui page 2 xpage else ' 350,210 if case #23 : rgb(green) gui page 3 ' 350, 260 else if case #24 : rgb(green) gui page 4 end if end select end sub gui setup 2 gui caption xsetup, "X Axis Config" 60, 20, rgb(green) Gui setup 3 Gui caption ysetup, "Y Axis Config",60, 20 rgb(green) gui setup 4 gui caption zsetup, " Z Axis Config", 60, 20 rgb(green) May be time for a caffine break |
||||
| ville56 Guru Joined: 08/06/2022 Location: AustriaPosts: 534 |
IMHo, If case # nn will be a showstopper either. Select case varname Case condition Case condition .... End select If you need a if then else within case just use it as in any other place. 73 de OE1HGA, Gerald |
||||
| Bryan1 Guru Joined: 22/02/2006 Location: AustraliaPosts: 2102 |
Ok thats enough for the day and the huge learning curve is going on but still stuck on getting the Axis radio buttons to work as the not declared error keeps coming up  Anyway with the display box's on the left when I put the Peek(Stepper) in got the error the stepper wasn't configured so they are for later. OPTION EXPLICIT OPTION DEFAULT NONE option console serial Colour RGB(white), rgb (black) const X_position = 1, X_goleft = 2, X_goright = 3, X_boundryleft = 4 const X_boundryright = 5, Y_position = 6, Y_goin = 7, Y_goout = 8 const Y_boundryin = 9, Y_boundryout = 10 Const Z_position = 9, Z_goup = 10, Z_godown = 11, Z1 = 24 const Z_boundaryup = 12, Z_boundarydown = 13, X1 = 22, Y1 = 23 const AENABLE = 14, XSTEP = 15, XDIR = 16, YSTEP = 17, YDIR = 18 const ZSTEP = 19, ZDIR = 20, PAGE_1TITLE = 21, ysetup = 23, Z0 = 35 const page_1 = 27, xsetup = 25, zsetup = 26, ver = 32, X0 = 33 const page_2 = 28, page_3 = 29, page_4 = 30, page_6 = 31, Y0 = 34 cls gui setup 1 font 1,2 : gui caption PAGE_1TITLE, "MMBasic Surface Grinder", 70, 20 gui caption ver, " Version 0.001", 100, 40 GUI radio #22,"X Axis", 350, 160, 10, rgb(red) gui radio #23,"Y Axis", 350, 210, 10, rgb(red) gui radio #24,"Z Axis", 350, 260, 10, rgb(red) gui displaybox X_position, 60, 90, 140, 30, rgb(white) ctrlval(1) = "0.000"'Str$(Peek(stepper x),-4,4) gui button X0,"X",0,80,50,50, rgb(white) gui displaybox Y_position, 60, 130, 140,30, rgb(white) ctrlval(6) = "0.000" ' Str$(Peek(stepper y),-4,4) gui button Y0, "Y", 0,120,50,50, rgb(white) gui displaybox Z_position, 60, 170, 140, 30, rgb(white) ctrlval(9) = "0.000" ' Str$(Peek(stepper z),-4,4)) gui button Z0, "Z", 0, 160, 50, 50, rgb(white) gui interrupt TOUCHDOWN do loop sub TOUCHDOWN select case click(ref) if click(val)(X1) then : rgb(green) gui page 2 else if click(val)(Y1) then : rgb(green) gui page 3 else if click(val)(Z1) then : rgb(green) else gui page 4 end if end select end sub gui setup 2 gui caption xsetup, "X Axis Config" 60, 20, rgb(green) Gui setup 3 Gui caption ysetup, "Y Axis Config",60, 20 rgb(green) gui setup 4 gui caption zsetup, " Z Axis Config", 60, 20 rgb(green) Those consts will need to be cleaned up but for the first day of coding in a longtime I will get there. It will be good for some assistance to get the multi page setup going so all the other pages can get started. Regards Bryan Edited 2026-05-04 17:35 by Bryan1 |
||||
disco4now Guru Joined: 18/12/2014 Location: AustraliaPosts: 1127 |
select case click(ref) is CMM2 I think SELECT CASE TOUCH(REF) is Picomite It most likely thinks click(ref) is an array where you have not defined ref F4 H7FotSF4xGT |
||||
| The Back Shed's forum code is written, and hosted, in Australia. | © JAQ Software 2026 |
