
|
|
Forum Index : Microcontroller and PC projects : Keyboard for Micromite Plus
| Author | Message | ||||
| MicroBlocks Guru Joined: 12/05/2012 Location: ThailandPosts: 2209 |
Yes, i like small.  It is 23x18mm. It is 23x18mm.
All the pins are still on a 0.1" grid. I considered 0.05" to allow flat cable, but then it gets really fiddly. Maybe i just try it to see how it pans out. Microblocks. Build with logic. |
||||
Grogster Admin Group Joined: 31/12/2012 Location: New ZealandPosts: 9985 |
They are easy to find on eBay - I bought these ones for the grand sum of US$3.68 for ten sockets, to suit the keyboard I am going to use, but similar types of FPC connector will also be on eBay for a similar price. @ TZA: RESULT: 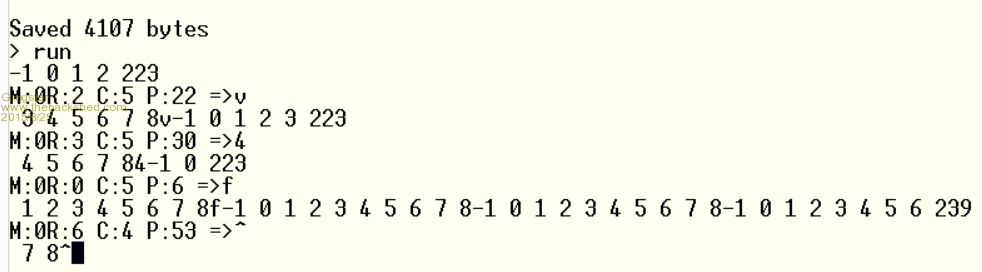
EDIT: This is with me typing QWERTY. Smoke makes things work. When the smoke gets out, it stops! |
||||
| paceman Guru Joined: 07/10/2011 Location: AustraliaPosts: 1329 |
Yes I saw your earlier post on that Grogs (15/8 10:40 a.m.). TZ is hoping to make this pretty generic though (USB,PS2 etc.) so I was meaning the external connection. Users could easily hard-connect a particular cable, but if you want to be able to swap it between different interfaces you need sockets on the keyboard.- it's also complicated by needing a power connection. Greg |
||||
| MicroBlocks Guru Joined: 12/05/2012 Location: ThailandPosts: 2209 |
Greg, I changed the 0.1" grid to 0.05" for the column and row pins. Now all connections to a keypad/keyboard are on a single edge and are easy to connect with standard flat cable. Flat cable should be spaced 0.05" so it will line up. 3d: 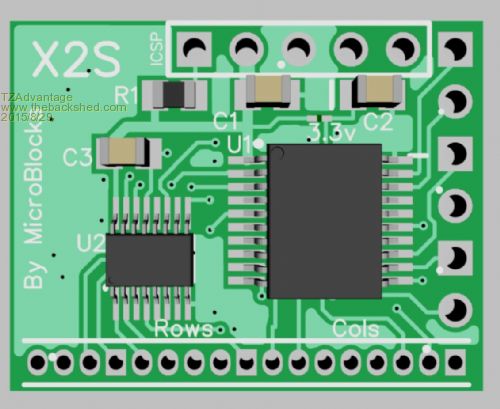
There is even space for a micro usb connector on the left. That would allow making a custom usb keypad. Just what i need! 
Getting better al the time. Thanks for the feedback. Microblocks. Build with logic. |
||||
| paceman Guru Joined: 07/10/2011 Location: AustraliaPosts: 1329 |
That will be good for ribbon cable but the FPC on Grogs' 'blue' keyboard has 1mm spacing, not 0.05" i.e. 1.25 mm. If a keyboard has FPC it will probably be 1mm (not expert on this at all) so making it easy to attach to that would be good. If it's better to come direct from the keys without the FPC, or if ribbon at 0.05" is the cable used in the keyboard, then ribbon at 0.05" spacing would be good. Ideally both is best - how about 1mm pads to match Grogs' connector (see p3 of thread) and 0.05" header as you've done for ribbon - just have to fit it.
If a micro USB will fit that's a plus but it will still need header access to the USB lines and ideally some way (a couple of close holes for a cable tie?) to securely attach a hard wired external cable. Greg |
||||
| MicroBlocks Guru Joined: 12/05/2012 Location: ThailandPosts: 2209 |
Grogster, Can you do the same kind of screen copy of the following keys for me? Tab, CapsLock, LeftShift, Fn, Control, Option, Command, LeftArrow, DownArrow, RightArrow, UpArrow, RightShift, Enter and Delete. I can then have a go to write some code to handle the special keys and figure out the rest of the Lookup table. Microblocks. Build with logic. |
||||
| MicroBlocks Guru Joined: 12/05/2012 Location: ThailandPosts: 2209 |
I ran into some trouble with the code. Should have thought about it a bit more. I was handling it as a keypad not a real keyboard. For that it needs to work as a replacement for a PS/2 keyboard and send VT100 codes through the serial port. Also the shift,caps,control etc keys need to be handled better. So a rewrite of the scan and lookup is necessary. Otherwise it will never work with the editor. Stay tuned, i think i have figured it out but i need some time to test it. Microblocks. Build with logic. |
||||
| Grogster Admin Group Joined: 31/12/2012 Location: New ZealandPosts: 9985 |
Was away yesterday - not ignoring you, TZA! 
Will do this shortly and post - I only post this now, as I see you are online. Smoke makes things work. When the smoke gets out, it stops! |
||||
| MicroBlocks Guru Joined: 12/05/2012 Location: ThailandPosts: 2209 |
:) I just woke up and do my, check mail, check TBS while having breakfast. Then off to bring my daughter to school. I build up a small test system with a mup, 170 and some switches until i discovered that this program will never run as it should.:) Have to work with keydown, keyup events. Will do some more coding on that later today. Microblocks. Build with logic. |
||||
| Grogster Admin Group Joined: 31/12/2012 Location: New ZealandPosts: 9985 |
So, do you still want those screenshots? Smoke makes things work. When the smoke gets out, it stops! |
||||
| MicroBlocks Guru Joined: 12/05/2012 Location: ThailandPosts: 2209 |
Yes, please. Microblocks. Build with logic. |
||||
| Grogster Admin Group Joined: 31/12/2012 Location: New ZealandPosts: 9985 |
UPDATE: TAB,CAPS,L-SHIFT,Fn,CONTROL,OPTION,COMMAND: 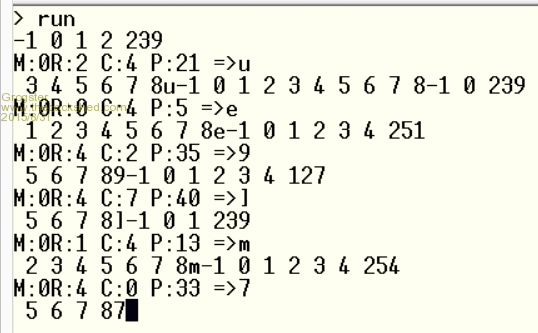
LEFT,DOWN,RIGHT,UP,R-SHIFT,ENTER,DELETE(backspace): 
Looks like gobble-de-gook to me, but I guess you can make sense of it? Smoke makes things work. When the smoke gets out, it stops! |
||||
| MicroBlocks Guru Joined: 12/05/2012 Location: ThailandPosts: 2209 |
Yes the R:, C: give the row and column. And P: gives the location in the lookup string. Helps me to check critical points (modifier keys) in the matrix. Thanks! Microblocks. Build with logic. |
||||
| MicroBlocks Guru Joined: 12/05/2012 Location: ThailandPosts: 2209 |
Grogster, Here is a totally rewritten matrix scanner. It works with a timer interrupt and has a better structure to allow for all the special keys. Code for the special keys have to be added, but i need from you the complete translation of all the keys. When the program starts it asks for the ENTER key. Press that and you are instructed to change the code. After you change the code run it again and then press all the keys in order from left to right, top to bottom. After each row press an enter. This will allow for an easier screendump with all the key values on it. At the end use the arrows left, up, down, right in that order. [code] 'This version allows for more key presses at the same time 'without adding diodes. 'It sets all rows to OC (Open Collector) outputs 'All inputs are pulled high internally. 'By MicroBlocks 1 september 2015 CONST Matrix.Output.Modes.RAW = 1, Matrix.Output.Modes.ASCII = 2, Matrix.Output.Modes.VT100 = 3 'Matrix.Output.Mode = Matrix.Output.Modes.RAW 'Matrix.Output.Mode = Matrix.Output.Modes.ASCII Matrix.Output.Mode = Matrix.Output.Modes.VT100 'Enable/Disabe debug messages per subroutine DIM Main.Debug = 1 'DEBUG DIM Matrix.Debug = 0 'DEBUG DIM Matrix.ProcessScan.Debug = 0 'DEBUG DIM Matrix.KeyDown.Debug = 0 'DEBUG DIM Matrix.KeyUp.Debug = 0 'DEBUG 'Define positions for ENTER and TAB keys in the Lookup string DIM Matrix.EnterPosition = 0 DIM Matrix.TabPosition = 0 '72 characters in a lookup string 123456789012345678901234567890123456789012345678901234567890123456789012 'for locating the right position "abcdefghijlkmnopqrstuvwxyz1234567890-=[]\;',./~!@#$%^&*()_+{}|:<>?789012" DIM Matrix.Lookup LENGTH 72 AS STRING = "abcdefghijlkmnopqrstuvwxyz1234567890-=[]\;',./~!@#$%^&*()_+{}|:<>?789012" DIM Matrix.LShift LENGTH 72 AS STRING = "abcdefghijlkmnopqrstuvwxyz1234567890-=[]\;',./~!@#$%^&*()_+{}|:<>?789012" 'Define the pins that are used for the Rows DIM integer Matrix.Rows(9) = (0,2,3,4,5,6,7,9,10,25) dim integer Matrix.NumberOfRows = 9 'Define the pins that are used for the columns DIM integer Matrix.Cols(7) = (15,16,17,21,22,23,24,26) dim integer Matrix.NumberOfCols = 7 'We can use A-Z for the modifiers and special keys. CONST Matrix.Key.LeftShift = ASC("L"), Matrix.Key.RightShift = ASC("S"), Matrix.Key.CapsLock = ASC("C") CONST Matrix.Key.FN = ASC("F"), Matrix.Key.Control = ASC("O"), Matrix.Key.Option = ASC("P") CONST Matrix.Key.Command = ASC("M"), Matrix.Key.Tab = 9, Matrix.Key.Delete = ASC("W") CONST Matrix.Key.Enter = 13, Matrix.Key.ArrowUp = ASC("U"), Matrix.Key.ArrowLeft = ASC("A") CONST Matrix.Key.ArrowRight = ASC("R"), Matrix.Key.ArrowDown = ASC("D") if Matrix.EnterPosition > 0 and Matrix.EnterPosition < 73 then POKE VAR Matrix.Lookup, Matrix.EnterPosition , Matrix.Key.Enter endif if Matrix.TabPosition > 0 and Matrix.TabPosition < 73 then POKE VAR Matrix.Lookup, Matrix.TabPosition , Matrix.Key.Tab endif if Matrix.Output.Mode = Matrix.Output.Modes.VT100 then 'A DIM within an IF actually works. Did not expect that. :) DIM STRING Matrix.Output.Key.Enter = chr$(13) + chr$(10) 'Add other key output if it is more then a single character endif CONST Matrix.SCANRATE = 10 'Scans are done twice for debouncing CONST Matrix.REPEATRATE = 10 'Keys will be repeated REPEATRATE * SCANRATE ms. Dim integer Matrix.State = 0 'Will be 1 for the first read and 2 for the second read that will give the debounced scanCodes 'It goes up until REPEATRATE where repeatable keys that were hold down are repeated. Then back to 0 Dim INTEGeR Matrix.FirstScan = 0 DIM INTEGER Matrix.ScanCode= 0 DIM INTEGER Matrix.ScanCount = 0 DIM Matrix.CAPSMODE = 0 DIM INTEGER Matrix.Prev(9) Dim integer Matrix.Current(9) DIM Matrix.Buffer$ = "" 'Setup all rows as output with open collector For Row = 1 to Matrix.NumberOfRows Setpin Matrix.Rows(Row),dout,OC next 'Setup all columns as input with a pullup For Col = 0 to Matrix.NumberOfCols Setpin Matrix.Cols(Col),din,pullup next SETTICK Matrix.SCANRATE, Matrix.Scan, 1 if Matrix.EnterPosition = 0 then 'DEBUG print "Press the ENTER button now" 'DEBUG else 'DEBUG print "Each following key will give the character" 'DEBUG print "in the lookup string on line 27. You can change it to the right" 'DEBUG print "value by looking up the character that appears on the screen" 'DEBUG print "and change it to its real character." 'DEBUG print "Have fun!" 'DEBUG endif 'DEBUG 'MAIN Do if len(Matrix.Buffer$) > 0 then Keys$ = Matrix.Buffer$: Matrix.Buffer$ = "" print Keys$; if Matrix.EnterPosition = 0 then print 'DEBUG endif 'Maybe do some other interesting stuff Loop SUB Matrix.SetRow(row) LOCAL integer Value = 0 if row > 0 then Value = 511 - (2 ^ (row-1)) PORT(2,6,9,2,25,1) = Value END SUB FUNCTION Matrix.ReadCols() 'Column pins 15,16,17,21,22,23,24,26 Matrix.ReadCols = 255 - PORT(15,3,21,4,26,1) END FUNCTION SUB Matrix.Scan() LOCAL integer Row Matrix.ScanCount = Matrix.ScanCount + 1 if Matrix.ScanCount = Matrix.REPEATRATE then Matrix.RepeatKeys Matrix.ScanCount = 0 endIF IF Matrix.State = 0 then Matrix.SetRow 0 Matrix.State = 1 ENDIF if Matrix.State = 1 then Matrix.FirstScan = Matrix.ReadCols() Matrix.State = 2 exit sub endif if Matrix.State = 2 THEN Matrix.ScanCode = Matrix.ReadCols() if Matrix.FirstScan <> Matrix.ScanCode then 'Unreliable scan values detected Matrix.FirstScan = Matrix.ScanCode EXIT SUB ENDIF if Matrix.ScanCode = 0 then Matrix.ReleaseKeys Matrix.State = 1 exit sub endif 'Scan the whole matrix for Row = 1 to Matrix.NumberOfRows Matrix.SetRow(Row) 'Maybe need a tiny delay to allow for correct read Matrix.Current(Row) = Matrix.ReadCols() next Matrix.ProcessScan RepeatKey = 0 Matrix.State = 0 EXIT SUB ENDIF 'Should never end up here. 'If it does then reset state Matrix.State = 0 RepeatKey = 0 Matrix.ScanCount = 0 END SUB SUB Matrix.ReleaseKeys() LOCAL Row,Col 'release ALL keys for Row = 1 to Matrix.NumberOfRows if Matrix.Prev(Row) > 0 then for Col = 0 to Matrix.NumberOfCols if (Matrix.Prev(Row) AND (2 ^ Col) ) > 0 then 'If the key was pressed previous scan then release it by calling keyup Matrix.KeyUp Row, Col endif next endif Matrix.Prev(Row) = 0 next end SUB SUB Matrix.ProcessScan() LOCAL integer Row, Col, Changes for Row = 1 to Matrix.NumberOfRows Changes = Matrix.Prev(Row) XOR Matrix.Current(Row) ' every bit that changed will be 1 if Matrix.ProcessScan.Debug = 1 then print "Prev:"Matrix.Prev(Row)"Cur:"Matrix.Current(Row)"Changes" Changes; 'DEBUG if Changes > 0 then for Col = 0 to Matrix.NumberOfCols P = 2 ^ Col 'if Matrix.Debug = 1 then Print P; if (Changes AND P) > 0 then if (Matrix.Current(Row) AND P) = 0 then Matrix.KeyUp Row, Col else Matrix.KeyDown Row, Col endif endif next endif if Matrix.ProcessScan.Debug = 1 then print 'DEBUG Matrix.Prev(Row) = Matrix.Current(Row) next end SUB SUB Matrix.KeyDown(row, col) LOCAL Key$,P P = row * 8 + col + 1 if Matrix.KeyDown.Debug = 1 or Matrix.EnterPosition = 0 then 'DEBUG print "KeyDown R:" row " C:" col " P:" P 'DEBUG endif 'DEBUG if Matrix.EnterPosition = 0 then 'DEBUG Matrix.EnterPosition = P 'DEBUG POKE VAR Matrix.Lookup, Matrix.EnterPosition , Matrix.Key.Enter 'DEBUG print "Enter key has been set. Its position is" P 'DEBUG print 'DEBUG PRINT "Change the code on line 22 to:" 'DEBUG print "DIM Matrix.EnterPosition ="P 'DEBUG print "Stopping program. Use Edit or MMEdit now" 'DEBUG print "To change the code." 'DEBUG END 'DEBUG endif 'DEBUG Key$ = MID$(Matrix.Lookup, P, 1) if Matrix.Output.Mode <> Matrix.Output.Modes.RAW then if Key$ = chr$(13) then Key$ = Matrix.Output.Key.Enter 'more to add later endif Matrix.Buffer$ = Matrix.Buffer$ + Key$ END SUB SUB Matrix.KeyUp(row,col) if Matrix.KeyUp.Debug = 1 then print "KeyUp R:" row " C:" col 'DEBUG end SUB SUB Matrix.RepeatKeys() LOCAL A = 1 END SUB [/code] Microblocks. Build with logic. |
||||
| Grogster Admin Group Joined: 31/12/2012 Location: New ZealandPosts: 9985 |
Crikey, you have been busy TZA!!! 
I will upload this and try it out later tonight. This post just to acknowledge your request. Smoke makes things work. When the smoke gets out, it stops! |
||||
| MicroBlocks Guru Joined: 12/05/2012 Location: ThailandPosts: 2209 |
Would it be possible to not use either the pins for COM2: (9,10) or the pins for COM1: (21,22) This would allow you to keep the console connected to the computer while a COM port is used to output the keyboard data. You would then be able to configure/program the keyboard through the console normally and even show debug messages while 'in-circuit'. Their should be just enough pins (if i count right) to do that. Microblocks. Build with logic. |
||||
| Grogster Admin Group Joined: 31/12/2012 Location: New ZealandPosts: 9985 |
Yes, can be done like that, but then no pins for either of the LED's. It's an interesting(and good!) idea though, but how to handle the LED's? We could just drop the LED's altogether(then the problem is solved), but I think they are nice to have. We could go to the 44-pin chip, then there would be no problems with pins, but not checked if the QFP would fit. Any reason you can't use the console for BOTH? Have a DEBUG routine you can call from the console, and run that if you need to debug, then the console would output both debug information, and the normal keypresses much along the same lines as all of the testing done thus far does. With autorun set on, the KB would start in KB mode as normal, but if you connect the KB to TT or the like, issue a CTRL-C, then direct the code to the debug routine, you have your testing mode. I might well be not seeing something here, in the way you want to do it, but..... I will do that testing you want tonight - sorry, I did not get to it last night. Smoke makes things work. When the smoke gets out, it stops! |
||||
| Grogster Admin Group Joined: 31/12/2012 Location: New ZealandPosts: 9985 |
UPDATE: Here are the results of running your code TZA: 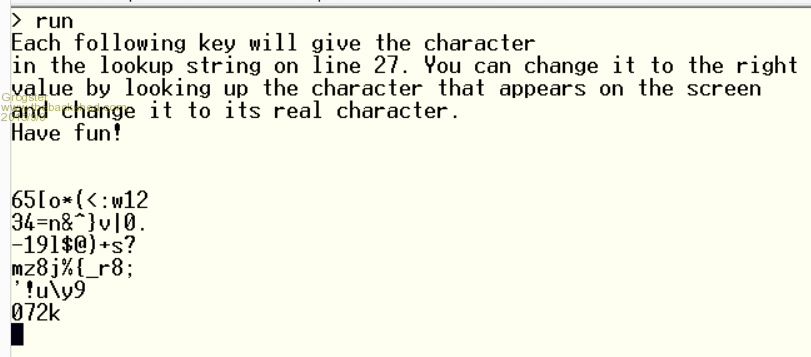
Each row of characters are the keyboard rows, left to right, top to bottom - as requested. Last line are arrows in left,up,down,right order as requested. Smoke makes things work. When the smoke gets out, it stops! |
||||
| MicroBlocks Guru Joined: 12/05/2012 Location: ThailandPosts: 2209 |
Thanks Grog. That makes it a lot easier to get that lookup table right. Edit: The number of characters on your screendump are not all of the keys. I guess the scan routine drops some keys. The top row should have 13 keys and i see only 11. All other rows are missing 1-3 keys also. Did you use TeraTerm because MMEdit VT100 sometimes misses a character. I have made a pinout of what is used and no more pins available. Why does the chip have 3 GND connections. I guess because it is long and skinny. 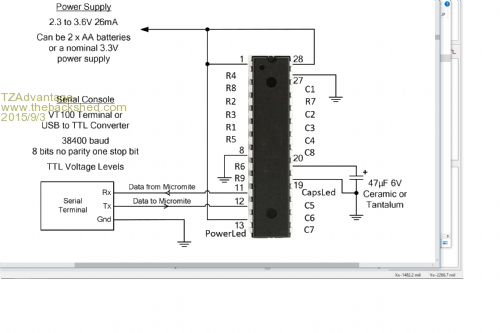
However it will still be possible to have a separate output if that is the wish. We could use a single pin and bitbang a serial out by using a CFunction made by Geoff. If the two LEDS are charlieplexed they would need only one pin. That will free up a pin to use as a TX output. Microblocks. Build with logic. |
||||
| Grogster Admin Group Joined: 31/12/2012 Location: New ZealandPosts: 9985 |
Hey TZA. I will run the test again - perhaps I was pressing the keys too fast. Yes, used TT, hence the black-on-yellow text from the TT window.
You can get the 44-pin chip in QFN, which is only 8x8 mm, but being QFN, I am not sure how difficult that would be to solder - probably harder then chips with legs. The standard 44-pin QFP does fit on the board, and would give us lots more pins to play with, but to get all the tracking in, the board would PROBABLY have to go to 4-layer. That is not a problem, really, it just makes the board more expensive to get made - but C'est La Vie......... Thw 44's would have the extra pins to allow for the matrix, up to four replacement LED's, and the serial port or ports. It could even be pin-mapped such that you could have serial, I2C and SPI output formats - that might be getting too close to your idea though. I will do another run of that test now, and post the screen grab shortly. Smoke makes things work. When the smoke gets out, it stops! |
||||
| The Back Shed's forum code is written, and hosted, in Australia. | © JAQ Software 2026 |
