
|
|
Forum Index : Microcontroller and PC projects : T-PicoC3 display works great, pros and cons
| Author | Message | ||||
| k2backhoe Regular Member Joined: 04/12/2021 Location: United StatesPosts: 47 |
The T-PicoC3 from Tindie has a lot going for it. <$9 (plus $9 shipping for one or several boards) gives you a RP2040 machine that works with MMBasic (a must for my use). Plus it comes with a wired 135X240 color display fully drivable by MMBasic. Also two pushbuttons (gp6, gp7). Plus there is a ESP32 supposedly supporting Bluetooth and Wi-Fi that I haven't begun to play with yet, all on one board. Picture and sample code below. One thing I haven't figured out yet, each time I reconnect it to Tera Term, I have to reload the .uf2 file in order for the serial channel to show up. A real annoyance, but at least the flash programs are still there. Warning: I am presenting code with pin numbers that work. It may be that different pin numbers should be used, but these make the image below very reliably. I would welcome anyone else's comments, questions or corrections. PS: The screen looks much better than my cruddy phone picture of it. ' T-PicoC3 test program ' OPTION SYSTEM SPI gp2, gp3, gp0 ' OPTION LCDPANEL ST7789, LANDSCAPE, gp1, gp6, gp5, gp4 CLS RGB(100,150,60) Text 0,12, "Text shows up HERE" Circle 100,100, 30,10,1,RGB(green), RGB(blue) Circle 120,80,30,10,1,RGB(red),RGB(200,0,200) Circle 140,60,30,10,1,RGB(200,200,0),RGB(50,50,50) 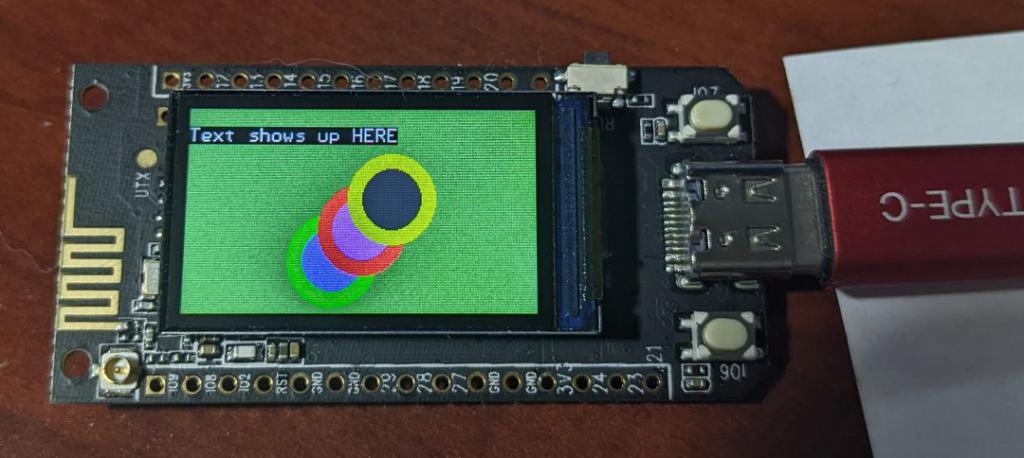 |
||||
| Mixtel90 Guru Joined: 05/10/2019 Location: United KingdomPosts: 8847 |
Have you got a circuit diagram for it? The problem with this sort of thing is in knowing what things are connected to. Using pins that are normally used for something else on a PicoMite system can easily mess things up, as others have discovered. :( Another niggle that I have with this sort of thing is problems you can get if you want to actually use it in something rather than experiment on it. I'll take this board as an example, but that's only because it's convenient to do so. :) Almost all other modules have problems too. You have two mounting holes, both at the same end. If you want to use the ESP then you can't put anything metallic in the lower hole as it's too close to the antenna. The RH end is unsupported - where you need support because of the USB connector. You can't plug anything into the remote antenna socket without increasing the distance between the front of the screen and the rear of a front panel as the plug projects forwards. I'm not sure what the switch does, but it would need some sort of slider system to operate it from outside a box. Likewise the two buttons - they aren't the sort that can take button caps. These are minor things, but they make things awkward. It wouldn't surprise me if this board wasn't intended to be used in portrait mode with the buttons at the bottom and the switch accessible from the side for some sort of hand-held device. Mick Zilog Inside! nascom.info for Nascom & Gemini Preliminary MMBasic docs & my PCB designs |
||||
| JohnS Guru Joined: 18/11/2011 Location: United KingdomPosts: 4330 |
Schematic on here �I think. Aha, this John Edited 2022-05-23 18:38 by JohnS |
||||
| Mixtel90 Guru Joined: 05/10/2019 Location: United KingdomPosts: 8847 |
An interesting little board, if a little restricted for external I/O. Flip the USB connector over to connect to the ESP or the RP2040. Green & blue LEDs indicate which. Neat. :) Battery charging from USB built in. ADC0 (GP26) is tied to the battery voltage, but ADC3 (GP29) is wired out. GP0 to GP5 are used by the display. GP8 to GP11 are connected to the ESP. You seem to get a lot for your money. Mick Zilog Inside! nascom.info for Nascom & Gemini Preliminary MMBasic docs & my PCB designs |
||||
| panky Guru Joined: 02/10/2012 Location: AustraliaPosts: 1127 |
@k2backhoe Just received a couple of these to play with - any hints on how you loaded MMBasic? Can't seem to get into the boot loader here. Regards, panky Edit: Forgot the "boot switch while powering up' bit. MMBasic loaded and further testing started. Edited 2022-06-14 11:28 by panky ... almost all of the Maximites, the MicromMites, the MM Extremes, the ArmMites, the PicoMite and loving it! |
||||
| phil99 Guru Joined: 11/02/2018 Location: AustraliaPosts: 3228 |
If there is no "Boot Select" button, in TeraTem try:- "1200 baud which puts the Pico into firmware upgrade mode" Manual page 5 near the bottom. |
||||
| k2backhoe Regular Member Joined: 04/12/2021 Location: United StatesPosts: 47 |
@panky For others trying this board, make sure you have a good USB-C cable and try reversing it's orientation until things work right. It takes a little fiddling, but worth it. |
||||
| panky Guru Joined: 02/10/2012 Location: AustraliaPosts: 1127 |
@k2backhoe A slightly modified version of Peter's Remote Thermostat program to run on the LilyGo T-PicoESP32C3. Note I don't have a temp module so those lines are commented out. ' LillyGo-Pico-ESP32 Thermostat v6 ' Option explicit Option default integer Const MaxLen=4096 Const max=20 ' Global variables Const quote=Chr$(34) Const SSID$=quote+"xxxxxx"+quote Const pw$=quote+"xxxxxx"+quote ' Const crlf$=Chr$(13)+Chr$(10) ' Note crlf$ in html code below are purely to help in debugging ' �- they are ignored by the browser. Const header$="<!DOCTYPE html>" Const starttext$="HTTP" Const pnf$="<html><body>Page not Found</body></html>" Const t1$="<html><meta charset="+quote+"UTF-8"+quote+">"+crlf$ Const title$=t1$+"<head><title>Remote Thermostat</title></head><body>"+crlf$ Const ending$="</form></body></html>"+crlf$ Const form$="<form name='f1' method='get' action='D'>"+crlf$ Const h2$="<h2 align='left'>Remote Thermostat V6.0</h2>"+crlf$ Const code1$="Update Code: <input type='text' name='S' size='6' " Const code$ = code1$+"value='000000'> "+crlf$ Const tstart$=" <TABLE BORDER='1' CELLSPACING='0' CELLPADDING='5'>"+crlf$ Const h3$="<TR><TD></TD><TD>Temperature</TD></TR>"+crlf$ Const s1$="<TR><TD>Current</TD><TD>"+crlf$ Const s2$="<TR><TD>Max</TD><TD>"+crlf$ Const s3$="<TR><TD>Min</TD><TD>"+crlf$ Const check1$="<input name='C' type='checkbox' value='R' " Const check$ = check1$+"onClick='this.form.submit()'> Reset Max/Min"+crlf$ Const s4$="<TR>"+crlf$+"<TD>Thermostat</TD>"+crlf$ Const s5$="<TD><input name='R' type='radio' checked='checked' value='" Const s6$="<TD><input name='R' type='radio' value='" Const click$=" 'onClick='this.form.submit()'> " Const degree$="C </TD>"+crlf$ Const offstr$="Off </TD>"+crlf$ Const onstr$="On </TD>"+crlf$ Const ON=1 Const off=0 ' ' Set up parameters ' Const starttemp=20 'set lowest temperature on the thermostat select radio buttons Const hysteresis=2 ' 2 tenths of a degree either side of the setpoint Const waittime=1000 'wait time in readrequest before timeout Const password$="123456" 'password to access change mode ' Const dspin=22 � � �'Pico GP17 Const relaypin=21 � 'Pico GP16 ' Dim integer webpage(4096\8) ' longstring with complete web page Dim arg$(2,max) length 20 Dim integer inbuf(Maxlen\8) 'global input buffer Dim integer IPDno 'global IPD numbers to ensure transmit is on correct IPD Dim integer heater,currenttemp,maxtemp,mintemp,setpoint Dim integer nparams Dim mypage$ 'variables used by main loop only Dim integer obuff(4096\8) 'buffer writes to the internet to optimise speed Init: ' TEMPR START dspin,3 'measure temp to 0.0625 degree accuracy mintemp=1000 'set to silly value to force reset if not saved maxtemp=-1000 ' currenttemp=Cint(TEMPR(dspin)*10) ' TEMPR START dspin,3 VAR restore 'recover the setpoint and min and max temps if already saved maxmin 'update the maximum and minimum and save them if changed heater=off Pin(relaypin)=heater SetPin relaypin,dout setpoint=Asc("E") Pause 2000 'wait for ESP8266 to wake up afer power on SetPin gp9,gp8,COM2 Open "com2:115200,4096" As #1 Close #1 'clear the buffer SetPin gp9,gp8,COM2 Open "com2:115200,4096" As #1 If Not Command(0, "AT",obuff(), 500) Then End If Not Command(0, "AT+RST",obuff(), 10000,"WIFI GOT IP") Then 'reset and checkFor valid connection � Print "Set up WIFI on SSID: ",SSID$ � If Not Command(0, "AT+CWMODE=1",obuff(), 5000) Then End � 'set device mode (1=client, 2=AP, 3=both) � If Not Command(0, "AT+CWLAP",obuff(), 30000) Then End � 'scan for WiFi hotspots � LongString print inbuf() 'output the list of valid networks � If Not Command(0,"AT+CWJAP="+SSID$+","+pw$,obuff(),20000,"WIFI GOT IP") Then � � End 'connect � EndIf � If Not Command(0, "AT+CIFSR",obuff(), 5000) Then End 'check IP address EndIf If Not Command(0, "AT+CIFSR",obuff(), 5000) Then End 'check IP address LongString Print inbuf() If Not Command(0, "AT+CIPMUX=1",obuff(), 5000) Then End If Not Command(0, "AT+CIPSERVER=1,80",obuff(), 5000) Then End Print "Connected" main: Do ' currenttemp=Cint(TEMPR(dspin)*10) updateheater ' TEMPR START dspin,3 maxmin 'update the maximum and minimum and save them if changed If ReadRequest(waittime) Then 'process HTML request � mypage$=UCase$(parsehtmldata$(nparams)) � 'parse the html request and get the Page requested � If mypage$<>"" Then 'real request so do something � � If mypage$= "INDEX" Then � � � drawpage � � ElseIf mypage$="D" Then � � � If nparams<>0 Then 'we have parameters to process � � � � If arg$(0,0)="S" And arg$(1,0) = password$ Then � � � � � If arg$(0,1)="C" And arg$(1,1)="R" Then � � � � � 'reset the max min to current � � � � � � maxtemp=currenttemp � � � � � � mintemp=currenttemp � � � � � � VAR save setpoint,maxtemp,mintemp � � � � � EndIf � � � � � If arg$(0,1)="R" Then � � � � � 'change the setpoint and update the heater if applicable � � � � � � setpoint=Asc(arg$(1,1)) � � � � � � VAR save setpoint,maxtemp,mintemp � � � � � � updateheater � � � � � EndIf � � � � EndIf � � � EndIf � � � drawpage � � Else � � � SendText pnf$+crlf$+crlf$'invalid page � � EndIf � � EndSend 'clear the write buffer and terminate the write � EndIf EndIf Loop End ' Function parsehtmldata$(paramcount As integer) Local a$,b$ Local integer buf(Maxlen\8) Local integer inpos,startparam,processargs paramcount=0 ' a valid browser requesu will look like ' � GET /D?S=123456&C=R&R=C+ ' once we get �the GET / we then ignore the D and look for the position ' of the ? then we extract the name pairs, each set seperated by & ' inpos=LInStr(inbuf(),"GET /",1) If inpos=0 Then � parsehtmldata$="" Else � LongString mid buf(),inbuf(),inpos+5,1000 � inpos=LInStr(buf(),starttext$,1) � If inpos>2 Then 'page request found � � inpos=inpos-2 � � a$=LGetStr$(buf(),1,inPos) � � inpos=Instr(a$,"?") � � If inpos<>0 Then 'parameters found � � � processargs=1 � � � parsehtmldata$=Left$(a$,inpos-1) � � � a$=Mid$(a$,inpos+1) � � � Do � � � � arg$(0,paramcount)="" � � � � arg$(1,paramcount)="" � � � � inpos=Instr(a$,"=") � � � � startparam=1 � � � � arg$(0,paramcount)=Mid$(a$,startparam,inpos-startparam) � � � � startparam=inpos+1 � � � � inpos=Instr(a$,"&") � � � � If inpos<>0 Then � � � � � arg$(1,paramcount)=Mid$(a$,startparam,inpos-startparam) � � � � � a$=Mid$(a$,inpos+1) � � � � � paramcount=paramcount+1 � � � � Else � � � � � arg$(1,paramcount)=Mid$(a$,startparam) � � � � � paramcount=paramcount+1 � � � � � processargs=0 � � � � EndIf � � � Loop While processargs � � Else � � � parsehtmldata$=a$ � � EndIf � Else ' no page requested � � parsehtmldata$="INDEX" � EndIf EndIf End Function Sub maxmin Local integer update=off If currenttemp>maxtemp Then � maxtemp=currenttemp � update=on EndIf If currenttemp<mintemp Then � mintemp=currenttemp � update=on EndIf If update Then VAR save setpoint,maxtemp,mintemp End Sub Sub updateheater Local integer hcalc If setpoint=Asc("L") Then � Pin(relaypin)=ON � heater=on EndIf If setpoint=Asc("A") Then � Pin(relaypin)=OFF � heater=oFF EndIf If setpoint>=Asc("B") And setpoint<=Asc("K") Then � hcalc=(setpoint-Asc("B")+starttemp)*10 'setpoint temperature * 10 � hcalc = hcalc + hysteresis � If currenttemp>=hcalc Then 'turn heating off � � Pin(relaypin)=OFF � � heater=oFF � EndIf � hcalc = hcalc - hysteresis - hysteresis � If currenttemp<=hcalc Then 'turn heating on � � Pin(relaypin)=ON � � heater=oN � EndIf EndIf End Sub Sub drawpage Local integer loopcounter,tempconvert Local b$ sendText header$ sendText title$+form$+h2$+code$ sendText tstart$+heat$ If heater Then � sendText hon$+tend$ Else � sendText hoff$+tend$ EndIf sendText tstart$ sendText h3$ b$=s1$+outtemp$(currenttemp)+degree$ b$=b$+s2$+outtemp$(maxtemp)+degree$ b$=b$+s3$+outtemp$(mintemp)+degree$ sendText b$ sendText tend$ sendText check$ sendText tstart$ sendText s4$ For loopcounter=Asc("A") To Asc("L") � If loopcounter=setpoint Then � � sendText s5$+Chr$(loopcounter) � Else � � sendText s6$+Chr$(loopcounter) � EndIf � sendText click$ � tempconvert=loopcounter-Asc("B")+starttemp � If loopcounter>Asc("A") And loopcounter<Asc("L") Then � � sendText Str$(tempconvert,2)+degree$ � EndIf � If loopcounter=Asc("A") Then sendText offstr$ � If loopcounter=Asc("L") Then sendText onstr$ Next loopcounter sendText tend$ sendText ending$+crlf$+crlf$ End Sub ' Function outtemp$(t As integer) Local integer tenths=t Mod 10 Local integer units= t\10 outtemp$=Str$(units,3)+"."+Chr$(tenths+48) End Function ' Sub EndSend Local b$ Pause 25 b$="AT+CIPSEND="+Chr$(IPDno+48)+","+Str$(LLen(obuff())) 'send anything still in the buffer If Not Command(0,b$,obuff(), 500,">") Then � If LInStr(inbuf(),"link is not valid") Then Exit Sub EndIf If Not Command(1, b$, obuff(),500) Then End Pause 25 If Not Command(0, "AT+CIPCLOSE="+Chr$(IPDno+48),obuff(), 500) Then � If LInStr(inbuf(),"UNLINK") Then � � LongString clear obuff() � � Exit Sub � Else � � End � EndIf EndIf LongString clear obuff() End Sub Sub SendText(a$) Local b$ If Len(a$)+LLen(obuff())< 2048 Then � 'add the new string to the output buffer � LongString append obuff(),a$ Else 'too big to fit so send the current output buffer �Pause 25 �b$="AT+CIPSEND="+Chr$(IPDno+48)+","+Str$(LLen(obuff())) � If Not Command(0,b$,obuff(),1000,">") Then � � If LInStr(inbuf(),"link is not valid") Then Exit Sub � EndIf � If Not Command(1, b$, obuff(),1000) Then End � LongString clear obuff() � LongString append obuff(),a$ EndIf End Sub ' Function ReadRequest(timeout%) As integer Local fv$ = "favicon",cf$="CONNECT FAIL" ReadRequest=0 LongString Clear inbuf() Timer =0 Do While Timer<timeout% And Loc(#1)=0 Loop If Timer>=timeout% Then Exit Function Do While Loc(#1)<>0 � LongString append inbuf(),Input$(Min(255,Loc(#1)),#1) � Pause 10 Loop Print "browser request - "; LongString Print inbuf() If (Not LInStr(inbuf(),fv$,0)) And (Not LInStr(inbuf(),cf$,1)) Then � ReadRequest=1 'junk the favicon requests and disconnects EndIf If LInStr(inbuf(),"IPD,0",1) Then IPDno=0 If LInStr(inbuf(),"IPD,1",1) Then IPDno=1 End Function ' Function Command(mode, AT$, outdata%(), timeout%, other$) As integer 'send a command And wait For the answer Local i%=0,j%,ex%=0 Local a$ Command=0 LongString Clear inbuf() If mode=0 Then � Print #1,AT$+crlf$; Else � LongString print #1,obuff(); EndIf Timer =0 i%=0 Do � If Timer>timeout% Then � � ex%=0 � � Exit � EndIf � j%=Loc(#1) � If j%>0 Then � � i%=i%+Min(255,j%) � � LongString append inbuf(),Input$(Min(255,j%),#1) � � If LLen(inbuf())>4 And other$="" Then � � � If LInStr(inbuf(),"OK",1) Then � � � � ex%=1 � � � � Exit � � � EndIf � � EndIf � � If LLen(inbuf())>7 Then � � � If LInStr(inbuf(),"ERROR",1) Then � � � � ex%=2 � � � � Exit � � � EndIf � � EndIf � � If LLen(inbuf())>Len(other$)+2 Then � � � If LInStr(inbuf(),other$,1) Then � � � � ex%=3 � � � � Exit � � � EndIf � � EndIf � EndIf Loop Select Case ex% � Case 0 � � Print "Timeout : "+AT$ � Case 1 � � Command=1 � Case 2 � � Print "ERROR : "+AT$ � Case 3 � � Command=1 End Select End Function > Also, the html source. In the original, there appeared to be some unclosed <TR></TR> sequences so I broke out and captured the html for my own education - might be useful if anyone wants to play with it. I put in some CR LF sequences to make it a little easier to see what was happening (note that html ignores CR LF). <!DOCTYPE html><html><meta charset="UTF-8"> <head><title>Remote Thermostat</title></head> <body> <form name='f1' method='get' action='D'> <h2 align='left'>Remote Thermostat V6.0</h2> Update Code: <input type='text' name='S' size='6' value='000000'> <TABLE BORDER='1' CELLSPACING='0' CELLPADDING='5'> <TABLE BORDER='1' CELLSPACING='0' CELLPADDING='5'> <input name='C' type='checkbox' value='R' onClick='this.form.submit()'> Reset Max/Min <TABLE BORDER='1' CELLSPACING='0' CELLPADDING='5'> </form> </body> </html> Edited 2022-06-21 10:08 by panky ... almost all of the Maximites, the MicromMites, the MM Extremes, the ArmMites, the PicoMite and loving it! |
||||
| Tinine Guru Joined: 30/03/2016 Location: United KingdomPosts: 1646 |
 Just hunted for this thread because I keep meaning to ask panky if he had the same problem as the OP in keeping MMBasic present on the chip Just hunted for this thread because I keep meaning to ask panky if he had the same problem as the OP in keeping MMBasic present on the chip. My Lilygo is not due until August 29th but I just found the thread and "plonk". Small package dropped on my desk, clearly from AE. Yup, my Lilygo Firmware loaded with no issues and it's sitting here, running @378MHz  Note to Mixtel90: That comment you made regarding the antenna connector? The display is only held on with tape. The idea is that you pull it away from the board when you install in an enclosure.  Craig |
||||
| Mixtel90 Guru Joined: 05/10/2019 Location: United KingdomPosts: 8847 |
My comment about the connector was that it's too close to the fixing hole. If you use a metal screw or mounting pillar there then you'll almost certainly de-tune the antenna to some extent. You can get round it by using a nylon pillar and screw, but I bet that isn't in the instructions. :) Mind you, that is the ground end of the antenna so the effect may not be too bad. The other end is the "hot" end - you don't want to get anything metallic near that or you may have no signal at all. I had another comment about the display being too close to any front panel. So you can pull the display off and mount separately it with no visible means of support? That's kinda interesting. lol Mick Zilog Inside! nascom.info for Nascom & Gemini Preliminary MMBasic docs & my PCB designs |
||||
| Tinine Guru Joined: 30/03/2016 Location: United KingdomPosts: 1646 |
Yeah, an enclosure would be a 3d print job: 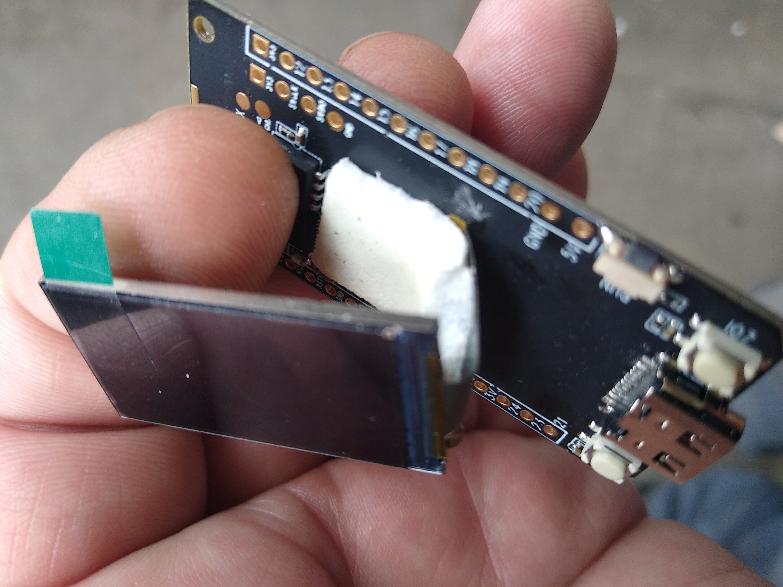 Craig |
||||
| Tinine Guru Joined: 30/03/2016 Location: United KingdomPosts: 1646 |
Double post Edited 2022-07-12 02:07 by Tinine |
||||
| k2backhoe Regular Member Joined: 04/12/2021 Location: United StatesPosts: 47 |
Mixtel raises some really good points about antenna detuning. I was initially enthralled with this board because it was a really cheap/small way to have display functionality with MMBasic. Since then many other alternatives have arrived, so don't be overly swayed by my initial enthusiasm. Tinine, neat catch on detaching display. I don't 3-D print but I kludge one-of-a-kind stuff with hot glue and I will try detaching this. k2 |
||||
| Tinine Guru Joined: 30/03/2016 Location: United KingdomPosts: 1646 |
Well, there's been a bit of chat about Picomite-WiFi and I have very little experience with WiFi....Within 20 min of first powering up, I was connected I like easy stuff. It runs happily at 378MHz. I have a guy here who owns nine 3d printers and #10 ships out this month....but he is short of things to print He's chomping at the bit to print stuff for me Craig |
||||
| Tinine Guru Joined: 30/03/2016 Location: United KingdomPosts: 1646 |
Meh...fallen out of love with this thing. Bluetooth Classic is not enabled and I'd need to jump through all kinds of hoops to do that. Display has an offset problem...screw-it. Gonna stick with the no-frills PGA2040  Craig |
||||
| panky Guru Joined: 02/10/2012 Location: AustraliaPosts: 1127 |
For those wishing to use Annex RDS Basic on the ESP in this module - please see RDS Forum here Cheers, Doug. ... almost all of the Maximites, the MicromMites, the MM Extremes, the ArmMites, the PicoMite and loving it! |
||||
| panky Guru Joined: 02/10/2012 Location: AustraliaPosts: 1127 |
You need to set the LCD driver as OPTION LCDPANEL ST7789_135, LANDSCAPE, gp1, gp6, gp5, gp4 Cheers, Doug. ... almost all of the Maximites, the MicromMites, the MM Extremes, the ArmMites, the PicoMite and loving it! |
||||
| The Back Shed's forum code is written, and hosted, in Australia. | © JAQ Software 2026 |
