
|
|
Forum Index : Microcontroller and PC projects : CGCOLORMAX2 designed for LEGO???
| Author | Message | ||||
| rave Newbie Joined: 24/02/2018 Location: United StatesPosts: 28 |
Hi, After measuring the four corner holes on the CGCOLORMAX2 board offered by CircuitGizmos, I could absolutely not resist to try to build a LEGO case for it, because these four holes are perfectly aligned to the standard LEGO stud dimensions. I wonder if the CGCOLORMAX2 was designed for LEGO?  My kids sure think so! My kids sure think so!Anyway, the result is a customizable case that has a nice fit and finish built with just a few LEGO parts that I had lying around. This case will not break easily or lose its parts, despite its just LEGO! I can plug VGA, PS/2 and USB in the back and slide an SD card in the slot in the front. There is enough room for the "Arduino" headers soldered on the board and wiring for projects. The green (power) and blue (SD card activity) LEDs clearly visible through the sides of the front slot that looks like a vintage floppy drive. No, this is not an April 1 fools joke, it actually works  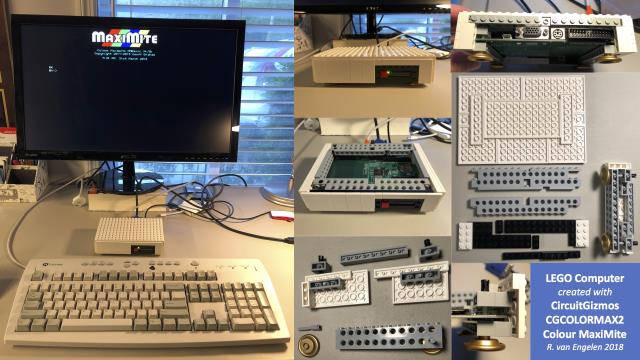 - Rob |
||||
TassyJim Guru Joined: 07/08/2011 Location: AustraliaPosts: 6538 |
Perfect for mounting a Lego robot arm on top. Controlled by the Maximite naturally. Jim VK7JH MMedit |
||||
| rave Newbie Joined: 24/02/2018 Location: United StatesPosts: 28 |
This is work in progress. I added a stereo jack and internal speaker (mono, one channel only) with amplifier to the LEGO CMM computer. A proper retro computer should have a decent internal speaker as well as a stereo jack.  The amplifier is driven by 5V and connected to the audio 1 pin. The jack is connected to both audio pins (1 for left, 2 for right). This amplifier has four gain levels (6dB, 9dB, 12dB, 15dB and 18dB) with a jumper, which makes your room mates happier. The highest gain with the 3W speaker sounds pretty loud at 18dB gain. Some gripes about the CMM as a "retro computer": - the stereo jack part ordered from CircuitGizmos is not useful, since it can't e easily soldered on the board. Instead I ordered the Adafruit breadboard-friendly stereo headphone jack. To sell the CMM as a retro computer should come with a proper stereo jack, e.g. to be soldered on the front or on the back of the board (the back has no space left though). - the CMM tone command produces high-pitched noise artifacts (sound like resonance interference) above 9K Herz, which is disappointing. Playing MOD files is OK. No artifacts. - only a few MOD files can be stored on the A drive. It would be nice if the B drive could be supported or if there was a way to generate sound in software (ideally in MMBASIC) like you can do with SID chips, to write games in MMBASIC. - the latest MMBASIC interpreter 4.5b is buggy and eats up memory fast when making function calls, see my previous posts. My CMM currently functions as a workhorse for projects with sensors, DC motors etc. Using it for LEGO NXT motors e.g. for robotics, will be tricky, due to the non-standard NXT connectors and power draw. - Rob |
||||
CircuitGizmos Guru Joined: 08/09/2011 Location: United StatesPosts: 1427 |
I love how that looks! Micromites and Maximites! - Beginning Maximite |
||||
| rave Newbie Joined: 24/02/2018 Location: United StatesPosts: 28 |
CircuitGizmos, I produced LEGO building instructions using LDD for this model in full, in case you are interested to create your own: 2018-07-31_054229_LEGOColourMaximte.pdf Only the gray parts for the frame are essential as well as some of the white and black plates for the front and sides. The "lightsaber" axels go through the CircuitGizmos ColourMaximite PCB and fit perfectly to my surprise. This makes the frame quite sturdy. There are lots of ways to customize. Enjoy! - Rob |
||||
| CircuitGizmos Guru Joined: 08/09/2011 Location: United StatesPosts: 1427 |
Excellent! Thank you! Micromites and Maximites! - Beginning Maximite |
||||
| The Back Shed's forum code is written, and hosted, in Australia. | © JAQ Software 2026 |
