Home
JAQForum Ver 24.01
Log In or Join  
Active Topics
Local Time 14:58 01 Jul 2025 Privacy Policy
Jump to

Notice. New forum software under development. It's going to miss a few functions and look a bit ugly for a while, but I'm working on it full time now as the old forum was too unstable. Couple days, all good. If you notice any issues, please contact me.

Forum Index : Microcontroller and PC projects : Maximite mouse and button demo

Author Message
Turbo46

Guru

Joined: 24/12/2017
Location: Australia
Posts: 1638
Posted: 05:32am 19 Mar 2019
Copy link to clipboard 
Print this post

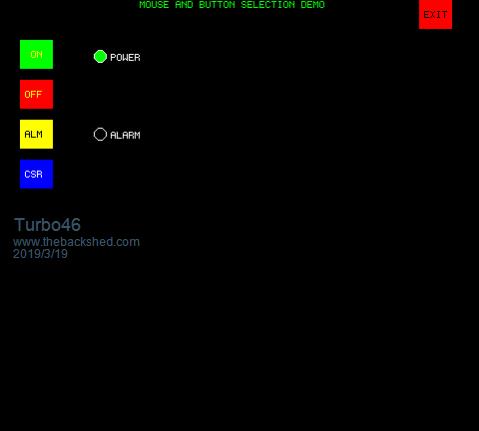
Below is a program for the Colour Maximite to demonstrate the use of a mouse to operate on screen “buttons” and the use of “LEDs” to indicate status. The cursor is a sprite. I am using the Silicon Chip USB Keyboard & mouse adaptor with a USB mouse using the default settings but an old serial mouse will work.

The mouse part of the program was adapted from Raros’ program. Raros’ program did not make use of the 6th bit for the X and Y movement, I thought that could cause erratic movement of the cursor (by turning a large movement into a small one) but that did not seem to be a problem in practice. Instead, I have used a lookup table for the mouse movement using all 7 bits. Calculation of the lookup table incorporates a scaling factor (div) to slow the mouse down a bit if necessary. This can be changed in the program to suit the mouse. The mouse movement calculation has been moved out of the interrupt routine so that less time is spent in the interrupt.

The button part of the program was adapted for the Maximite from Geoff’s “Drawing Buttons” section of his “Getting Started with the Micromite” tutorial.

A right-click will display the cursor coordinates under the heading. Clicking on the ON button will turn the power LED on while the OFF button will turn it off. The ALM button will toggle the alarm condition from off to on, when on the alarm LED will flash. The CSR button will change the cursor, there are only two. The EXIT button will exit the program.

Mouse movement is disabled while a mouse button is clicked. This prevents artefacts appearing on a button due to the Maximite restoring the previous background colour behind the button if the cursor is moved.


The program:

  Quote  ' Serial mouse and button selection demonstration for the Maximite
'
' Serial mouse data format
' Byte D7 D6 D5 D4 D3 D2 D1 D0
'
' 1 1 1 LB RB Y7 Y6 X7 X6
' 2 1 0 X5 X4 X3 X2 X1 X0
' 3 1 0 Y5 Y4 Y3 Y2 Y1 Y0
'
' This program was developed from the Serial Mouse program by Raros
' as presented on The Back Shed Forum -
' and from the Button Drawing program by Geoff Graham in his
' "Getting Started with the Maximite" document.
'
' It works well with the Silicon Chip "USB Mouse and Keyboard Adapter"
' Both a corded USB mouse and a wireless mouse work well and you can
' change mouses while everything is running with no problem.
' Only three connections are needed between the Maximite and the adapter:
' 0v, 5v and transmit on the adaptor to pin 15 (com1 Rx) on the Maximite.
'
' Thanks to Geoff, Raros and Silicon Chip
'
' Bill McKinley
'
NbrBtn = 4 ' Number of buttons (zero based)
DIM bx(NbrBtn), by(NbrBtn), bw(NbrBtn), bh(NbrBtn)
DIM bfc(NbrBtn), bbc(NbrBtn), tfc(NbrBtn)
DIM bs$(NbrBtn)
NbrLED =
2 ' Number of LEDs
DIM lx(NbrLED), ly(NbrLED), lr(NbrLED) 'LED x,y,radius
DIM los(NbrLED), lfc(NbrLED), lbc(NbrLED) 'LED outside clr, fore clr, rear clr
DIM ls$(NbrLED), ltc(NbrLED) ' LED text, text colour
'
DIM posn(255) ' Mouse position array
CLS
div =
3 ' Mouse movement divisor: less = faster, more = slower
MMA ' fill the mouse movement array
Spr = 1 ' Sprite (Cursor) number
' Start with the Cursor in the middle
Px = MM.HRES / 2 ' Cursor X position
Py = MM.VRES / 2 ' Cursor y position
mm = 0 ' Mouse movement flag
MODE 3
COLOR 2 ' Green
SPRITE LOAD "cursor.spr"
SPRITE ON Spr,Px,Py
OPEN "COM1: 1200, 256, Cursor, 3" AS #1
' Initialise buttons and array
' Btn#, X, Y, H, W, Col, SelCol, Text, TextCol
InitBtn 0, 20, 40, 32, 28, green, red, " ON", yellow
InitBtn
1, 20, 80, 32, 28, red, green, "OFF", yellow
InitBtn
2, 20, 120, 32, 28, yellow, red, "ALM", black
InitBtn
3, 20, 160, 32, 28, blue, blue, "CSR", white
InitBtn
4, 420, 0, 32, 28, red, red, "EXIT",black
'
AlmLED = 0 ' alarm LED is off
Alm1 = 0 ' alarm condition is off
InitLED 0, 100, 56, 6, white, green, black, "POWER", white
InitLED
1, 100, 134, 6, white, yellow, black, "ALARM", white
SETTICK 500, Flash ' Alarm flash timer
Headings
DO
IF mm = 1 THEN ' Move Mouse
IF (Lb OR Rb) = 0 THEN ' Don't move if mouse click
MoveM
ENDIF
mm =
0
ENDIF
IF Lb = 1 THEN ' Left mouse button is pressed: Check the buttons
IF CheckBtnDown(0) THEN ' Power on
ln=0
DrawLED lx(ln),ly(ln),lr(ln),los(ln),lfc(ln),ls$(ln),ltc(ln)
WaitBtnUp(
0)
ENDIF
IF CheckBtnDown(1) THEN ' Power off
ln=0
DrawLED lx(ln),ly(ln),lr(ln),los(ln),lbc(ln),ls$(ln),ltc(ln)
WaitBtnUp(
1)
ENDIF
IF CheckBtnDown(2) THEN ' Toggle alarm condition
IF Alm1 = 0 THEN
Alm1 =
1 ' set alarm on
ELSE
Alm1 =
0 ' reset alarm
DrawLED lx(ln),ly(ln),lr(ln),los(ln),lbc(ln),ls$(ln),ltc(ln)
ENDIF
WaitBtnUp(
2)
ENDIF
IF CheckBtnDown(3) THEN ' Change the cursor
SPRITE OFF all
IF Spr = 1 THEN
Spr =
2
ELSE
Spr =
1
ENDIF
SPRITE ON Spr,Px,Py
WaitBtnUp(
3)
ENDIF
IF CheckBtnDown(4) THEN ' Exit the program
CLS
END ' Exit
WaitBtnUp(4) ' Not needed for this control
ENDIF
ENDIF
' Check for right mouse button click
IF Rb = 1 THEN
' < do whatever right click is for
PRINT @(130,15) CLR$(yellow);"Cursor Coordinates: X =";px;" ,Y =";py
DO: LOOP UNTIL Rb = 0
PRINT @(130,15) SPACE$(40)
ENDIF
LOOP
' Draw the heading
SUB Headings
PRINT @(140, 0) "MOUSE AND BUTTON SELECTION DEMO"
END SUB
' Draw the buttons (bc not used)
SUB DrawBtn x, y, w, h, fg, bc, s$, tc
LINE(x, y)-(w+x, h+y), fg, BF
PRINT @(x + 5, y + 10) CLR$(tc, fg) s$
' PRINT @(60,168) "Cursor No."; Spr
END SUB
' Initialise buttons and arrays (bc not used)
SUB InitBtn n, x, y, w, h, fg, bc, s$, tc
bx(n) = x : by(n) = y : bw(n) = w : bh(n) = h
bfc(n) = fg : bbc(n) = bc : bs$(n) = s$ : tfc(n) = tc
DrawBtn x, y, w, h, fg, bc, s$, tc
END SUB
' Check if the button is selected
FUNCTION CheckBtnDown(n)
LOCAL x,y
x = px: y = py
'if Lb = 1 then
IF x > bx(n) AND x < bx(n)+bw(n) AND y > by(n) AND y < by(n)+bh(n) THEN
DrawBtn bx(n), by(n), bw(n), bh(n), bbc(n), bfc(n), bs$(n), tfc(n)
CheckBtnDown =
1
ENDIF
END FUNCTION
' Wait until the mouse button is released
SUB WaitBtnUp(n)
DO
LOOP UNTIL Lb = 0
DrawBtn bx(n), by(n), bw(n), bh(n), bfc(n), bbc(n), bs$(n), tfc(n)
END SUB
' Initialise the LEDs and arrays
SUB InitLED ln, x, y, r, os, fg, bc, s$, tc
lx(ln) = x: ly(ln) = y: lr(ln) = r: los(ln) = os
lfc(ln) = fg: lbc(ln) = bc: ls$(ln) = s$: ltc(ln) = tc
DrawLED x, y, r, os, bc, s$, tc
END SUB
' Draw a LED
SUB DrawLED x, y, r, os, fg, s$, tc
CIRCLE(x, y), r, os
CIRCLE(x, y), r-1, fg , ,F
PRINT @(x + r +5, y - r/2) CLR$(tc) s$
END SUB
' fill the mouse movement array
SUB MMA
FOR i = 0 TO 127
posn(i) =
CINT(i/div)
NEXT i
FOR i = 128 TO 255
posn(i) =
CINT(((i AND 127) - 128)/div)
NEXT i
END SUB
' Interrupt subroutine to flash the alsrm LED
SUB Flash
IF Alm1 = 0 THEN EXIT SUB
ln=
1
IF AlmLED = 0 THEN
AlmLED =
1
DrawLED lx(ln),ly(ln),lr(ln),los(ln),lfc(ln),ls$(ln),ltc(ln)
ELSE
AlmLED =
0
DrawLED lx(ln),ly(ln),lr(ln),los(ln),lbc(ln),ls$(ln),ltc(ln)
ENDIF
END SUB
' Interrupt routine to handle mouse
SUB Cursor:
A$ =
INPUT$(1,#1)
MB1 =
ASC(A$) ' Convert to number only once
IF (MB1 AND 192) <> 192 THEN EXIT SUB ' First byte is 11xxxxxx, not synced
Lb = (MB1 AND 32)/32 ' Left mouse button
Rb = (MB1 AND 16)/16 ' Right mouse button
B$ = INPUT$(1,#1) :C$ = INPUT$(1,#1)
mm =
1
END SUB
' Move cursor
SUB MoveM
Px = Px + posn((
ASC(B$) AND 63) + (64 * (MB1 AND 3)))
Py = Py + posn((
ASC(C$) AND 63) + (16 * (MB1 AND 12)))
IF Px < 0 THEN Px = 0: IF Px > 479 THEN Px = 479
IF Py < 0 THEN Py = 0: IF Py > 431 THEN Py = 431
SPRITE move Spr, Px, Py
END SUB


The cursors: "Cursor.spr"

2019-03-19_152839_Cursor.zip

The program will run without a mouse but of course you cannot move the cursor.

Bill
Keep safe. Live long and prosper.
 
Turbo46

Guru

Joined: 24/12/2017
Location: Australia
Posts: 1638
Posted: 06:45am 19 Mar 2019
Copy link to clipboard 
Print this post

It just occurred to me that someone might want to try this but doesn't want to bother with a mouse. I could make another version that uses the keyboard cursor keys to move the mouse. Say move 5 pixels with a cursor key press and 1 pixel with CTRL+key press. Enter to select and (say) the R key to right click.

Bill


Keep safe. Live long and prosper.
 
Frank N. Furter
Guru

Joined: 28/05/2012
Location: Germany
Posts: 946
Posted: 10:16am 21 Mar 2019
Copy link to clipboard 
Print this post

Very cool code! Thanks for sharing!!!

Frank
 
Raros

Regular Member

Joined: 06/02/2012
Location: Italy
Posts: 55
Posted: 02:27pm 21 Mar 2019
Copy link to clipboard 
Print this post

Great. A good job.


Raros
Edited by Raros 2019-03-23
 
Turbo46

Guru

Joined: 24/12/2017
Location: Australia
Posts: 1638
Posted: 01:53am 22 Mar 2019
Copy link to clipboard 
Print this post

Thanks for the kind comments and thank you again Raros for your original program.

Bill
Keep safe. Live long and prosper.
 
Print this page


To reply to this topic, you need to log in.

The Back Shed's forum code is written, and hosted, in Australia.
© JAQ Software 2025