
|
|
Forum Index : Other Stuff : New F&P micro hydro generator
| Author | Message | ||||
SSW_squall Senior Member Joined: 20/03/2010 Location: AustraliaPosts: 111 |
Hi Pete, Fair point, although the whole turbine will be protected under a some sheets corrugated iron to keep the rain off, it would definitly be a good idea to protect the F&P smart drive with a round cover of some sort. Orginally I was thinking about using a plastic bucket of some description, but just remembered an old urn i got floating around in the shed that could be just the ticket and would keep the stainless steel theme going too... One of the tasks for the long weekend is to rewire the F&P stator, i'm thinking about going for the 7P2S configuration with a switch to select either star or delta to suit the 48V battery i've got. Anyone have any other thoughts on this?? Cheers AB Einstein: Everything should be made as simple as possible, but not one bit simpler |
||||
Downwind Guru Joined: 09/09/2009 Location: AustraliaPosts: 2333 |
Hi AB, Looking at where the jet enters it would be an advantage if he slotted the hole slightly, and put a plate either side of the slotted hole with the jet mounted through the plates to allow for some adjustment of the jet alignment to the wheel. Pete. Sometimes it just works |
||||
| SSW_squall Senior Member Joined: 20/03/2010 Location: AustraliaPosts: 111 |
More than a month since my last update!! It's been on the go slow for various other reasons, mentioned else where... Anyway a couple of things have been happening: Took delivery of the chassis and payed for it: $280 Which i reckon is a steal!! (no pun intended) Considering how nice it's turned out and how much the completed ecoinovation units cost. Drilled the holes in the front of the chassis for the plastic window, bought some M5 stainless steel bolts to secure it. Cut a piece of acrylic for the window on the table saw at work, the corner shattered because it's a acrylic not polycarbonate. I'll buy some some polycarb at some point, but the acrylic will be fine at least initally... Will post some pic's of this stuff when i can take them in the daylight I rewired the smart drive the other night using the 7P2S configuration, with both ends of the winding availiable for star or delta connection: 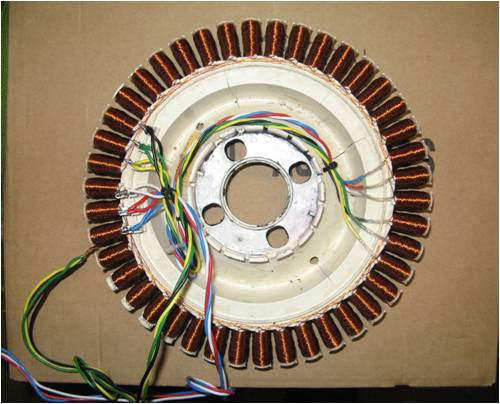
Stripped a piece of trailer cabling to get some good colours, although it should easily handle the 2-3A. I'm not sure this was a good idea because any or all of the following could happen: 1. If the smart drive turns clockwise only phases A and C will work. 2. If the smart drive turns anti-clockwise only phases B and C will work. 3. At any given time phase A will flicker imtermittently, but only when someone other than yourself is watching. Joking!! The average conditon of wiring on any trailer on the road in SA, HAHA!! And lastly and most importantly it POURED last night from 8PM to 8AM this morning and we had 30mm, which will mean the creak should now be flowing reasonably... AB Pete: In reply to your last comment about the jets, they do have abit of play in all directions. I'll need a rubber washer to hold them still i think Einstein: Everything should be made as simple as possible, but not one bit simpler |
||||
Greenbelt Guru Joined: 11/01/2009 Location: United StatesPosts: 566 |
AB; Thanks for the Update. I have high interest in your project as I have a Water source on my property and would like to do something similar. I would like to know the diameter of the Pelton T and its thickness. Good Job on the rewind, Hope to see it running soon, Roe Time has proven that I am blind to the Obvious, some of the above may be True? |
||||
| SSW_squall Senior Member Joined: 20/03/2010 Location: AustraliaPosts: 111 |
UPDATE: Tried the new hydro setup for the first time today!!! Greenbelt, in answer to your question, i'll refer to the Econinovation website which is where i brought the pelton runner and other bits: Eccoinovation pelton runner A previous repair on the penstock pipe failed, so i had to fix that before anything could really happen: 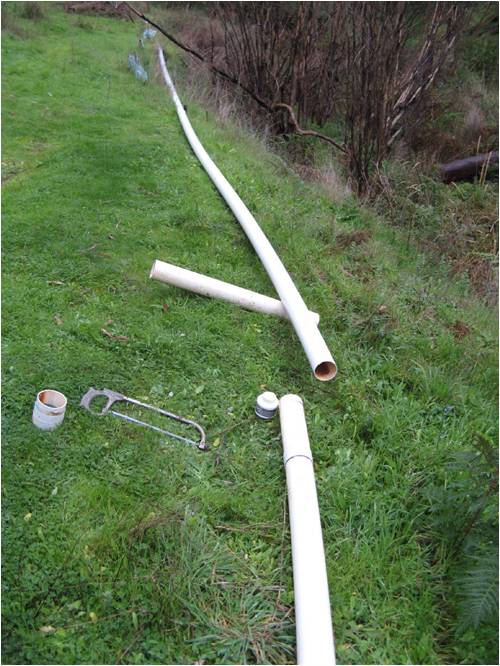
Cut out the broken section and sandpapered all gluing surfaces before connecting it all back together, after drying overnight hopefully it holds: 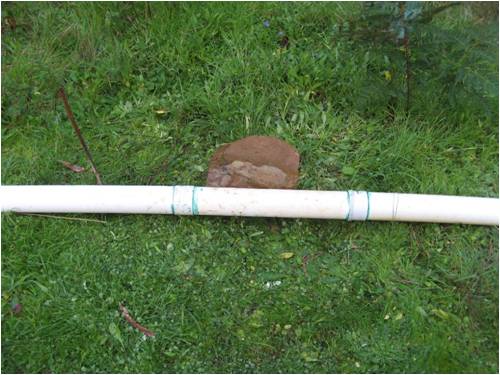
The blackberry bushes in our valley seem to be intent on breaking some sort of record for the time taken to totally engulf any cleared space, so i spent a good 30 minutes reclear the space to set things up in. (I think i need to get serious with some chemical weapons AKA roundup) 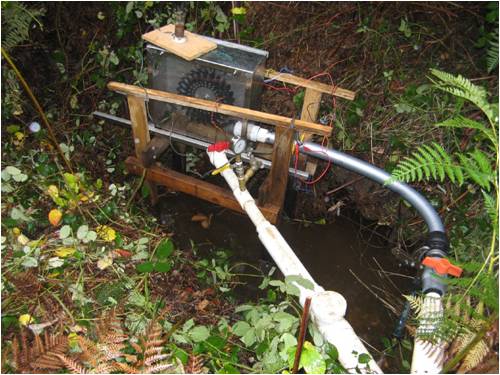
Charged up the penstock, this photo shows the static head: 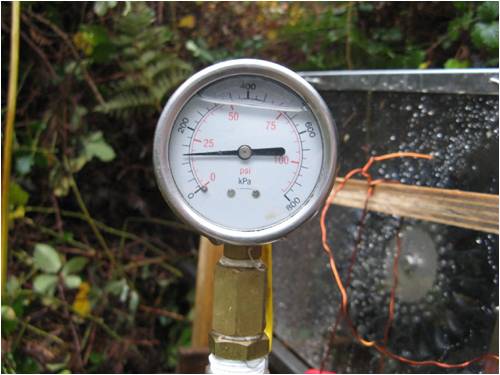
To start up the turbine, first i open a tap under the pressure gauge to relieve any pressure spikes in the penstock, then open the main valve and lastly close the relief tap for max pressure. Started off with a jet opening of about 10mm, with the 1000W projector lamp connected. Opening the valve for the first time was abit of a disapointment, as the turbine was struggling to move at all (F&P is too good??). After jacking the F&P rotor about halfway across the magnets things were starting to go a little better, although the turbine was still running a little too slow as shown by the water exhausting backwards: 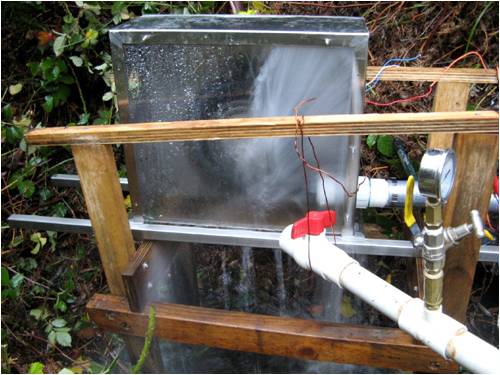
After opening the jet up to about 14mm, the power increased to 1.56A x 47.2 V = 73w approx, the turbine was running at about an optimal RPM and the light was starting to glow: 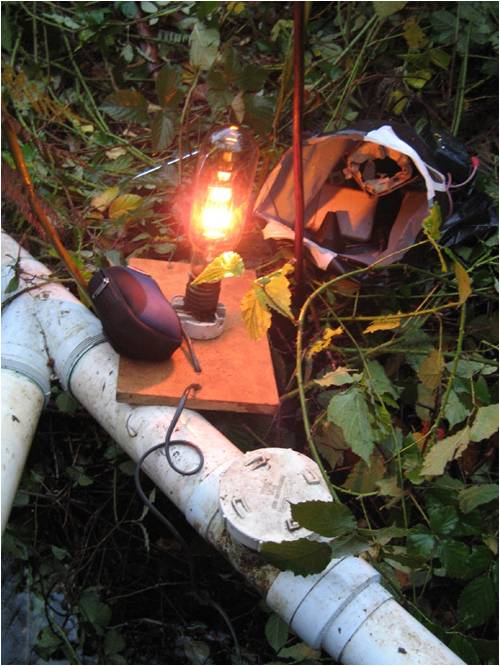
Already i can tell that hydraulically the system is operating a lot more efficently than the previous DC generator turgo turbine with radiator hose connection + poly irrigation takeoff. To get the same amount of power, i had to use a 19mm jet. Although i havn't really measured the flow it seems considerable less for same amount of output power... With more water, a bigger jet (or using the second jet) i'm sure we could be talking 150W plus. So i'm pretty happy with the results of the first test run, i was worried that the SS box would vibrate make too much noise, but the whole rig is really very quiet, because the samrt drive is running at less than 600RPM. It's only the wirring of the smart drive that gives it away and even then it could easily be mistaken for the noise of the creek flowing at a distance of more than 20m. Because the system is opperating close to the static head with only a small dynamic loss of head, there is a very pronounced "hill" which represents the optimum turbine RPM and electrical load. So electrically the issue of matching the load (MPPT) is going to be fairly important to obtain the maximium watts and therefore watt-hours possible... Not to sure how the efficency of the smart drive will be affected by jacking the magnet rotor out away from the poles. Basically i need to get an MPPT controller, this will also mean i can send the power up the hill at 100V say, which will reduce the power line I^2R losses and then step it down to the ~54v of the 48v battery bank. The tasks now are: - Lubricate the bearing block with teflon based dry-glide. - Setup the second jet on the turbine. - Enclose the 3 phase rectifier in a waterproof box, with start/delta switch and some LED's for illumination. - Sort out a cover (stainless steel urn) for the smart drive - Setup the power line properly (this is going to be an excerise). - Setup all the fuses and connection buss bars on the battery bank. AB Einstein: Everything should be made as simple as possible, but not one bit simpler |
||||
| Downwind Guru Joined: 09/09/2009 Location: AustraliaPosts: 2333 |
Nice to see a plan come together and give some results on first testing. Although it will be a pitty the blackberrys will have engulfed the whole thing by morning. 
Pete. Sometimes it just works |
||||
| GWatPE Senior Member Joined: 01/09/2006 Location: AustraliaPosts: 2127 |
quote from AB "Opening the valve for the first time was abit of a disapointment, as the turbine was struggling to move at all (F&P is too good??). " The fact that you had a resistive load connected during the startup test has more to do with what you observed, and not with how good you think the F&P alternator is. If the turbine shows similar startup characteristics with no load connected, then this indicates how poor a F&P is. It is still good that you can put some of the creek water flow to some useful work. Those kWh produced per day still mean less to come from another source. Gordon. become more energy aware |
||||
| SSW_squall Senior Member Joined: 20/03/2010 Location: AustraliaPosts: 111 |
Hi Gordon, Thank for the comment, perhaps i was using abit of hyperbole... The turbine can freewheel quite easily without any load, i did disconnect the load momenterily and the open circuit voltage went up to 90V! Although i think there are some friction losses that can be improved abit and i'm not sure if the coggging is having any effect when the F&P is actually running. And as you've said it was really the load which was too good (and the matching that was poor) i should have taken some of the other light bulbs to give a couple more dummy load options. I might rig up a tapped resistor string of 10x 5.6Ohm 10w resistors for testing purposes next time, with a 10w light bulb across the string for visual indication of more or less power... AB PS: I was reading abit about blackberry weed control today, and apparently under ideal conditions the shoots can grow up to 5cm per day!! so maybe it's not my imagination. Einstein: Everything should be made as simple as possible, but not one bit simpler |
||||
| Greenbelt Guru Joined: 11/01/2009 Location: United StatesPosts: 566 |
SSW_squall, Good start. Thanks for the link. Roe Time has proven that I am blind to the Obvious, some of the above may be True? |
||||
| SSW_squall Senior Member Joined: 20/03/2010 Location: AustraliaPosts: 111 |
Where is the year going?? Another month has almost past again!! Finally some action!! The last couple of weekends I've managed to run the power line from the turbine site up to the house. It is 2.5mm diameter enameled copper wire, supported by plastic electric fence insulators, secured to some big trees with stainless steel screws. I've found that normal steel screws in trees rust away very quickly, the stainless is a necessity. Because of it's brown colour it's really quite difficult to photograph, but with the sun at the right angle you can see the wires 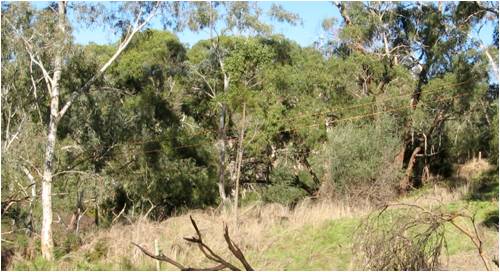
Here's another shot showing the insulators on the tree. I only put the power line up last weekend and already there's a stick that's got caught!! 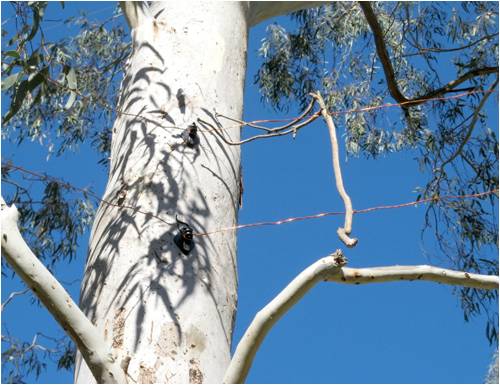
I shorted the power line at the turbine end to test the resistance around the loop and hooked up a 12v light bulb to an SLA battery i measured a 2.54V drop with a current of 1.4A V / I = R 2.54/1.4 = 1.8 Ohms!! I'd estimate the length of the line at about 250m and was hoping for less than about 5 ohms, so this was a pleasent suprise. Next i enclosed the 3 phase rectifier with filter capacitor in a waterproof box with cable glands to terminate the power line. This box is situated away from the creek with the water and spray, an old extension cord carries the 3 phase wild AC from the smart drive to the box so that there is less chance of the connections corroding electrolytically. Here's another shot showing the voltage at the output of the rectifier, the battery voltage is sitting about a volt or so below this figure. 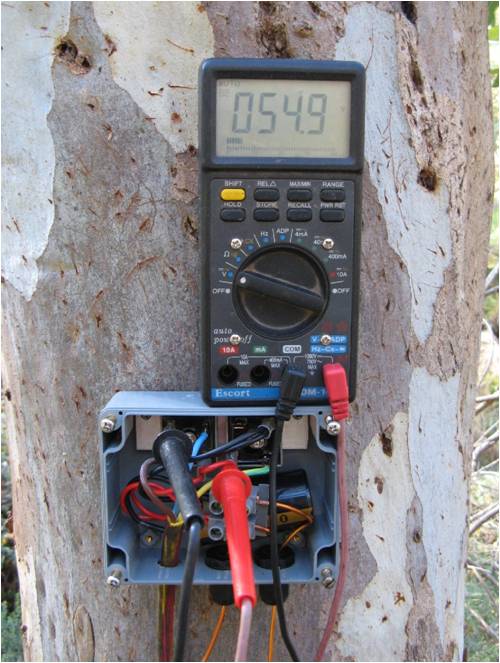
The battery bank is being fed through a low loss shottky diode that stops the power line being energized by the battery down into the valley for safety reasons. I will put a switch across this diode so that it's possible to power up some lights down there from the battery if i have to go down at night and sort out problems or something. Actually i'll pull the fuse to the power line as i don't want my power line starting a black saturday bushfire in summer if it happens to short circuit?! Here's another shot of the turbine running: 
The water is exhausting in the middle of the casing showing that unit is running close to the maximum power point The turbine was delivering about 80W at this point but was drawing down the intake wier, because it hasn't really rained for the last week or so. So i reduced the jet size as of the moment it's delivering about 40W, so the battery is helping me make this post! After i've finnished it i'll let it charge up overnight. I took our stafie Boo down for a walk to keep an eye on things: 
I also snapped an eagle soaring way above the 11kv etsa power lines that goes across the valley: 
Forecast for Monday Fine and partly cloudy during the morning. Showers developing in the south after midday, then extending northwards during the afternoon and evening. Cool with moderate northwest winds freshening early afternoon. Precis Showers developing. City: Min 4 Max 15 Elizabeth: Min 3 Max 15 Mount Barker: Min 3 Max 14 Noarlunga: Min 7 Max 15 UV Alert: Nil , UV Index predicted to reach 2 [Low] Tuesday A few showers. Min 8 Max 14 Wednesday A few showers easing. Min 9 Max 15 Thursday Shower or two. Min 6 Max 15 Friday Mainly fine. Partly cloudy. Min 7 Max 15 Saturday Mainly fine. Min 8 Max 15 Sunday A few showers. Min 7 Max 14 Hopefully the showers mean more than just drizzle and sprinkles... Bring it on AB Einstein: Everything should be made as simple as possible, but not one bit simpler |
||||
| SSW_squall Senior Member Joined: 20/03/2010 Location: AustraliaPosts: 111 |
Well has it been raining or what?? It rained all last night, in the 24 hours to 9am we had 43mm, plus so far today we've racked up another 17mm!! The normally sedate creek has been thundering along at i would estimate to be more than 50 Litres per second. I've gone up to the 19mm jet on the hydro generator and it's still only using a fraction of the water availiable. If i had the second jet rigged up i'd be able to open that up too, but i hav'nt quite set up the plumbing for it yet As of now it's generating almost 130 watts which means about 3kWh a day totally free of charge.(The money kind of charge that is) At the moment i don't have a diversion load controller to to stop the battery from getting overcharged, so i'm trying to carefully balance the power generation against consumption. I think my morning coffee definitely tastes better made with hydro power 
AB Einstein: Everything should be made as simple as possible, but not one bit simpler |
||||
| Downwind Guru Joined: 09/09/2009 Location: AustraliaPosts: 2333 |
WHAT??? With all your back ground you havent thrown together a $10.00 control circuit. You more than likely have enough junk on the work bench to construct one out of. Question ..with hydro do you really require a diverion load, as its not like a mill that will spin to destruction. A wiper motor and ball valve would make a good flow controller. You can tell your rain god he can back the flow off a little for a while now. Pete. Sometimes it just works |
||||
| SSW_squall Senior Member Joined: 20/03/2010 Location: AustraliaPosts: 111 |
Hi Pete, I only only really got this all working and havn't had a chance to do much more... YET
Your quite right, a dump load is not really nessecary for the sake of the turbine, The unloaded speed is approximately twice the max loaded speed for the modest power level that it's running at, this is less then 1000 RPM and won't put undue stress on the pelton runner or F&P alternator. The thing i like about the micro hydro generator is just it's consistency, for the last couple of days it's been spinning up those Wh's like clockwork. Fo the sake of the battery bank not getting overcharged it really needs something that will progressively divert the power to a dump load. Something like xantrex C40 in diversion control mode would do the trick, as it uses pulse width modulation to direct just the right amount of current to the dump load to hold the battery voltage down to the right level. And does a 3 step charging process that is also temperature compensated. I was looking on the fieldlines forum and someone was trying to develop what i had in mind based on an ATMEL tiny microcontroller. But it's not clear from the thread if they actually got the all problems sorted out... The last day i've had it powering our freezer which uses about 1.8kWh a day, the 48V UPS i've got as an inverter is using a fairly greedy 0.7kWh a day meaning there's a few Wh's left for the battery to make sure the net energy in and out is positive. Actually using a ball valve to limit the flow will introduce hydaulic losses that would reduce the pressuse seen at the jet and reduce the hence the power output from what would otherwise be possible. Although i might try to rig up a wipper motor on a ball valve to open the second jet which would double/half the flow What i really need is a Spear valve This varies the aperture of the jet directly and are used on commercial scale pelton turbines. Connecting this to control system that uses an float on the intake weir to measure the avaliable water level would be the ideal setup. This would be the hydro equivalant of variable pitch blades on a wind turbine!!! The next task i've got to do is setup some copper buss bars on a piece of plywood for the DC connections and loads and also distribution for the AC loads With spaces for current shunts so i can meter the power in and out of the battery and measure(log?)the performance of the system. More on that to come... thank for the comments AB Einstein: Everything should be made as simple as possible, but not one bit simpler |
||||
| Downwind Guru Joined: 09/09/2009 Location: AustraliaPosts: 2333 |
Hi AB, I really meant the wiper motor to control the on off of the jet flow with a ball valve for a dump on off function and not a variable flow control. Im a little doubtful on your wiring as a good choice but we use what we have and is the right price at the time. Nice to hear you are generating some free W/H, although of late you could push the freezer out the door and pull the plug and it still not defrost with the weather we are having. Brrrrrrrrrr. Enjoy the morning coffee, (and maybe a ice cold beer for the evening) Pete. Sometimes it just works |
||||
| SSW_squall Senior Member Joined: 20/03/2010 Location: AustraliaPosts: 111 |
About time for an update on how the hydro rig has been going: Positives: 1. The machine has been running since June 28 minus a few of days of down time equals about 50 days or 1200h of contineous operation! 2. At least this winter, there has been a good minimum useful flow at all times. 2. The meter i've got on the output of the inverter has clocked up about 70kWh of energy consumed by the AC loads. 3. Easily achived my inital goal of running our fridge (and freezer sometimes) from RE power. 4. The stainless steel case for the turbine hasn't corroded at all and has stood up well to the constant use in the wet environment. Negatives: 1. Not all of those 50 days was at max power production with the largest jet, the flow 2. Attempting to take all the water from the creek results in the intake wier being drawn down with the penstock half empty and alot less power output 3. The UPS inverter is a big parasitic load on the system and uses about 0.8kWh a day 4. Links on the battery bank keep corroding. 4. Biggest one - water has apparently been making it's way into the bearing block and running THROUGH the bearings. I had to change the bearings, i think i've got one sorted now. Probably guilty of turning a blind eye to this, as there was water running along the outside of the bearing block and i was hoping that there was little or no water on the inside but i was wrong... Part of the problem lies with the stainless steel case i had made up, the hole though it was not a close fit with the shaft and hence water could easily flow up against the bearing. Fixed this with a simple spacer of polycabonate sheet drilled just larger than the shaft with a 1mm gap. However when using large 19mm jet, water was still getting blasted up the drain hole and being forced into the bearing block 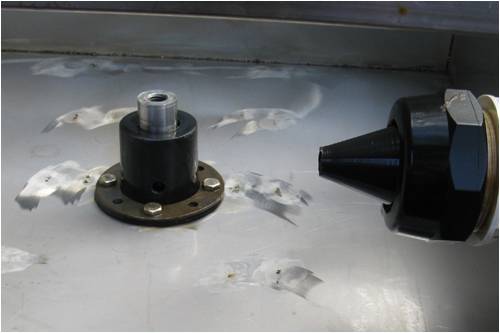
Added a shield made from some PVC pipe to protect the drain hole from direct spray and fingers crossed i think the problem is solved. 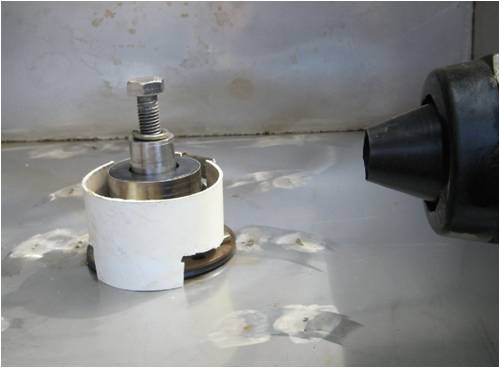
Here's a pic of the copper battery link: 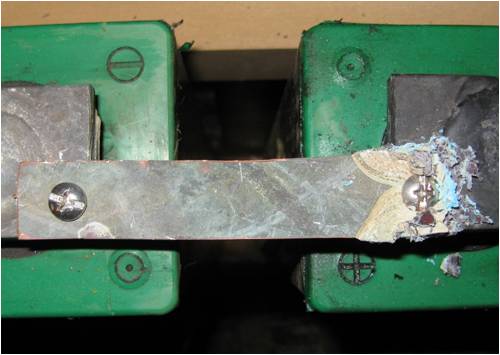
I've replaced some of the links with lugs that i've coated with 60/40 leaded solder but even these seem to be corroding 
The stainless steel screws seem to be surviving OK, so that might be the only answer, any other thoughts?? Still heaps of work to do: 1. Finish the distribution panel, with buss bars fuses ect 2. Finish modifying a 24V to 12V DC-DC converter for 48V so i can run 12V loads directly off the 48V supply. 3. Set up the second jet so i can take avantage of the extra flow when it pours: 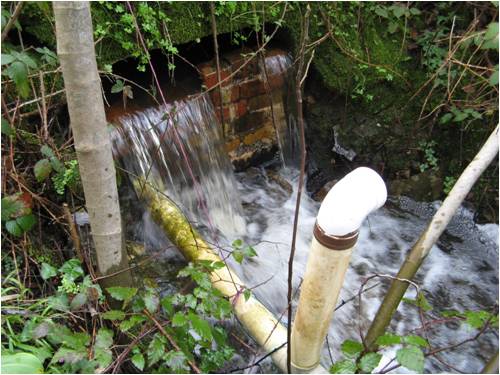
For next year: I connected a hose to the end of the penstock and ran it down stream and worked out i could get about another 2m of head bring total pressure to 20PSI So i have to order some more 90mm PVC pipe, clear the blackberries and set up the machine in a better more accesable location AB Einstein: Everything should be made as simple as possible, but not one bit simpler |
||||
| Downwind Guru Joined: 09/09/2009 Location: AustraliaPosts: 2333 |
Try a coating of grease or vasaline over the terminals to prevent the corrosion. There is also a spray on terminal lube to prevent corrosion, and think there is a marine one too. Might be the answer, a tool kit in a can. I see most of the battery places use it when replacing a battery and i have never had a corroded terminal with one that has has the spray applied. Luck or myth i dont know but worth a try. One would expect you are gassing the batteries a bit to get that sort of corrosion rate. Pete. Sometimes it just works |
||||
KarlJ Guru Joined: 19/05/2008 Location: AustraliaPosts: 1178 |
SSW mate what an achievement ! Awesome I cant help but notice its a 60S stator right? potentially this is not the right tool for this job particularly as you can get 600rpm+ If you have one laying around or keep an eye on the verge collection an 80S wired as you did this one will punch out alot more amps. I'd be keeping a close eye out for some more DC cable back to the house, scrap yards etc can pay as little as $5/KG for good (ie on a roll brand new). The 80m run from my windturbine i did in 16mm2 cable and I was worried this wasnt big enough hence I'm thinking you need to double up at least. As you say the extra 2m of head will help too, then you can start adding some more loads Top effort in all well done. BTW at that money for your box you did indeed get one helluva bargain, ecoinnovation stuff starts at 5x that. I'd even consider if your mate has any more SS to build another, flog it here or on ebay and spend the profit on any one of a dozen improvements, bigger batteries, bigger cable, dump load, HV transmission perhaps! Luck favours the well prepared |
||||
| SSW_squall Senior Member Joined: 20/03/2010 Location: AustraliaPosts: 111 |
G'day Karl, Thanks for the encouraging comments mate... I know you've totally *SMASHED* it with your 4.5kW solar array and it will probably make 70kWh over the course of 2 days rather than 2 months which is just magic!! I'm in abit of a quandry at the moment, because i want to add some solar panels to complement the hydro generator for the other 8 months of the year. But even if i buy some panels outright at wholesale prices from altronics at $3.375 per watt 2 grand will only buy me a 0.56kW array. For that price i could get 1.5kW grid tie system installed that attracts the 8 grand government rebate. However i want to have a source of grid independent power for fire protection reasons and so i can have DC power to play with. Also i really struggle to with the concept of feeding power into an energy black hole which is the power grid which will just be subsidising my neighbours (or in your case half the street's) inefficient and wasteful energy useage. I would love to be wrong but i don't think i can get the rebate with my grid independent system. The enamalled copper wire that is the power line is 4.9mm2 and was free from work, i do have plenty of wire and could double it up. Even through the run is about 250m the cable is only losing me about 12 watts, yes HV transmission at 100V with a MPPT controller is one of the things on the cards for next year. I would like to try a different stator, the thicker wire of a 80S would probably give less copper loss and may well be more efficient. Thanks for the comments Pete, i do need to get some of that blue spray which seems to have magical properties in repeling battery terminal corrosion. Cheers AB Einstein: Everything should be made as simple as possible, but not one bit simpler |
||||
| KarlJ Guru Joined: 19/05/2008 Location: AustraliaPosts: 1178 |
get the 1.5KW system using a PVE 1200 send an email to LAtronics for a supplier in your area. get them to wire it up as a 48V system then aim for that if you can! that way you get both. if you are entirely off grid it gets tougher as you say, not sure where the rebates lie at the moment but typically its for a ground up install with all new gear $$$$ I got my panels from www.pindanpower.com.au Ben was great at at roughly $520 for a 185W panel, under $3/W thus it is out there. can always get onto Matt Lyons from energy matters, he always looks after forum members as best he can and Solarfun panels can be had for reasonable money too. No good for me as freight to the other side of the country risky at best! in the grand scheme of things $2K is nothing! BTW mine is now 5.18KW and I've made 22KW so far today and still pumping them in at 2300W.....only 3.30 here so a good 4-5 KW for the day still to come!  Luck favours the well prepared |
||||
MacGyver Guru Joined: 12/05/2009 Location: United StatesPosts: 1329 |
SSW_squall I'm just now discovering this thread. Being a plumber for over 40 years, I wish I had been following it sooner, since I deal with water all day every day and maybe I could have helped along the way, but it looks like you're "arrived" with out me; good job. One thing I will stress is you should paint that white plastic pipe with just about any paint available so as to protect the plastic from UV degradation. If you notice the surface of the pipe beginning to "check" (little cracks) that's a sign of UV deterioration and sooner or later it will break. [Quote=SSW_squall]I also snapped an eagle soaring way above the 11kv etsa power lines that goes across the valley: (bold added) The thought occurred to me those high-voltage lines are sure to leak flux. If you could somehow get a coil winding close enough to one of these 11KVA lines to induce a current into it, you could snag some free power. Of course, you could also maybe snag some time in Hotel No Knob (jail) or maybe even host a "termination" party at the local cemetery, but it was just a thought.
. . . . . Mac Nothing difficult is ever easy! Perhaps better stated in the words of Morgan Freeman, "Where there is no struggle, there is no progress!" Copeville, Texas |
||||
