
|
|
Forum Index : Microcontroller and PC projects : MM2: 4-wire GLCD
| Author | Message | ||||
| matherp Guru Joined: 11/12/2012 Location: United KingdomPosts: 11128 |
There are some new 126x64 GLCDs available to replace the venerable KS0108 based ones. The new ones use the ST7920 controller, still 5V unfortunately, but I'm connecting direct to the MM without problem as all connections from the MM are outputs. e.g. this one These can be used in SPI mode, 4-bit parallel, and 8-bit parallel (like the older ones). I've modified the graphics routines to drive this display in SPI mode using only 4 pins on the micromite. The display I received needed a minor mod to work in serial mode. The resistor circled in the picture was originally 0-ohm. This resistor is a pullup on the PSB input to the display (pin 15) which puts it into parallel mode. Before I discovered this, when I tried to tie PSB to 0V to put the display into serial mode it shorted out the power supply through this resistor 
I replaced the 0-ohm part with a 4K7 resistor so I could then tie PSB to ground. I made one other mod circled in the picture. There is a 2 way shorting link that selects between an external contrast potentiometer and using the on-board one. Changing the link as pictured enabled the on-board one (next to the link). 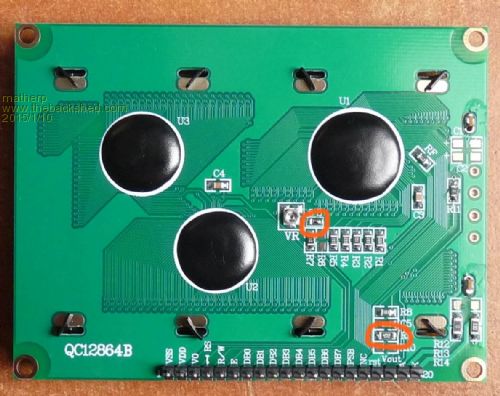
The board has a 330ohm dropper resistor for the backlight so the wiring is really easy. GND - pins 1, 15, 20 5V - pins 2, 19 RESET pin 17 connected to micromite (pin selectable in the software) RS pin 4 connected to micromite (pin selectable in the software) RW pin 5 connected to SPIout on mixcromite E pin 6 connected to SPIclk on micromite The picture doesn't come across very well but the display has very good contrast and viewing angle. 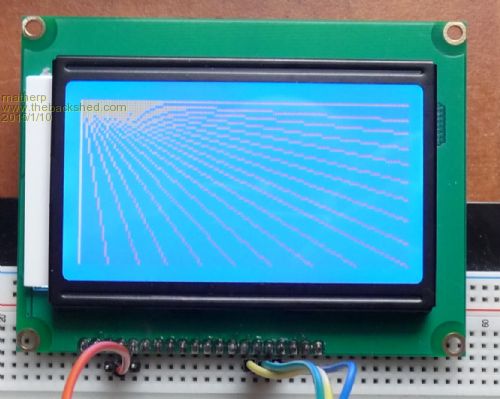
The demo program includes my normal test harness for monochrome displays and the only changes from the OLED code are the initialisation and a different Cfunction to construct the output string for sending to the display. 2015-01-10_115226_st7920.zip |
||||
| viscomjim Guru Joined: 08/01/2014 Location: United StatesPosts: 925 |
Matherp, this is excellent work! It looks like its time for me to take the plunge and get a couple of these displays to play with. You seem to really have a great handle on the c functions and I think I can speak for quite a few tbs members by saying thank you for doing all this homework. It is greatly appreciated. This type of code will bring the uMite more into the limelight for bigger and better projects. |
||||
| Zonker Guru Joined: 18/08/2012 Location: United StatesPosts: 772 |
Thanks for the Info Matherp..! I just ordered 2 of these to play with. I used the Nokia display to build a R/C servo tester box for my buddy Ed to use in a project, so I need more to play with. Oh, a quick question... Is there a way to strip your library down to a smaller size if you didn't want the graphic objects..? ie Character only mode... Thanks again for all the fine work you have done supplying the code for this class if display units..! |
||||
retepsnikrep Senior Member Joined: 31/12/2007 Location: United KingdomPosts: 134 |
I second that request and also thank you for all the work done on these displays. A lot are just looking for a replacement for the old trusty 20x4 lcd.  Gen1 Honda Insights. |
||||
muddy0409 Senior Member Joined: 15/06/2011 Location: AustraliaPosts: 125 |
Oh Wow! A GLCD that works serial without an extra driver board. Been a long time coming. Don't poo poo conspiracy theories. Remember that everything ever discovered started somewhere as a theory. |
||||
bigmik Guru Joined: 20/06/2011 Location: AustraliaPosts: 2979 |
Great work Matherp, I am very great full to the work you are doing on these displays.. I am curious though, why would you use one if these modules over the cheaper colour modules that also have touch screens? Not a criticism, just curious.... Mick Mick's uMite Stuff can be found >>> HERE (Kindly hosted by Dontronics) <<< |
||||
| matherp Guru Joined: 11/12/2012 Location: United KingdomPosts: 11128 |
In general you can reduce code size of the programs by deleting all the basic wrappers for the unused CFunctions. Also, you can chop the font table in half, all the normal characters are in the first half. I have requested that Geoff looks at the way C Functions are stored for a future release of the MM2 code because at the moment they are stored twice - both as ascii text for the editor and as the actual binary which is pretty small. It is of course possible to re-compile the cFunctions without some of the code but the impact of this isn't that great as the big routines are all needed for character drawing. The advantage of these LCD displays is that, depending on the technology (transflective or reflective), they can be much more readable in sunlight. Also, being monochrome they need much less data sending to drive them. This particular display has a character generator built in but it uses 16x8 characters (4 lines of 16 characters). It can also display 4 lines of 8 16x16 kanji characters out of a set of 8192!. By contrast the graphics routines can display 8 lines of 21 characters in single height mode. In character mode the underlying hardware display addressing is actually 2 lines of 16 (16x16) characters. 16x8 characters have to be written 2 at a time as though they were one 16x16 character and can't be written individually. It is possible to mix character and graphics modes but probably not worth the effort. The attached code uses no cFunctions and drives the display in 16x8 character mode (4 lines of 16 characters) and hides all the complexity of the underlying addressing. There is only one "user" routine pstring(string$, x ,y) where string contains the characters to be displayed and x=0 to 15, y=0 to 3 An optional cursor is simulated in software using a timer. One point to note, both this code and the graphics code leave the chip-select line permanently enabled as the datasheet implies that the controller doesn't like activity on the clock or data lines when it is not enabled. I may be misreading this but the code at the moment does not allow for a second SPI device to be connected. option explicit option default NONE initdisplay(16,15) 'Reset on pin 16, Chip select on pin 15 cursoron pstring("World",9,0) pause 375 'pause to allow cursor to flash and check it gets corrected pstring("Hello my",0,0) pause 375 pstring("World",10,3) pause 375 pstring("Hello my",1,3) pause 8000 cursoroff cls end ' sub initdisplay(rs as integer,cs as integer) DIM integer LCD_RESET=rs DIM integer LCD_CS=cs DIM integer LCD_CMD=&B11111000 DIM integer LCD_DATA=&B11111010 dim screen$(4) length 16 'memory map used to get round the problems of single character output dim integer cursorx,cursory,cursorstate,lastx, lasty, cursoronoff spi open 1000000,3,8 pin(LCD_RESET)=1 pin(LCD_CS)=1 setpin LCD_RESET,dout setpin LCD_CS,dout pin(LCD_RESET)=0 pause 200 PIN(LCD_RESET)=1 pause 200 PIN(LCD_CS)=1 ' continuous enable for the moment sendCMD(1) 'DISPLAY CLEAR sendCMD(&B00001100) 'display on cls end sub ' sub cls 'clear screen sendCMD(1) 'DISPLAY CLEAR screen$(0)=" " screen$(1)=" " screen$(2)=" " screen$(3)=" " cursorx=0 cursory=0 end sub ' sub sendbytes(databyte1 as integer,databyte2 as integer) local integer i i=SPI(LCD_DATA) i=spi(DATABYTE1 AND &HF0) i=spi((DATABYTE1 and &H0F)<<4) i=spi(DATABYTE2 AND &HF0) i=spi((DATABYTE2 and &H0F)<<4) end sub ' sub sendCMD(databyte as integer) local integer i,J i=SPI(LCD_CMD) i=spi(DATABYTE AND &HF0) i=spi((DATABYTE and &H0F)<<4) pause 2 end sub ' sub goto2xy(x as integer, y as integer) local integer command command=&H80 command=command or (x and &H07) command=command or ((Y mod 2)<<4) if y>1 then command=command or 8 sendCMD(command) end sub ' sub pstring(instring$,x%,y%) settick 0,0,1 goto2xy(0,y%) local i%,j%,k% for i%=1 to len(instring$) poke var screen$(y%),i%+x%,asc(mid$(instring$,i%,1)) 'update the memory image next i% for i%=1 to 16 step 2 j%=peek(var screen$(y%),i%) k%=peek(var screen$(y%),i%+1) sendbytes(j%,k%) next i% cursory=y% cursorx=x%+len(instring$) if cursoronoff then settick 400,blink,1 end sub ' sub cursoron cursorstate=1 cursoronoff=1 settick 400,blink,1 end sub ' sub cursoroff cursorstate=0 cursoronoff=0 blink settick 0,0,1 end sub ' sub blink local i%,j%,k% if cursorstate then goto2xy(cursorx\2,cursory) lastx=cursorx lasty=cursory if cursorx mod 2 then 'odd position j%=peek(var screen$(cursory),cursorx) k%=&H5F else j%=&H5F k%=peek(var screen$(cursory),cursorx+2) endif cursorstate=0 else goto2xy(lastx\2,lasty) if lastx mod 2 then 'odd position j%=peek(var screen$(lasty),lastx) k%=peek(var screen$(lasty),lastx+1) else j%=peek(var screen$(lasty),lastx+1) k%=peek(var screen$(lasty),lastx+2) endif cursorstate=1 endif sendbytes(j%,k%) end sub |
||||
| muddy0409 Senior Member Joined: 15/06/2011 Location: AustraliaPosts: 125 |
Found a bunch of these on Ebay.au Just search for the controller the ST7920 They are around $10 each Now I just gotta find a data sheet, in engrish, or better still, english. Don't poo poo conspiracy theories. Remember that everything ever discovered started somewhere as a theory. |
||||
| Zonker Guru Joined: 18/08/2012 Location: United StatesPosts: 772 |
Yes Sir... I did the same snagging the 2 got... Then, I just looked through the pix looking for the one that had the same back PCB as matherp Pix... Hopefully, it will work the same... I really like the size of the unit... Maybe try out some daylight readable types next.. I'm still waiting on the color ones to come in... I would still like to spin up a suitable uMite back board for one of these... Maybe do a little Micro-View Butt kickin...  |
||||
| muddy0409 Senior Member Joined: 15/06/2011 Location: AustraliaPosts: 125 |
Well, I found a readable datasheet for the driver IC. Does anyone know where I can find a sheet for the complete LCD module? Don't poo poo conspiracy theories. Remember that everything ever discovered started somewhere as a theory. |
||||
| matherp Guru Joined: 11/12/2012 Location: United KingdomPosts: 11128 |
For reference, this is the display I bought Has a good picture of the back. And the advert tells you how to measure your bra size |
||||
| The Back Shed's forum code is written, and hosted, in Australia. | © JAQ Software 2026 |
