
|
|
Forum Index : Microcontroller and PC projects : ESP8266: Lots to play with
| Page 1 of 2 |
|||||
| Author | Message | ||||
| matherp Guru Joined: 11/12/2012 Location: United KingdomPosts: 11512 |
Thanks to viscomjim I've just wasted (spent profitably?) a day playing with the cheapest version of the ESP8266 modules - the ESP-01. There are lots of other variants but they all use the same underlying chip - ESP8266EX 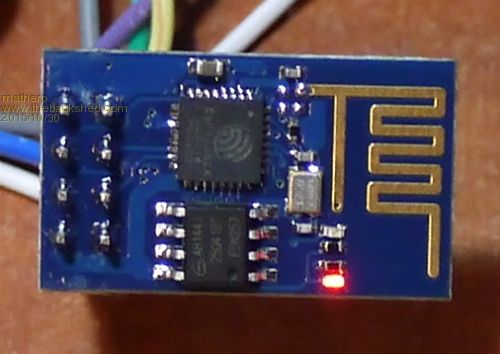
First a warning: to run Basic it needs a 1Meg x 8-bit or bigger flash chip. This version only has a 512kb x 8-bit chip - easily replaced though. However, it can run lots of other things. 
To program it you need to download some suitable programmer software. Programming takes place over a normal USB/UART. Google will uncover lots of information on programming but for the ESP-01. I connected as follows (viewed as in photo): _________________________________________________________________________ | RX-pin on UART: GND | | 10K to 3V3 : NC | | 10K to 3v3 and switch to GND : 10K to GND | | 3V3 : TX-pin on UART | -------------------------------------------------------------------------- To program I found it best to hold the chip in reset with the switch to GND and then release it just before starting programming and it works perfectly everytime. Programming can be controlled using the DTR and RST pins on the USB UART but this relies on full function USB drivers and correctly implemented USB hardware so it is easier to do it manually. The ESP8266 has a bootloader that can load programs and store them in the SPI flash memory which is included on all of the modules. The programs can be all sorts of things and not just the buggy modem like "AT" interface: Python Basic A Lua interpreter Or you can link additional modules into the Arduino IDE and program it exactly as you would an Arduino. As I'm waiting for a bigger SPI flash to try Basic, I loaded the Arduino modules and had a play with that - it works superbly. Attached below is one of the example programs that connects via wifi to your router and then interrogates an NTP server. The output in the example is sent to the ESP8266's serial port and is verbose but could easily be cut back to act as a time source for a Micromite not bad for a $2.59 module! One of the things I really like about the ESP8266 environment in general is the use of the SPI Nand Flash. This is organised as a simple file system using the spiffs software. Geoff: if you are reading this, spiffs would be a great addition to the Micromite 
The esp8266 is really a very powerful microprocessor in its own right that also happens to support wifi networking. The Arduino reference for the ESP8266 is worth looking at just to see the scope of the chips capability. All in all, the ESP8266 looks like a very good candidate for many embedded applications either as a support chip or just by itself and it is certainly the easiest way into the Internet of things (IOT) that I have found. /* Udp NTP Client Get the time from a Network Time Protocol (NTP) time server Demonstrates use of UDP sendPacket and ReceivePacket For more on NTP time servers and the messages needed to communicate with them, see http://en.wikipedia.org/wiki/Network_Time_Protocol created 4 Sep 2010 by Michael Margolis modified 9 Apr 2012 by Tom Igoe updated for the ESP8266 12 Apr 2015 by Ivan Grokhotkov This code is in the public domain. */ #include <ESP8266WiFi.h> #include <WiFiUdp.h> char ssid[] = "mySSID"; // your network SSID (name) char pass[] = "myPassword"; // your network password unsigned int localPort = 2390; // local port to listen for UDP packets /* Don't hardwire the IP address or we won't get the benefits of the pool. * Lookup the IP address for the host name instead */ //IPAddress timeServer(129, 6, 15, 28); // time.nist.gov NTP server IPAddress timeServerIP; // time.nist.gov NTP server address const char* ntpServerName = "time.nist.gov"; const int NTP_PACKET_SIZE = 48; // NTP time stamp is in the first 48 bytes of the message byte packetBuffer[ NTP_PACKET_SIZE]; //buffer to hold incoming and outgoing packets // A UDP instance to let us send and receive packets over UDP WiFiUDP udp; void setup() { Serial.begin(115200); Serial.println(); Serial.println(); // We start by connecting to a WiFi network Serial.print("Connecting to "); Serial.println(ssid); WiFi.begin(ssid, pass); while (WiFi.status() != WL_CONNECTED) { delay(500); Serial.print("."); } Serial.println(""); Serial.println("WiFi connected"); Serial.println("IP address: "); Serial.println(WiFi.localIP()); Serial.println("Starting UDP"); udp.begin(localPort); Serial.print("Local port: "); Serial.println(udp.localPort()); } void loop() { //get a random server from the pool WiFi.hostByName(ntpServerName, timeServerIP); sendNTPpacket(timeServerIP); // send an NTP packet to a time server // wait to see if a reply is available delay(1000); int cb = udp.parsePacket(); if (!cb) { Serial.println("no packet yet"); } else { Serial.print("packet received, length="); Serial.println(cb); // We've received a packet, read the data from it udp.read(packetBuffer, NTP_PACKET_SIZE); // read the packet into the buffer //the timestamp starts at byte 40 of the received packet and is four bytes, // or two words, long. First, esxtract the two words: unsigned long highWord = word(packetBuffer[40], packetBuffer[41]); unsigned long lowWord = word(packetBuffer[42], packetBuffer[43]); // combine the four bytes (two words) into a long integer // this is NTP time (seconds since Jan 1 1900): unsigned long secsSince1900 = highWord << 16 | lowWord; Serial.print("Seconds since Jan 1 1900 = " ); Serial.println(secsSince1900); // now convert NTP time into everyday time: Serial.print("Unix time = "); // Unix time starts on Jan 1 1970. In seconds, that's 2208988800: const unsigned long seventyYears = 2208988800UL; // subtract seventy years: unsigned long epoch = secsSince1900 - seventyYears; // print Unix time: Serial.println(epoch); // print the hour, minute and second: Serial.print("The UTC time is "); // UTC is the time at Greenwich Meridian (GMT) Serial.print((epoch % 86400L) / 3600); // print the hour (86400 equals secs per day) Serial.print(':'); if ( ((epoch % 3600) / 60) < 10 ) { // In the first 10 minutes of each hour, we'll want a leading '0' Serial.print('0'); } Serial.print((epoch % 3600) / 60); // print the minute (3600 equals secs per minute) Serial.print(':'); if ( (epoch % 60) < 10 ) { // In the first 10 seconds of each minute, we'll want a leading '0' Serial.print('0'); } Serial.println(epoch % 60); // print the second } // wait ten seconds before asking for the time again delay(10000); } // send an NTP request to the time server at the given address unsigned long sendNTPpacket(IPAddress& address) { Serial.println("sending NTP packet..."); // set all bytes in the buffer to 0 memset(packetBuffer, 0, NTP_PACKET_SIZE); // Initialize values needed to form NTP request // (see URL above for details on the packets) packetBuffer[0] = 0b11100011; // LI, Version, Mode packetBuffer[1] = 0; // Stratum, or type of clock packetBuffer[2] = 6; // Polling Interval packetBuffer[3] = 0xEC; // Peer Clock Precision // 8 bytes of zero for Root Delay & Root Dispersion packetBuffer[12] = 49; packetBuffer[13] = 0x4E; packetBuffer[14] = 49; packetBuffer[15] = 52; // all NTP fields have been given values, now // you can send a packet requesting a timestamp: udp.beginPacket(address, 123); //NTP requests are to port 123 udp.write(packetBuffer, NTP_PACKET_SIZE); udp.endPacket(); } |
||||
jman Guru Joined: 12/06/2011 Location: New ZealandPosts: 711 |
Hi Did you see this post NTP Clock The linked post is an NTP clock in basic Regards Jman |
||||
| matherp Guru Joined: 11/12/2012 Location: United KingdomPosts: 11512 |
Yes saw that previously. The point wasn't that there is anything specific about NTP, but that the code is running directly on the ESP8266 without any other micro: no Arduino, no Micromite... The mechanism I was playing with just happens to use the Arduino IDE but the upload is direct to the ESP8266 which does everything. |
||||
| HankR Senior Member Joined: 02/01/2015 Location: United StatesPosts: 209 |
Peter, This is a big contribution to consumer awareness (the part about Basic not working on the 01) and a huge help for a lot of us to decide if it's now time to jump into the ESP8266 pool. For me it looks like that time. So thank you very much for all your exquisite work. I just glanced at the photo concerning the oscilloscope concept, and that looks outstanding as others have already mentioned. Hank |
||||
TassyJim Guru Joined: 07/08/2011 Location: AustraliaPosts: 6538 |
I have a couple to play with when time permits. I have also ordered one with more memory and more IO pins exposed. What I really want it the equivalent in Ethernet instead of WiFi. Jim VK7JH MMedit |
||||
| viscomjim Guru Joined: 08/01/2014 Location: United StatesPosts: 925 |
Matherp, great to see you playing with this. I too have a few 01s in stock and can't run the basic interpreter, which I am SUPER excited about. I ordered THESE for the extra memory and I/O pins. It has I2C, PWM and lots of other goodies (and 4MB of memory) that I can't wait to play with. When they get here, I will burn the basic and report back. The processor on these little units apparently kicks a bit of butt. Should be fun... |
||||
| MicroBlocks Guru Joined: 12/05/2012 Location: ThailandPosts: 2209 |
The real strength of this ESPBasic is that you not only have a basic interpreter that runs code but you also have the full capabilities of a browser available. This would allow you to use the full speed of the host that the browser runs in while a javascript could request info from the basic program that is running in the chip. A page could even combine information form the internet and lots of ESP's to make applications that were not possible before. For me it is a total game changer. Microblocks. Build with logic. |
||||
| viscomjim Guru Joined: 08/01/2014 Location: United StatesPosts: 925 |
A lot of people have done some really cool things with these already using the other programming languages that are available for it. I was just never really able to wrap my head around these languages like LUA and now even the arduino IDE. The ability to use basic is what is really exciting to me and Mike, the guy that did the port, did a great job and is still improving on it. HERE is a link to the esp8266 community forum and his particular basic port. |
||||
| cwilt Senior Member Joined: 20/03/2012 Location: United StatesPosts: 147 |
Javascript is also available. |
||||
| WhiteWizzard Guru Joined: 05/04/2013 Location: United KingdomPosts: 2991 |
Hi Peter, Please can you share which part number you ordered
I have Google'd the part number on my modules (which are very difficult to read as they are partially rubbed off) and no results coming back. 
Any help appreciated. . . WW |
||||
| matherp Guru Joined: 11/12/2012 Location: United KingdomPosts: 11512 |
I ordered: RS 7824651 5 Flash Memory 32Mb SPI,3V,108MHz,SO8 but wait til I've installed and I'll confirm it works |
||||
| viscomjim Guru Joined: 08/01/2014 Location: United StatesPosts: 925 |
Matherp, if you haven't taken apart your board yet, this was just posted on the forum... "Posted a new build after upgrading my arduino esp8266 arduino environment. 512k works now and is in the list. Get the latest version from http://www.esp8266basic.com/download.html" |
||||
| TassyJim Guru Joined: 07/08/2011 Location: AustraliaPosts: 6538 |
It took me a lot of failed attempts but I finally managed to program one of my 512k modules. It is very interesting and shows a lot of promise. Jim VK7JH MMedit |
||||
| WhiteWizzard Guru Joined: 05/04/2013 Location: United KingdomPosts: 2991 |
If you don't mind me asking, what turned out to be causing the 'failed attempts'? I am hoping to have a go at this later today but any 'advice' about potential 'traps' would be good to know about
WW |
||||
| matherp Guru Joined: 11/12/2012 Location: United KingdomPosts: 11512 |
If you follow the wiring in my original note it should work first time as follows: select the options in the flash program (size and com port) Then hold the ESP in reset and press "flash", immediately release the reset and all should work fine. I found the key was to keep the ESP in reset until after the flash program is trying to write. |
||||
| WhiteWizzard Guru Joined: 05/04/2013 Location: United KingdomPosts: 2991 |
Thanks Peter - was going to do as you posted (but into a 512k); however I was just curious as to TassyJim's issues. Will let you know if I have any issues . . . . |
||||
| TassyJim Guru Joined: 07/08/2011 Location: AustraliaPosts: 6538 |
I didn't try holding the chip in reset until just before programming as Peter suggested. I followed the 'brief' instructions at http://www.esp8266basic.com/flashing-instructions.html I tried different USB-TTL adapters (ended up with an FTDI one). The programming would fail to start usually but occasionally get part way through before spitting the dummy. Jim VK7JH MMedit |
||||
| TassyJim Guru Joined: 07/08/2011 Location: AustraliaPosts: 6538 |
Still having some failures but getting better. The last update went in first try which is just as well because update are frequent. I think I am hooked. One of these for the HTML front end and a micromite hanging off the serial port for the serious maths and interface work. Jim VK7JH MMedit |
||||
| viscomjim Guru Joined: 08/01/2014 Location: United StatesPosts: 925 |
Hi TassyJim, please keep us posted on your progress. I am now going to dig up my few 01 units and try flashing the new firmware. I originally went with the esp 12E due to the larger memory and had to use the nodencu flasher to get it to flash properly. After trying the flasher from the basic website, I had to give up and the nodencu flasher worked great. If you still have problems, try that route. HERE is the link for that one. I used the 64bit version without a hitch. |
||||
| matherp Guru Joined: 11/12/2012 Location: United KingdomPosts: 11512 |
UPDATE The mod to increase memory on the ESP-01 didn't work. Despite specifically searching on RS for a SOIC part, the part I received was SOICW so didn't fit the pads. I tried to bodge it but it didn't work. Too many variables to know why. I replaced the 512K part and all works fine again. The Basic for the ESP8266 continues to improve, I2C now working, but is PRIMITIVE in the extreme compared to MMBasic. However, the web access is very easy so probably worth persevering given the parts are so cheap. This is very early days for the Basic development but the developer is extremely responsive both to additional functionality and bug fixes. I bought a ESP-07 module to get more memory except it turned up with only 1M rather than the advertise 4M  . It is however easier to breadboard than the ESP-01 and has more pins brought out. ESP-12 is probably the best way to go for a development environment. . It is however easier to breadboard than the ESP-01 and has more pins brought out. ESP-12 is probably the best way to go for a development environment.
Programming the new releases of the firmware continues to give no problems as long as GPIO0 is tied low and the device is held in reset until after the flash button is pushed. |
||||
| Page 1 of 2 |
|||||
| The Back Shed's forum code is written, and hosted, in Australia. | © JAQ Software 2026 |
