
|
|
Forum Index : Microcontroller and PC projects : ESP8266 + uMite = MikeO
| Author | Message | ||||
| viscomjim Guru Joined: 08/01/2014 Location: United StatesPosts: 925 |
Member MikeO interfaced the uMite with the ESP8266 running the basic port from MMISCOOL. Here is what he said in a different thread. I hope no one minds that I started a new thread for this as it is a great start to getting these two units to talk to each other... MikeO said... Hi Jim, I have just posted some code on ESP Basic today for interfacing with a uMite, transfers 10 data fields and commands, currently sends emails , reads NTP time and requests setup info from ESP8266, I had some sync issues trying to send all the data individually probably due to the limited control you have with the ESPs INPUT command as it's blocking and will wait for ever if you have any data screw ups but in the end I used a single string and built a parse routine on the ESP to pull out the fields, which seems to be quite robust. Have a look may help you with your quest! umite to ESP8266 I hope MikoO will post the code he is using on the uMite side for this. Extremely exciting stuff. uMite interface to the www! |
||||
| MikeO Senior Member Joined: 11/09/2011 Location: AustraliaPosts: 275 |
Here is my "proof of concept" code from a uMite connected to a ESP8266. The code "randomly" ? responds to the ESP requests for data + command field. In this test the ESP8266 responds with NTP clock data , status info and sends an email with data provided by the uMite. The uMite can ofcourse update its internal clock with the NTP data. 10 fields of data are also sent at each transfer in my case they will be garden data from my Greenhouse, Weather station and Solar PV generation. A very simple web interface in the ESP displays the "Garden" data but could also be sent to IOT etc. Emails will be able to provide status update. 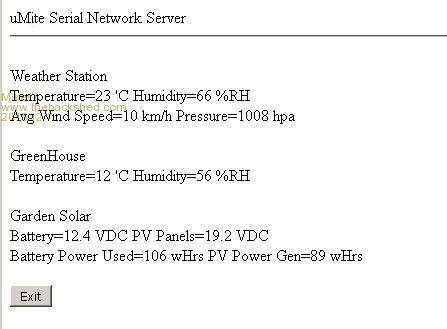
uMite test bed code below and Esp8266 code link was in previous post ' 'Test bed for ESP8266 Wifi module connected to uMite
' M.Ogden Nov 2015 ' randomize 1 Open "Com2:9600, 1024" As #1 'Open "Com1:115200, 1024" As #1 'clear the esp8266 input buffer print #1,"" print #1,"" Do input #1, str$ Print str$ if instr(str$,"getdata:>") then senddata end if Loop sub senddata emailaddress$="youremailaddress" replyaddress$="yourreplyaddress" 'create a random value to select getnewvalue: randomValue = Int((3-0 + 1) * Rnd()) + 1 print randomvalue if lastvalue=randomvalue then goto getnewvalue lastvalue=randomvalue select case randomvalue case 1 strout$="Sync: 45.2:66:10:1008:17:89:12.4:19.2:106:89:info:" print #1,strout$ print strout$ case 2 strout$="Sync: 30:62:10:967:17:89:12.4:19.2:106:89:ntp:" print #1,strout$ print strout$ case 3 strout$="Sync: 36:56:10:1020:17:89:12.4:19.2:106:89:email:" print #1,strout$ input #1, str$ Print str$ strout$="Sync: " + emailaddress$ + ":" + replyaddress$ + ":test from ESP8266:Hello, test sent from ESP8266:" print #1,strout$ print strout$ case 4 strout$="Sync: 23:66:10:1008:12:56:12.4:19.2:106:89::" print #1,strout$ print strout$ case 5 case else print #1,"nothing" end select End Sub Codenquilts |
||||
| WhiteWizzard Guru Joined: 05/04/2013 Location: United KingdomPosts: 2991 |
@MikeO Great to see you're making good progress with your project. No doubt other members will find your code a useful reference. Guess next thing is to find out why the code response is 'random' 
Do keep us updated with progress . . . . WW |
||||
| MikeO Senior Member Joined: 11/09/2011 Location: AustraliaPosts: 275 |
@WW  its a secret! its a secret!
Cheers Mike. Codenquilts |
||||
| viscomjim Guru Joined: 08/01/2014 Location: United StatesPosts: 925 |
Hi Mike, thanks for posting the code. This will be fun to play with when I get back home. I do have a question for you, what does the case 4 strout$ do as there is no cmd on that string? Thanks for you help!! EDIT.. P.S. your parsing routine on the esp is pretty slick. |
||||
| MikeO Senior Member Joined: 11/09/2011 Location: AustraliaPosts: 275 |
Hi Jim, all the code was just a test routine to respond to the requests from the ESP each time with a different set of data and command, for testing purposes, the #4 is just showing that just data can be sent without a command. Currently I had only coded the three commands in the ESP but there will be others, IOT comes to mind but also some setup instructions for the ESP perhaps. Sending them sequentially with each set of data keeps the communication with the ESP simple as the Input command on the ESP is rather basic, no timeout (I have suggested this to Mike) for instance so if the data stream is missing its sits forever! until it receives something. This is why the single string consisting of a load of fields is better as it removes any syncing issues of individual fields, if one gets missed being received or are out of sequence being sent.The number of fields that can be sent are only limited by the string length in the esp but I am guessing its 256 bytes perhaps, the parsing routing will handle it. The string must consist of the first field in the "Sync: " format the space is important or the first "real" field will not be resolved properly, the ":" is used as the delimiter of course and the last char following the command field must be a ":" plus Cr/Ln, that's the whole data packet. Incidentally when working with the ESP code I found it useful to just use a comms editor. I used a program called CoolTerm excellent as it has a very nice send string capability that you can set up with different strings and select them as needed. I have a screenshot of when I was using it, 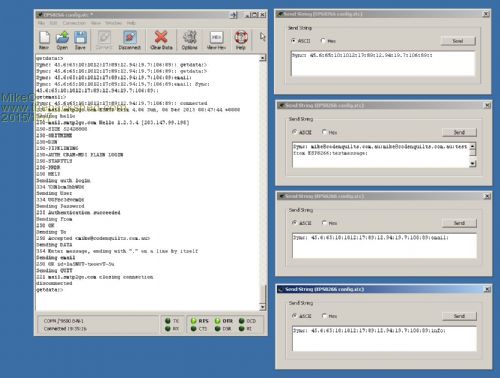
I will post more as the integration develops. Mike Codenquilts |
||||
TassyJim Guru Joined: 07/08/2011 Location: AustraliaPosts: 6538 |
A few of us have requested a timeout for the serial input. Mike is usually quick to take ideas on board so I hope that it will happen eventually. I think that doing all the data acquisition and manipulation on the micromite (or other PIC) and keeping the ESPbasic as minimal as possible is the safest way to go. Jim VK7JH MMedit |
||||
| MikeO Senior Member Joined: 11/09/2011 Location: AustraliaPosts: 275 |
I have just posted my completed software for this project on ESPBasic which I have repeated here. I have now completed a working version of the ESP8266-MCU Web interface. The following functions are provided. Multi data field output, software captures these fields from the MCU and makes them available to the WEB GUI, current software has 10 fields but more or less may be configured Format, sync: field1:------field10:cmd:crlf A command may also be sent on its own line as cmd:crlf Commands are in the following format "Send Email" email:crlf then on the next line sync: to_address:reply_address:subject:body:crlf "Send Thingspeak data" ts:crlf then on the next line sync: key:fieldnumber:fielddata:crlf "Change Network" net:crlf then on new line sync: name:pasword:ip:gateway:mask:crlf "Network Time" ntp:crlf requests NTP time info "ESP System info" info:crlf requests system information network name,IP,freeram,freeFlash "ESP reboot" reboot:crlf restarts the ESP8266 "ESP quit" quit:crlf quits the ESP software, useful during development. A constant stream of information is sent from the ESP including responses to above commands , this data may be parsed by the connected MCU. This software needs ESPbasic 1.65 or greater, needs new serial port commands. Thanks to Mike for ESPbasic and being extremely responsive to change requests. memclear
serialprintln "" serialprintln "uMite WUI Initialising......" ver$ = "ESP8266 uMite WUI 0.8b" 'connect "Network" "password" "IP"" "gateway" "mask" 'baudrate 38400 serialflush serialtimeout 3000 timesetup(11,0) setupemail "mail.smtp2go.com" 2525 "youraddress" "password" gosub [getinfo] let otemp = 23.3 let ohum = 78 let ows = 10 let opres = 1008 let gtemp = 23.3 let ghum = 78 let bv = 12.6 let pvv = 18.6 let bp = 120 let pvp = 90 'put your web GUI code here cls wprint "<head>" wprint "<meta http-equiv='refresh' content='15;URL=/input?'>" wprint "</head>" print "uMite Serial Network Server" wprint "<br>" wprint "Weather Station" wprint "<br>" wprint "Temperature=" wprint htmlvar(otemp) wprint " 'C " wprint " Humidity=" wprint htmlvar(ohum) wprint " %RH" wprint "<br>" wprint " Avg Wind Speed=" wprint htmlvar(ows) wprint " km/h" wprint " Pressure=" wprint htmlvar(opres) wprint " hpa" wprint "<br>" wprint "<br>" wprint "GreenHouse" wprint "<br>" wprint "Temperature=" wprint htmlvar(gtemp) wprint " 'C " wprint " Humidity=" wprint htmlvar(ghum) wprint " %RH" wprint "<br>" wprint "<br>" wprint "Garden Solar" wprint "<br>" wprint "Battery=" wprint htmlvar(bv) wprint " VDC " wprint " PV Panels=" wprint htmlvar(pvv) wprint " VDC" wprint "<br>" wprint "Battery Power Used=" wprint htmlvar(bp) wprint " wHrs " wprint " PV Power Gen=" wprint htmlvar(pvp) wprint " wHrs " wprint "<br>" wprint "<br>" button "Exit" [quit] timer 6000 [update] wait 'end of GUI code 'code runs as called by timer 'receives data packet from MCU [update] input "getdata:" str$ serialprint "LineLen:" serialprintln len(str$) serialprint "Packet:" serialprintln str$ delay 5 if len(str$) = 1 then goto [exitupdate] if instr(str$,"sync:") > 0 then goto [parsedata] gosub [parse] serialprintln field$ cmd = field$ goto [command] [parsedata] serialprintln "Parse data" 'each of your variables in sequence to be parsed from data string gosub [parse] sstatus = field$ gosub [parse] otemp = field$ gosub [parse] ohum = field$ gosub [parse] ows = field$ gosub [parse] opres = field$ gosub [parse] gtemp = field$ gosub [parse] ghum = field$ gosub [parse] bv = field$ gosub [parse] pvv = field$ gosub [parse] bp = field$ gosub [parse] pvp = field$ gosub [parse] cmd = field$ [command] serialprint "Command:" serialprintln cmd if cmd == "ntp" then gosub [gettime] else [exitupdate] if cmd == "email" then gosub [sendemail] else [exitupdate] if cmd == "info" then gosub [getinfo] else [exitupdate] if cmd == "quit" then goto [quit] if cmd == "reboot" then reboot if cmd == "net" then gosub [setnet] if cmd == "ts" then gosub [thingspeak] [exitupdate] wait [thingspeak] input "gettsdata:" str$ gosub [parse] sstatus = field$ gosub [parse] ts.key$ = field$ gosub [parse] ts.fieldnum$ = field$ gosub [parse] ts.fielddata$ = field$ serialprint "Send to thingspeak:" b$ = ts.key$ & ts.fieldnum$ & ts.fielddata$ serialprintln b$ sendts(ts.key$,ts.fieldnum$,ts.fielddata$) return [setnet] input "getnetwork:" str$ gosub [parse] sstatus = field$ gosub [parse] net.name$ = field$ gosub [parse] net.password$ = field$ gosub [parse] net.ip$ = field$ gosub [parse] net.gateway$ = field$ gosub [parse] net.mask$ = field$ if net.ip$ == "" then [auto] else [static] [static] serialprintln "connect static" connect net.name$ net.password$ net.ip$ net.gateway$ net.mask$ goto [exitsetnet] [auto] serialprintln "connect auto" connect net.name$ net.password$ [exitsetnet] gosub [getinfo] return [sendemail] input "getemail:" str$ gosub [parse] sstatus = field$ gosub [parse] address$ = field$ gosub [parse] reply$ = field$ gosub [parse] subject$ = field$ gosub [parse] body$ = field$ serialprint "Send to:" serialprintln address$ & reply$ & subject$ & body$ email address$ reply$ subject$ body$ return [getinfo] serialprintln "" serialprint "Version:" serialprintln ver$ serialprint "IP:" serialprintln ip() read "WIFIname" blaWIFIssid serialprint "SSID:" serialprintln blaWIFIssid serialprint "FlashFree:" serialprintln flashfree() serialprint "RamFree:" serialprintln ramfree() return [gettime] ntp$ = time() ntp$ = "NTP:" & ntp$ serialprintln ntp$ return [parse] field$ = "" 'serialprint "parse this:" 'serialprintln str$ [search] delim = instr(str$,":") 'serialprintln delim [found] field = delim - 1 delim = delim + 1 rest = len(str$) - delim field$ = left(str$,field) rest$ = right(str$,rest) str$ = rest$ 'serialprintln field$ 'serialprintln str$ [exitparse] return [quit] timer 0 wprint "<a href='/'>Menu</a>" end Codenquilts |
||||
| viscomjim Guru Joined: 08/01/2014 Location: United StatesPosts: 925 |
This is great work MikeO. Did the umite code change much for this revision or does it use the same code? Thanks for your effort. This allows for some great possiblilities!!!! |
||||
| MikeO Senior Member Joined: 11/09/2011 Location: AustraliaPosts: 275 |
No real changes to uMite other than making use of the added commands and responses from the ESP8266. Remember the code I posted for the uMite was only really intended as a test bed and not for a real project. Mike Codenquilts |
||||
| viscomjim Guru Joined: 08/01/2014 Location: United StatesPosts: 925 |
Hi MikeO, quick question on the setup. Do you have the tx of the umite hooked up to the rx of the esp and the tx of the esp hooked up to the serial terminal to watch what is happining? So the uMite is not receiving anything on it's rx line, or do I have this wrong? |
||||
| MikeO Senior Member Joined: 11/09/2011 Location: AustraliaPosts: 275 |
Hi Jim, I am assuming you are using an ESP01x style ? If so you would be programming the ESP8266 with ESPBasic via a Serial adapter from the Flasher software. If so this is the way I would suggest you proceed initially, instead of using the ESPflasher software use a comms program like Teraterm to talk directly to the ESP while you get familiar with the operation of the software in the ESP. Personally I use a program called CoolTerm as its very easy to control the comm port and also it has the ability to make up "SendString" windows that you can choose at will to send to the ESP. See my previous post on this. So to recap. Connect up your ESP8266 via serial adapter, in boot mode program the module with ESP Basic 1.65 or greater. Remove the boot mode link Restart the module with the terminal program connected set up at 9600 baud. After it has started up program with the uMite WUI software. If you have not previously setup network connection (ie you are still using AP mode) you can enable line 5 in the program with your network details. 'connect "Network" "password" "IP"" "gateway" "mask" , you don't need to fill in the last three fields unless you are using a static address, then when the software runs it will set up your new network connection. Run the software. If all your hardware it set correctly you should see all the boot up and initializing messages on your terminal. Like this... 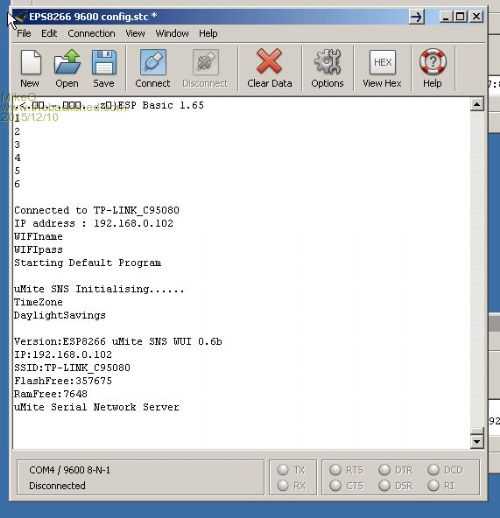
If you get this then all is good! You should then see every 6 secs the following, as the software polls the serial port via the input "getdata" command. Due to the new "Serialtimeout" command it is just terminating looking for an input after the period set in the serialtimeout command in this case 3 secs. LineLen:0 Packet: Command: getdata:> LineLen:0 Packet: Command: getdata:> LineLen:0 Packet: Command: getdata:> Now you can start sending data and commands via the terminal program. On a new line type info:crlf and the response from the ESP8266 will be, Command: getdata:> info: info: LineLen:6 Packet:info: info Command:info Version:ESP8266 uMite SNS WUI 0.6b IP:192.168.0.102 SSID:TP-LINK_C95080 FlashFree:357675 RamFree:7200 likewise if you type ntp:crlf Command: ntp: getdata:> ntp: LineLen:5 Packet:ntp: ntp Command:ntp NTP:Thu Dec 10 13:47:49 2015 To send an email (provided you have to set up the emailsetup command in the program). type... email:crlf sync: mike@codenquilts.com.au:mike@codenquilts.com.au:test from ESP8266:test:crlf and the response will be something like this. email: LineLen:7 Packet:email: email Command:email getemail:> sync: mike@codenquilts.com.au:mike@codenquilts.com.au:test from ESP8266:test: Send to:mike@codenquilts.com.au connected 220 mail.smtp2go.com ESMTP Exim 4.86 Thu, 10 Dec 2015 02:57:05 +0000 Sending hello 250-mail.smtp2go.com Hello 1.2.3.4 [203.147.99.198] 250-SIZE 52428800 250-8BITMIME 250-DSN 250-PIPELINING 250-AUTH CRAM-MD5 PLAIN LOGIN 250-STARTTLS 250-PRDR 250 HELP Sending auth login 334 VXNlcm5hbWU6 Sending User 334 UGFzc3dvcmQ6 Sending Password 235 Authentication succeeded Sending From 250 OK Sending To 250 Accepted <mike@codenquilts.com.au> Sending DATA 354 Enter message, ending with "." on a line by itself Sending email 250 OK id=1a6rPr-kaUEES-9u Sending QUIT If you follow this you should get the idea how to use the ESP program when connected to a Mite! Let me know how you go on. Cheers Mike. Codenquilts |
||||
| The Back Shed's forum code is written, and hosted, in Australia. | © JAQ Software 2026 |
