
| Menu | JAQForum Ver 19.10.27 |
| Menu | JAQForum Ver 19.10.27 |
Forum Index : Microcontroller and PC projects : 3D Model Editor
Well guy's since my club.py is done it was time to have a go at making my own 3D Model Editor and went leap and bounds today where after a drawing is made one can save a stl file to pass to Cura etc No as I don't have a 3D printer yet could a member try this out and see after a drawing is made does the stl file slice properly. 3D Model Editor Regards Bryan |
||||||
Well got a bit more done today and talked with claude about Flash Forge so it brought up a page in the right window, was a Adventurer 4 pro 3D printer new for $228 and silly me didn't click on it to buy. Anyway downloaded the Flash Forge program so I could see the output stl file made in 3D Model Editor. now as the holes are mm or 2 off on the claude version of the pico 3 box it was time to draw up a new one while adding new code. So now got 1. line :--- input the co-ordinates or snap to grid 2. Multi line :-- choose how many points to make a polygon 3. box :-- input or snap to grid 4. circle :-- input or snap to grid 5 radius :-- select 2 edges or 2 edges of a box then input number 6. Extrude :-- select object and choose height 7. select :-- select a part 8. edit :-- edit the selected part where input can change numbers 9. delete:-- select an object and delete it 10. open :-- open a file on /sd/model 11. New :-- open a blank canvas at 0,0,0 12. Grid :-- grid on/grid off Now with the grid we can set the area and size for any axis Layers can be shown and hidden. Now everything is save in triangles and saved as a .model file Now in the save as box we have save, delete, export STL file and send to board so other pico3's get updated with the file. I do update my gihub at the end of everyday so all the code and files are there but best off I'm having fun. Regards Bryan |
||||||
Hi Bryan, If you can post the .stl file here I can see if it slices etc. Andrew |
||||||
Andrew I will update my github with the changes I did yesterday and today this afternoon  Now got a measurement function where one clicks on 2 points and the dimension is shown for X Y Z also setup where 2 grids can be setup on different planes so snap to grid will work in 3D. Now 3D Model Editor is in club.py and we also made a stand alone version and while I'm working on it the club.py version is being worked on. What I do need is for a member to use it and give feedback and as this is open source if the member does have Claude use the code not home version and is free to modify the code to improve it. The help file gets updated with every new command so when a member uses it for the first time have a look at the help file so one can learn how to get around and get started. At the moment Claude can't get the mouse wheel working so one can pan in and out and got told with the colour command trying to colour a part will crash the code. I'm sure it's just my terminology talking with Claude is the problem. Now with all the changes we did yesterday this morning I will give the code a good road test to make sure I find all the bugs etc. I do have that pico 3 box Sam 3D printed for me to use for the measurements so with some luck I will have the box done today. I did have a look at the 3D printer software and with a huge learning curve I thought bugger it make my own so I can learn as I go and for example:- the radius function pick 2 edges of a part specify the radius and thickness and it's drawn in 3D on the screen. Once a part is made clicking on select then the part and clicking edit one can adjust the axis on all 3 planes. Now I am looking for a 3D printer now being on a budget the Flash Forge Adventurer 5 Pro looks like a good one and for $379(yesterdays price) it is in my budget range so what do members think of that printer. Regards Bryan Edit: well won't have a full day working on 3D Model Editor as just checked my email and those GPS chips have arrived so today GPS will be added to club.py Edited 2026-08-14 08:15 by Bryan1 |
||||||
Hi Bryan, I'm not into github so I will need the .stl file. Cheers, Andrew |
||||||
Ok Andrew do you have a pico3 board to run the code if not I do need to edit the box as I made it 5mm wide now looking in Flash Forge software it does look the goods but I can't splice as no board is present. I will get on and modify the STL file and post it here so you can have a look sometime today as after this last caffine intake it's time to go get those GPS chips so more fun today in club.py. |
||||||
Hi Bryan, I don't have a Pico3 board but I do have a 3D printer and software to input a .stl file etc. I'll await your .stl file. Andrew |
||||||
Hi Andrew I got on this morning and edited pico3box.model where I changed the wall thickness from 5 to 2. I did find I had to turn off snap which will get fixed and all I had to do was Select click on part Edit one dimension then Save, did all parts so the box is now 2mm thickness and all though I haven't run it in Flash Forge Claude did check out the STL and found no errors. pico3box.zip So mate have a go slicing it and let me know how it went. Regards Bryan |
||||||
Hi Bryan, My printer uses 'eufyMake Studio' which is based on 'PrusaSlicer'. It imported your .stl with no problems. The attached image is what my machine would have printed. Notice the 'effect' on the corners: - The base is still square but above it is rounded. - There are also square intrusions into the interior. Cheers, Andrew 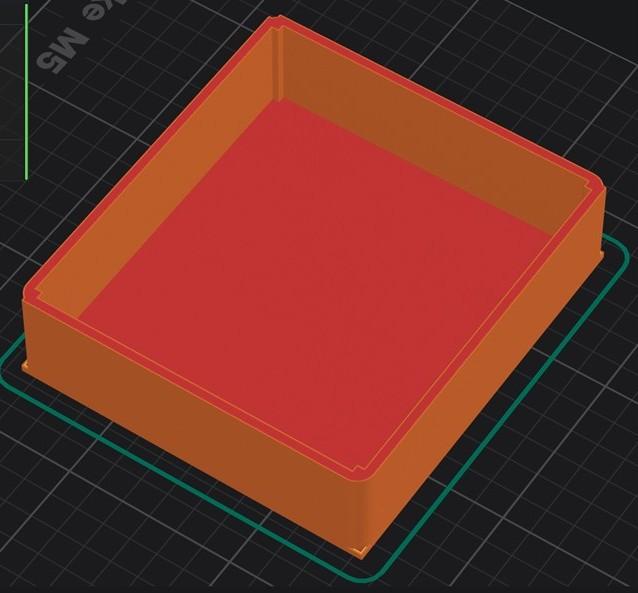 |
||||||
Hi Andrew thanks for doing that now I did get on and put all the holes in where I measured off the pico 3 box with my trusty 6" ruler and manually entered the data in. Now there was a problem with extrude on the XZ plane so got that fixed and I will have a look on my Flash Forge software to see how it looks. Just got the top to finish for the lid closure then it will time to start drawing up the lid. After the next update I can put that STL up so you can have a look Anyway on the GPS front I have board 2 sitting near the front of my shed and the ticker is running with gps and weather reports  so getting them work took less than a hour so getting them work took less than a hour |
||||||
ok got the box finished and yes those 2mm radius's are still there on the base as I kept forgetting to update the base. Now to get on and draw up the lid then the PICO 3 Case can be updated pico3box.zip Regards Bryan Edit: I had a look on flash forge and found a major error where the holes were imposed on the inner so got the bug fixed and looking now on flash forge it does look the goods. so updated the zip file. Edited 2026-08-14 17:02 by Bryan1 |
||||||
Hi Bryan, The effects are still in the corners, Andrew .jpg) |
||||||
Hi Andrew yes it seems Claude had stuffed up the 'radius' function and it is quite clear as only 1 corner has the right radius also that standoff function has to go to stop those inlays in the inside corners. Now also looking at the picture I'm going back in the .model file and put the right figures in as I got the direction of the holes backwards on both sides or more than likely it was Claude when he fixed the issue with thru holes Anyway today's job is to setup 2 more boards with club.py as got the meeting next Tuesday night and check each one with the GPS where I do need to get on and design the box to hold the GPS. Regards Bryan |
||||||
 |
The Back Shed's forum code is written, and hosted, in Australia. |


