| Menu | JAQForum Ver 19.10.27 |
| Menu | JAQForum Ver 19.10.27 |
Forum Index : Microcontroller and PC projects : how do setup picomite hdmiusb ??
| Page 1 of 3 |
||||||
out of the box the hdmi works how do activate sound and the sd card and need the correct firmware i try the newest firmware from the webpage then cant do |
||||||
Which PicoMite board are you using? They vary. |
||||||
Reference Design for HDMI/USB Computer |
||||||
It's in the instructions for that board on Geoff's site. That should configure eveything automatically. :) |
||||||
OPTION RESET HDMIUSB then get error |
||||||
Have you got the right firmware installed? You'd better check as they are easily confused. What error are you getting? |
||||||
can still use the sd card if only try the hdmi firmware whit out the usb do then need to do option sdcard ?,GP26,GP27,GP28 |
||||||
No. There are never 3 arguments for the SDcard. OPTION RESET HDMIUSB should set everything up, including the SDcard. It's specific to that board. If you are getting an error then what is it? It's a HDMI USB board so both will be configured along with the sound and the SDcard. Make sure you are following the instructions when setting it up. Once the USB is configured the socket on the Pico is in Host mode and can't connect to the console. |
||||||
Hi Mick, It depends on the age of the Ref Design, the version with a Pico2 board soldered on was Option Reset HDMIUSB, However there was a later version, with a 2350 directly soldered to the board, which used Option Reset HDMIUSBI2S It has I2S sound. A Photo of the board would make it obvious. Regards, Kevin. |
||||||
think fail so hard can only connect the board to micro usb then do firmware on the board no jumpers on board then if do the firmware pico hdmiusb on the board it is over sofar do usb c cable in the board do the power switch a COM port comes up i connect to it and it fails :( i give up on this picohdmi board maby i can donate my 4 unsoldert boards from jlcb then place all the parts on it missing leds that command says got wrong firmware whit this board so dont think ever gone work Edited 2026-02-28 05:52 by tenij000 |
||||||
In theory it's this one, but of course he could have built the other. :) Without the error message, at least, I can't really help any further. . Edited 2026-02-28 05:53 by Mixtel90 |
||||||
yes it is |
||||||
 now stuck here cant login to the board only what working if use the hdmi firmware whit out the usb |
||||||
Those boards do work. If you can't install the firmware, and the links at CN4 have been removed, then you are probably trying to install the wrong firmware. You are using a Pico 2 aren't you? I hope I've got this right... :) Open File Manager so that you can see the list of MMBasic versions Switch off the Pico board Remove the CN4 links Connect the USB-C on the Pico to the PC Hold down BOOTSEL on the Pico and switch the Pico board on Release BOOTSEL You should see the virtual drive appear Find the correct file and drag it onto the virtual drive. (It will be called PicoMiteHDMIUSB - nothing else will work) You should get a pop-up box while the file copies After a few seconds the Heartbeat LED should start flashing Switch off the Pico board Unplug the USB lead from the Pico and move it to USB2 Replace the links on CN4 1-2 and 3-4 Connect a USB keyboard to one of the USB connectors Switch on the Pico board Start Tera Term and look for the new COM port. Connect to it at 115200 baud You'll probably get a blank screen. Press Enter a couple of times and you should see the ">" prompt. Enter OPTION RESET HDMIUSB Try OPTION LIST and you should see things that make sense. Now you can connect your HDMI display, where you should see the same thing as the console. You may want to change your keyboard language. At this point the console isn't really being used so you can carry on working with the HDMI display. I'm sorry if I've messed up any of the above, but It's been ages since I set mine up and my memory isn't what it once was. :) |
||||||
maby still use the board if can figure out what that command does 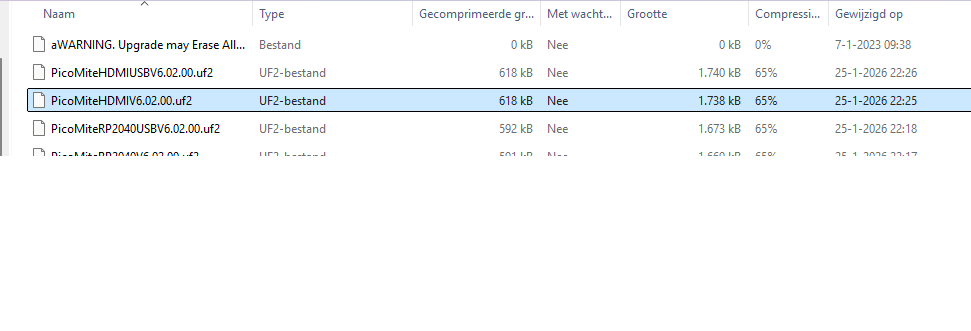 try this firmware |
||||||
You can't use the USB display until it's been set up by OPTION RESET HDMIUSB. You will be in the console until then. The console is on USB2, NOT the USB port on the Pico - that's in host mode as soon as MMBasic starts. It's also disconnected from the USB-A ports until you put the CN4 links back. Use the HDMIUSB firmware and follow my instructions. Don't use the HDMI firmware as there is no default keyboard if you use that. The board is designed for a USB keyboard. Edited 2026-02-28 06:27 by Mixtel90 |
||||||
PicoMiteHDMI MMBasic RP2350A Edition V6.02.00 OPTION FLASH SIZE 4194304 OPTION COLOURCODE ON OPTION KEYBOARD US OPTION RESOLUTION 640x480 @ 252000KHz if use the hdmi version but now how do gues the cs pin for the sdcard |
||||||
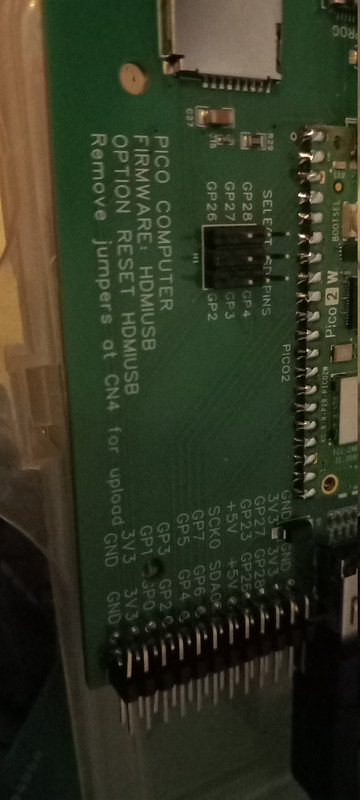
As Mick says the Option reset hdmiusb will setup all options. I think another possible problem might be you have not, or not well enough, put solder through the 4 holes on the back of the board, as the instructions say in the first paragraph. These holes need to make contact with the Gold plated pads on the back of the Pico, if they do not, the USB will not work. I fed a reasonable amount of solder onto each hole, while holding the soldering iron in place for a good 5 seconds, if still not working, try for longer. But don't damage the PCB. Regards Kevin. Edited 2026-02-28 06:30 by Bleep |
||||||
What's written on the bottom of the PCB? Anything? |
||||||
 Edited 2026-02-28 06:33 by tenij000 |
||||||
| Page 1 of 3 |
||||||
| The Back Shed's forum code is written, and hosted, in Australia. |
