| Menu | JAQForum Ver 19.10.27 |
| Menu | JAQForum Ver 19.10.27 |
Forum Index : Microcontroller and PC projects : Huntron tracker on LCD backpack
About the backpack tracker.... Finally decided to finish it. I had plans to improve the tracker using a ArmiteF4, then investigated the PicroMite. In the end, decided to leave it as is. It is good enough for me. Used some thin wood to build a case, painted it army green (don't know why, not really happy with the color now) an use it now. I will give it a second layer of paint (this one is not covering well) and add a sticker with text "Backpack Tracker" next week. 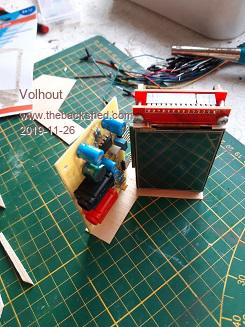 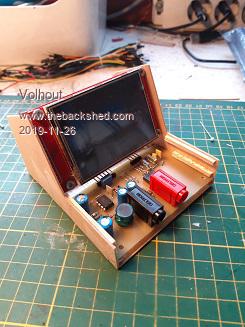 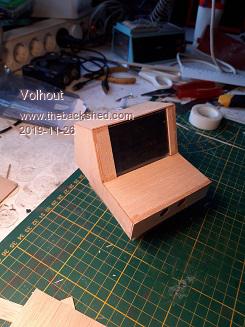 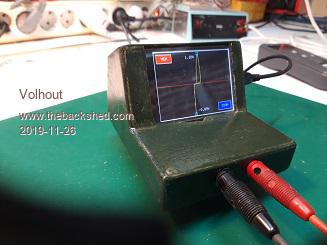 But it works, and is used... Volhout PicomiteVGA PETSCII ROBOTS |
||||||
Nice job Harm!!! You'll get a lot of use out of it. Back in the 1950s I found an RCA published note showing how to use an XY scope, a 6.3 volt filament transformer and three resistors as a current limited curve tracer. I got it working using a Dumont 294 scope and it proved very useful. At Link Alan (W2AEW) posted a video showing a Heath 4552 scope which contains the curve tracing components built it and then shows the use of the transformer excited circuit on a Tektronic dual trace scope. Decades later at Pan Am I bought about 20 of the original Huntron Trackers which proved very useful in the electronic shops. I can't seem to find the original RCA publication on line. I did find an excerpt of an August 1975 Popular Electronics article by Randy Fromm showing a current limited circuit which works well at PDF Link. Here's another one that uses a very unusual enclosure.Tuna Fish Can Curve Tracer They will work with any 500 KHz XY scope. Search Google for OCTOPUS COMPONENT TESTER. Don't build one without limiting the maximum current with extra resistors! Does anyone have any suggestions for the most unusual enclosure? Have fun guys! Paul in NY |
||||||
New housing, the old one cracked when I stepped on it... I still often use it... 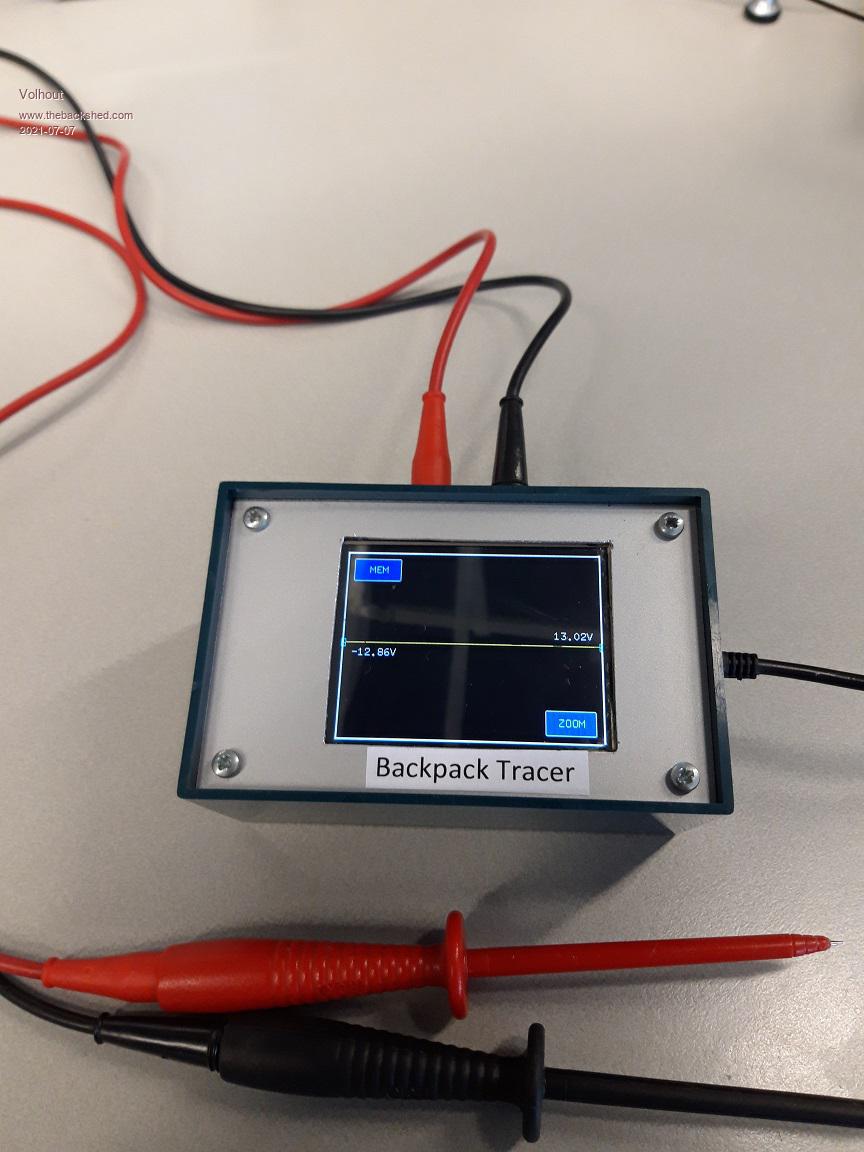 Edited 2021-07-07 01:16 by Volhout |
||||||
I really like this V could have used this just recently .. think I am gonna make one. Can you post the PCB foil image (just the copper)? |
||||||
I can also send berbers, but the foil image (pdf) is attached (bottom copper) as well as silkscreen, schematics are few posts back. huntron-B_Cu.pdf huntron-F_SilkS.pdf Edited 2021-07-07 04:34 by Volhout |
||||||
That's some influence you have  Are they good at electronics ?  Best wishes, Tom |
||||||
thanks a load... weekend project . |
||||||
@thwill, Giggle!  |
||||||
I made one. Quickly knocked this together over a weekend using Volhout's PCB, one of my own postage-stamp controllers and a non-touch 2.8" display. 3D printed a box for it and rammed it all inside - not showing that coz I am not proud of the hook-up wire and hot-glue solution (it was a weekend and I just wanted to get it done  ) )Tweaked the software to remove the touch functions and some other bits (now I know the secret of the white border!). Replaced touch with discrete push-button switches, I prefer the tactile-ness of them on test kit. Kept the displays for each function because they are as good as any. 5V inputs on the rear (with simple schottkey diode reverse polarity protection) takes a pair of banana leads from my PC bench supply and we are good to go. Has already done some sterling work in helping me sort a "mystery bag" of un-marked zeners of various flavours - in the pic below is a 1W 5V6 in the process of identification. This work alone could have taken a day with a bench supply, adjusting up and down to find the knee then checking forward with a DMM, but did 100+ zeners (including two duds) in a long lunch. Cheers Harm! 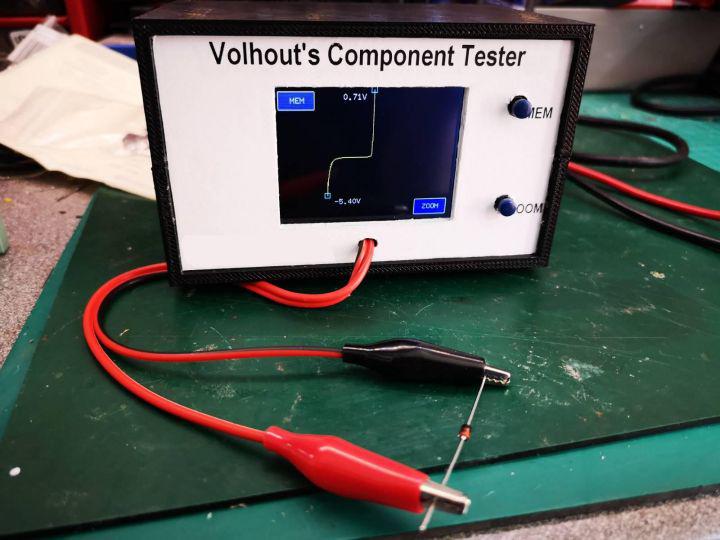 Edited 2021-08-28 20:22 by CaptainBoing |
||||||
Very nice. It's on my gunna-do list too but I have to wait until after we get the new carpet in the house. Until then, all my gear will be in storage to clear the space. How long we wait for the carpet is up to the covid gods... Jim |
||||||
Back in the early 70's I used my RCA audio scope fixing 4, 8 track and reel to reel tape decks. There was a project in I think Radio Electronics adding a parts tester. I built 2 one for home and one for shop. They saved so much time as in most cases no schematics for individual units. Way to many brands but most transistor amps where much the same basic designs. Now I have some me time I can to build one. I'll do a PCB as I have extra MMX170 hat stands with 3.5" screens and later want to make use of the RP's. I have a lot of 3B's with 4" to 7" screens. Just need to get MMBasic on them. I would love input from any one using MMBasic on them before I do a PCB layout. Thanks Volhout for doing the heavy lifting. |
||||||
Not sure if you want to use a raspberry pi 3B to build a tracker, but the pi 3B doesn't have an ADC. You will have to add an external ADC through SPI or I2C. Not sure if that is supported in MMBasic (in picromite). And you must see to find a picromite version that works. I read there is a set (some version of Raspbian, with some version of MMBasic) that works relatively good (1 command does not work). But keep in mind that the picromite is not extremely fast (*). I tested it on a pi zero (single core 1GHz) and it was barely faster than a MX170. You have a Pi 3B, multicore 1.2GHz. So it will be faster. The tracker also works on pi pico .. I think I published the version in this thread. Version V10: MX170 Version V11: MX170 + F4 Version V12: MX170 + F4 + PICO Success EDIT: the pi pico version was posted in the picomite thread: link Check the pin assignment used. The pi pico is very versatile and has many PWM's. By using the pin assignment as in V12, there is no change in the code needed to make it run on all 3 platforms. Volhout (*) I guess the PIGPIO used to generate the IO access from MMBasic is causing this. It seems to be set for 1usec resolution, causing polling or interrupts every 1 usec. In a single core system that may definitely cause significant CPU load. Maybe a relief to 10usec resolution will make MMBasic fly....on the pi... Edited 2021-09-01 16:46 by Volhout |
||||||
Don't recommend cleaning up your shed. I found a copy of an article on the Huntron Tracker 2000 from ETI July 1987. List price then was $3527 ex tax. What does one of the above versions cost now. Times have certainly moved on. |
||||||
| The Back Shed's forum code is written, and hosted, in Australia. |


